Note
Access to this page requires authorization. You can try signing in or changing directories.
Access to this page requires authorization. You can try changing directories.
The integration runtime (IR) is the compute infrastructure that Microsoft Purview uses to power data scan across different network environments.
A self-hosted integration runtime (SHIR) can be used to scan data source in an on-premises network or a virtual network. The installation of a self-hosted integration runtime needs an on-premises machine or a virtual machine inside a private network.
This article covers both setup of a self-hosted integration runtime, and troubleshooting and management.
Important
Download the self-hosted integration runtime from: Microsoft Integration Runtime.
| To learn about | See |
|---|---|
| Setting up a new self-hosted integration runtime | Machine requirements |
| Source-specific machine requirements are listed under prerequisites in each source article | |
| Set up guide | |
| Networking | Networking requirements |
| Proxy servers | |
| Private endpoints | |
| Troubleshoot proxy and firewall | |
| Troubleshoot connectivity | |
| Management | General |
Note
The Microsoft Purview Integration Runtime can't be shared with an Azure Synapse Analytics or Azure Data Factory Integration Runtime on the same machine. It needs to be installed on a separated machine.
Prerequisites
The supported versions of Windows are:
- Windows 8.1
- Windows 10
- Windows 11
- Windows Server 2012
- Windows Server 2012 R2
- Windows Server 2016
- Windows Server 2019
- Windows Server 2022
Installation of the self-hosted integration runtime on a domain controller isn't supported.
FIPS mode isn't currently supported for SHIR machines.
Important
Scanning some data sources requires extra setup on the self-hosted integration runtime machine. For example, JDK, Visual C++ Redistributable, or specific driver. For your source, refer to each source article for prerequisite details. Any requirements will be listed in the Prerequisites section.
To add and manage a SHIR in Microsoft Purview, you'll need data source administrator permissions in Microsoft Purview.
Self-hosted integration runtime requires a 64-bit Operating System with .NET Framework 4.7.2 or above. See .NET Framework System Requirements for details.
The recommended minimum configuration for the self-hosted integration runtime machine is a 2-GHz processor with 8 cores, 28 GB of RAM, and 80 GB of available hard drive space. Scanning some data sources may require higher machine specification based on your scenario. Also check the prerequisites in corresponding connector article.
If the host machine hibernates, the self-hosted integration runtime doesn't respond to data requests. Configure an appropriate power plan on the computer before you install the self-hosted integration runtime. If the machine is configured to hibernate, the self-hosted integration runtime installer prompts with a message.
You must be an administrator on the machine to successfully install and configure the self-hosted integration runtime.
Scan runs happen with a specific frequency per the schedule you've set up. Processor and RAM usage on the machine follows the same pattern with peak and idle times. Resource usage also depends heavily on the amount of data that is scanned. When multiple scan jobs are in progress, you see resource usage goes up during peak times.
Enable Windows long path by default by following these steps.
Important
If you use the Self-Hosted Integration runtime to scan Parquet files, you need to install the 64-bit JRE 8 (Java Runtime Environment) or OpenJDK on your IR machine. Check our Java Runtime Environment section at the bottom of the page for an installation guide.
Considerations for using a self-hosted IR
- You can use a single self-hosted integration runtime for scanning multiple data sources.
- You can install only one instance of self-hosted integration runtime on any single machine. If you have two Microsoft Purview accounts that need to scan on-premises data sources, install the self-hosted IR on two machines, one for each Microsoft Purview account.
- The self-hosted integration runtime doesn't need to be on the same machine as the data source, unless specially called out as a prerequisite in the respective source article. Having the self-hosted integration runtime close to the data source reduces the time for the self-hosted integration runtime to connect to the data source.
- To optimize disk space, it's recommended to periodically clean up the numerical folders, along with numerical folders under the Data Scan and MITIlib folder that are older than seven days, in the Temp folder generated on your machine.
Setting up a self-hosted integration runtime
To create and set up a self-hosted integration runtime, use the following procedures.
Create a self-hosted integration runtime
Note
To add or manage a SHIR in Microsoft Purview, you'll need data source administrator permissions in Microsoft Purview.
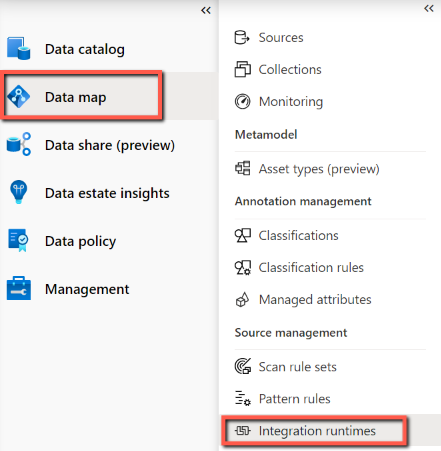
On the home page of the classic Microsoft Purview governance portal, select Data Map from the left navigation pane.
Under Sources and scanning on the left pane, select Integration runtimes, and then select + New.
On the Integration runtime setup page, select Self-Hosted to create a self-Hosted IR, and then select Continue.

Enter a name for your IR, and select Create.
On the Integration Runtime settings page, follow the steps under the Manual setup section. You'll have to download the integration runtime from the download site onto a VM or machine where you intend to run it.
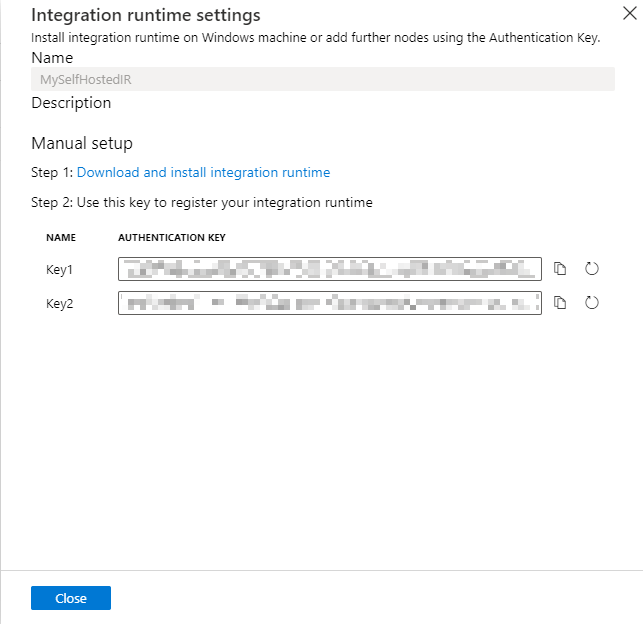
Copy and paste the authentication key.
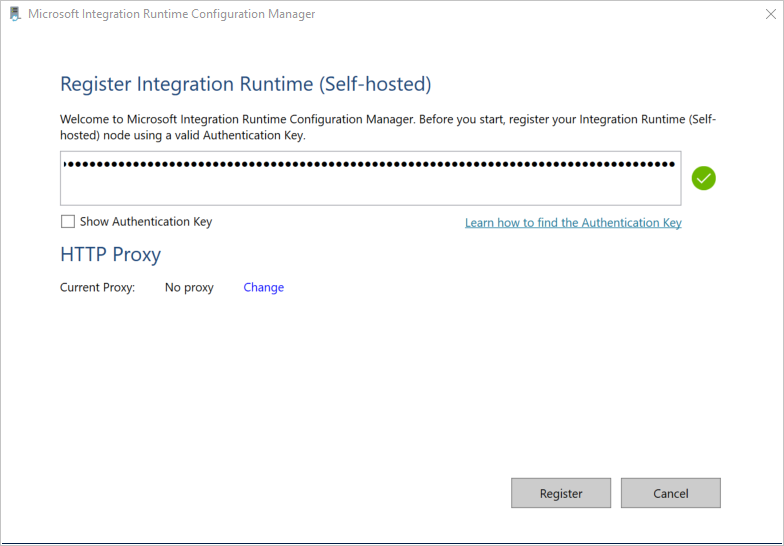
Download the self-hosted integration runtime from Microsoft Integration Runtime on a local Windows machine. Run the installer. Self-hosted integration runtime versions such as 5.4.7803.1 and 5.6.7795.1 are supported.
On the Register Integration Runtime (Self-hosted) page, paste one of the two keys you saved earlier, and select Register.
On the New Integration Runtime (Self-hosted) Node page, select Finish.
After the Self-hosted integration runtime is registered successfully, you see the following window:
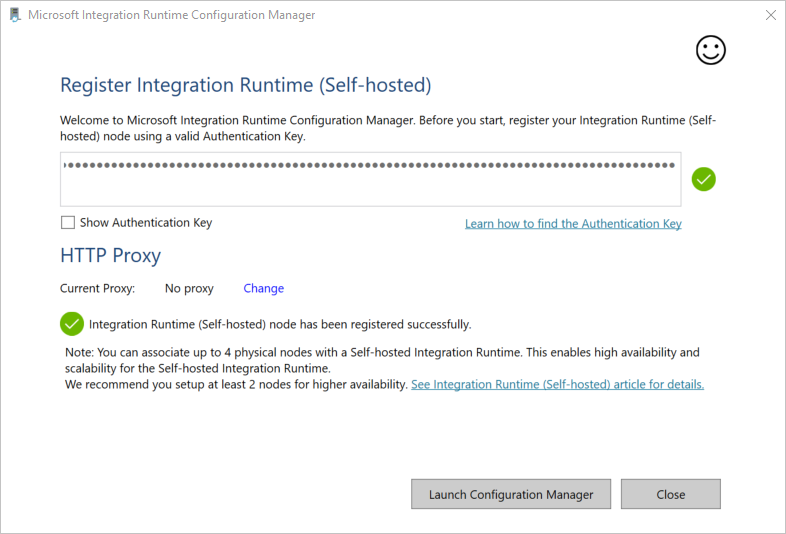
You can register multiple nodes for a self-hosted integration runtime using the same key. Learn more from High availability and scalability.
Manage a self-hosted integration runtime
You can edit a self-hosted integration runtime by navigating to Integration runtimes in the classic Microsoft Purview governance portal by hovering on the IR, then select Edit.
- In the Settings tab, you can update the description, copy the key, or regenerate new keys.
- In the Nodes tab, you can see a list of the registered nodes, along with the status, IP address, and the option of node deletion. Learn more from High availability and scalability.
- In the Version tab, you can see the IR version status. Learn more from Self-hosted integration runtime autoupdate and expire notification.
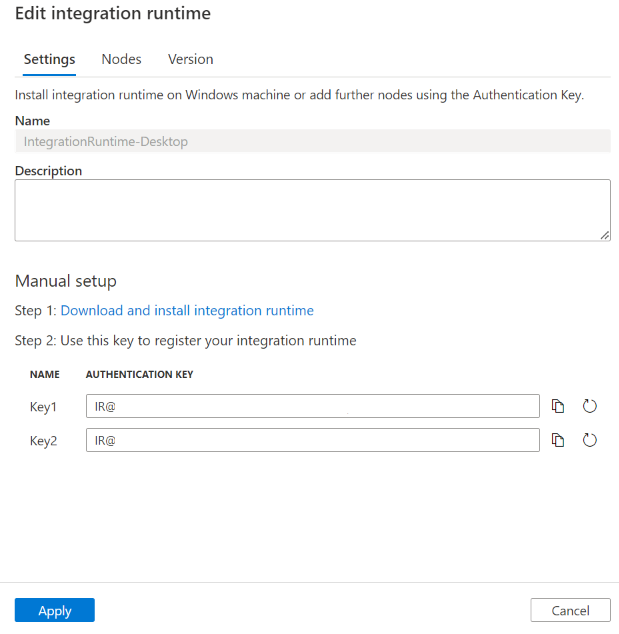
You can delete a self-hosted integration runtime by navigating to Integration runtimes, hover on the IR then select the Delete button.
Notification area icons and notifications
If you move your cursor over the icon or message in the notification area, you can see details about the state of the self-hosted integration runtime.

Service account for Self-hosted integration runtime
The default sign-in service account of self-hosted integration runtime is NT SERVICE\DIAHostService. You can see it in Services -> Integration Runtime Service -> Properties -> Log on.
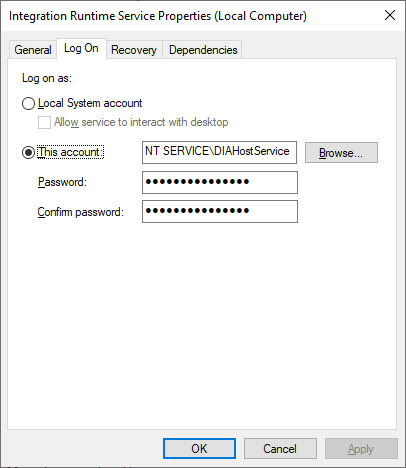
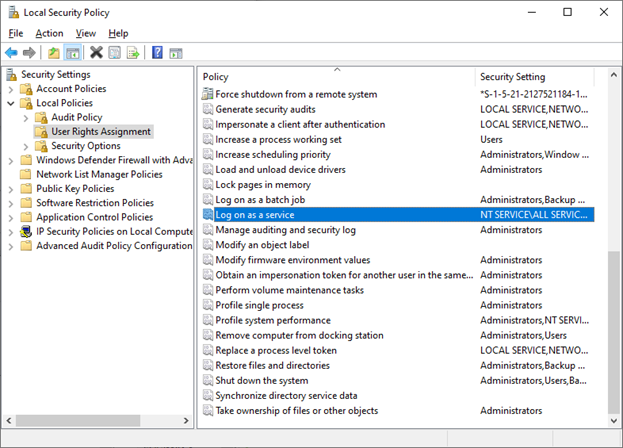
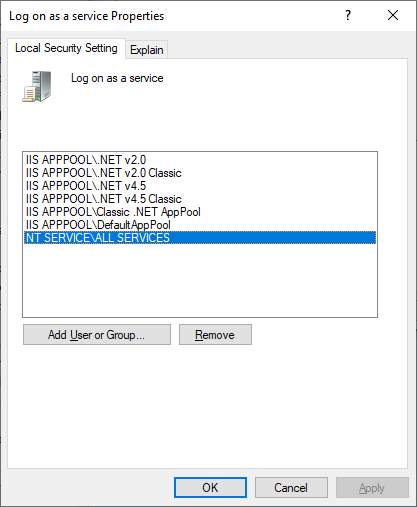
Make sure the account has the permission of Log-on as a service. Otherwise self-hosted integration runtime can't start successfully. You can check the permission in Local Security Policy -> Security Settings -> Local Policies -> User Rights Assignment -> Log on as a service
High availability and scalability
You can associate a self-hosted integration runtime with multiple on-premises machines or virtual machines in Azure. These machines are called nodes. You can have up to four nodes associated with a self-hosted integration runtime. The benefits of having multiple nodes are:
- Higher availability of the self-hosted integration runtime so that it's no longer the single point of failure for scan. This availability helps ensure continuity when you use up to four nodes.
- Run more concurrent scans. Each self-hosted integration runtime can empower many scan runs at the same time, auto determined based on the machine's CPU/memory. You can install more nodes if you have more concurrency need.
You can associate multiple nodes by installing the self-hosted integration runtime software from Download Center. Then, register it by using the same authentication key.
Note
Before you add another node for high availability and scalability, ensure that the Remote access to intranet option is enabled on the first node. To do so, select Microsoft Integration Runtime Configuration Manager > Settings > Remote access to intranet.
Networking requirements
Your self-hosted integration runtime machine needs to connect to several resources to work correctly:
- The Microsoft Purview services used to manage the self-hosted integration runtime.
- The data sources you want to scan using the self-hosted integration runtime.
- If your account was created before December 15, 2023, your integration runtime needs to be able to connect to the managed storage account created by Microsoft Purview. If your account is created after this date (or deployed using API version 2023-05-01-preview onwards), an ingestion storage account is used. Microsoft Purview uses this resource to ingest the results of the scan, among many other things.
There are two firewalls to consider:
- The corporate firewall that runs on the central router of the organization
- The Windows Firewall that is configured as a daemon on the local machine where the self-hosted integration runtime is installed
Here are the domains and outbound ports that you need to allow at both corporate and Windows/machine firewalls.
Tip
- For domains listed with '<managed_storage_account>', add the name of the managed resources associated with your Microsoft Purview account. You can find them from Azure portal -> your Microsoft Purview account -> Settings -> Managed resources tab.
- If your account doesn't have a managed storage account, it's using ingestion storage. Refer to the domains with '<ingestion_storage_account>' in below table. You can find the storage information from Azure portal -> Properties -> Ingestion storage ID. To check the endpoint details, go to Overview -> JSON View -> "primaryEndpoint" property.
| Domain names | Outbound ports | Description |
|---|---|---|
*.frontend.clouddatahub.net |
443 | Required to connect to the Microsoft Purview service. Currently wildcard is required as there's no dedicated resource. |
*.servicebus.chinacloudapi.cn |
443 | Required for setting up scan in the Microsoft Purview governance portal. This endpoint is used for interactive authoring from UI, for example, test connection, browse folder list and table list to scope scan. To avoid using wildcard, see Get URL of Azure Relay. |
<purview_account>.purview.azure.cn |
443 | Required to connect to Microsoft Purview service. If you use Purview Private Endpoints, this endpoint is covered by account private endpoint. |
<managed_storage_account>.blob.core.chinacloudapi.cn |
443 | Required to connect to the Microsoft Purview managed Azure Blob storage account. If you use Purview Private Endpoints, this endpoint is covered by ingestion private endpoint. |
<managed_storage_account>.queue.core.chinacloudapi.cn |
443 | Required to connect to the Microsoft Purview managed Azure Queue storage account. If you use Purview Private Endpoints, this endpoint is covered by ingestion private endpoint. |
download.microsoft.com |
443 | Required to download the self-hosted integration runtime updates. If you have disabled autoupdate, you can skip configuring this domain. |
login.chinacloudapi.cnlogin.partner.microsoftonline.cn |
443 | Required to sign in to the Microsoft Entra ID. |
Note
As currently Azure Relay doesn't support service tag, you have to use service tag AzureCloud or Internet in NSG rules for the communication to Azure Relay.
Depending on the sources you want to scan, you also need to allow other domains and outbound ports for other Azure or external sources. A few examples are provided here:
| Domain names | Outbound ports | Description |
|---|---|---|
<your_storage_account>.dfs.core.chinacloudapi.cn |
443 | When scan Azure Data Lake Store Gen 2. |
<your_storage_account>.blob.core.chinacloudapi.cn |
443 | When scan Azure Blob storage. |
<your_sql_server>.database.chinacloudapi.cn |
1433 | When scan Azure SQL Database. |
*.powerbi.com and *.analysis.chinacloudapi.cn |
443 | When scan Power BI tenant. |
<your_ADLS_account>.azuredatalakestore.net |
443 | When scan Azure Data Lake Store Gen 1. |
| Various domains | Dependent | Domains and ports for any other sources the SHIR will scan. |
For some cloud data stores such as Azure SQL Database and Azure Storage, you may need to allow IP address of self-hosted integration runtime machine on their firewall configuration, or you can create private endpoint of the service in your self-hosted integration runtime's network.
Important
In most environments, you will also need to make sure that your DNS is correctly configured. To confirm, you can use nslookup from your SHIR machine to check connectivity to each of the domains. Each nslookup should return the IP of the resource. If you are using Private Endpoints, the private IP should be returned and not the Public IP. If no IP is returned, or if when using Private Endpoints the public IP is returned, you need to address your DNS/VNet association, or your Private Endpoint/VNet peering.
Get URL of Azure Relay
One required domain and port that need to be put in the allowlist of your firewall is for the communication to Azure Relay. The self-hosted integration runtime uses it for interactive authoring such as test connection and browse folder/table list. If you don't want to allow .servicebus.chinacloudapi.cn and would like to have more specific URLs, then you can see all the FQDNs that are required by your self-hosted integration runtime. Follow these steps:
Go to the classic Microsoft Purview governance portal -> Data Map -> Integration runtimes, and edit your self-hosted integration runtime.
In Edit page, select Nodes tab.
Select View Service URLs to get all FQDNs.
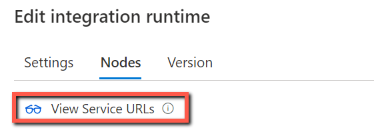
You can add these FQDNs in the allowlist of firewall rules.
Note
For the details related to Azure Relay connections protocol, see Azure Relay Hybrid Connections protocol.
Proxy server considerations
If your corporate network environment uses a proxy server to access the internet, configure the self-hosted integration runtime to use appropriate proxy settings. You can set the proxy during the initial registration phase or after it's being registered.
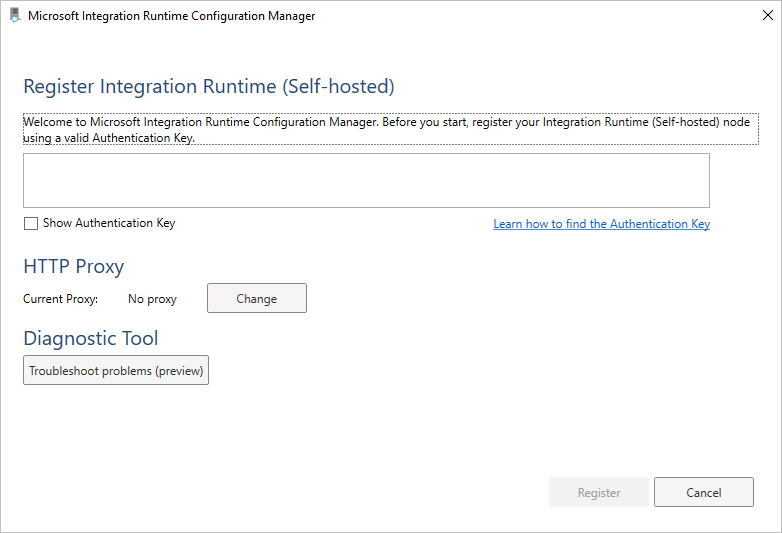
When configured, the self-hosted integration runtime uses the proxy server to connect to the services that use HTTP or HTTPS protocol. This is why you select Change link during initial setup.
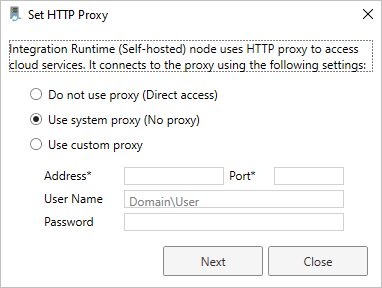
There are two supported configuration options by Microsoft Purview:
- Do not use proxy: The self-hosted integration runtime doesn't explicitly use any proxy to connect to cloud services.
- Use system proxy: The self-hosted integration runtime uses the proxy setting that is configured in the executable's configuration files. If no proxy is specified in these files, the self-hosted integration runtime connects to the services directly without going through a proxy.
- Use custom proxy: Configure the HTTP proxy setting to use for the self-hosted integration runtime, instead of using configurations in diahost.exe.config and diawp.exe.config. Address and Port values are required. User Name and Password values are optional, depending on your proxy's authentication setting. All settings are encrypted with Windows DPAPI on the self-hosted integration runtime and stored locally on the machine.
Note
Connecting to data sources via proxy isn't supported for connectors other than Azure data sources and Power BI.
The integration runtime host service restarts automatically after you save the updated proxy settings.
After you register the self-hosted integration runtime, if you want to view or update proxy settings, use Microsoft Integration Runtime Configuration Manager.
- Open Microsoft Integration Runtime Configuration Manager.
- Select the Settings tab.
- Under HTTP Proxy, select the Change link to open the Set HTTP Proxy dialog box.
- Select Next. You then see a warning that asks for your permission to save the proxy setting and restart the integration runtime host service.
Note
If you set up a proxy server with NTLM authentication, the integration runtime host service runs under the domain account. If you later change the password for the domain account, remember to update the configuration settings for the service and restart the service. Because of this requirement, we suggest that you access the proxy server by using a dedicated domain account that doesn't require you to update the password frequently.
If using system proxy, make sure your proxy server allow outbound traffic to the network rules.
Configure proxy server settings
If you select the Use system proxy option for the HTTP proxy, the self-hosted integration runtime uses the proxy settings in the following four files under the path C:\Program Files\Microsoft Integration Runtime\5.0\ to perform different operations:
- .\Shared\diahost.exe.config
- .\Shared\diawp.exe.config
- .\Gateway\DataScan\Microsoft.DataMap.Agent.exe.config
- .\Gateway\DataScan\DataTransfer\Microsoft.DataMap.Agent.Connectors.Azure.DataFactory.ServiceHost.exe.config
When no proxy is specified in these files, the self-hosted integration runtime connects to the services directly without going through a proxy.
The following procedure provides instructions for updating the diahost.exe.config file.
In File Explorer, make a safe copy of C:\Program Files\Microsoft Integration Runtime\5.0\Shared\diahost.exe.config as a backup of the original file.
Open Notepad running as administrator.
In Notepad, open the text file C:\Program Files\Microsoft Integration Runtime\5.0\Shared\diahost.exe.config.
Find the default system.net tag as shown in the following code:
<system.net>
    <defaultProxy useDefaultCredentials="true" />
</system.net>
You can then add proxy server details as shown in the following example:
<system.net>
  <defaultProxy>
    <proxy bypassonlocal="true" proxyaddress="<your proxy server e.g. http://proxy.domain.org:8888/>" />
  </defaultProxy>
</system.net>
The proxy tag allows other properties to specify required settings like
scriptLocation. See <proxy> Element (Network Settings) for syntax.<proxy autoDetect="true|false|unspecified" bypassonlocal="true|false|unspecified" proxyaddress="uriString" scriptLocation="uriString" usesystemdefault="true|false|unspecified "/>Save the configuration file in its original location.
Repeat the same procedure to update diawp.exe.config and Microsoft.DataMap.Agent.exe.config files.
Then go to path C:\Program Files\Microsoft Integration Runtime\5.0\Gateway\DataScan\DataTransfer, create a file named "Microsoft.DataMap.Agent.Connectors.Azure.DataFactory.ServiceHost.exe.config", and configure the proxy setting as follows. You can also extend the settings as described above.
<?xml version="1.0" encoding="utf-8"?>
<configuration>
  <system.net>
    <defaultProxy>
      <proxy bypassonlocal="true" proxyaddress="<your proxy server e.g. http://proxy.domain.org:8888/>" />
    </defaultProxy>
  </system.net>
</configuration>
Local traffic must be excluded from proxy, for example if your Microsoft Purview account is behind private endpoints. In such cases, update the following four files under the path to include bypass list C:\Program Files\Microsoft Integration Runtime\5.0\ with required bypass list:
- .\Shared\diahost.exe.config
- .\Shared\diawp.exe.config
- .\Gateway\DataScan\Microsoft.DataMap.Agent.exe.config
- .\Gateway\DataScan\DataTransfer\Microsoft.DataMap.Agent.Connectors.Azure.DataFactory.ServiceHost.exe.config
An example for bypass list for scanning an Azure SQL Database and ADLS gen 2 Storage:
 <system.net>
   <defaultProxy>
     <bypasslist>
       <add address="scanchinanorth4123.blob.core.chinacloudapi.cn" />
       <add address="scanchinanorth4123.queue.core.chinacloudapi.cn" />
       <add address="Atlas-abc12345-1234-abcd-a73c-394243a566fa.servicebus.chinacloudapi.cn" />
       <add address="contosopurview123.purview.azure.cn" />
       <add address="contososqlsrv123.database.chinacloudapi.cn" />
       <add address="contosoadls123.dfs.core.chinacloudapi.cn" />
       <add address="contosoakv123.vault.azure.cn" />
     </bypasslist>
     <proxy proxyaddress=http://proxy.domain.org:8888 bypassonlocal="True" />
   </defaultProxy>
 </system.net>
Restart the self-hosted integration runtime host service, which picks up the changes. To restart the service, use the services applet from Control Panel. Or from Integration Runtime Configuration Manager, select the Stop Service button, and then select Start Service. If the service doesn't start, you likely added incorrect XML tag syntax in the application configuration file that you edited.
Important
Don't forget to update all four files mentioned above.
You also need to make sure that Azure is in your company's allowlist. You can download the list of valid Azure IP addresses. IP ranges for each cloud, broken down by region and by the tagged services in that cloud are now available on MS Download:
Possible symptoms for issues related to the firewall and proxy server
If you see error messages like the following ones, the likely reason is improper configuration of the firewall or proxy server. Such configuration prevents the self-hosted integration runtime from connecting to Microsoft Purview services. To ensure that your firewall and proxy server are properly configured, refer to the previous section.
When you try to register the self-hosted integration runtime, you receive the following error message: "Failed to register this Integration Runtime node! Confirm that the Authentication key is valid and the integration service host service is running on this machine."
When you open Integration Runtime Configuration Manager, you see a status of Disconnected or Connecting. When you view Windows event logs, under Event Viewer > Application and Services Logs > Microsoft Integration Runtime, you see error messages like this one:
Unable to connect to the remote server
A component of Integration Runtime has become unresponsive and restarts automatically. Component name: Integration Runtime (Self-hosted)
Java Runtime Environment Installation
If you scan Parquet files using the self-hosted integration runtime with Microsoft Purview, you'll need to install either the Java Runtime Environment or OpenJDK on your self-hosted IR machine.
When scanning Parquet files using the self-hosted IR, the service locates the Java runtime by firstly checking the registry (HKEY_LOCAL_MACHINE\SOFTWARE\JavaSoft\Java Runtime Environment\{Current Version}\JavaHome) for JRE, if not found, secondly checking system variable JAVA_HOME for OpenJDK. You can set JAVA_HOME under System Settings, Environment Variables on your machine. Create or edit the JAVA_HOME variable to point to the Java jre on your machine. For example: C:\Program Files\Java\jdk1.8\jre
- To use JRE: The 64-bit IR requires 64-bit JRE. You can find it from here.
- To use OpenJDK: It's supported since IR version 3.13. Package the jvm.dll with all other required assemblies of OpenJDK into self-hosted IR machine, and set system environment variable JAVA_HOME accordingly.
How to check your self-hosted integration runtime version
You can check the version of your self-hosted integration runtime in the classic Microsoft Purview governance portal -> Data Map -> Integration runtimes:
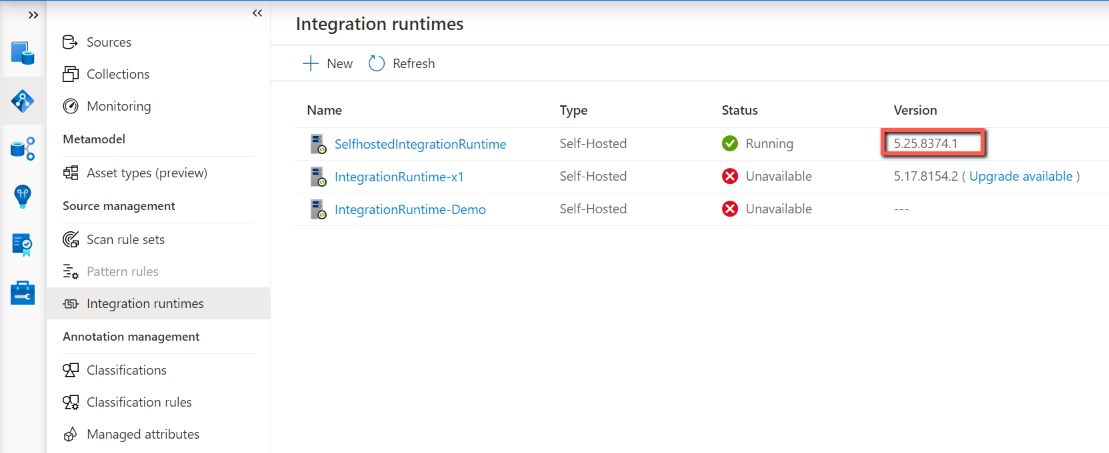
You can also check the version in your self-hosted integration runtime client -> Help tab.
Self-hosted Integration Runtime autoupdate
Auto update is enabled by default when you install a self-hosted integration runtime. You have two options to manage the version of self-hosted integration runtime: autoupdate or maintain manually. Typically, Microsoft Purview releases two new versions of self-hosted integration runtime every month, which includes new feature release, bug fix or enhancement. So we recommend users to update to newer version in order to get the latest feature and enhancement.
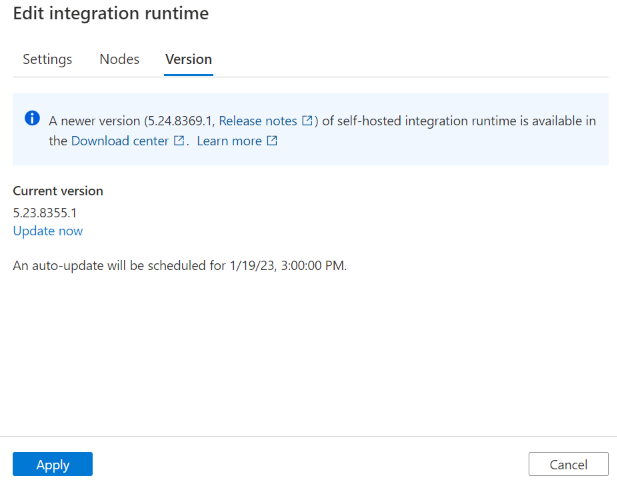
The self-hosted integration runtime is automatically updated to newer version. When new version is available while not yet scheduled for your instance, you can also trigger the update from the portal.
Note
If you have multiple self-hosted integration runtime nodes, there's no downtime during autoupdate. The autoupdate happens in one node first while others are working on tasks. When the first node finishes the update, it takes over the remaining tasks when other nodes are updating. If you only have one self-hosted integration runtime node, then it has some downtime during the autoupdate.
Autoupdate version vs latest version
To ensure the stability of self-hosted integration runtime, although we release two versions, we only push one version every month. So sometimes you find that the autoupdate version is the previous version of the actual latest version. If you want to get the latest version, you can go to download center and do so manually. Additionally, auto-update to a new version is managed by the service, and you can't change it.
The self-hosted integration runtime Version tab in the classic Microsoft Purview governance portal shows the newer version if current version is old. When your self-hosted integration runtime is online, this version is the autoupdate version and automatically updates your self-hosted integration runtime in the scheduled time. But if your self-hosted integration runtime is offline, the page only shows the newer version.
If you have multiple nodes, and for some reasons that some of them aren't autoupdated successfully. Then these nodes roll back to the version, which was the same across all nodes before autoupdate.
Self-hosted Integration Runtime expiration
Each version of self-hosted integration runtime expires in one year. The expiring message is shown in the classic Microsoft Purview governance portal and the self-hosted integration runtime client 90 days before expiration.