Note
Access to this page requires authorization. You can try signing in or changing directories.
Access to this page requires authorization. You can try changing directories.
If the Azure built-in roles don't meet the specific needs of your organization, you can create your own custom roles. This article describes how to create or update a custom role using an Azure Resource Manager template (ARM template).
An Azure Resource Manager template is a JavaScript Object Notation (JSON) file that defines the infrastructure and configuration for your project. The template uses declarative syntax. You describe your intended deployment without writing the sequence of programming commands to create the deployment.
To create a custom role, you specify a role name, permissions, and where the role can be used. In this article, you create a role named Custom Role - RG Reader with resource permissions that can be assigned at a subscription scope or lower.
If your environment meets the prerequisites and you're familiar with using ARM templates, select the Deploy to Azure button. The template will open in the Azure portal.

Prerequisites
To create a custom role, you must have:
- Permissions to create custom roles, such as User Access Administrator.
You must use the following version:
2018-07-01or later
For more information, see API versions of Azure RBAC REST APIs.
Review the template
The template used in this article is from Azure Quickstart Templates. The template has four parameters and a resources section. The four parameters are:
- Array of actions with a default value of
["Microsoft.Resources/subscriptions/resourceGroups/read"]. - Array of
notActionswith an empty default value. - Role name with a default value of
Custom Role - RG Reader. - Role description with a default value of
Subscription Level Deployment of a Role Definition.
The scope where this custom role can be assigned is set to the current subscription.
{
  "$schema": "https://schema.management.azure.com/schemas/2018-05-01/subscriptionDeploymentTemplate.json#",
  "contentVersion": "1.0.0.0",
  "metadata": {
    "_generator": {
      "name": "bicep",
      "version": "0.25.53.49325",
      "templateHash": "16704138909949665309"
    }
  },
  "parameters": {
    "actions": {
      "type": "array",
      "defaultValue": [
        "Microsoft.Resources/subscriptions/resourceGroups/read"
      ],
      "metadata": {
        "description": "Array of actions for the roleDefinition"
      }
    },
    "notActions": {
      "type": "array",
      "defaultValue": [],
      "metadata": {
        "description": "Array of notActions for the roleDefinition"
      }
    },
    "roleName": {
      "type": "string",
      "defaultValue": "Custom Role - RG Reader",
      "metadata": {
        "description": "Friendly name of the role definition"
      }
    },
    "roleDescription": {
      "type": "string",
      "defaultValue": "Subscription Level Deployment of a Role Definition",
      "metadata": {
        "description": "Detailed description of the role definition"
      }
    }
  },
  "variables": {
    "roleDefName": "[guid(parameters('roleName'))]"
  },
  "resources": [
    {
      "type": "Microsoft.Authorization/roleDefinitions",
      "apiVersion": "2022-04-01",
      "name": "[variables('roleDefName')]",
      "properties": {
        "roleName": "[parameters('roleName')]",
        "description": "[parameters('roleDescription')]",
        "type": "customRole",
        "permissions": [
          {
            "actions": "[parameters('actions')]",
            "notActions": "[parameters('notActions')]"
          }
        ],
        "assignableScopes": [
          "[subscription().id]"
        ]
      }
    }
  ]
}
The resource defined in the template is:
Deploy the template
Follow these steps to deploy the previous template.
Sign in to the Azure portal.
Open PowerShell. Login with your subscription then copy and paste the following script.
$location = Read-Host -Prompt "Enter a location (i.e. chinanorth2)"
[string[]]$actions = Read-Host -Prompt "Enter actions as a comma-separated list (i.e. action1,action2)"
$actions = $actions.Split(',')
$templateUri = "https://raw.githubusercontent.com/Azure/azure-quickstart-templates/master/subscription-deployments/create-role-def/azuredeploy.json"
New-AzDeployment -Location $location -TemplateUri $templateUri -actions $actions
Enter a location for the deployment such as chinanorth2.
Enter a list of actions for the custom role as a comma-separated list such as
Microsoft.Resources/resources/read,Microsoft.Resources/subscriptions/resourceGroups/read.If necessary, press Enter to run the
New-AzDeploymentcommand.The New-AzDeployment command deploys the template to create the custom role.
You should see output similar to the following:
PS> New-AzDeployment -Location $location -TemplateUri $templateUri -actions $actions

Id                      : /subscriptions/{subscriptionId}/providers/Microsoft.Resources/deployments/azuredeploy
DeploymentName          : azuredeploy
Location                : chinanorth2
ProvisioningState       : Succeeded
Timestamp               : 6/25/2020 8:08:32 PM
Mode                    : Incremental
TemplateLink            :
                          Uri            : https://raw.githubusercontent.com/Azure/azure-quickstart-templates/master/subscription-deployments/create-role-def/azuredeploy.json
                          ContentVersion : 1.0.0.0

Parameters              :
                          Name               Type                       Value
                          =================  =========================  ==========
                          actions            Array                      [
                            "Microsoft.Resources/resources/read",
                            "Microsoft.Resources/subscriptions/resourceGroups/read"
                          ]
                          notActions         Array                      []
                          roleName           String                     Custom Role - RG Reader
                          roleDescription    String                     Subscription Level Deployment of a Role Definition

Outputs                 :
DeploymentDebugLogLevel :
Review deployed resources
Follow these steps to verify that the custom role was created.
Run the Get-AzRoleDefinition command to list the custom role.
Get-AzRoleDefinition "Custom Role - RG Reader" | ConvertTo-JsonYou should see output similar to the following:
{
  "Name": "Custom Role - RG Reader",
  "Id": "11111111-1111-1111-1111-111111111111",
  "IsCustom": true,
  "Description": "Subscription Level Deployment of a Role Definition",
  "Actions": [
    "Microsoft.Resources/resources/read",
    "Microsoft.Resources/subscriptions/resourceGroups/read"
  ],
  "NotActions": [],
  "DataActions": [],
  "NotDataActions": [],
  "AssignableScopes": [
    "/subscriptions/{subscriptionId}"
  ]
}
In the Azure portal, open your subscription.
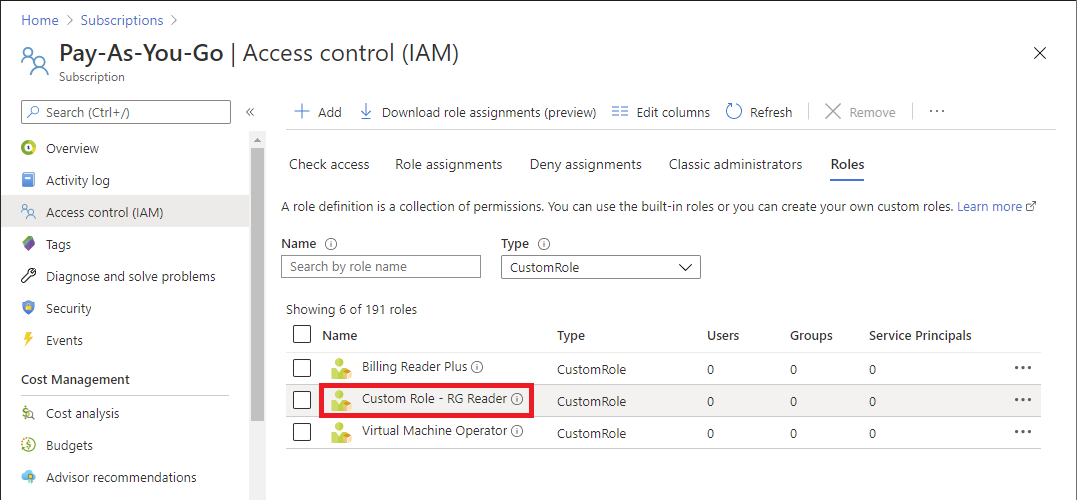
In the left menu, select Access control (IAM).
Select the Roles tab.
Set the Type list to CustomRole.
Verify that the Custom Role - RG Reader role is listed.
Update a custom role
Similar to creating a custom role, you can update an existing custom role by using a template. To update a custom role, you must specify the role you want to update.
Here are the changes you would need to make to the previous Quickstart template to update the custom role.
Include the role ID as a parameter.
    ...
    "roleDefName": {
      "type": "string",
      "metadata": {
        "description": "ID of the role definition"
      }
    ...
Include the role ID parameter in the role definition.
  ...
  "resources": [
    {
      "type": "Microsoft.Authorization/roleDefinitions",
      "apiVersion": "2022-04-01",
      "name": "[parameters('roleDefName')]",
      "properties": {
        ...
Here's an example of how to deploy the template.
$location = Read-Host -Prompt "Enter a location (i.e. chinanorth2)"
[string[]]$actions = Read-Host -Prompt "Enter actions as a comma-separated list (i.e. action1,action2)"
$actions = $actions.Split(',')
$roleDefName = Read-Host -Prompt "Enter the role ID to update"
$templateFile = "rg-reader-update.json"
New-AzDeployment -Location $location -TemplateFile $templateFile -actions $actions -roleDefName $roleDefName
Clean up resources
To remove the custom role, follow these steps.
Run the following command to remove the custom role.
Get-AzRoleDefinition -Name "Custom Role - RG Reader" | Remove-AzRoleDefinitionEnter Y to confirm that you want to remove the custom role.