Note
Access to this page requires authorization. You can try signing in or changing directories.
Access to this page requires authorization. You can try changing directories.
This quickstart helps you deploy an existing application (Node.js in this example) to a Service Fabric cluster running on Azure.
Prerequisites
Before you get started, make sure that you have set up your development environment, which includes installing the Service Fabric SDK and Visual Studio 2019 or 2015.
You also need to have an existing Node.js application for deployment. This quickstart uses a simple Node.js website that can be downloaded here. Extract this file to your <path-to-project>\ApplicationPackageRoot\<package-name>\Code\ folder after you create the project in the next step.
If you don't have an Azure subscription, create a trial subscription.
Create the service
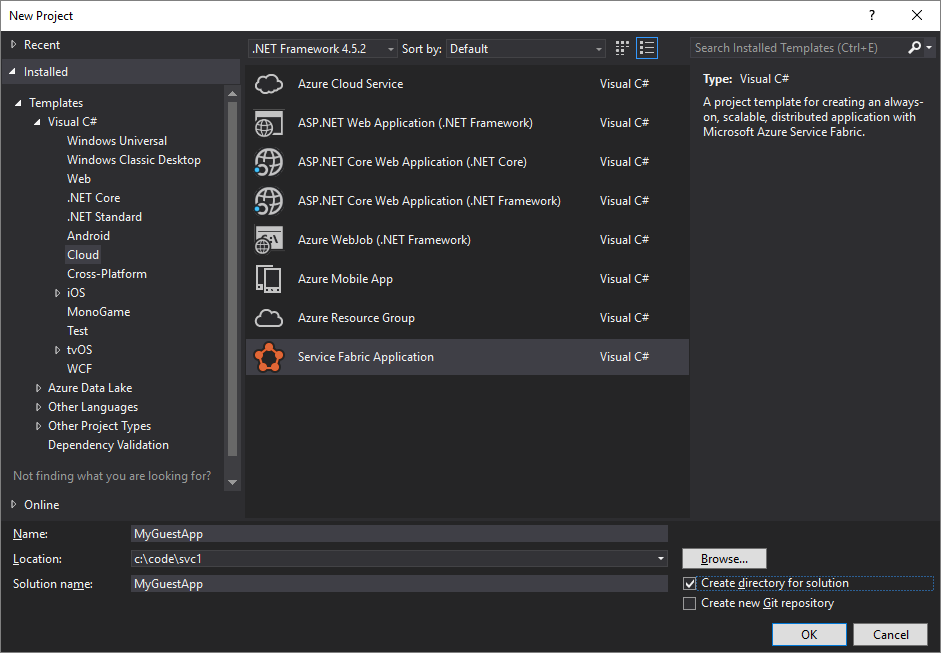
Launch Visual Studio as an administrator.
Create a project with CTRL+SHIFT+N
In the New Project dialog, choose Cloud > Service Fabric Application.
Name the application MyGuestApp and press Create.
Important
Node.js can easily break the 260 character limit for paths that windows has. Use a short path for the project itself such as c:\code\svc1. Optionally, you can follow these instructions to enable long file paths in Windows 10.
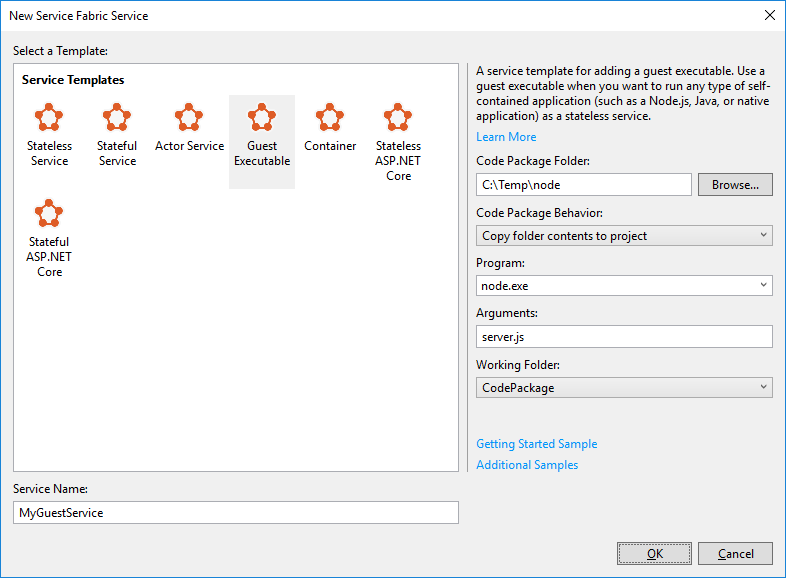
You can create any type of Service Fabric service from the next dialog. For this quickstart, choose Guest Executable.
Name the service MyGuestService and set the options on the right to the following values:
| Setting | Value |
|---|---|
| Code Package Folder | <the folder with your Node.js app> |
| Code Package Behavior | Copy folder contents to project |
| Program | node.exe |
| Arguments | server.js |
| Working Folder | CodePackage |
Press OK.
Visual Studio creates the application project and the actor service project and displays them in Solution Explorer.
The application project (MyGuestApp) doesn't contain any code directly. The project references a set of service projects. Also, it contains three other types of content:
Publish profiles
Tooling preferences for different environments.Scripts
PowerShell script for deploying/upgrading your application.Application definition
Includes the application manifest under ApplicationPackageRoot. Associated application parameter files are under ApplicationParameters, which define the application and allow you to configure it specifically for a given environment.
For an overview of the contents of the service project, see Getting started with Reliable Services.
Set up networking
The example Node.js app we're deploying uses port 80 and we need to tell Service Fabric that we need that port exposed.
Open the ServiceManifest.xml file in the project. At the bottom of the manifest, there's a <Resources> \ <Endpoints> with an entry already defined. Modify that entry to add Port, Protocol, and Type.
  <Resources>
    <Endpoints>
      <!-- This endpoint is used by the communication listener to obtain the port on which to
           listen. Please note that if your service is partitioned, this port is shared with
           replicas of different partitions that are placed in your code. -->

      <Endpoint Name="MyGuestAppServiceTypeEndpoint" Port="80" Protocol="http" Type="Input" />
    </Endpoints>
  </Resources>
Deploy to Azure
If you press F5 and run the project, it's deployed to the local cluster. However, let's deploy to Azure instead.
Right-click on the project and choose Publish... which opens a dialog to publish to Azure.
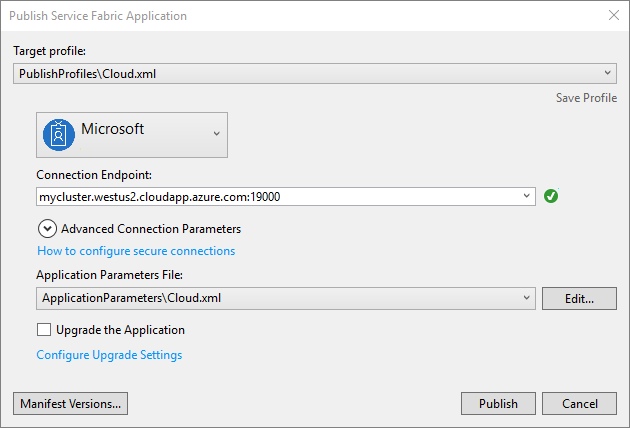
Select the PublishProfiles\Cloud.xml target profile.
If you haven't previously, choose an Azure account to deploy to. If you don't have one yet, sign-up for one.
Under Connection Endpoint, select the Service Fabric cluster to deploy to. If you don't have one, select <Create New Cluster...> which opens up web browser window to the Azure portal. For more information, see create a cluster in the portal.
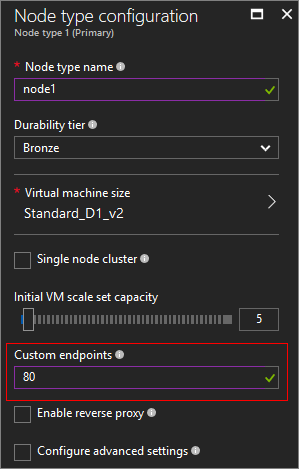
When you create the Service Fabric cluster, make sure to set the Custom endpoints setting to 80.
Creating a new Service Fabric cluster takes some time to complete. Once it has been created, go back to the publish dialog and select <Refresh>. The new cluster is listed in the drop-down box; select it.
Press Publish and wait for the deployment to finish.
This may take a few minutes. After it completes, it may take a few more minutes for the application to be fully available.
Test the website
After your service has been published, test it in a web browser.
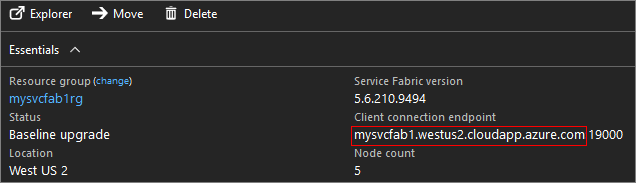
First, open the Azure portal and find your Service Fabric service.
Check the overview blade of the service address. Use the domain name from the Client connection endpoint property. For example, http://mysvcfab1.chinanorth3.cloudapp.chinacloudapi.cn.
Navigate to this address where you'll see the HELLO WORLD response.
Delete the cluster
Don't forget to delete all of the resources you've created for this quickstart, as you're charged for those resources.
Next steps
Read more about guest executables.