Note
Access to this page requires authorization. You can try signing in or changing directories.
Access to this page requires authorization. You can try changing directories.
You set up an on-premises configuration server when you use Azure Site Recovery for disaster recovery of VMware virtual machines (VMs) and physical servers to Azure. The configuration server coordinates communications between on-premises VMware and Azure and manages data replication. This article summarizes common tasks for managing the configuration server after it deploys.
Note
We recommend that you use the Azure Az PowerShell module to interact with Azure. See Install Azure PowerShell to get started. To learn how to migrate to the Az PowerShell module, see Migrate Azure PowerShell from AzureRM to Az.
Note
This article describes the classic ASR experience for VMware. For the modernized experience and updated workflows, see VMware to Azure disaster recovery architecture – Modernized and Set up disaster recovery for VMware VMs – Modernized.
Update Windows license
The license provided with the Open Virtualization Format (OVF) template is an evaluation license valid for 180 days. For uninterrupted usage, you must activate Windows with a procured license. You can update a license either through a standalone key or a Key Management Services (KMS) standard key. For guidance, see DISM Windows edition servicing command-line options. To obtain keys, refer to KMS client setup.
Access configuration server
To access the configuration server:
- Sign in to the VM on which it's deployed. Start Azure Site Recovery Configuration Manager from the desktop shortcut.
- Alternatively, access the configuration server remotely from
https://<ConfigurationServerName>/:44315/. Sign in with administrator credentials.
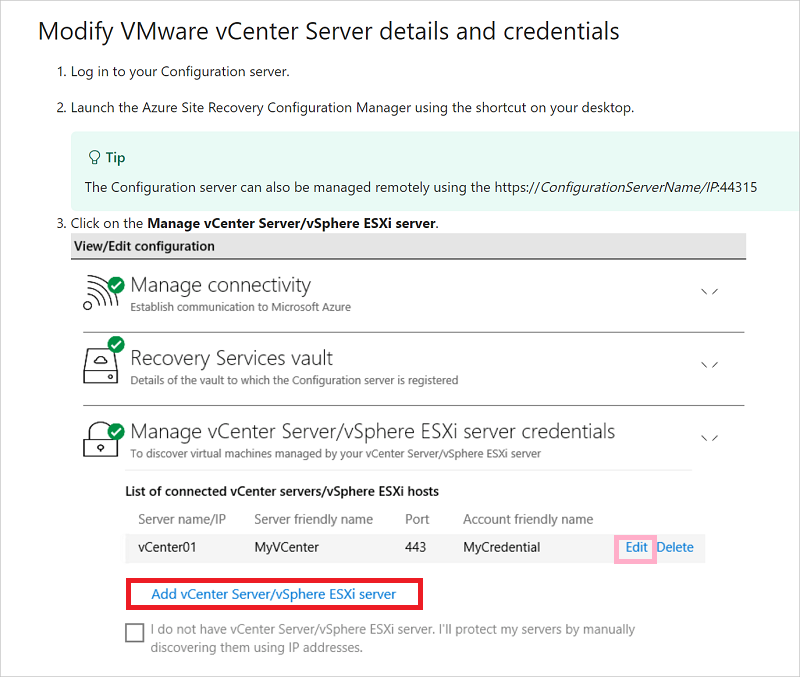
Modify VMware server settings
- To associate a different VMware server with the configuration server, after sign-in, select Add vCenter Server/vSphere ESXi server.
- Enter the details, and then select OK.
Modify credentials for automatic discovery
To update the credentials used to connect to the VMware server for automatic discovery of VMware VMs, after sign-in, choose the account and select Edit.
Enter the new credentials, and then select OK.
You can also modify the credentials through CSPSConfigtool.exe:
- Sign in to the configuration server and start
CSPSConfigtool.exe. - Choose the account that you want to modify and select Edit.
- Enter the modified credentials, and then select OK.
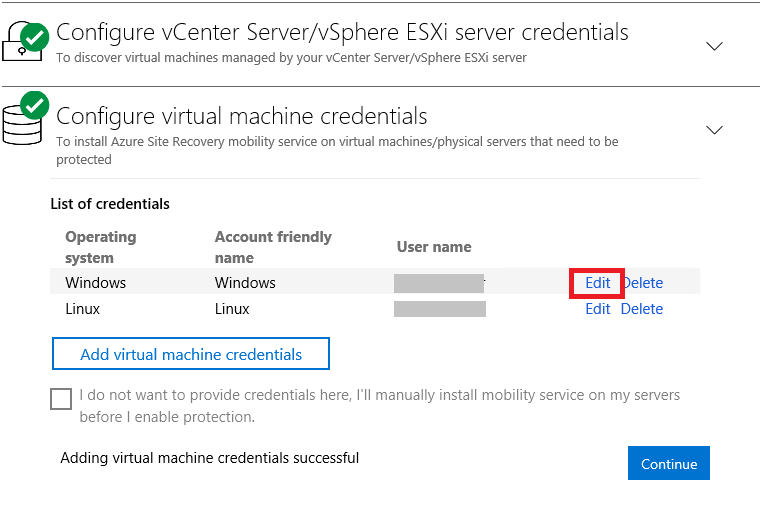
Modify credentials for Mobility service installation
Modify the credentials used to automatically install the Mobility service on the VMware VMs that you enable for replication.
After sign-in, select Manage virtual machine credentials.
Choose the account that you want to modify and select Edit.
Enter the new credentials, and then select OK.
You can also modify credentials through CSPSConfigtool.exe:
- Sign in to the configuration server and start
CSPSConfigtool.exe. - Choose the account that you want to modify and select Edit.
- Enter the new credentials, and then select OK.
Add credentials for Mobility service installation
If you missed adding credentials during OVF deployment of the configuration server:
After sign-in, select Manage virtual machine credentials.
Select Add virtual machine credentials.
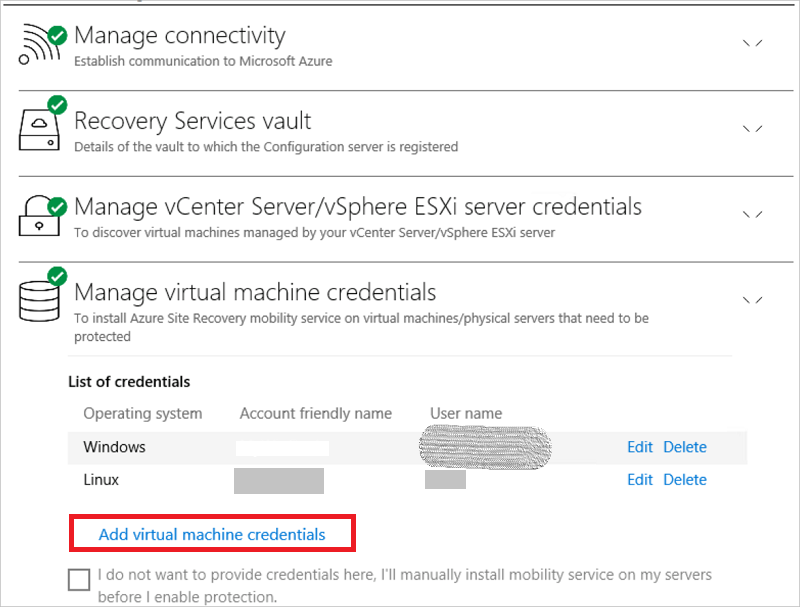
Enter the new credentials and select Add.
You can also add credentials through CSPSConfigtool.exe:
- Sign in to the configuration server and start
CSPSConfigtool.exe. - Select Add, enter the new credentials, and select OK.
Modify proxy settings
Modify the proxy settings used by the configuration server machine for internet access to Azure. If you have a process server machine in addition to the default process server running on the configuration server machine, modify the settings on both machines.
- After sign-in to the configuration server, select Manage connectivity.
- Update the proxy values. Then select Save to update the settings.
Add a network adapter
The OVF template deploys the configuration server VM with a single network adapter.
- You can add another adapter to the VM, but you must add it before you register the configuration server in the vault.
- You can add an adapter after you register the configuration server in the vault. Add the adapter in the VM properties. Then you need to reregister the server in the vault.
Renew SSL certificates
The configuration server has an inbuilt web server, which orchestrates activities of the mobility agents on all protected machines, inbuilt/scale-out process servers, and master target servers connected to it. The web server uses a Secure Sockets Layer (SSL) certificate to authenticate clients. The certificate expires after three years, and you can renew it at any time.
Check expiry
The expiry date appears under Configuration Server health. For configuration server deployments before May 2016, certificate expiry was set to one year. If you have a certificate that's going to expire, the following actions occur:
- When the expiry date is two months or less, the service sends notifications in the portal and by email (if you subscribed to Site Recovery notifications).
- When a notification banner appears on the vault resource page, select the banner for more information.
- If you see Upgrade Now, it indicates that some components in your environment must be upgraded to 9.4.xxxx.x or later versions. Upgrade the components before you renew the certificate. You can't renew older versions.
If certificates are yet to expire
- To renew, in the vault, open Site Recovery Infrastructure > Configuration Server. Select the required configuration server.
- Ensure that all scale-out process servers for components, master target servers, and mobility agents on all protected machines are on the latest versions and in the connected state.
- Select Renew Certificates.
- Carefully follow the instructions on this page. Select OK to renew certificates on the selected configuration server and its associated components.
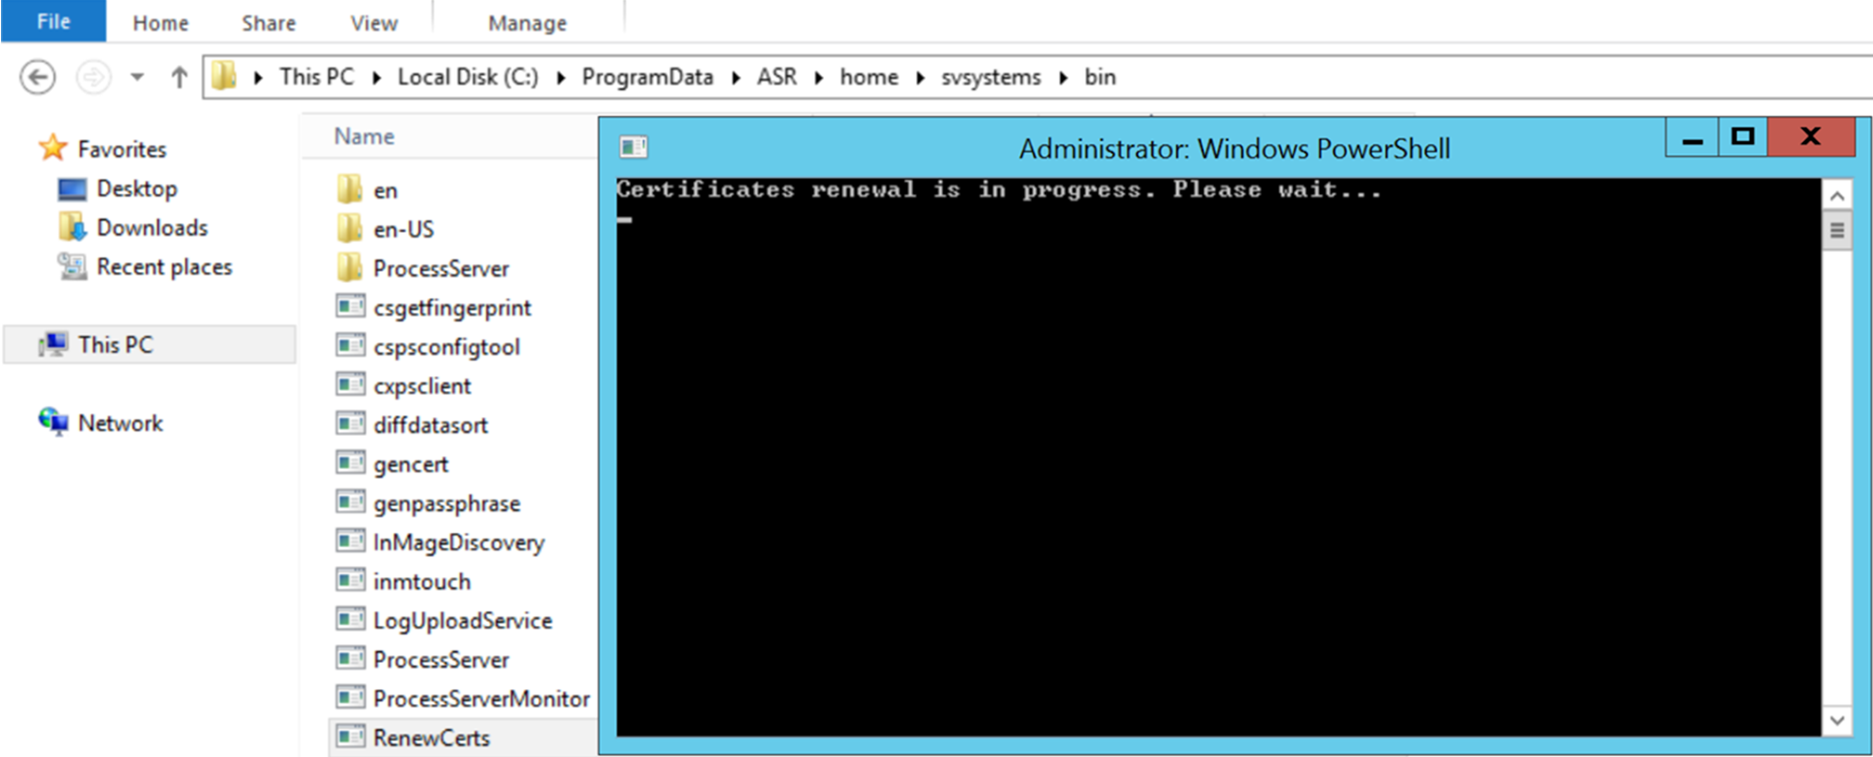
If certificates are already expired
Post expiry, certificates can't be renewed from the Azure portal. Before you proceed, ensure that all scale-out process servers for components, master target servers, and mobility agents on all protected machines are on the latest versions and in the connected state.
Follow this procedure only if certificates are already expired. Sign in to the configuration server, go to
C:\ProgramData\ASR\home\svsystems\bin, and run theRenewCertsexecutor tool as an administrator.A PowerShell execution window opens and triggers renewal of certificates. This process can take up to 15 minutes. Don't close the window until renewal is finished.
Reregister a configuration server in the same vault
You can reregister the configuration server in the same vault if you need to. If you have another process server machine in addition to the default process server running on the configuration server machine, reregister both machines.
In the vault, open Manage > Site Recovery Infrastructure > Configuration Servers.
On Servers, select Download registration key to download the vault credentials file.
Sign in to the configuration server machine.
In
%ProgramData%\ASR\home\svsystems\bin, open cspsconfigtool.exe.On the Vault Registration tab, select Browse, and locate the vault credentials file that you downloaded.
If needed, enter proxy server details. Then select Register.
Open an admin PowerShell command window, and run the following command:
 $pwd = ConvertTo-SecureString -String MyProxyUserPassword
 Set-OBMachineSetting -ProxyServer http://myproxyserver.domain.com -ProxyPort PortNumber – ProxyUserName domain\username -ProxyPassword $pwd
Note
To pull the latest certificates from the configuration server to the scale-out process server, run the command
"\<Installation Drive\Azure Site Recovery\agent\cdpcli.exe>"--registermt.Restart the
obengineby running the following command:net stop obengine net start obengine
Register a configuration server with a different vault
Warning
The following step disassociates the configuration server from the current vault so that the replication of all protected VMs under the configuration server stops.
Sign in to the configuration server.
Open an admin PowerShell command window, and run the following command:
reg delete "HKLM\Software\Microsoft\Azure Site Recovery\Registration"
net stop dra
Use the shortcut on your desktop to start the configuration server appliance browser portal.
Perform the registration steps similar to a new configuration server registration.
Upgrade the configuration server
You run update rollups to update the configuration server. You can apply updates for up to N-4 versions. For example:
- If you run 9.7, 9.8, 9.9, or 9.10, you can upgrade directly to 9.11.
- If you run 9.6 or earlier and you want to upgrade to 9.11, you must first upgrade to version 9.7 before you can upgrade to 9.11.
For the Site Recovery components support statement, refer to Service updates in Site Recovery. Links to update rollups for upgrading to all versions of the configuration server are available in Service updates in Site Recovery.
Important
With every new release of a version N of a Site Recovery component, all versions previous to N-4 are considered out of support. We recommend that you upgrade to the latest versions that are available.
For the Site Recovery components support statement, refer to Service updates in Site Recovery.
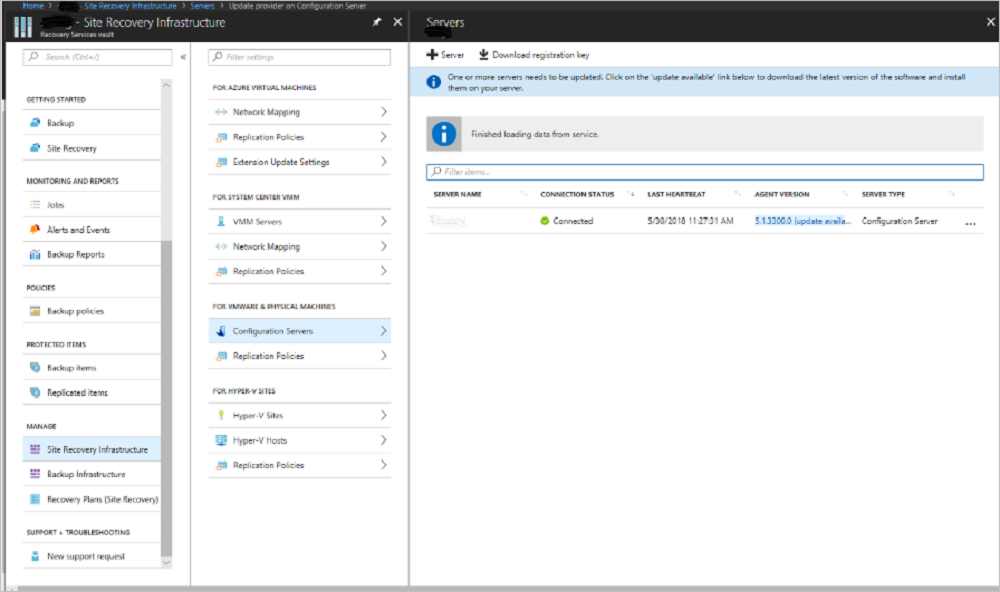
Upgrade the server:
In the vault, go to Manage > Site Recovery Infrastructure > Configuration Servers.
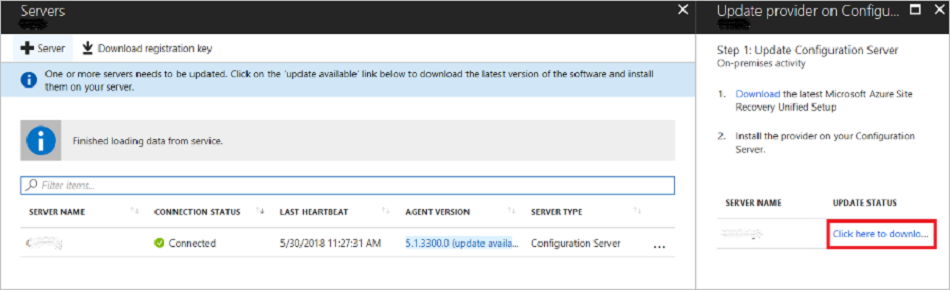
If an update is available, a link appears in the Agent version column.
Download the update installer file to the configuration server.
Double-click to run the installer.
The installer detects the current version running on the machine. Select Yes to start the upgrade.
After the upgrade finishes, the server configuration validates.
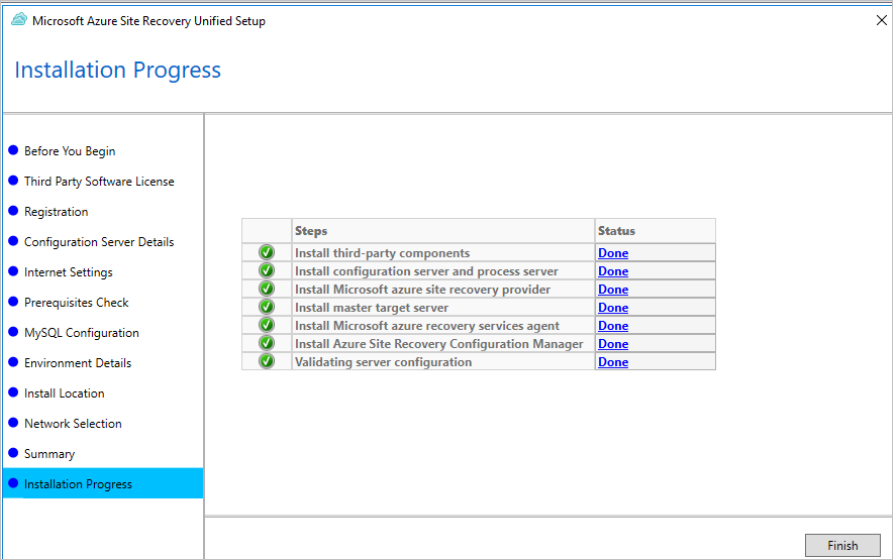
Select Finish to close the installer.
To upgrade the rest of the Site Recovery components, refer to the upgrade guidance.
Upgrade the configuration server/process server from the command line
Run the installation file:
UnifiedSetup.exe [/ServerMode <CS/PS>] [/InstallDrive <DriveLetter>] [/MySQLCredsFilePath <MySQL credentials file path>] [/VaultCredsFilePath <Vault credentials file path>] [/EnvType <VMWare/NonVMWare>] [/PSIP <IP address to be used for data transfer] [/CSIP <IP address of CS to be registered with>] [/PassphraseFilePath <Passphrase file path>]
Sample usage
MicrosoftAzureSiteRecoveryUnifiedSetup.exe /q /x:C:\Temp\Extracted
cd C:\Temp\Extracted
UNIFIEDSETUP.EXE /AcceptThirdpartyEULA /servermode "CS" /InstallLocation "D:\" /MySQLCredsFilePath "C:\Temp\MySQLCredentialsfile.txt" /VaultCredsFilePath "C:\Temp\MyVault.vaultcredentials" /EnvType "VMWare"
Parameters
| Parameter name | Type | Description | Values |
|---|---|---|---|
/ServerMode |
Required | Specifies whether both the configuration and process servers should be installed or the process server only. | Configuration server Process server |
/InstallLocation |
Required | The folder in which the components are installed. | Any folder on the computer. |
/MySQLCredsFilePath |
Required | The file path in which the MySQL server credentials are stored. | The file should be the format specified in the following section. |
/VaultCredsFilePath |
Required | The path of the vault credentials file. | Valid file path. |
/EnvType |
Required | Type of environment that you want to protect. | VMware NonVMware |
/PSIP |
Required | IP address of the network interface card (NIC) to be used for replication data transfer. | Any valid IP address. |
/CSIP |
Required | The IP address of the NIC on which the configuration server is listening. | Any valid IP address. |
/PassphraseFilePath |
Required | The full path to the location of the passphrase file. | Valid file path. |
/BypassProxy |
Optional | Specifies that the configuration server connects to Azure without a proxy. | |
/ProxySettingsFilePath |
Optional | Proxy settings. (The default proxy requires authentication or a custom proxy.) | The file should be in the format specified in the following section. |
DataTransferSecurePort |
Optional | Port number on the PSIP to be used for replication data. | Valid port number (default value is 9433). |
/SkipSpaceCheck |
Optional | Skip space check for cache disk. | |
/AcceptThirdpartyEULA |
Required | Flag implies acceptance of non-Microsoft EULA. | |
/ShowThirdpartyEULA |
Optional | Displays non-Microsoft EULA. If provided as input, all other parameters are ignored. |
Create file input for MYSQLCredsFilePath
The MySQLCredsFilePath parameter takes a file as input. Create the file by using the following format, and pass it as the input MySQLCredsFilePath parameter.
[MySQLCredentials]
MySQLRootPassword = "Password>"
MySQLUserPassword = "Password"
Create file input for ProxySettingsFilePath
The ProxySettingsFilePath parameter takes a file as input. Create the file by using the following format, and pass it as the input ProxySettingsFilePath parameter.
[ProxySettings]
ProxyAuthentication = "Yes/No"
Proxy IP = "IP Address"
ProxyPort = "Port"
ProxyUserName="UserName"
ProxyPassword="Password"
Delete or unregister a configuration server
If you replicate VMware VMs or Windows/Linux physical servers to Azure, you can unregister an unconnected configuration server from a vault.
Disable protection for all VMs under the configuration server.
Disassociate and delete all replication policies from the configuration server.
Delete all vCenter servers/vSphere hosts that are associated with the configuration server.
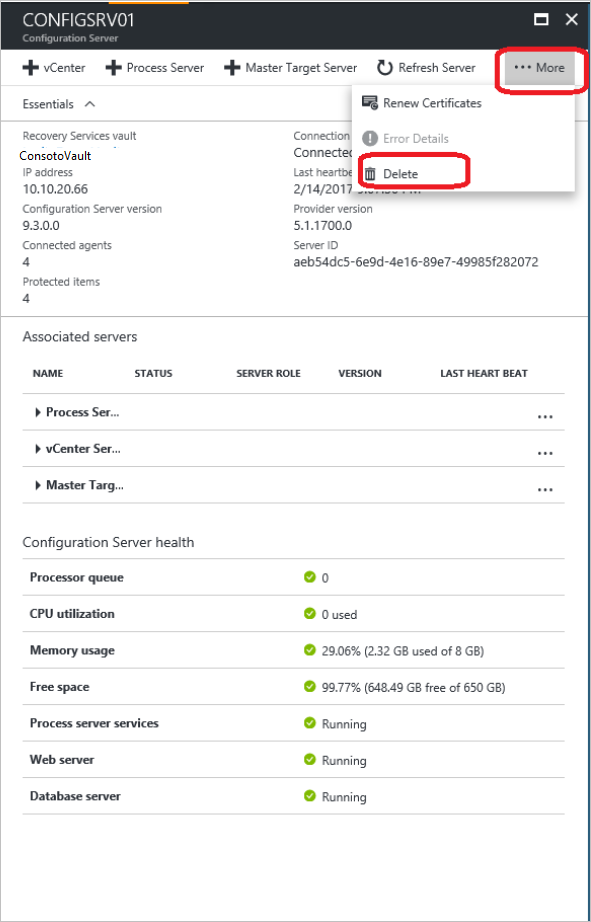
In the vault, open Site Recovery Infrastructure > Configuration Servers.
Select the configuration server that you want to remove. Then, on the Details page, select Delete.
Delete with PowerShell
You can optionally delete the configuration server by using PowerShell.
Install the Azure PowerShell module.
Sign in to your Azure account by using this command:
Connect-AzAccountSelect the vault subscription.
Get-AzSubscription –SubscriptionName <your subscription name> | Select-AzSubscriptionSet the vault context.
$vault = Get-AzRecoveryServicesVault -Name <name of your vault>
Set-AzRecoveryServicesAsrVaultContext -Vault $vault
Retrieve the configuration server.
$fabric = Get-AzRecoveryServicesAsrFabric -FriendlyName <name of your configuration server>Delete the configuration server.
Remove-AzRecoveryServicesAsrFabric -Fabric $fabric [-Force]
Note
You can use the -Force option in Remove-AzRecoveryServicesAsrFabric for forced deletion of the configuration server.
Generate configuration server passphrase
- Sign in to your configuration server, and then open a command prompt window as an administrator.
- To change the directory to the bin folder, run the command
cd %ProgramData%\ASR\home\svsystems\bin. - To generate the passphrase file, run
genpassphrase.exe -v > MobSvc.passphrase. - Your passphrase is stored in the file located at
%ProgramData%\ASR\home\svsystems\bin\MobSvc.passphrase.
Refresh configuration server
- In the Azure portal, go to Recovery Services Vault > Manage > Site Recovery Infrastructure > For VMware & Physical machines > Configuration Servers.
- Select the configuration server that you want to refresh.
- On the pane with details of the chosen configuration server, select More > Refresh Server.
- Monitor the progress of the job under Recovery Services Vault > Monitoring > Site Recovery jobs.
Failback requirements
During reprotect and failback, the on-premises configuration server must be running and in a connected state. For successful failback, the VM being failed back must exist in the configuration server database.
Ensure that you take regular scheduled backups of your configuration server. If a disaster occurs and the configuration server is lost, you must first restore the configuration server from a backup copy. Ensure that the restored configuration server has the same IP address with which it was registered to the vault. Failback doesn't work if a different IP address is used for the restored configuration server.
Related content
- Review the tutorials on how to set up disaster recovery of VMware VMs to Azure.