Note
Access to this page requires authorization. You can try signing in or changing directories.
Access to this page requires authorization. You can try changing directories.
The archive tier is an offline tier for storing blob data that is rarely accessed. The archive tier offers the lowest storage costs, but higher data retrieval costs and latency compared to the online tiers (hot and cool). Data must remain in the archive tier for at least 180 days or be subject to an early deletion charge. For more information about the archive tier, see Archive access tier.
While a blob is in the archive tier, it can't be read or modified. To read or download a blob in the archive tier, you must first rehydrate it to an online tier, either hot or cool. Data in the archive tier can take up to 15 hours to rehydrate, depending on the priority you specify for the rehydration operation. For more information about blob rehydration, see Overview of blob rehydration from the archive tier.
Caution
A blob in the archive tier is offline. That is, it cannot be read or modified until it is rehydrated. The rehydration process can take several hours and has associated costs. Before you move data to the archive tier, consider whether taking blob data offline may affect your workflows.
You can use the Azure portal, PowerShell, Azure CLI, or one of the Azure Storage client libraries to manage data archiving.
Archive blobs on upload
To archive one ore more blob on upload, create the blob directly in the archive tier.
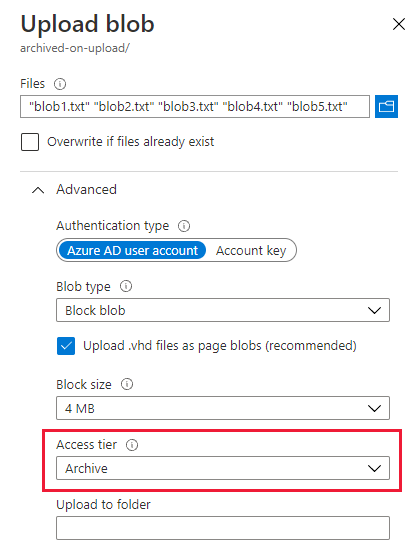
To archive a blob or set of blobs on upload from the Azure portal, follow these steps:
Navigate to the target container.
Select the Upload button.
Select the file or files to upload.
Expand the Advanced section, and set the Access tier to Archive.
Select the Upload button.

Archive an existing blob
You can move an existing blob to the archive tier in one of two ways:
You can change a blob's tier with the Set Blob Tier operation. Set Blob Tier moves a single blob from one tier to another.
Keep in mind that when you move a blob to the archive tier with Set Blob Tier, then you can't read or modify the blob's data until you rehydrate the blob. If you may need to read or modify the blob's data before the early deletion interval has elapsed, then consider using a Copy Blob operation to create a copy of the blob in the archive tier.
You can copy a blob in an online tier to the archive tier with the Copy Blob operation. You can call the Copy Blob operation to copy a blob from an online tier (hot or cool) to the archive tier. The source blob remains in the online tier, and you can continue to read or modify its data in the online tier.
Archive an existing blob by changing its tier
Use the Set Blob Tier operation to move a blob from the Hot or cool tier to the archive tier. The Set Blob Tier operation is best for scenarios where you won't need to access the archived data before the early deletion interval has elapsed.
The Set Blob Tier operation changes the tier of a single blob. To move a set of blobs to the archive tier with optimum performance, Azure recommends performing a bulk archive operation. The bulk archive operation sends a batch of Set Blob Tier calls to the service in a single transaction. For more information, see Bulk archive.
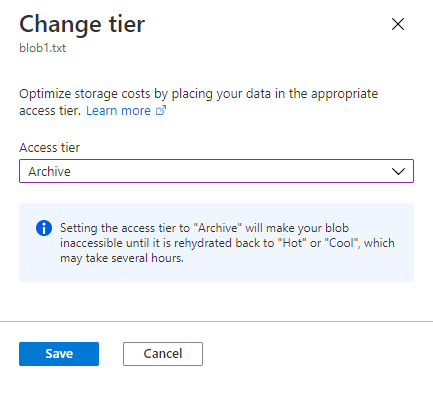
To move an existing blob to the archive tier in the Azure portal, follow these steps:
Navigate to the blob's container.
Select the blob to archive.
Select the Change tier button.
Select Archive from the Access tier dropdown.
Select Save.

Archive an existing blob with a copy operation
Use the Copy Blob operation to copy a blob from the hot or cool tier to the archive tier. The source blob remains in the hot or cool tier, while the destination blob is created in the archive tier.
A Copy Blob operation is best for scenarios where you may need to read or modify the archived data before the early deletion interval has elapsed. You can access the source blob's data without needing to rehydrate the archived blob.
Bulk archive
To move blobs to the archive tier in a container or a folder, enumerate blobs and call the Set Blob Tier operation on each one. The following example shows how to perform this operation:
When moving a large number of blobs to the archive tier, use a batch operation for optimal performance. A batch operation sends multiple API calls to the service with a single request. The suboperations supported by the Blob Batch operation include Delete Blob and Set Blob Tier.
To archive blobs with a batch operation, use one of the Azure Storage client libraries. The following code example shows how to perform a basic batch operation with the .NET client library:
static async Task BulkArchiveContainerContents(string accountName, string containerName)
{
    string containerUri = string.Format("https://{0}.blob.core.chinacloudapi.cn/{1}",
                                    accountName,
                                    containerName);

    // Get container client, using Azure AD credentials.
    BlobUriBuilder containerUriBuilder = new BlobUriBuilder(new Uri(containerUri));
    BlobContainerClient blobContainerClient = new BlobContainerClient(containerUriBuilder.ToUri(),
                                                                      new DefaultAzureCredential());

    // Get URIs for blobs in this container and add to stack.
    var uris = new Stack<Uri>();
    await foreach (var item in blobContainerClient.GetBlobsAsync())
    {
        uris.Push(blobContainerClient.GetBlobClient(item.Name).Uri);
    }

    // Get the blob batch client.
    BlobBatchClient blobBatchClient = blobContainerClient.GetBlobBatchClient();

    try
    {
        // Perform the bulk operation to archive blobs.
        await blobBatchClient.SetBlobsAccessTierAsync(blobUris: uris, accessTier: AccessTier.Archive);
    }
    catch (RequestFailedException e)
    {
        Console.WriteLine(e.Message);
    }
}
For an in-depth sample application that shows how to change tiers with a batch operation, see AzBulkSetBlobTier.
Use lifecycle management policies to archive blobs
You can optimize costs for blob data that is rarely accessed by creating lifecycle management policies that automatically move blobs to the archive tier when they haven't been accessed or modified for a specified period of time. After you configure a lifecycle management policy, Azure Storage runs it once per day. For more information about lifecycle management policies, see Optimize costs by automatically managing the data lifecycle.
You can use the Azure portal, PowerShell, Azure CLI, or an Azure Resource Manager template to create a lifecycle management policy. For simplicity, this section shows how to create a lifecycle management policy in the Azure portal only. For more examples showing how to create lifecycle management policies, see Configure a lifecycle management policy.
Caution
Before you use a lifecycle management policy to move data to the archive tier, verify that that data does not need to be deleted or moved to another tier for at least 180 days. Data that is deleted or moved to a different tier before the 180 day period has elapsed is subject to an early deletion fee.
Also keep in mind that data in the archive tier must be rehydrated before it can be read or modified. Rehydrating a blob from the archive tier can take several hours and has associated costs.
To create a lifecycle management policy to archive blobs in the Azure portal, follow these steps:
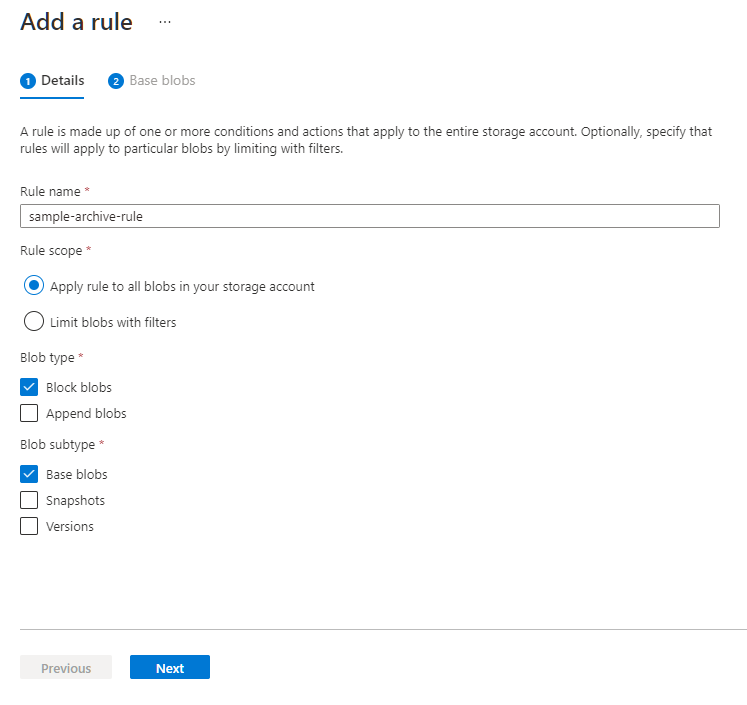
Step 1: Create the rule and specify the blob type
Navigate to your storage account in the portal.
Under Data management, locate the Lifecycle management settings.
Select the Add a rule button.
On the Details tab, specify a name for your rule.
Specify the rule scope: either Apply rule to all blobs in your storage account, or Limit blobs with filters.
Select the types of blobs for which the rule is to be applied, and specify whether to include blob snapshots or versions.

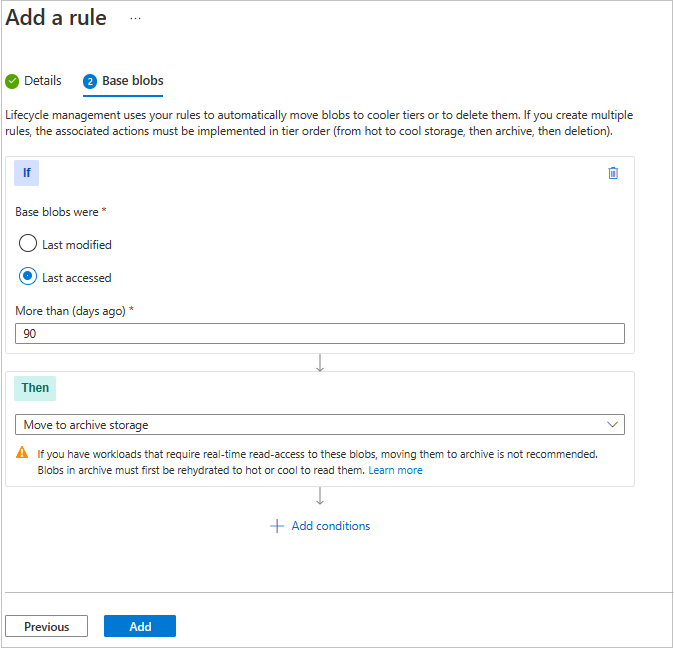
Step 2: Add rule conditions
Depending on your selections, you can configure rules for base blobs (current versions), previous versions, or blob snapshots. Specify one of two conditions to check for:
- Objects were last modified some number of days ago.
- Objects were created some number of days ago.
- Objects were last accessed some number of days ago.
Only one of these conditions can be applied to move a particular type of object to the archive tier per rule. For example, if you define an action that archives base blobs if they haven't been modified for 90 days, then you can't also define an action that archives base blobs if they haven't been accessed for 90 days. Similarly, you can define one action per rule with either of these conditions to archive previous versions, and one to archive snapshots.
Next, specify the number of days to elapse after the object is modified or accessed.
Specify that the object is to be moved to the archive tier after the interval has elapsed.

If you chose to limit the blobs affected by the rule with filters, you can specify a filter, either with a blob prefix or blob index match.
Select the Add button to add the rule to the policy.
View the policy JSON
After you create the lifecycle management policy, you can view the JSON for the policy on the Lifecycle management page by switching from List view to Code view.
Here's the JSON for the simple lifecycle management policy created in the images shown above:
{
  "rules": [
    {
      "enabled": true,
      "name": "sample-archive-rule",
      "type": "Lifecycle",
      "definition": {
        "actions": {
          "baseBlob": {
            "tierToArchive": {
              "daysAfterLastAccessTimeGreaterThan": 90
            }
          }
        },
        "filters": {
          "blobTypes": [
            "blockBlob"
          ]
        }
      }
    }
  ]
}