Blob index tags categorize data in your storage account using key-value tag attributes. These tags are automatically indexed and exposed as a searchable multi-dimensional index to easily find data. This article shows you how to set, get, and find data using blob index tags.
To learn more about this feature along with known issues and limitations, see Manage and find Azure Blob data with blob index tags.
This task can be performed by a Storage Blob Data Owner or a security principal that has been given permission to the Microsoft.Storage/storageAccounts/blobServices/containers/blobs/tags/write Azure resource provider operation via a custom Azure role.
In the Azure portal, select your storage account.
Navigate to the Containers option under Data storage, and select your container.
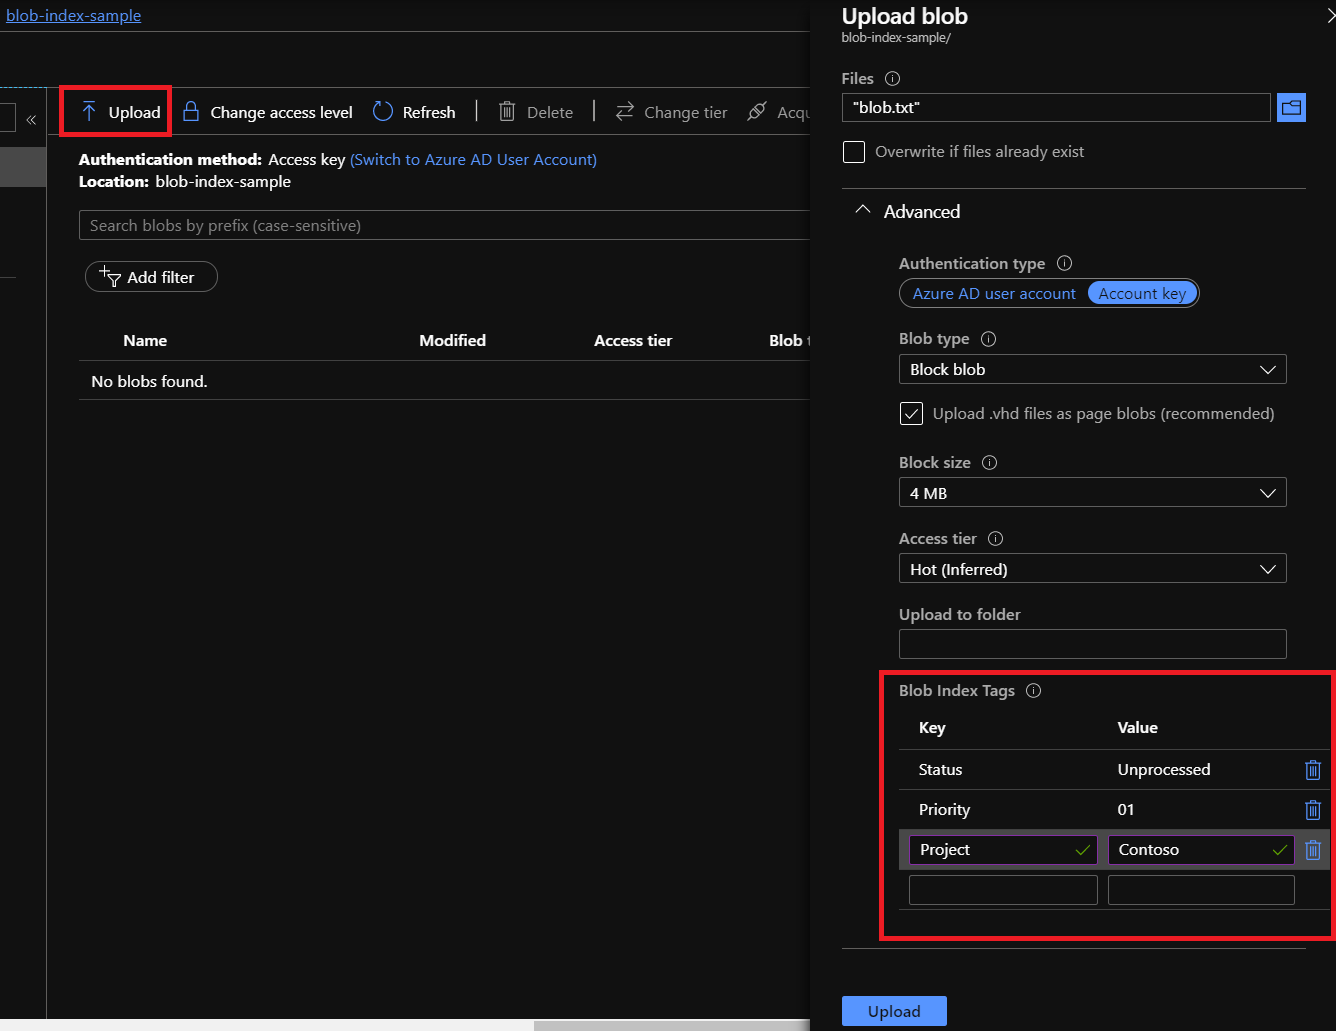
Select the Upload button and browse your local file system to find a file to upload as a block blob.
Expand the Advanced dropdown and go to the Blob Index Tags section.
Input the key/value blob index tags that you want applied to your data.
Select the Upload button to upload the blob.
Sign in to your Azure subscription with the Connect-AzAccount command and follow the on-screen directions.
Connect-AzAccount -Environment AzureChinaCloud
If your identity is associated with more than one subscription, then set your active subscription. Then, get the storage account context.
$context = Get-AzSubscription -SubscriptionId <subscription-id>
Set-AzContext $context
$storageAccount = Get-AzStorageAccount -ResourceGroupName "<resource-group-name>" -AccountName "<storage-account-name>"
$ctx = $storageAccount.Context
Upload a blob by using the Set-AzStorageBlobContent command. Set tags by using the -Tag parameter.
$containerName = "myContainer"
$file = "C:\demo-file.txt"

Set-AzStorageBlobContent -File $file -Container $containerName -Context $ctx -Tag @{"tag1" = "value1"; "tag2" = "value2" }
Installed the Azure CLI locally, open a command console application such as Windows PowerShell.
Install the storage-preview extension.
az extension add -n storage-preview
If you're using Azure CLI locally, run the login command.
az login
If your identity is associated with more than one subscription, then set your active subscription to subscription of the storage account.
az account set --subscription <subscription-id>
Replace the <subscription-id> placeholder value with the ID of your subscription.
Upload a blob by using the az storage blob upload command. Set tags by using the --tags parameter.
az storage blob upload --account-name mystorageaccount --container-name myContainer --name demo-file.txt --file C:\demo-file.txt --tags tag1=value1 tag2=value2 --auth-mode login
Getting blob index tags can be performed by a Storage Blob Data Owner or a security principal that has been given permission to the Microsoft.Storage/storageAccounts/blobServices/containers/blobs/tags/read Azure resource provider operation via a custom Azure role.
Setting and updating blob index tags can be performed by a Storage Blob Data Owner or a security principal that has been given permission to the Microsoft.Storage/storageAccounts/blobServices/containers/blobs/tags/write Azure resource provider operation via a custom Azure role.
In the Azure portal, select your storage account.
Navigate to the Containers option under Data storage, select your container.
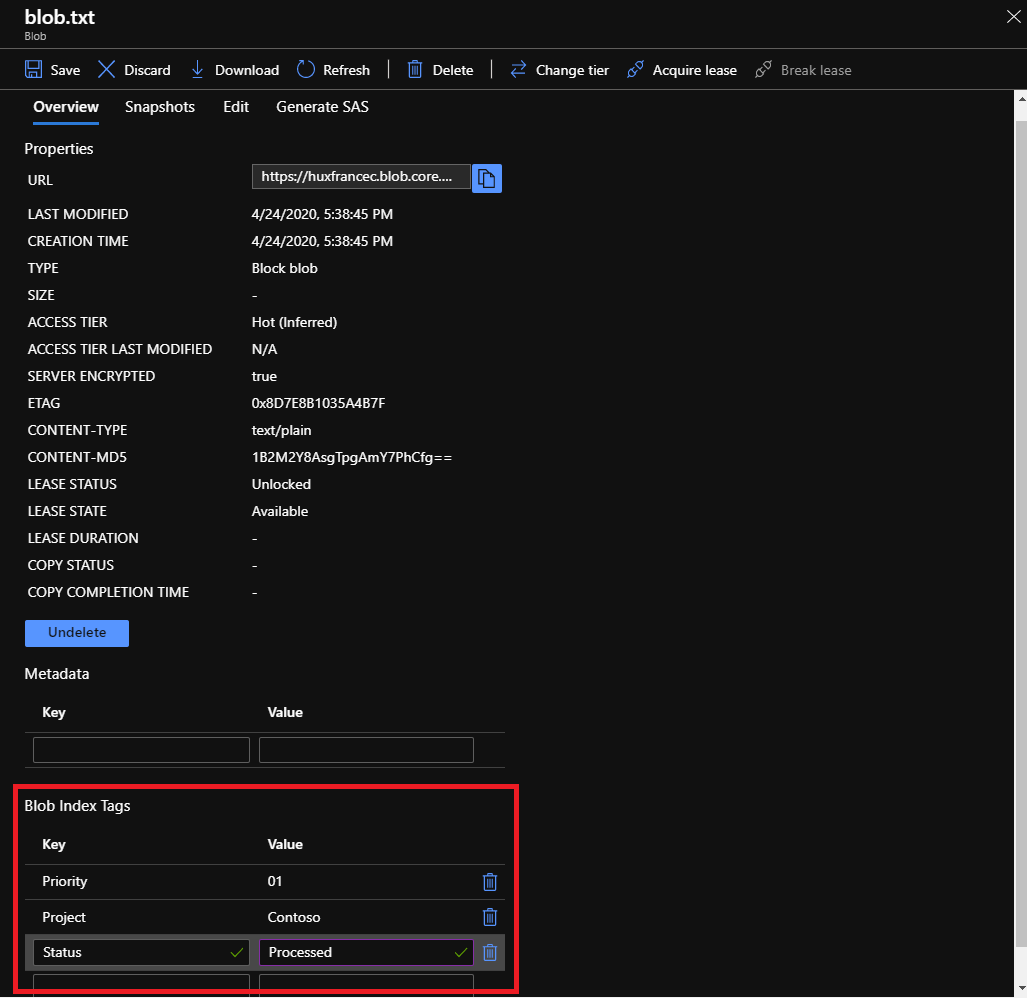
Select your blob from the list of blobs within the selected container.
The blob overview tab will display your blob's properties including any Blob Index Tags.
You can get, set, modify, or delete any of the key/value index tags for your blob.
Select the Save button to confirm any updates to your blob.
Sign in to your Azure subscription with the Connect-AzAccount command and follow the on-screen directions.
Connect-AzAccount -Environment AzureChinaCloud
If your identity is associated with more than one subscription, then set your active subscription. Then, get the storage account context.
$context = Get-AzSubscription -SubscriptionId <subscription-id>
Set-AzContext $context
$storageAccount = Get-AzStorageAccount -ResourceGroupName "<resource-group-name>" -AccountName "<storage-account-name>"
$ctx = $storageAccount.Context
To get the tags of a blob, use the Get-AzStorageBlobTag command and set the -Blob parameter to the name of the blob.
$containerName = "myContainer"
$blobName = "myBlob"
Get-AzStorageBlobTag -Context $ctx -Container $containerName -Blob $blobName
To set the tags of a blob, use the Set-AzStorageBlobTag command. Set the -Blob parameter to the name of the blob, and set the -Tag parameter to a collection of name and value pairs.
$containerName = "myContainer"
$blobName = "myBlob"
$tags = @{"tag1" = "value1"; "tag2" = "value2" }
Set-AzStorageBlobTag -Context $ctx -Container $containerName -Blob $blobName -Tag $tags
Installed the Azure CLI locally, open a command console application such as Windows PowerShell.
Install the storage-preview extension.
az extension add -n storage-preview
If you're using Azure CLI locally, run the login command.
az login
If your identity is associated with more than one subscription, then set your active subscription to subscription of the storage account.
az account set --subscription <subscription-id>
Replace the <subscription-id> placeholder value with the ID of your subscription.
To get the tags of a blob, use the az storage blob tag list command and set the --name parameter to the name of the blob.
az storage blob tag list --account-name mystorageaccount --container-name myContainer --name demo-file.txt --auth-mode login
To set the tags of a blob, use the az storage blob tag set command. Set the --name parameter to the name of the blob, and set the --tags parameter to a collection of name and value pairs.
az storage blob tag set --account-name mystorageaccount --container-name myContainer --name demo-file.txt --tags tag1=value1 tag2=value2 --auth-mode login
This task can be performed by a Storage Blob Data Owner or a security principal that has been given permission to the Microsoft.Storage/storageAccounts/blobServices/containers/blobs/filter/action Azure resource provider operation via a custom Azure role.
Note
You can't use index tags to retrieve previous versions. Tags for previous versions aren't passed to the blob index engine. For more information, see Conditions and known issues.
Within the Azure portal, the blob index tags filter automatically applies the @container parameter to scope your selected container. If you wish to filter and find tagged data across your entire storage account, use our REST API, SDKs, or tools.
In the Azure portal, select your storage account.
Navigate to the Containers option under Data storage, select your container.
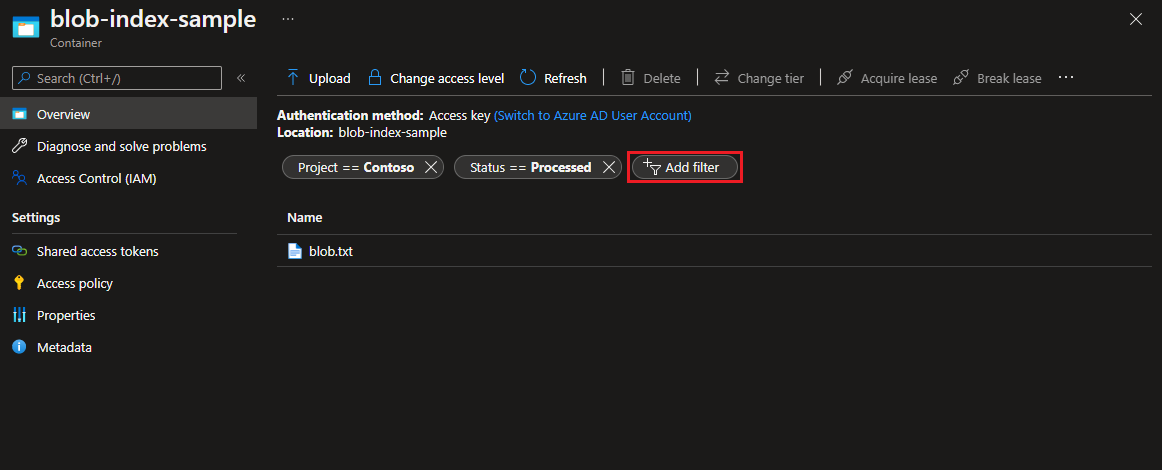
Select the Add filter button to filter within the selected container.
Enter a blob index tag key and tag value.
Select the Add filter button to add additional tag filters (up to 10).
Sign in to your Azure subscription with the Connect-AzAccount command and follow the on-screen directions.
Connect-AzAccount -Environment AzureChinaCloud
If your identity is associated with more than one subscription, then set your active subscription. Then, get the storage account context.
$context = Get-AzSubscription -SubscriptionId <subscription-id>
Set-AzContext $context
$storageAccount = Get-AzStorageAccount -ResourceGroupName "<resource-group-name>" -AccountName "<storage-account-name>"
$ctx = $storageAccount.Context
To find all blobs that match a specific blob tag, use the Get-AzStorageBlobByTag command.
$filterExpression = """tag1""='value1'"
Get-AzStorageBlobByTag -TagFilterSqlExpression $filterExpression -Context $ctx
To find blobs only in a specific container, include the container name in the -TagFilterSqlExpression.
$filterExpression = "@container='myContainer' AND ""tag1""='value1'"
Get-AzStorageBlobByTag -TagFilterSqlExpression $filterExpression -Context $ctx
Installed the Azure CLI locally, open a command console application such as Windows PowerShell.
Install the storage-preview extension.
az extension add -n storage-preview
If you're using Azure CLI locally, run the login command.
az login
If your identity is associated with more than one subscription, then set your active subscription to subscription of the storage account.
az account set --subscription <subscription-id>
Replace the <subscription-id> placeholder value with the ID of your subscription.
To find all blobs that match a specific blob tag, use the az storage blob filter command.
az storage blob filter --account-name mystorageaccount --tag-filter """tag1""='value1' and ""tag2""='value2'" --auth-mode login
To find blobs only in a specific container, include the container name in the --tag-filter parameter.
az storage blob filter --account-name mystorageaccount --tag-filter """@container""='myContainer' and ""tag1""='value1' and ""tag2""='value2'" --auth-mode login
Next steps