Note
Access to this page requires authorization. You can try signing in or changing directories.
Access to this page requires authorization. You can try changing directories.
Azure Storage Analytics provides logs for blobs, queues, and tables. You can use the Azure portal to configure logs are recorded for your account. This article shows you how to enable and manage logs. To learn how to enable metrics, see Transition to metrics in Azure Monitor. There are costs associated with examining and storing monitoring data in the Azure portal. For more information, see Storage Analytics.
Note
We recommend that you use Azure Storage logs in Azure Monitor instead of Storage Analytics logs. See any of the following articles:
Enable logs
You can instruct Azure Storage to save diagnostics logs for read, write, and delete requests for the blob, table, and queue services. The data retention policy you set also applies to these logs.
Note
Azure Files currently supports Storage Analytics metrics, but does not support Storage Analytics logging.
In the Azure portal, select Storage accounts, then the name of the storage account to open the storage account blade.
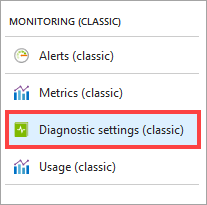
Select Diagnostic settings (classic) in the Monitoring (classic) section of the menu blade.

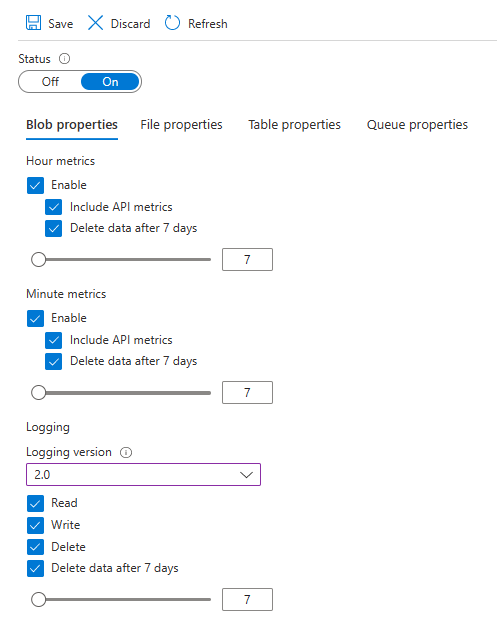
Ensure Status is set to On, and select the services for which you'd like to enable logging.

To retain logs, ensure that the Delete data check box is selected. Then, set the number of days that you would like log data to be retained by moving the slider control beneath the check box, or by directly modifying the value that appears in the text box next to the slider control. The default for new storage accounts is seven days. If you do not want to set a retention policy, leave the Delete data checkbox unchecked. If there is no retention policy, it is up to you to delete the log data.
Warning
Logs are stored as data in your account. Log data can accumulate in your account over time which can increase the cost of storage. If you need log data for only a small period of time, you can reduce your costs by modifying the data retention policy. Stale log data (data older than your retention policy) is deleted by the system. We recommend setting a retention policy based on how long you want to retain the log data for your account. See Billing on storage metrics for more information.
Click Save.
The diagnostics logs are saved in a blob container named $logs in your storage account. You can view the log data using a storage explorer like the Microsoft Azure Storage Explorer, or programmatically using the storage client library or PowerShell.
For information about accessing the $logs container, see Storage analytics logging.
Note
For classic storage accounts, the $logs container appears only in Azure Storage Explorer. The $logs container isn't visible from storage browser or the container view that is available in the Azure portal.
Modify log data retention period
Log data can accumulate in your account over time which can increase the cost of storage. If you need log data for only a small period of time, you can reduce your costs by modifying the log data retention period. For example, if you need logs for only three days, set your log data retention period to a value of 3. That way logs will be automatically deleted from your account after 3 days. This section shows you how to view your current log data retention period, and then update that period if that's what you want to do.
Note
The logging version for Azure Storage Analytics (classic) is set automatically by Azure and isn't configurable. In the Azure portal, the default value might appear as Logging Version = 2.0.
In the Azure portal, select Storage accounts, then the name of the storage account to open the storage account blade.
Select Diagnostic settings (classic) in the Monitoring (classic) section of the menu blade.

Ensure that the Delete data check box is selected. Then, set the number of days that you would like log data to be retained by moving the slider control beneath the check box, or by directly modifying the value that appears in the text box next to the slider control.

The default number of days for new storage accounts is seven days. If you do not want to set a retention policy, leave the Delete data checkbox unchecked. If there is no retention policy, it is up to you to delete the monitoring data.
Click Save.
The diagnostics logs are saved in a blob container named $logs in your storage account. You can view the log data using a storage explorer like the Microsoft Azure Storage Explorer, or programmatically using the storage client library or PowerShell.
For information about accessing the $logs container, see Storage analytics logging.
Verify that log data is being deleted
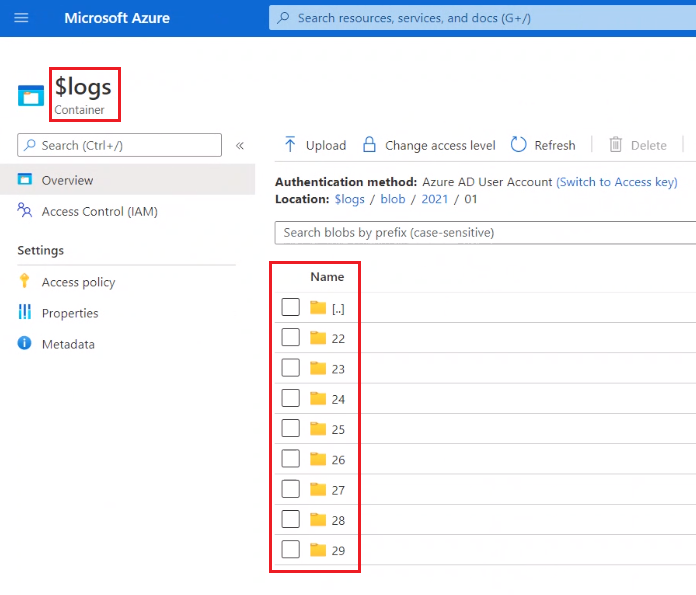
You can verify that logs are being deleted by viewing the contents of the $logs container of your storage account. The following image shows the contents of a folder in the $logs container. The folder corresponds to January 2021 and each folder contains logs for one day. If the day today was January 29th 2021, and your retention policy is set to only one day, then this folder should contain logs for only one day.

View log data
To view and analyze your log data, you should download the blobs that contain the log data you are interested in to a local machine. Many storage-browsing tools enable you to download blobs from your storage account; you can also use the Azure Storage team provided command-line Azure Copy Tool AzCopy to download your log data.
Note
The $logs container isn't integrated with Event Grid, so you won't receive notifications when log files are written.
To make sure you download the log data you are interested in and to avoid downloading the same log data more than once:
Use the date and time naming convention for blobs containing log data to track which blobs you have already downloaded for analysis to avoid re-downloading the same data more than once.
Use the metadata on the blobs containing log data to identify the specific period for which the blob holds log data to identify the exact blob you need to download.
To get started with AzCopy, see Get started with AzCopy
The following example shows how you can download the log data for the queue service for the hours starting at 09 AM, 10 AM, and 11 AM on 20th May, 2014.
azcopy copy 'https://mystorageaccount.blob.core.chinacloudapi.cn/$logs/queue' 'C:\Logs\Storage' --include-path '2014/05/20/09;2014/05/20/10;2014/05/20/11' --recursive
To learn more about how to download specific files, see Download blobs from Azure Blob storage by using AzCopy v10.
When you have downloaded your log data, you can view the log entries in the files. These log files use a delimited text format that many log reading tools are able to parse (for more information, see the guide Monitoring, Diagnosing, and Troubleshooting Azure Storage). Different tools have different facilities for formatting, filtering, sorting, ad searching the contents of your log files. For more information about the Storage Logging log file format and content, see Storage Analytics Log Format and Storage Analytics Logged Operations and Status Messages.
Next steps
- To learn more about Storage Analytics, see Storage Analytics for Storage Analytics.
- For more information about using a .NET language to configure Storage Logging, see Storage Client Library Reference.
- For general information about configuring Storage Logging using the REST API, see Enabling and Configuring Storage Analytics.
- Learn more about the format of Storage Analytics logs. See Storage Analytics Log Format.
