Note
Access to this page requires authorization. You can try signing in or changing directories.
Access to this page requires authorization. You can try changing directories.
Applies to: ✔️ SMB file shares
This article explains how you can use managed identities to allow Windows and Linux virtual machines (VMs) to access SMB Azure file shares by using identity-based authentication with Microsoft Entra ID.
A managed identity is an identity in Microsoft Entra ID that Azure automatically manages. Typically, you use managed identities when developing cloud applications to manage the credentials for authenticating to Azure services. Azure Files now supports both application managed identities and end-user identity-based access on the same storage account. Applications and users are independently authenticated via Microsoft Entra ID and authorized through a shared permissions model.
By the end of this guide, you create a storage account that's ready to access with a managed identity. You also learn how to create a managed identity for a VM and generate an OAuth token for it. Then you mount a file share by using managed identity-based authentication and authorization. Using a managed identity eliminates the need to use a storage account key.
Why authenticate by using a managed identity?
For security reasons, we don't recommend that you use storage account keys to access a file share. When you assign a managed identity to a VM or use an application identity, you can use that identity to authenticate to Azure Files.
Benefits include:
Enhanced security: No dependency on storage account keys to manage or expose.
Simplified management: No key rotation required.
Fine-grained access control: Role-based access at the identity level.
Automation friendly: Easy to integrate with continuous integration and continuous delivery (CI/CD) pipelines, Azure Kubernetes Service (AKS) workloads, and customer applications.
Cost effective: No extra storage cost for managed identities.
System-assigned and user-assigned managed identities
Azure provides two types of managed identities: system assigned and user assigned.
A system-assigned managed identity is restricted to one per resource and is tied to the life cycle of a resource. You can grant permissions to the managed identity by using Azure role-based access control (Azure RBAC). The managed identity is authenticated with Microsoft Entra ID, so you don't have to store any credentials in code.
User-assigned managed identities enable Azure resources to authenticate to cloud services without storing credentials in code. You create this type of managed identity as a standalone Azure resource with its own life cycle. A single resource, like a VM, can use multiple user-assigned managed identities. Also, multiple VMs can share a single user-assigned managed identity.
Although you can configure both user-assigned and system-assigned managed identities on a single VM, we recommend using one or the other.
Prerequisites
This article assumes that you have an Azure subscription with permissions to create storage accounts and assign Azure RBAC roles. To assign roles, you need role-assignment write permission (Microsoft.Authorization/roleAssignments/write) at the required scope.
The clients that need to authenticate by using a managed identity shouldn't be joined to any domain.
Configure the managed identity's access property on your storage account
To authenticate a managed identity, you must enable the SMBOAuth property on the storage account that contains the Azure file share you want to access. We recommend creating a new storage account for this purpose, although you can use an existing storage account.
To enable the SMBOAuth property on your storage account by using Azure PowerShell, first prepare your PowerShell environment.
Open PowerShell as an administrator and run the following command to set the PowerShell execution policy:
Set-ExecutionPolicy Unrestricted -Scope CurrentUser
Make sure you have the latest PowerShellGet module:
Install-Module PowerShellGet -Force -AllowClobber
Install the Az module if it isn't already installed:
Install-Module -Name Az -Repository PSGallery -Force
Import-Module Az
Sign in to Azure:
Connect-AzAccount -Environment AzureChinaCloud
Select your subscription by specifying your subscription ID (recommended):
Set-AzContext -SubscriptionId "<subscription-ID>"
You can also select your subscription by specifying your subscription name:
Set-AzContext -Subscription "<subscription-name>"
Create the storage account
To create a new storage account with SMBOAuth enabled, run the following PowerShell command as an administrator. Replace <resource-group>, <storage-account-name>, and <region> with your values. You can specify a different SkuName value if needed.
New-AzStorageAccount -ResourceGroupName <resource-group> -Name <storage-account-name> -SkuName Standard_LRS -Location <region> -EnableSmbOAuth $true
To enable SMBOAuth on an existing storage account, run the following PowerShell command. Replace <resource-group> and <storage-account-name> with your values.
Set-AzStorageAccount -ResourceGroupName <resource-group> -Name <storage-account-name> -EnableSmbOAuth $true
If errors say that the policy disallows the resource, you might have a policy set on your subscription that disallows Set-AzStorageAccount. To work around this problem, retry by using the following command:
Set-AzStorageAccount -ResourceGroupName <resource-group> -Name <storage-account-name> -EnableSmbOAuth $true -AllowBlobPublicAccess $false
Next, create an SMB file share on the storage account. Replace <resource-group>, <storage-account-name>, and <file-share-name> with your values.
$storageAccount = Get-AzStorageAccount -ResourceGroupName <resource-group> -Name <storage-account-name>
New-AzStorageShare -Name <file-share-name> -Context $storageAccount.Context
You now have a storage account and file share ready for SMB OAuth authentication. Verify in the Azure portal that your storage account and file share were created.
Configure a managed identity
You can use managed identities with Windows or Linux. Select your operating system at the beginning of this article and follow the instructions.
The enablement steps described here are for Azure VMs. If you want to enable a managed identity on non-Azure Windows machines (on-premises or other cloud), you must onboard them to Azure Arc and assign a managed identity. You can also authenticate by using an application identity instead of using a managed identity on a VM or Windows device.
Enable a managed identity on an Azure VM
The managed identity can be either system assigned or user assigned. If the VM has both system-assigned and user-assigned managed identities, Azure defaults to system assigned. Assign only one for best results.
Enable a system-assigned managed identity
Follow these steps to enable a system-assigned managed identity on a Windows VM running in Azure:
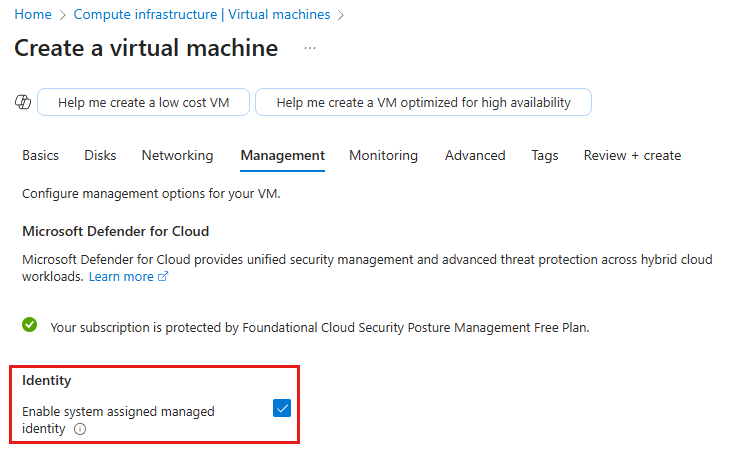
Sign in to the Azure portal and create a Windows VM. Your VM must run Windows Server 2019 or later for server versions, or any Windows client version. See Create a Windows virtual machine in the Azure portal.
You can enable a system-assigned managed identity during VM creation on the Management tab.
Enable a user-assigned managed identity
Sign in to the Azure portal and follow the steps to create a user-assigned managed identity.
Go to the user-assigned managed identity that you just created and copy the Client ID value. You need this value later.
Assign a built-in RBAC role to the managed identity or application identity
After you enable a managed identity, grant all necessary permissions through Azure RBAC. To assign roles, sign in as a user with role-assignment write permission at the required scope.
Follow these steps to assign the built-in Azure RBAC role Storage File Data SMB MI Admin. This role gives admin-level access for managed identities on files and directories in Azure Files.
Go to the storage account that contains the file share you want to mount by using a managed identity. On the service menu, select Access Control (IAM).
Under Grant access to this resource, select Add role assignment.
On the Role tab, under Job function roles, search for and select Storage File Data SMB MI Admin. Then select Next.
On the Members tab, under Assign access to, select Managed identity for VM or Azure Arc identities. For application identities, select User, group, or service principal.
Under Members, select + Select members.
For Azure VMs or Azure Arc identities, select the managed identity for your VM or Windows device. For application identities, search for and select the application identity. Choose Select.
Verify that the managed identity or application identity is listed under Members. Select Next.
Select Review + assign to add the role assignment to the storage account.
Add a user-assigned managed identity to a VM
If you created a user-assigned managed identity, follow these steps to add it to your VM:
Go to your VM. On the service menu, under Security, select Identity.
Select the User assigned tab, and then select Add user assigned managed identity. Select the managed identity that you created, and then select Add.
To configure a managed identity on a Linux VM running in Azure, follow these steps. Your VM must be running Azure Linux 3.0, Ubuntu 22.04, Ubuntu 24.04, RHEL 9.6+, or SLES 15 SP6+.
Enable a managed identity on an Azure VM
The managed identity can be either system assigned or user assigned. If the VM has both system-assigned and user-assigned managed identities, Azure defaults to system assigned. Assign only one for best results.
Enable a system-assigned managed identity
Sign in to the Azure portal.
You can enable a system assigned managed identity during VM creation on the Management tab. See Create a Linux virtual machine in the Azure portal.
Enable a user-assigned managed identity
Sign in to the Azure portal and follow the steps to create a user-assigned managed identity.
Go to the user-assigned managed identity that you just created and copy the Client ID value. You need this value later.
Assign a built-in RBAC role to the managed identity
Go to the storage account that contains the file share you want to mount by using a managed identity. On the service menu, select Access Control (IAM).
Under Grant access to this resource, select Add role assignment.
On the Role tab, under Job function roles, search for and select Storage File Data SMB MI Admin. Then select Next.
On the Members tab, under Assign access to, select Managed identity.
Under Members, select + Select members. The Select managed identities pane appears.
Under Managed identity, select the managed identity, and then choose Select.
Verify that the managed identity is listed under Members. Select Next.
Select Review + assign to add the role assignment to the storage account.
Add a user-assigned managed identity to a VM
If you created a user-assigned managed identity, follow these steps to add it to your VM:
Go to your VM. On the service menu, under Security, select Identity.
Select the User assigned tab, and then select Add user assigned managed identity. Select the managed identity that you created, and then select Add.
Prepare your client to authenticate by using a managed identity
The steps for preparing your system to mount the file share by using managed identity authentication are different for Windows and Linux clients. Clients shouldn't be domain joined.
To prepare your client VM or Windows device to authenticate by using a managed identity, follow these steps:
Sign in to your VM or device that has the managed identity assigned and open a PowerShell window as administrator. You need either PowerShell 5.1+ or PowerShell 7+.
Install the Azure Files SMB Managed Identity Client PowerShell module and import it:
Install-Module AzFilesSmbMIClient
Import-Module AzFilesSmbMIClient
Check your current PowerShell execution policy by running the following command:
Get-ExecutionPolicy -ListIf the execution policy on
CurrentUserisRestrictedorUndefined, change it toRemoteSigned. If the execution policy isRemoteSigned,Default,AllSigned,Bypass, orUnrestricted, you can skip this step.Set-ExecutionPolicy -ExecutionPolicy RemoteSigned -Scope CurrentUser
Refresh the authentication credentials
Before you can mount the file share by using the managed identity, refresh the authentication credentials and specify your storage account endpoint. To copy your storage account URI, go to the storage account in the Azure portal and then select Settings > Endpoints from the service menu. Be sure to copy the entire URI, including the trailing slash: https://<storage-account-name>.file.core.chinacloudapi.cn/.
For a system-assigned managed identity, run the following command to get an OAuth token, insert it in the Kerberos cache, and automatically refresh when the token is close to expiration. You can optionally omit refresh.
AzFilesSmbMIClient.exe refresh --uri https://<storage-account-name>.file.core.chinacloudapi.cn/
For a user-assigned managed identity, you need to specify the client ID. Replace <client-id> with the client ID of the managed identity.
AzFilesSmbMIClient.exe refresh --uri https://<storage-account-name>.file.core.chinacloudapi.cn/ --clientId <client-id>
Tip
To view complete usage information and examples, run the executable file without any parameters: AzFilesSmbMIClient.exe.
To prepare your Linux VM to authenticate by using a managed identity, follow these steps.
Download and install the authentication packages
The package location and installation steps differ depending on your Linux distribution.
Azure Linux 3.0
Run the following commands to install azfilesauth on Azure Linux 3.0:
tdnf update
tdnf install azfilesauth
RHEL 9.6+
Run the following commands to install azfilesauth on RHEL 9.6+:
curl -sSL -O https://packages.microsoft.com/config/$(source /etc/os-release && echo "$ID/${VERSION_ID%%.*}")/packages-microsoft-prod.rpm
sudo rpm -i packages-microsoft-prod.rpm
rm packages-microsoft-prod.rpm
dnf update
dnf install -y azfilesauth
Sometimes RHEL can block kernel upcall access to the credential cache file. If a failure occurs, see /var/log/messages for potential causes.
RHEL uses a persistent credential or KCM cache by default. You can switch to a file-based cache for azfilesauth:
  sudo tee /etc/krb5.conf.d/00-azfilesauth.conf > /dev/null <<EOF
  [libdefaults]
    default_ccache_name = FILE:/tmp/krb5cc_%{uid}
  EOF
SLES 15 SP6+
Run the following commands to install azfilesauth on SLES 15 SP6+:
curl -sSL -O https://packages.microsoft.com/config/sles/15/packages-microsoft-prod.rpm
sudo rpm -i packages-microsoft-prod.rpm
rm packages-microsoft-prod.rpm
sudo zypper refresh
sudo zypper install -y azfilesauth
SLES 15 SP6+ uses a persistent credential or KCM cache by default. You can switch to a file-based cache for azfilesauth:
  sudo tee /etc/krb5.conf.d/00-azfilesauth.conf > /dev/null <<EOF
  [libdefaults]
    default_ccache_name = FILE:/tmp/krb5cc_%{uid}
  EOF
Ubuntu 22.04
Run the following commands to install azfilesauth on Ubuntu 22.04:
curl -sSL -O https://packages.microsoft.com/config/ubuntu/22.04/packages-microsoft-prod.deb
sudo dpkg -i packages-microsoft-prod.deb
rm packages-microsoft-prod.deb
# the above steps update the sources.list
sudo apt-get update
sudo apt-get install -y azfilesauth
Ubuntu 24.04
Run the following commands to install azfilesauth on Ubuntu 24.04:
curl -sSL -O https://packages.microsoft.com/config/ubuntu/24.04/packages-microsoft-prod.deb
sudo dpkg -i packages-microsoft-prod.deb
rm packages-microsoft-prod.deb
# the above steps update the sources.list
sudo apt-get update
sudo apt-get install -y azfilesauth
Configure authentication
You have two options for configuring authentication on Linux:
- Use a VM managed identity: Select this option if your VM has a managed identity assigned.
- Supply the OAuth token directly: Select this option if you're managing OAuth tokens yourself.
Option 1: Use a VM managed identity
You can use a system-assigned or user-assigned managed identity to configure authentication.
If your VM has a user-assigned managed identity, run the following command to get a token from the Azure Instance Metadata Service (IMDS) and store it automatically. Replace <storage-account-name> with your storage account name. Replace <client-id> with the client ID of your managed identity. If you don't have the client ID, go to the managed identity in the Azure portal and copy the client ID.
sudo azfilesauthmanager set https://<storage-account-name>.file.core.chinacloudapi.cn --imds-client-id <client-id>
If your VM has a system-assigned managed identity, use the --system flag and don't supply a client ID:
sudo azfilesauthmanager set https://<storage-account-name>.file.core.chinacloudapi.cn --system
Verify that the ticket was created properly:
sudo azfilesauthmanager list
Option 2: Supply the OAuth token directly
If you're managing tokens yourself, supply the OAuth token directly. The aud (audience) value for the token must be https://storage.azure.com (no trailing forward slash) and not https://storage.azure.com/ to mount the file share.
Run the following commands. Replace <storage-account-name> and <access-token> with your values.
# Insert the token into your credential cache
sudo azfilesauthmanager set https://<storage-account-name>.file.core.chinacloudapi.cn <access-token>
# Verify the ticket is properly stored
sudo azfilesauthmanager list
Mount the file share
You can now mount the file share on Windows or Linux without using a storage account key.
On Windows clients, you can directly access your Azure file share by using the UNC path by entering the following path into Windows File Explorer. Replace <storage-account-name> with your storage account name and <file-share-name> with your file share name.
\\<storage-account-name>.file.core.chinacloudapi.cn\<file-share-name>
For more information, see Mount SMB Azure file share on Windows.
Run the following command to mount the file share with the recommended mount options. Replace <storage-account-name> with your storage account name and <file-share-name> with your file share name. You can find your credential ID in the following configuration file: cat /etc/azfilesauth/config.yaml. For a user-assigned managed identity, include the client ID of the managed identity by using the username=<client-id> mount option. For a system-assigned managed identity, omit the mount option username=<client-id>.
sudo mount -t cifs //<storage-account-name>.file.core.chinacloudapi.cn/<file-share-name> /mnt/smb -o sec=krb5,cruid=<credential-id>,username=<client-id>,dir_mode=0755,file_mode=0755,serverino,nosharesock,mfsymlinks,actimeo=30
Verify that the mount succeeded:
ls -la /mnt/smb
For more information, see Mount SMB Azure file shares on Linux clients.
Refresh your credentials
To prevent access interruptions, you should refresh your credentials periodically. The refresh service automatically detects and renews credentials as needed.
After you mount the file share for the first time, start the refresh service:
sudo systemctl start azfilesrefresh
To ensure that the service starts automatically on every boot:
sudo systemctl enable --now azfilesrefresh
Automatic credential refresh requires a managed identity assigned to your VM. If you're supplying the OAuth token directly, you must refresh credentials manually by using the azfilesauthmanager set command as described in Configure authentication, or programmatically via the shared library APIs.
Troubleshooting
Troubleshooting steps are different for Windows and Linux clients.
If you encounter problems when mounting your file share on Windows, follow these steps to enable verbose logging and collect diagnostic information:
On Windows clients, use the Registry Editor to set the Data level for verbosity to
0x00000004(4) forComputer\HKEY_LOCAL_MACHINE\SOFTWARE\Microsoft\Windows Azure\Storage\Files\SmbAuth.Try to mount the share again and reproduce the error.
You should now have a file named
AzFilesSmbMILog.log. Send the log file to the Azure Files team for assistance.
If you encounter problems when mounting your file share on Linux, follow these SMB diagnostics steps.
Client library installation and integration options
The following information is for developers who need to integrate managed identities into their applications.
For developers who need to integrate managed identities into their Windows applications, multiple implementation approaches are available. The approach that you choose depends on your application architecture and requirements.
Managed assembly integration: NuGet package
For .NET applications, the Microsoft.Azure.AzFilesSmbMI NuGet package includes a managed assembly (Microsoft.Azure.AzFilesSmbMI.dll) that provides direct access to the SMB OAuth authentication functionality. Use this approach for C# and other .NET-based applications.
To install the assembly, use Install-Package Microsoft.Azure.AzFilesSmbMI -version 1.2.3168.94.
Native DLL integration
For native applications that need direct API access, AzFilesSmbMIClient is available as a native DLL. This option is particularly useful for C/C++ applications or systems that need lower-level integration. See the Windows implementation and API reference (native header file).
Native API methods
The native DLL exports the following core methods for credential management:
extern "C" AZFILESSMBMI_API HRESULT SmbSetCredential(
    _In_  PCWSTR pwszFileEndpointUri,
    _In_  PCWSTR pwszOauthToken,
    _In_  PCWSTR pwszClientID,
    _Out_ PDWORD pdwCredentialExpiresInSeconds
);
extern "C" AZFILESSMBMI_API HRESULT SmbRefreshCredential(
    _In_ PCWSTR pwszFileEndpointUri,
    _In_ PCWSTR pwszClientID
);
extern "C" AZFILESSMBMI_API HRESULT SmbClearCredential(
    _In_ PCWSTR pwszFileEndpointUri
);
Linux developers can use the shared library that's automatically installed with the azfilesauth package. You can link against the library in your C/C++ applications for direct API access.
Be sure to include the public header.
For more information, see the AzFilesAuthenticator project.
Shared library API methods
The shared library exports the following core methods for credential management:
#ifdef __cplusplus
extern "C" {
#endif

int extern_smb_set_credential_oauth_token(char* file_endpoint_uri,
                                                char* auth_token,
                                                unsigned int* credential_expires_in_seconds);

int extern_smb_clear_credential(char* file_endpoint_uri);

int extern_smb_list_credential(bool is_json);

const char* extern_smb_version();

#ifdef __cplusplus
}
#endif
API description
The following table lists the API commands and their usage. Returned values follow standard C conventions (zero for success, nonzero for errors).
| Command | Description |
|---|---|
extern_smb_set_credential_oauth_token() |
Sets OAuth token credentials for a specific storage endpoint. |
extern_smb_clear_credential() |
Removes stored credentials for a storage endpoint. |
extern_smb_list_credential() |
Lists all stored credentials. |
extern_smb_version() |
Returns the version string of the azfilesauth library. |