Note
Access to this page requires authorization. You can try signing in or changing directories.
Access to this page requires authorization. You can try changing directories.
This article helps you understand managed identity (formerly known as Managed Service Identity/MSI) and how it works in Azure Synapse.
Note
We recommend that you use the Azure Az PowerShell module to interact with Azure. See Install Azure PowerShell to get started. To learn how to migrate to the Az PowerShell module, see Migrate Azure PowerShell from AzureRM to Az.
Overview
Managed identities eliminate the need to manage credentials. Managed identities provide an identity for the service instance when connecting to resources that support Microsoft Entra authentication. For example, the service can use a managed identity to access resources like Azure Key Vault, where data admins can securely store credentials or access storage accounts. The service uses the managed identity to obtain Microsoft Entra tokens.
There are two types of supported managed identities:
- System-assigned: You can enable a managed identity directly on a service instance. When you allow a system-assigned managed identity during the creation of the service, an identity is created in Microsoft Entra tied to that service instance's lifecycle. By design, only that Azure resource can use this identity to request tokens from Microsoft Entra ID. So when the resource is deleted, Azure automatically deletes the identity for you. Azure Synapse Analytics requires that a system-assigned managed identity must be created along with the Synapse workspace.
- User-assigned: You can also create a managed identity as a standalone Azure resource. You can create a user-assigned managed identity and assign it to one or more instances of a Synapse workspace. In user-assigned managed identities, the identity is managed separately from the resources that use it.
Managed identity provides the below benefits:
- Store credential in Azure Key Vault, in which case-managed identity is used for Azure Key Vault authentication.
- Access data stores or computes using managed identity authentication, including Azure Blob storage, Azure Data Lake Storage Gen2, Azure SQL Database, Azure SQL Managed Instance, Azure Synapse Analytics, REST, Databricks activity, Web activity, and more. Check the connector and activity articles for details.
- Managed identity is also used to encrypt/decrypt data and metadata using the customer-managed key stored in Azure Key Vault, providing double encryption.
System-assigned managed identity
Note
System-assigned managed identity is also referred to as 'Managed identity' elsewhere in the documentation and in the Synapse Studio UI for backward compatibility purpose. We will explicitly mention 'User-assigned managed identity' when referring to it.
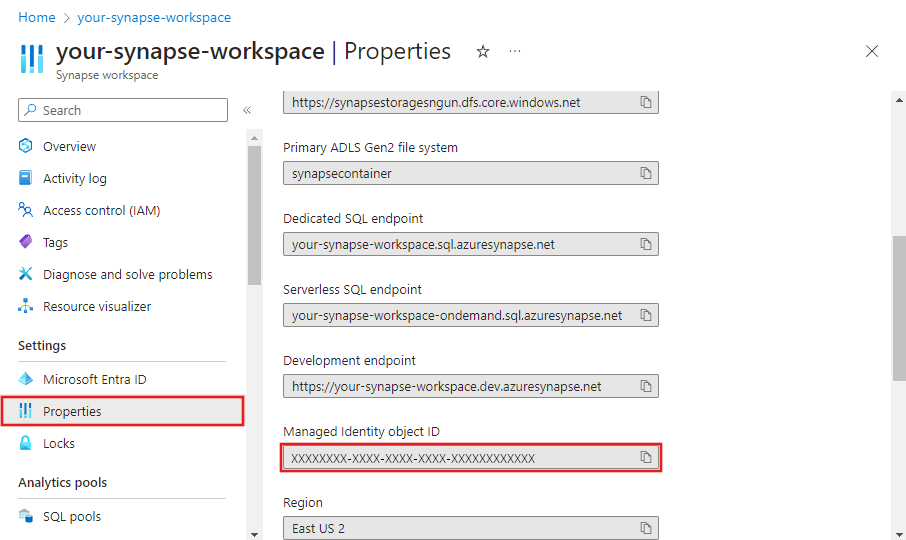
Retrieve system-assigned managed identity using Azure portal
You can find the managed identity information from Azure portal -> your Synapse workspace -> Properties.
The managed identity information will also show up when you create linked service, which supports managed identity authentication, like Azure Blob, Azure Data Lake Storage, Azure Key Vault, etc.
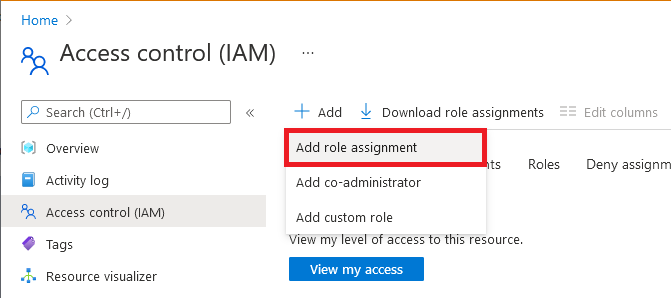
To grant permissions, follow these steps. For detailed steps, see Assign Azure roles using the Azure portal.
Select Access control (IAM).
Select Add > Add role assignment.

On the Members tab, select Managed identity, and then select Select members.
Select your Azure subscription.
Under System-assigned managed identity, select Synapse workspace, and then select a workspace. You can also use the object ID or workspace name (as the managed-identity name) to find this identity. To get the managed identity's application ID, use PowerShell.
On the Review + assign tab, select Review + assign to assign the role.
Retrieve system-assigned managed identity using PowerShell
The managed identity principal ID and tenant ID will be returned when you get a specific service instance as follows. Use the PrincipalId to grant access:
PS C:\> (Get-AzSynapseWorkspace -ResourceGroupName <resourceGroupName> -Name <workspaceName>).Identity

IdentityType   PrincipalId                          TenantId
------------   -----------                          --------
SystemAssigned aaaaaaaa-0000-1111-2222-bbbbbbbbbbbb aaaabbbb-0000-cccc-1111-dddd2222eeee
You can get the application ID by copying above principal ID, then running below Microsoft Entra ID command with principal ID as parameter.
PS C:\> Get-AzADServicePrincipal -ObjectId aaaaaaaa-0000-1111-2222-bbbbbbbbbbbb

ServicePrincipalNames : {00001111-aaaa-2222-bbbb-3333cccc4444, https://identity.azure.cn/P86P8g6nt1QxfPJx22om8MOooMf/Ag0Qf/nnREppHkU=}
ApplicationId         : 00001111-aaaa-2222-bbbb-3333cccc4444
DisplayName           : <workspaceName>
Id                    : aaaaaaaa-0000-1111-2222-bbbbbbbbbbbb
Type                  : ServicePrincipal
Retrieve managed identity using REST API
The managed identity principal ID and tenant ID will be returned when you get a specific service instance as follows.
Call below API in the request:
GET https://management.chinacloudapi.cn/subscriptions/{subscriptionId}/resourceGroups/{resourceGroupName}/providers/Microsoft.Synapse/workspaces/{workspaceName}?api-version=2018-06-01
Response: You'll get response like shown in below example. The "identity" section is populated accordingly.
{
  "properties": {
    "defaultDataLakeStorage": {
      "accountUrl": "https://exampledatalakeaccount.dfs.core.chinacloudapi.cn",
      "filesystem": "examplefilesystem"
    },
    "encryption": {
      "doubleEncryptionEnabled": false
    },
    "provisioningState": "Succeeded",
    "connectivityEndpoints": {
      "web": "https://web.azuresynapse.azure.cn?workspace=%2fsubscriptions%2{subscriptionId}%2fresourceGroups%2f{resourceGroupName}%2fproviders%2fMicrosoft.Synapse%2fworkspaces%2f{workspaceName}",
      "dev": "https://{workspaceName}.dev.azuresynapse.azure.cn",
      "sqlOnDemand": "{workspaceName}-ondemand.sql.azuresynapse.azure.cn",
      "sql": "{workspaceName}.sql.azuresynapse.azure.cn"
    },
    "managedResourceGroupName": "synapseworkspace-managedrg-f77f7cf2-XXXX-XXXX-XXXX-c4cb7ac3cf4f",
    "sqlAdministratorLogin": "sqladminuser",
    "privateEndpointConnections": [],
    "workspaceUID": "e56f5773-XXXX-XXXX-XXXX-a0dc107af9ea",
    "extraProperties": {
      "WorkspaceType": "Normal",
      "IsScopeEnabled": false
    },
    "publicNetworkAccess": "Enabled",
    "cspWorkspaceAdminProperties": {
      "initialWorkspaceAdminObjectId": "3746a407-XXXX-XXXX-XXXX-842b6cf1fbcc"
    },
    "trustedServiceBypassEnabled": false
  },
  "type": "Microsoft.Synapse/workspaces",
  "id": "/subscriptions/{subscriptionId}/resourceGroups/{resourceGroupName}/providers/Microsoft.Synapse/workspaces/{workspaceName}",
  "location": "chinanorth3",
  "name": "{workspaceName}",
  "identity": {
    "type": "SystemAssigned",
    "tenantId": "aaaabbbb-0000-cccc-1111-dddd2222eeee",
    "principalId": "aaaaaaaa-bbbb-cccc-1111-222222222222"
  },
  "tags": {}
}
Tip
To retrieve the managed identity from an ARM template, add an outputs section in the ARM JSON:
{
    "outputs":{
        "managedIdentityObjectId":{
            "type":"string",
            "value":"[reference(resourceId('Microsoft.Synapse/workspaces', parameters('<workspaceName>')), '2018-06-01', 'Full').identity.principalId]"
        }
    }
}
Generate system-assigned managed identity
System-assigned managed identity is generated as follows:
- When creating a Synapse workspace through Azure portal or PowerShell, managed identity will always be created automatically.
- When creating a workspace through SDK, managed identity will be created only if you specify Identity = new ManagedIdentity" in the Synapse workspace object for creation." See example in .NET Quickstart - Create data factory.
- When creating Synapse workspace through REST API, managed identity will be created only if you specify "identity" section in request body. See example in REST quickstart - create data factory.
If you find your service instance doesn't have a managed identity associated following retrieve managed identity instruction, you can explicitly generate one by updating it with identity initiator programmatically:
- Generate managed identity using PowerShell
- Generate managed identity using REST API
- Generate managed identity using an Azure Resource Manager template
- Generate managed identity using SDK
Note
- Managed identity cannot be modified. Updating a service instance which already has a managed identity won't have any impact, and the managed identity is kept unchanged.
- If you update a service instance which already has a managed identity without specifying the "identity" parameter in the factory or workspace objects or without specifying "identity" section in REST request body, you will get an error.
- When you delete a service instance, the associated managed identity will be deleted along.
Generate system-assigned managed identity using PowerShell
Call New-AzSynapseWorkspace command, then you see "Identity" fields being newly generated:
PS C:\> $password = ConvertTo-SecureString -String "****" -AsPlainText -Force
PS C:\> $creds = New-Object System.Management.Automation.PSCredential ("ContosoUser", $password)
PS C:\> New-AzSynapseWorkspace -ResourceGroupName <resourceGroupName> -Name <workspaceName> -Location <region> -DefaultDataLakeStorageAccountName <storageAccountName> -DefaultDataLakeStorageFileSystem <fileSystemName> -SqlAdministratorLoginCredential $creds

DefaultDataLakeStorage           : Microsoft.Azure.Commands.Synapse.Models.PSDataLakeStorageAccountDetails
ProvisioningState                : Succeeded
SqlAdministratorLogin            : ContosoUser
VirtualNetworkProfile            :
Identity                         : Microsoft.Azure.Commands.Synapse.Models.PSManagedIdentity
ManagedVirtualNetwork            :
PrivateEndpointConnections       : {}
WorkspaceUID                     : <workspaceUid>
ExtraProperties                  : {[WorkspaceType, Normal], [IsScopeEnabled, False]}
ManagedVirtualNetworkSettings    :
Encryption                       : Microsoft.Azure.Commands.Synapse.Models.PSEncryptionDetails
WorkspaceRepositoryConfiguration :
Tags                             :
TagsTable                        :
Location                         : <region>
Id                               : /subscriptions/<subsID>/resourceGroups/<resourceGroupName>/providers/
                                   Microsoft.Synapse/workspaces/<workspaceName>
Name                             : <workspaceName>
Type                             : Microsoft.Synapse/workspaces
Generate system-assigned managed identity using REST API
Note
If you attempt to update a service instance that already has a managed identity without either specifying the identity parameter in the workspace object or providing an identity section in the REST request body, you will get an error.
Call the API below with the "identity" section in the request body:
PATCH https://management.chinacloudapi.cn/subscriptions/{subscriptionId}/resourceGroups/{resourceGroupName}/providers/Microsoft.Synapse/workspaces/{workspaceName}?api-version=2018-06-01
Request body: add "identity": { "type": "SystemAssigned" }.
{
    "name": "<workspaceName>",
    "location": "<region>",
    "properties": {},
    "identity": {
        "type": "SystemAssigned"
    }
}
Response: managed identity is created automatically, and "identity" section is populated accordingly.
{
    "name": "<workspaceName>",
    "tags": {},
    "properties": {
        "provisioningState": "Succeeded",
        "loggingStorageAccountKey": "**********",
        "createTime": "2021-09-26T04:10:01.1135678Z",
        "version": "2018-06-01"
    },
    "identity": {
        "type": "SystemAssigned",
        "principalId": "aaaaaaaa-bbbb-cccc-1111-222222222222",
        "tenantId": "aaaabbbb-0000-cccc-1111-dddd2222eeee"
    },
    "id": "/subscriptions/<subscriptionId>/resourceGroups/<resourceGroupName>/providers/Microsoft.Synapse/workspaces/<workspaceName>",
    "type": "Microsoft.Synapse/workspaces",
    "location": "<region>"
}
Generate system-assigned managed identity using an Azure Resource Manager template
Template: add "identity": { "type": "SystemAssigned" }.
{
    "contentVersion": "1.0.0.0",
    "$schema": "https://schema.management.azure.com/schemas/2019-04-01/deploymentTemplate.json#",
    "resources": [{
        "name": "<workspaceName>",
        "apiVersion": "2018-06-01",
        "type": "Microsoft.Synapse/workspaces",
        "location": "<region>",
        "identity": {
            "type": "SystemAssigned"
        }
    }]
}
Generate system-assigned managed identity using SDK
Workspace workspace = new Workspace
{
    Identity = new ManagedIdentity
    {
        Type = ResourceIdentityType.SystemAssigned
    },
    DefaultDataLakeStorage = new DataLakeStorageAccountDetails
    {
        AccountUrl = <defaultDataLakeStorageAccountUrl>,
        Filesystem = <DefaultDataLakeStorageFilesystem>
    },
    SqlAdministratorLogin = <SqlAdministratorLoginCredentialUserName>
    SqlAdministratorLoginPassword = <SqlAdministratorLoginCredentialPassword>,
    Location = <region>
};
client.Workspaces.CreateOrUpdate(resourceGroupName, workspaceName, workspace);
Retrieve system-assigned managed identity
You can retrieve the managed identity from Azure portal or programmatically. The following sections show some samples.
Tip
If you don't see the managed identity, generate managed identity by updating your service instance.
Execute Azure Synapse Spark Notebooks with system assigned managed identity
You can easily execute Synapse Spark Notebooks with the system assigned managed identity (or workspace managed identity) by enabling Run as managed identity from the Configure session menu. To execute Spark Notebooks with workspace managed identity, users need to have following RBAC roles:
- Synapse Compute Operator on the workspace or selected Spark pool
- Synapse Credential User on the workspace managed identity


Note
Synapse notebooks and Spark job definitions only support the use of system-assigned managed identity through linked services and the mssparkutils APIs. MSAL and other authentication libraries can't use the system-assigned managed identity. You can instead generate a service principal and store the credentials in Key Vault.
User-assigned managed identity
You can create, delete, manage user-assigned managed identities in Microsoft Entra ID. For more information, see Create, list, delete, or assign a role to a user-assigned managed identity using the Azure portal.
In order to use a user-assigned managed identity, you must first create credentials in your service instance for the UAMI.
Note
User-assigned Managed Identity already supported Synapse Notebook activities and Spark job definition activities in pipeline.
Next steps
See the following articles that introduce when and how to use managed identity:
See Managed Identities for Azure Resources Overview for more background on managed identities for Azure resources, on which managed identity in Azure Synapse is based.
