Note
Access to this page requires authorization. You can try signing in or changing directories.
Access to this page requires authorization. You can try changing directories.
Applies to: ✔️ Windows VMs ✔️ Flexible scale sets
When you create a new virtual machine (VM) in a resource group by deploying an image from Azure Marketplace, the default operating system (OS) disk is usually 127 GiB. (Some images have smaller OS disk sizes by default.) You can add data disks to your VM. The number of data disks you can attach depends on the VM size that you selected.
You should install applications and CPU-intensive workloads on data disks. You might need to expand the OS disk if you're supporting a legacy application that installs components on the OS disk or if you're migrating a physical PC or VM from on-premises that has a larger OS disk. To complete an expansion, first increase the Azure managed OS disk or data disk size by using the Azure portal or Azure PowerShell, and then expand the volume in Windows to use the additional space.
An OS disk has a maximum capacity of 4,095 GiB. However, many operating systems are partitioned with master boot record (MBR) by default. MBR limits the usable size to 2 TiB. If you need more than 2 TiB, create and attach data disks and use them for data storage. If you need to store data on the OS disk and require the extra space, convert it to a GUID Partition Table (GPT). To learn about the differences between MBR and GPT on Windows deployments, see Windows and GPT FAQ.
Unless you use Expand without downtime, expanding a data disk requires the VM to be deallocated. Shrinking an existing disk isn't supported and might result in data loss.
After you expand the disks, expand the volume in the OS to take advantage of the larger disk. You can't expand the size of striped volumes.
Expand without downtime
You can expand data disks without deallocating your VM. The host cache setting of your disk doesn't change whether or not you can expand a data disk without deallocating your VM.
This feature has the following limitations.
Important
This limitation doesn't apply to Premium SSD v2 or Ultra Disks.
If a Standard HDD, Standard SSD, or Premium SSD is 4 TiB or less, deallocate your VM and detach the disk before you expand it beyond 4 TiB. If one of those disk types is already greater than 4 TiB, you can expand it without deallocating the VM and detaching the disk.
- Is supported only for data disks.
- Must be installed and use one of the following options:
- The latest Azure CLI.
- The latest Azure PowerShell module.
- The Azure portal.
- An Azure Resource Manager template with an API version that's
2021-04-01or newer.
- Isn't available on some classic VMs. Use this script to get a list of classic VM SKUs that support expanding without downtime.
Expand with Ultra Disks and Premium SSD v2
Expanding Ultra Disks and Premium SSD v2 disks without downtime has the following additional limitations:
- You can't expand a disk while a background copy of data is also occurring on that disk.
You can expand Ultra Disks and Premium SSD v2 disks attached to VMs using NVMe controllers without downtime in all regions that support either of those disk types using either the Azure Portal, Azure CLI, or the Azure PowerShell module to make the change.
Allow up to 10 minutes for the correct size to be reflected in Windows VMs and Linux VMs. For Linux VMs, you must perform a Linux rescan function. For a Windows VM that doesn't have a workload, you must perform a Windows rescan function. You can rescan immediately, but if the time is within 10 minutes, you might need to rescan again to display the correct size. If a rescan doesn't work properly, you can either repeat the rescan or restart the VM to display the correct size.
Resize a managed disk in the Azure portal
Only eligible data disks can be expanded without deallocating the VM. OS disks and data disks that don't meet the requirements for expansion without downtime require deallocation.
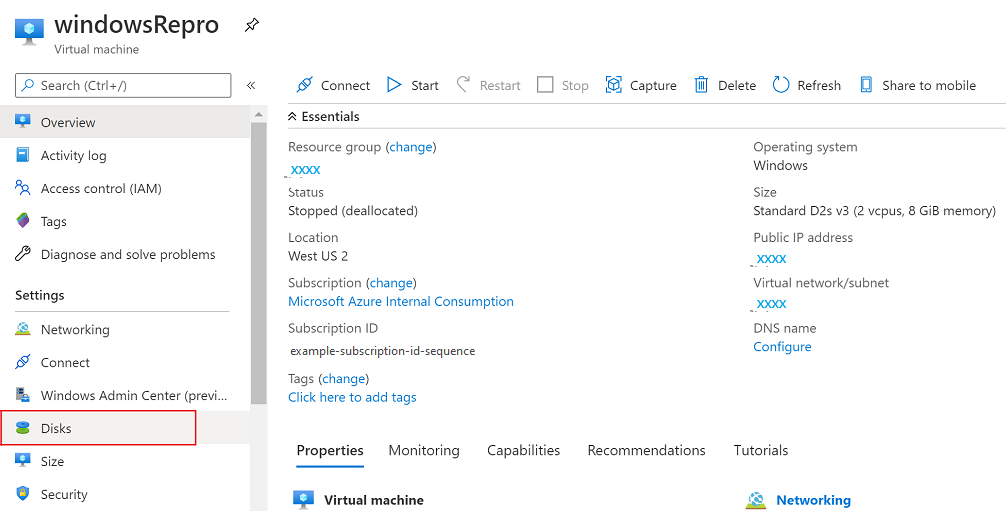
In the Azure portal, go to the VM in which you want to expand the disk. If the disk requires deallocation, select Stop.
On the left menu, under Settings, select Disks.
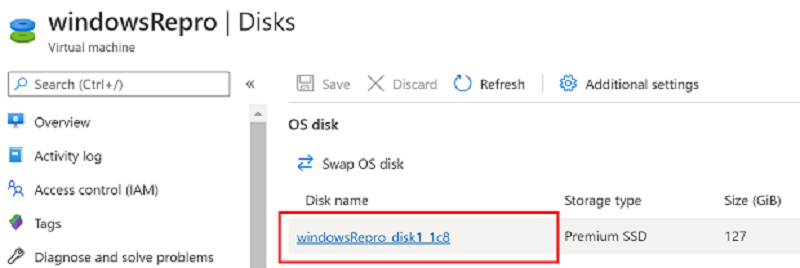
Under Disk name, select the disk that you want to expand.
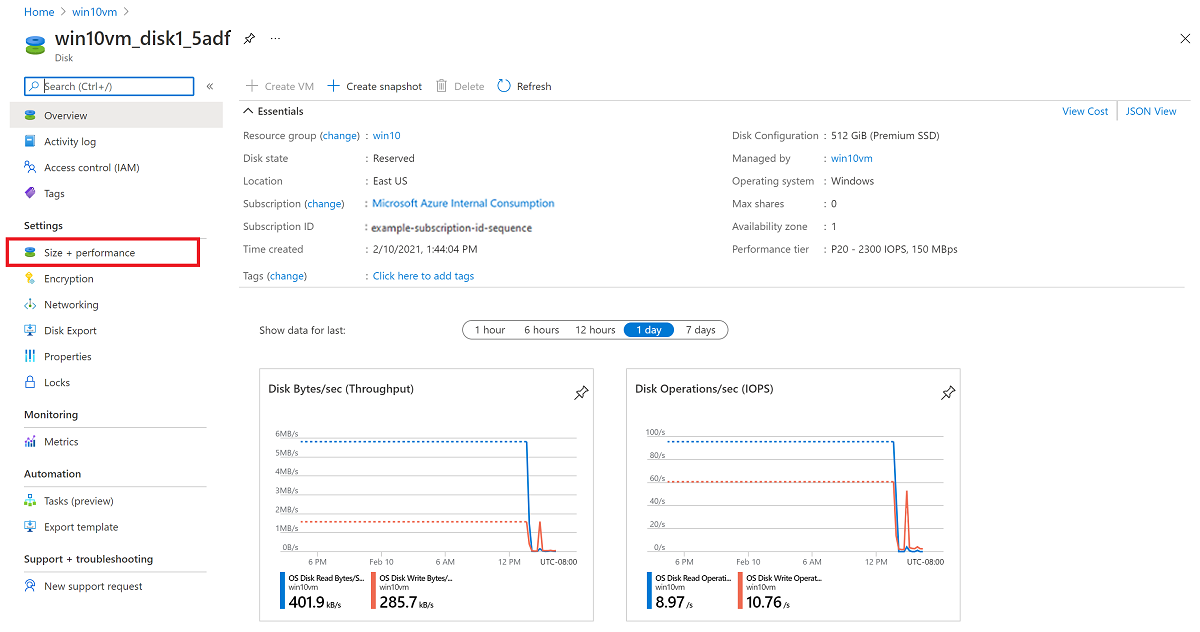
On the left menu, under Settings, select Size + performance.
On Size + performance, select the disk size that you want.
The new size should be greater than the existing disk size. The maximum allowed is 4,095 GiB for OS disks. You can expand the virtual hard disk (VHD) blob beyond that size, but the OS works only with the first 4,095 GiB of space.
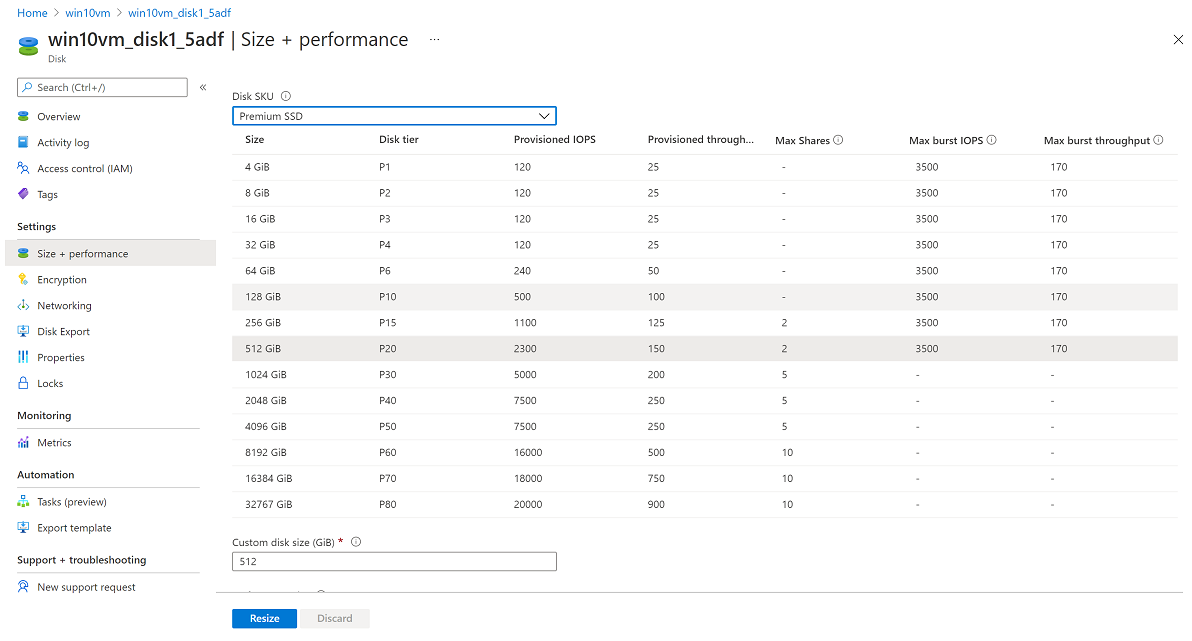
Select Resize at the bottom of the page.
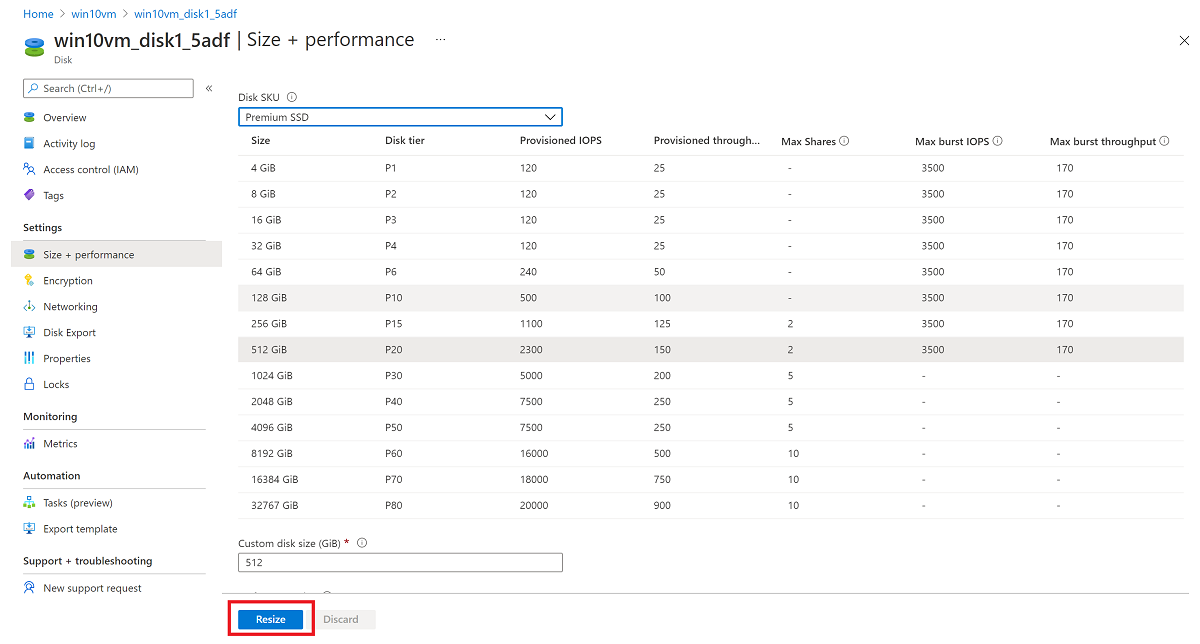
If you deallocated the VM, return to the VM Overview pane and select Start.
Resize a managed disk by using PowerShell
Open a PowerShell window in administrative mode and follow these steps. Only eligible data disks can be expanded without deallocating the VM. OS disks and data disks that don't meet the requirements for expansion without downtime require deallocation.
Sign in to your Azure account by using Connect-AzAccount, and set the active subscription by using Set-AzContext:
Connect-AzAccount -Environment AzureChinaCloud
Set-AzContext -Subscription 'my-subscription-name'
Set your resource group name and VM name:
$rgName = 'my-resource-group-name'
$vmName = 'my-vm-name'
$diskName = 'my-disk-name'
Obtain a reference to your VM:
$vm = Get-AzVM -ResourceGroupName $rgName -Name $vmNameIf the disk requires deallocation, stop the VM before you resize the disk:
Stop-AzVM -ResourceGroupName $rgName -Name $vmNameObtain a reference to the managed disk. Set the managed disk size to the value that you want and update the disk:
$disk= Get-AzDisk -ResourceGroupName $rgName -DiskName $diskName
$disk.DiskSizeGB = 1023
Update-AzDisk -ResourceGroupName $rgName -Disk $disk -DiskName $disk.Name
The new size should be greater than the existing disk size. The maximum allowed is 4,095 GiB for OS disks. You can expand the VHD blob beyond that size, but the OS works only with the first 4,095 GiB of space.
Updating the disk might take a few seconds. If you deallocated the VM, restart it after the command finishes running:
Start-AzVM -ResourceGroupName $rgName -Name $vmName
Remote into the VM, open Computer Management (or Disk Management), and expand the drive by using the newly allocated space.
Expand the volume in the operating system
After you expand the disk for the VM, go into the OS and expand the volume to encompass the new space. There are several methods for expanding a partition. This section covers connecting the VM by using a Remote Desktop Protocol (RDP) connection to expand the partition by using DiskPart or Disk Manager.
Use DiskPart
Open an RDP connection to your VM.
Open a command prompt and enter
diskpart.At the
DISKPARTprompt, enterlist volume. Make a note of the volume that you want to extend.At the
DISKPARTprompt, enterselect volume <volumenumber>. This action selects the volumevolumenumberthat you want to extend into contiguous, empty space on the same disk.At the
DISKPARTprompt, enterextend [size=<size>]. This action extends the selected volume by size in megabytes (MBs).
Use Disk Manager
Start a remote desktop session with the VM.
Open Disk Management.
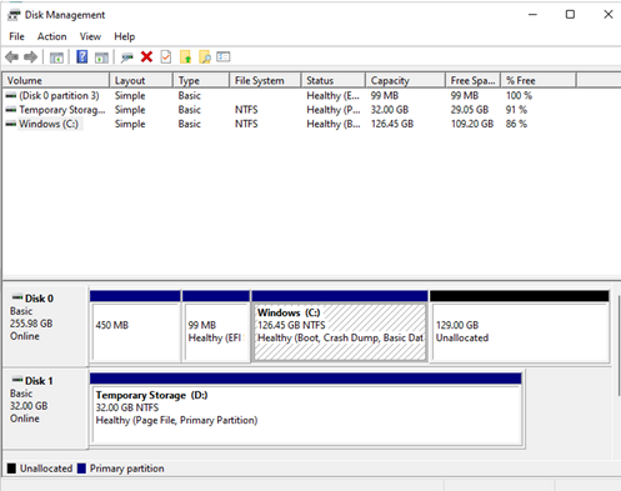
Right-click an existing C: drive partition and select Extend Volume.
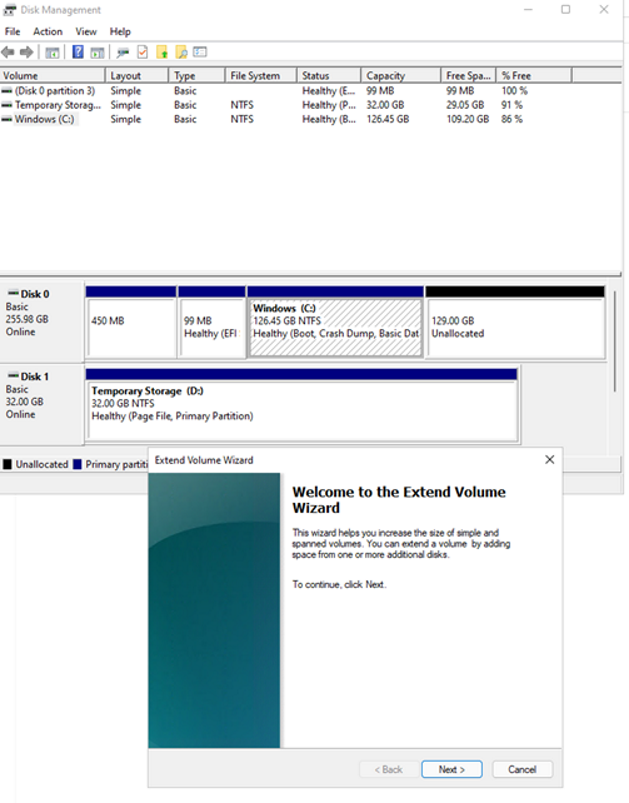
Follow the steps in the wizard to see the disk with updated capacity.
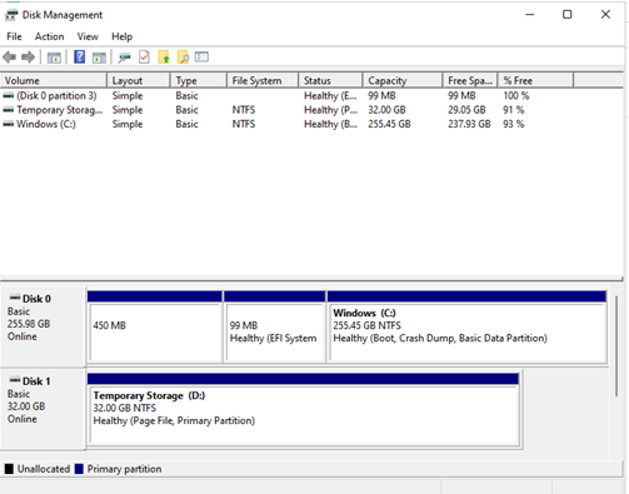
Expand without downtime classic VM SKU support
If you're using a classic VM SKU, it might not support expanding disks without downtime.
Use the following PowerShell script to determine which classic VM SKUs support expansion without downtime:
Connect-AzAccount  -Environment AzureChinaCloud
$subscriptionId="yourSubID"
$location="desiredRegion"
Set-AzContext -Subscription $subscriptionId
$vmSizes=Get-AzComputeResourceSku -Location $location | where{$_.ResourceType -eq 'virtualMachines'}

foreach($vmSize in $vmSizes){
    foreach($capability in $vmSize.Capabilities)
    {
       if(($capability.Name -eq "EphemeralOSDiskSupported" -and $capability.Value -eq "True") -or ($capability.Name -eq "PremiumIO" -and $capability.Value -eq "True") -or ($capability.Name -eq "HyperVGenerations" -and $capability.Value -match "V2"))
        {
            $vmSize.Name
       }
   }
}
Related content
You can also attach disks by using the Azure portal.