Note
Access to this page requires authorization. You can try signing in or changing directories.
Access to this page requires authorization. You can try changing directories.
Important
Currently, the IP address management (IPAM) feature in Azure Virtual Network Manager is generally available in all regions where Azure Virtual Network Manager is available.
Azure Virtual Network Manager enables you to manage IP addresses by creating and assigning IP address pools to your virtual networks. This article shows you how to create and assign IP address pools to your virtual networks by using IP address management (IPAM) in Azure Virtual Network Manager.
Prerequisites
- An Azure subscription. If you don't have an Azure subscription, create a Trial before you begin.
- An existing network manager instance. If you don't have a network manager instance, see Create a network manager instance.
- A virtual network that you want to associate with an IP address pool.
- To create and manage IP address pools, you need the Network Contributor role on the network manager. Classic Admin and legacy authorization aren't supported.
- To delegate pool access, you need the
Microsoft.Authorization/roleAssignments/writepermission at the pool scope or higher, such as Role Based Access Control Administrator. For more information, see Steps to assign an Azure role.
Create an IP address pool
In this step, you create an IP address pool for your virtual network.
In the Azure portal, search for and select Network managers.
Select your network manager instance.
In the left menu, under IP address management, select IP address pools.
Select + Create or Create to create a new IP address pool.
In the Create an IP address pool window, enter the following information:
Field Description Name Enter a name for the IP address pool. Display name Optionally, enter a friendly display name for the pool. Region Select the Azure region for the pool. Description Optionally, enter a description for the IP address pool. Parent pool For a root pool, select None. For a child pool, select the parent pool. 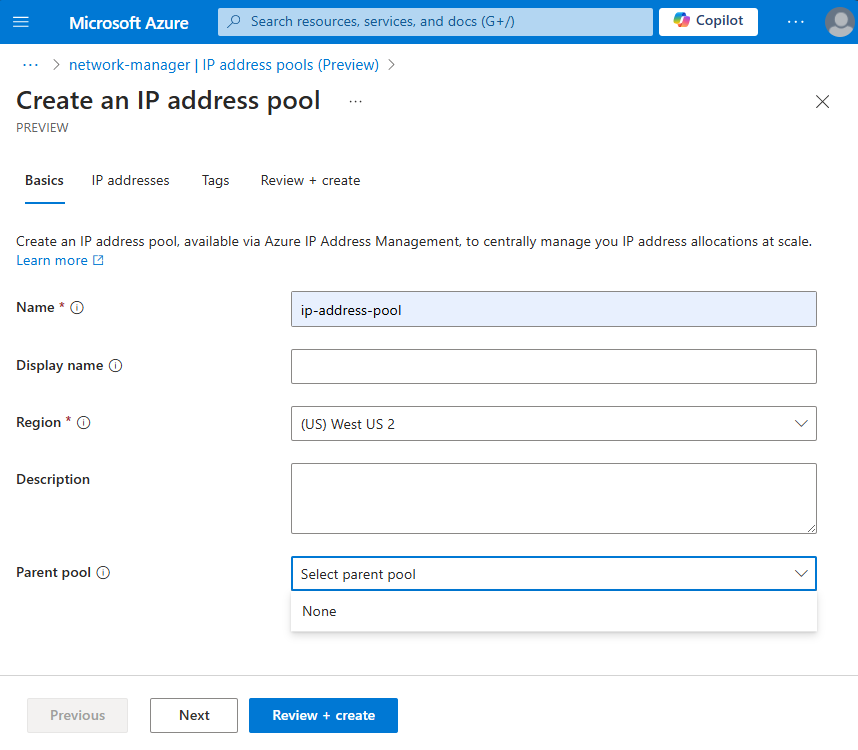
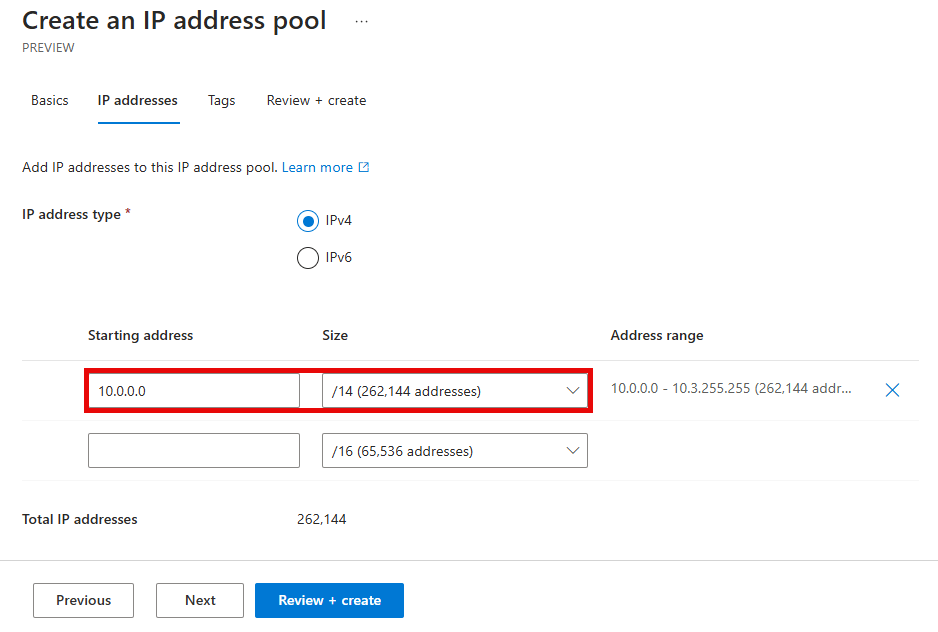
Select Next or the IP addresses tab.
Under Starting address, enter the IP address range for the pool.

Select Review + create and then Create to create the IP address pool.
After Azure creates the pool, open it and verify that Pool address space shows the range you entered.
Repeat these steps for another root or child pool.
Associate a virtual network with an IP address pool
In this step, you associate an existing virtual network with an IP address pool on the pool's Allocations page.
Browse to your network manager instance and select your IP address pool.
From the left menu, select Allocations under Settings or select Allocate.
In the Allocations window, select + Create > Associate resources. The Associate resources option allocates a CIDR to an existing virtual network.
In the Select resources window, select the virtual networks you want to associate with the IP address pool and then choose Select.
Verify the virtual network is listed.

Note
In addition to associating resources, you can allocate address spaces to a child pool or a static CIDR block from the pool's Allocations page.
Create static CIDR blocks for a pool
In this step, you create a static CIDR block for a pool. This block helps you allocate space that's outside Azure or used by Azure resources that IPAM doesn't support. For example, you can allocate a CIDR in the pool to address space in your on-premises environment, a Virtual WAN hub, or Azure VMware Private Cloud.
Browse to your IP address pool.
Select Allocate or Allocations under Settings.
In Allocations, select + Create > Allocate static CIDRs.
In Allocate static CIDRs from pool, enter the following information:
Field Description Name Enter a name for the static CIDR block. Description Optionally, enter a description for the static CIDR block. Starting address Enter the first IP address in the range. Size Select the CIDR prefix and address count. Address range Verify the calculated address range. 
Select Allocate.
Review allocation usage
In this step, you review the address space and allocations for the IP address pool.
Browse to your IP address pool.
Select Allocations under Settings.
In the Allocations window, you can review all of the statistics for the address pool, including:
Field Description Pool address space The total address space in the pool. Allocated address space The address ranges allocated to child pools, resources, and static CIDRs. Available address space The address ranges that remain available for allocation. Available address count The number of IP addresses that remain available. IP allocation The percentage and number of addresses allocated from the pool. 
For each allocation, you can review the following information:
Field Description Name The name of the allocated resource or static CIDR. Address space The CIDR allocated from the pool. Address count The number of addresses in the allocation. Status The current allocation status. 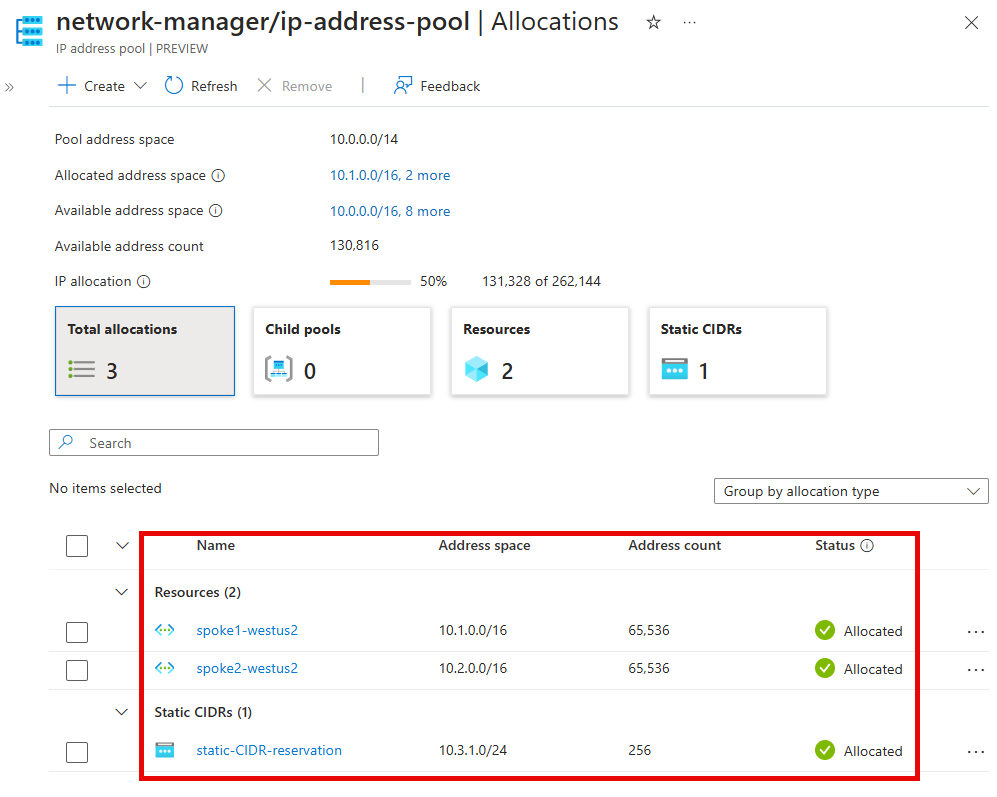
Delegate permissions for IP address management (IPAM)
In this step, assign the IPAM Pool User role so another user can view and allocate address space from the pool. This role doesn't grant permission to modify the pool itself. For more information, see Azure role-based access control (RBAC).
- Browse to your IP address pool.
- In the left menu, select Access control (IAM).
- In the Access control (IAM) window, select + Add > Add role assignment.
- Under Role, select IPAM Pool User through the search bar under the Job function roles tab, and then select Next.
- On the Members tab, select how you want to assign access to the role. You can assign access to a user, group, or service principal, or you can use a managed identity.
- Choose + Select members and then Select the user, group, service principal, or managed identity that you want to assign the role to.
- Select Review + assign and then Assign to delegate permissions to the user.
Note
If the assigned user can't discover the pool or virtual networks, also grant the Network Manager Read role at the network manager scope.
Create a virtual network with a nonoverlapping CIDR range
In this step, you create a virtual network with a nonoverlapping CIDR range by allowing IPAM to automatically provide the CIDR.
In the Azure portal, search for and select Virtual networks.
Select + Create.
On the Basics tab, enter the following information:
Field Description Subscription Select the subscription managed by a Network Manager management scope. Resource group Select the resource group for the virtual network. Name Enter a name for the virtual network. Region Select the region for the virtual network. Select the IP addresses tab or Next > Next.
On the IP addresses tab, select the Allocate using IP address pools checkbox.
In the Select an IP address pool window, select the IP address pool that you want to associate with the virtual network and then choose Save. You can select at most one IPv4 pool and one IPv6 pool for association to a single virtual network.
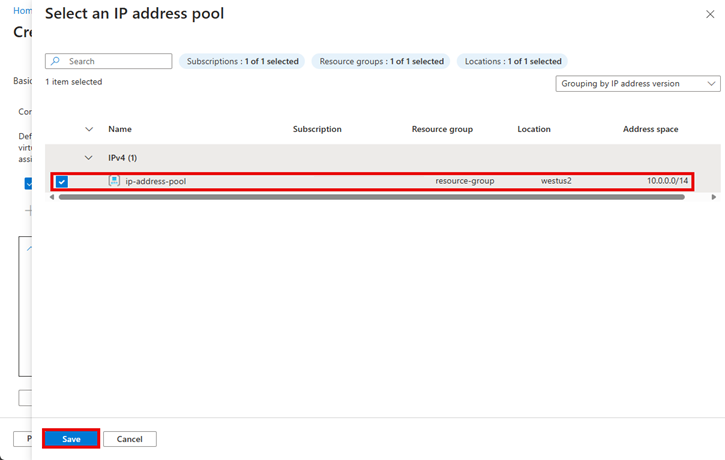
From the dropdown menu next to your IP address pool, select the size for the virtual network.

Select Review + create and then Create to create the virtual network.