Azure Virtual Network encryption is a feature of Azure Virtual Network. With Virtual Network encryption, you can seamlessly encrypt and decrypt internal network traffic over the wire, with minimal effect to performance and scale. Virtual Network encryption protects data that traverses your virtual network from virtual machine to virtual machine.
Prerequisites
Have an Azure account with an active subscription. Create an account.
Azure PowerShell installed locally.
Sign in to Azure PowerShell and select the subscription with which you want to use this feature. For more information, see Sign in with Azure PowerShell.
Ensure that your Az.Network module is 4.3.0 or later. To verify the installed module, use the command Get-InstalledModule -Name Az.Network. If the module requires an update, use the command Update-Module -Name Az.Network, if necessary.
If you choose to install and use PowerShell locally, this article requires the Azure PowerShell module version 5.4.1 or later. Run Get-Module -ListAvailable Az to find the installed version. If you need to upgrade, see Install Azure PowerShell module. If you're running PowerShell locally, you also need to run Connect-AzAccount -Environment AzureChinaCloud to create a connection with Azure.
You can use the local Azure CLI.
- The how-to article requires version 2.31.0 or later of the Azure CLI.
Create a virtual network
Create a virtual network
The following procedure creates a virtual network with a resource subnet.
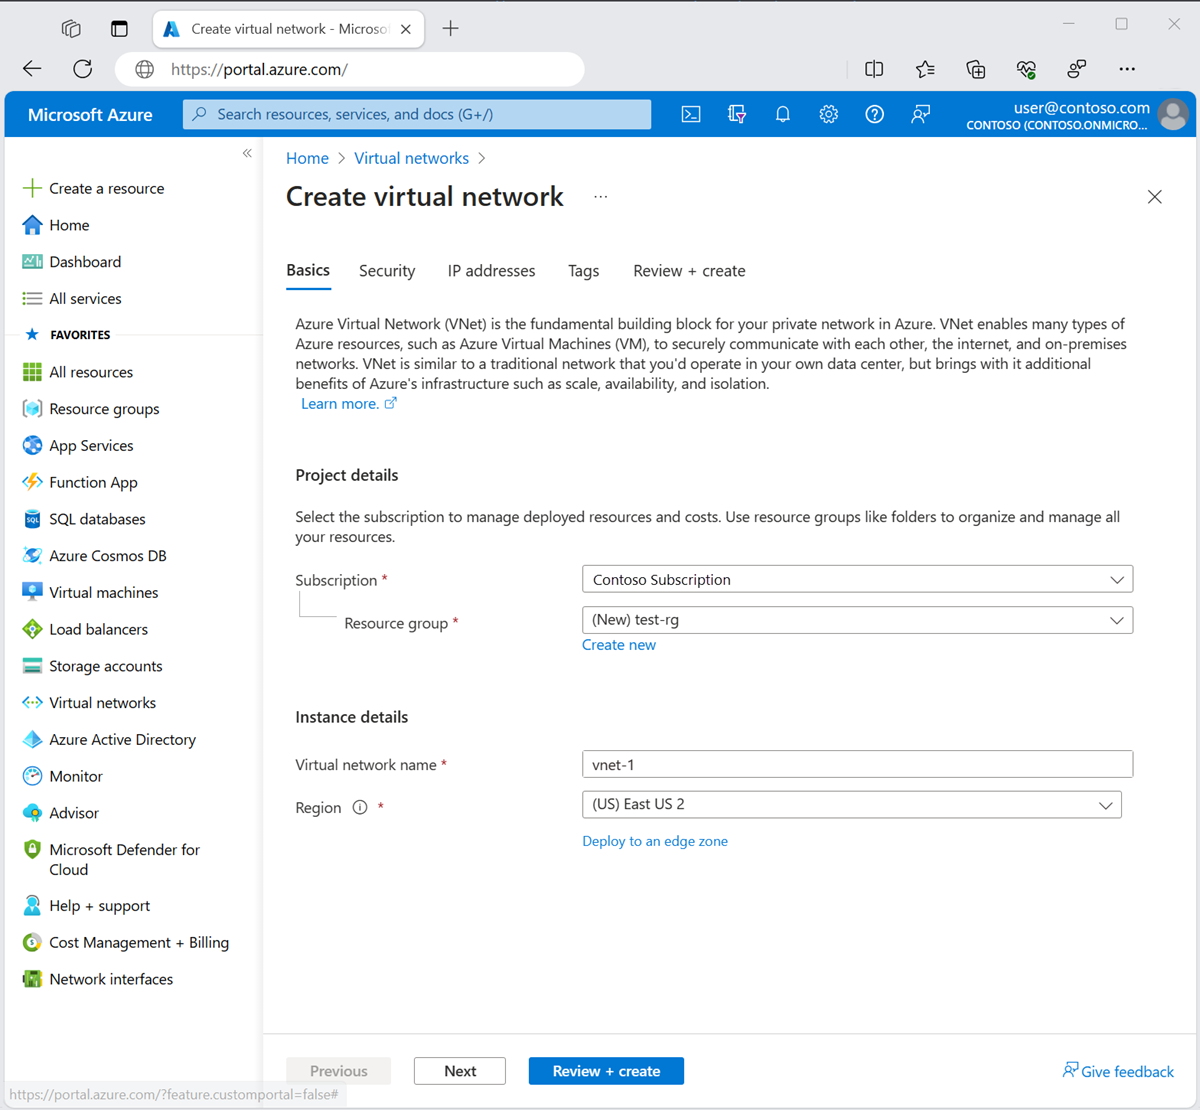
In the portal, search for and select Virtual networks.
On the Virtual networks page, select + Create.
On the Basics tab of Create virtual network, enter or select the following information:
| Setting |
Value |
| Project details |
|
| Subscription |
Select your subscription. |
| Resource group |
Select Create new.
Enter test-rg in Name.
Select OK. |
| Instance details |
|
| Name |
Enter vnet-1. |
| Region |
Select (Asia Pacific) China East 2. |

Select Next: IP Addresses to proceed to the IP Addresses tab.
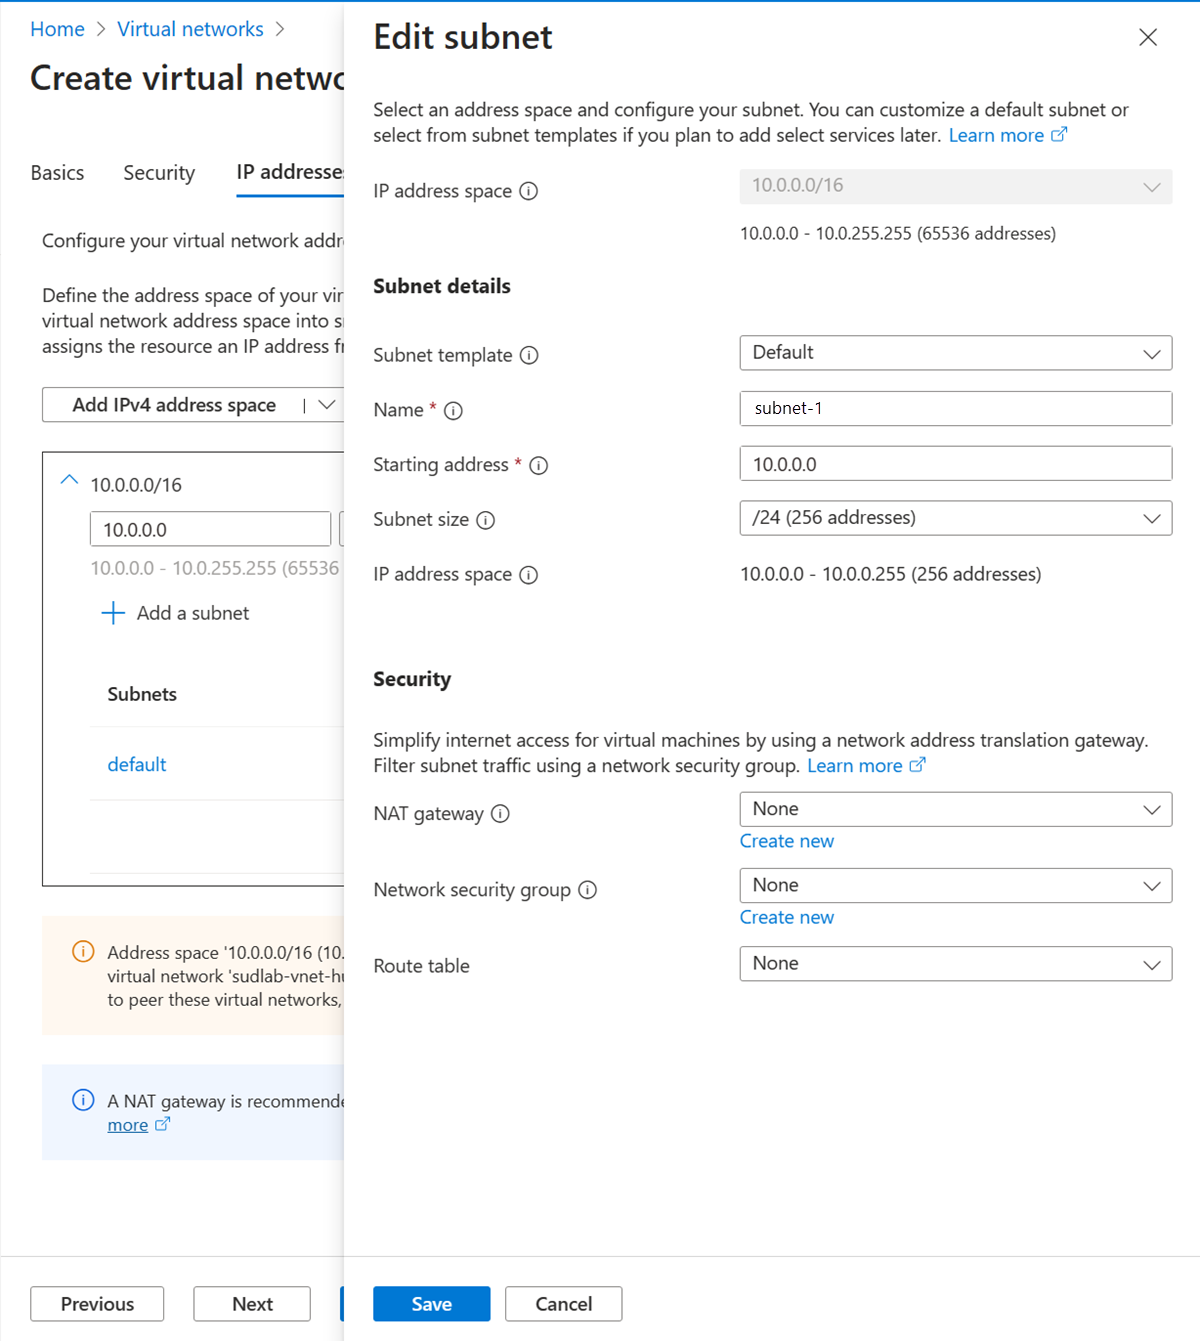
In the address space box in Subnets, select the default subnet.
In Edit subnet, enter or select the following information:
| Setting |
Value |
| Subnet name |
Enter subnet-1. |
| Subnet address range |
Enter 10.0.0.0/24. |

Select Save.
Select Review + create at the bottom of the screen, and when validation passes, select Create.
Create a resource group with New-AzResourceGroup named test-rg in the chinanorth3 location.
$rg =@{
    Name = 'test-rg'
    Location = 'chinanorth3'
}
New-AzResourceGroup @rg
Use New-AzVirtualNetwork and New-AzVirtualNetworkSubnetConfig to create a virtual network.
## Create backend subnet config ##
$subnet = @{
    Name = 'subnet-1'
    AddressPrefix = '10.0.0.0/24'
}
$subnetConfig = New-AzVirtualNetworkSubnetConfig @subnet

## Create the virtual network ##
$net = @{
    Name = 'vnet-1'
    ResourceGroupName = 'test-rg'
    Location = 'chinanorth3'
    AddressPrefix = '10.0.0.0/16'
    Subnet = $subnetConfig
    EnableEncryption = 'true'
    EncryptionEnforcementPolicy = 'AllowUnencrypted'
}
New-AzVirtualNetwork @net
Create a resource group with az group create named test-rg in the chinanorth3 location.
  az group create \
    --name test-rg \
    --location chinanorth3
Use az network vnet create to create a virtual network.
  az network vnet create \
    --resource-group test-rg \
    --location chinanorth3 \
    --name vnet-1 \
    --enable-encryption true \
    --encryption-enforcement-policy allowUnencrypted \
    --address-prefixes 10.0.0.0/16 \
    --subnet-name subnet-1 \
    --subnet-prefixes 10.0.0.0/24
Important
To encrypt traffic, Virtual Network encryption requires supported virtual machine versions in the virtual network. The setting dropUnencrypted drops traffic between unsupported virtual machine versions if they're deployed in the virtual network.
Enable encryption on a virtual network
Use the following steps to enable encryption for a virtual network.
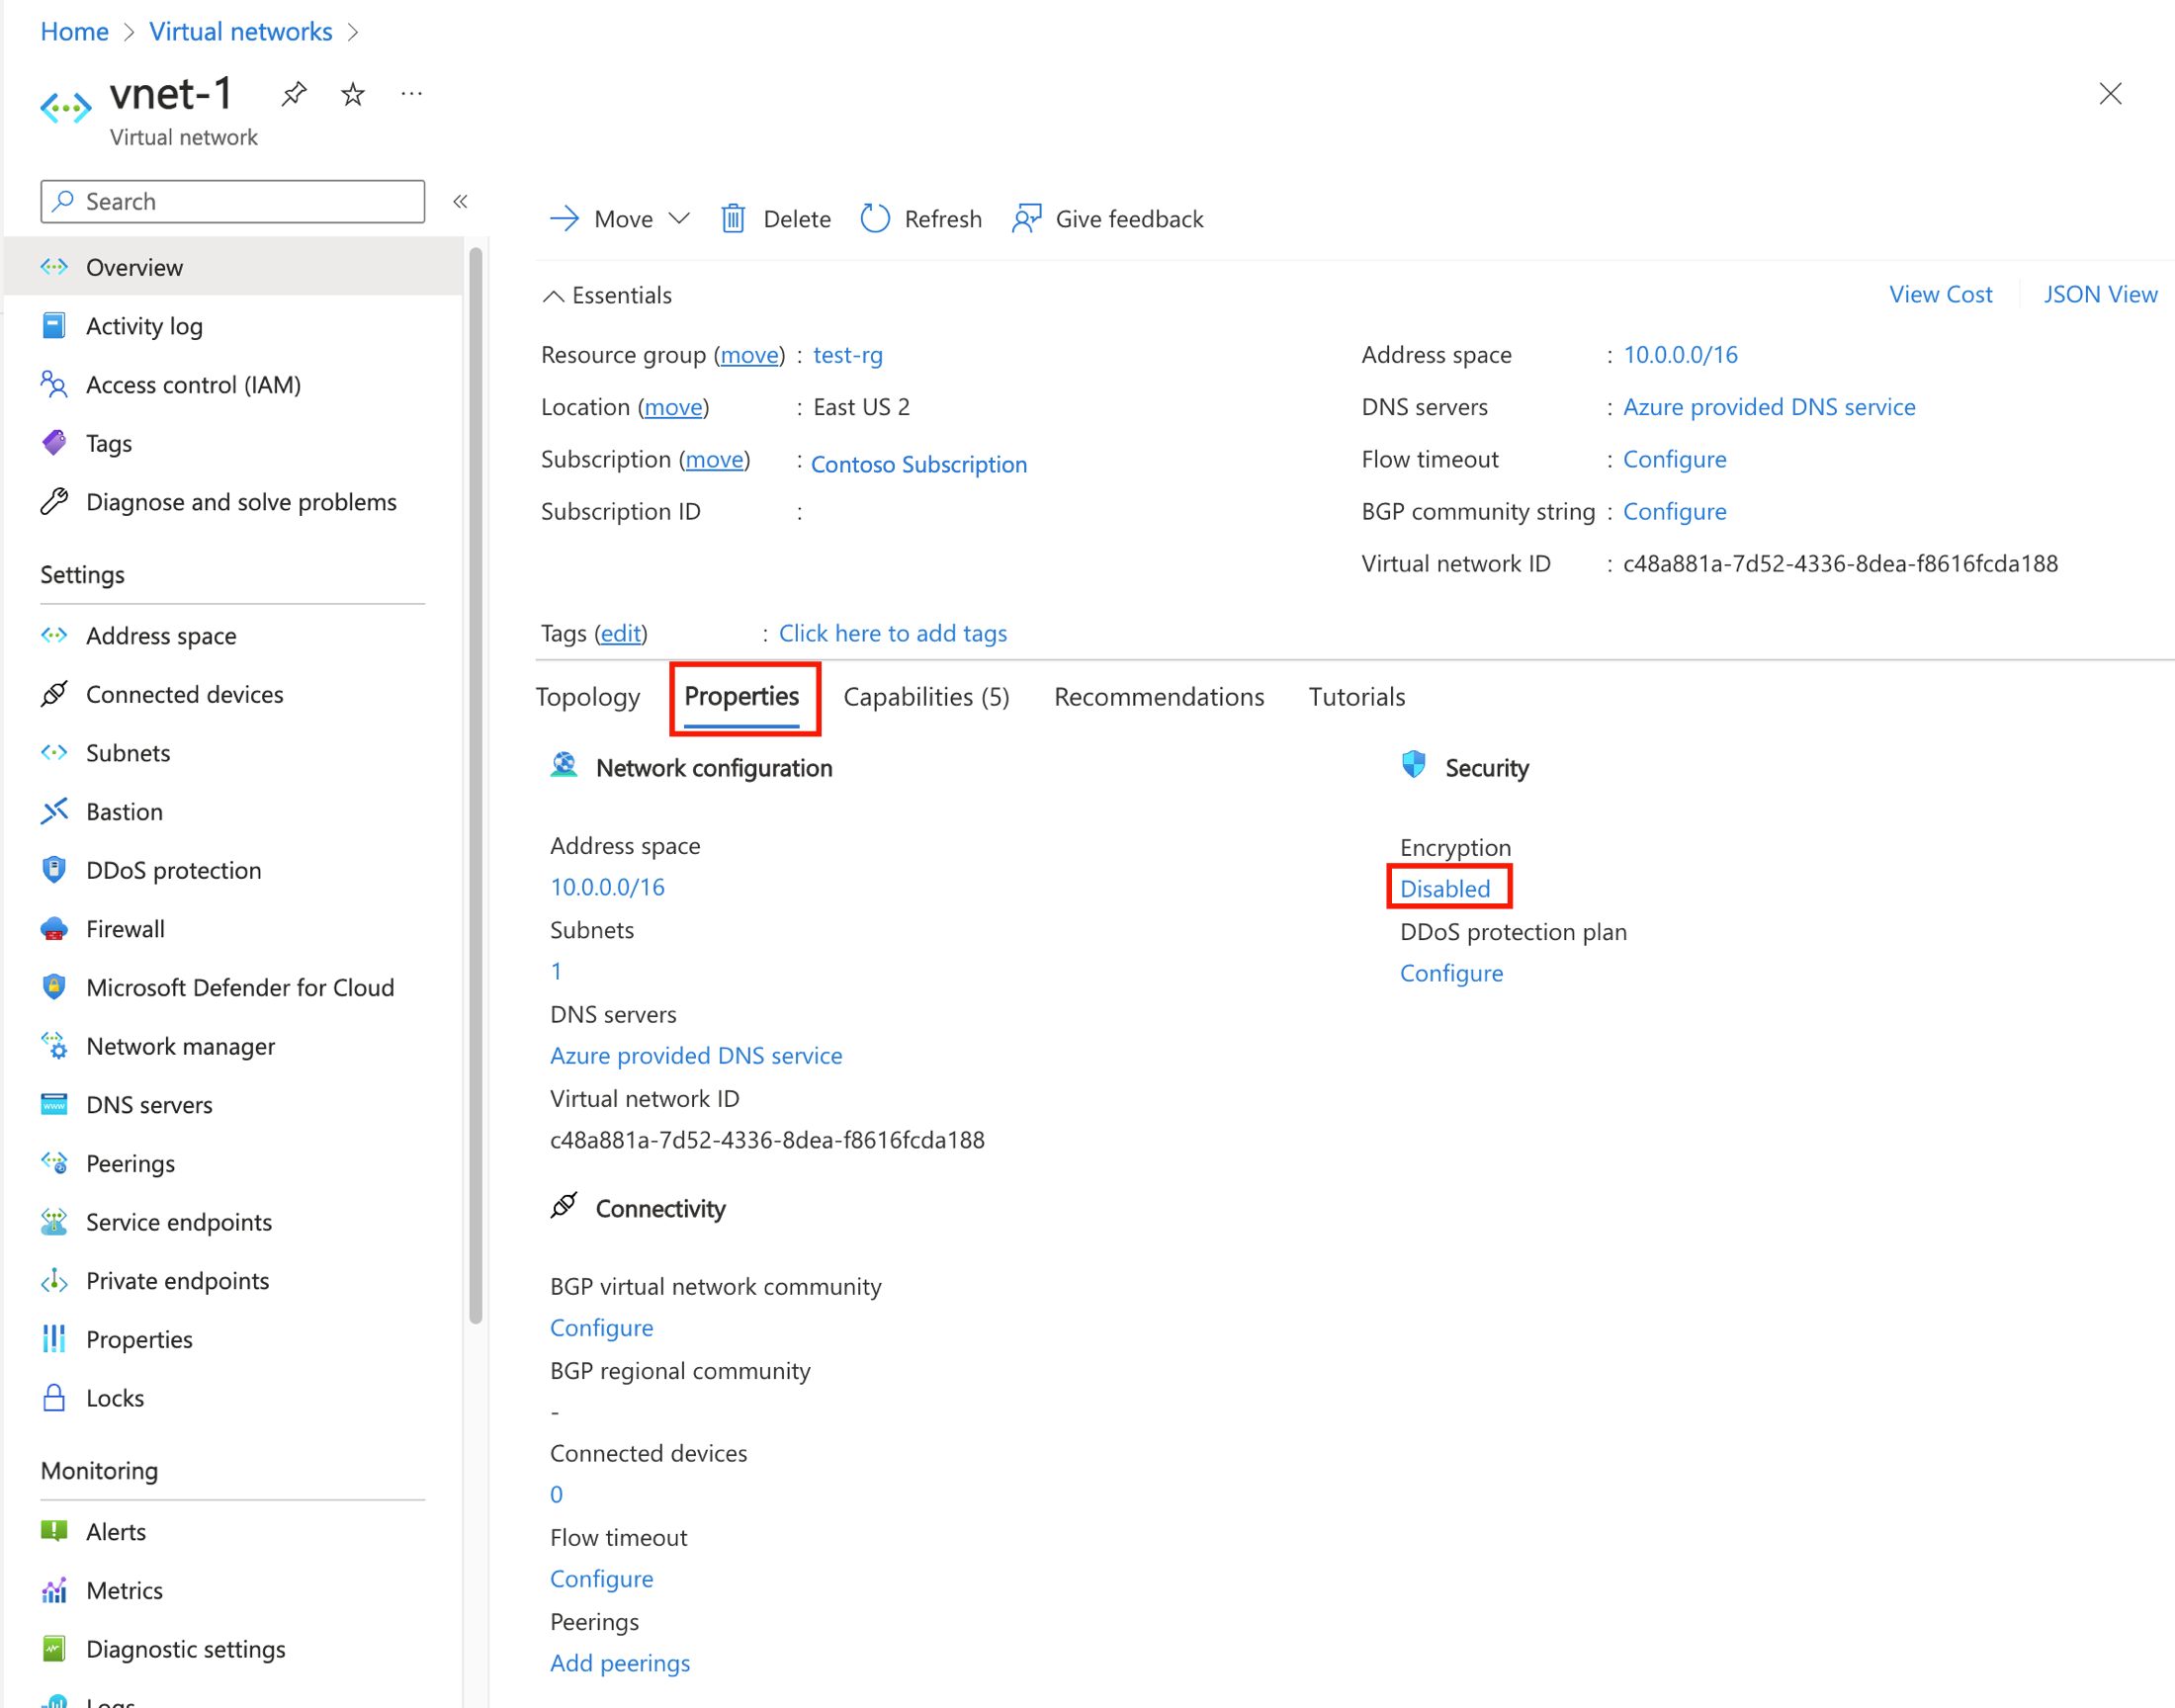
In the search box at the top of the portal, begin to enter Virtual networks. When Virtual networks appears in the search results, select it.
Select vnet-1 to open the vnet-1 pane.
On the service menu, select Overview, and then select the Properties tab.
Under Encryption, select Disabled.

Select the box next to Virtual network encryption.
Select Save.
You can also enable encryption on an existing virtual network by using Set-AzVirtualNetwork. This step isn't necessary if you created the virtual network with encryption enabled in the previous steps.
## Place the virtual network configuration into a variable. ##
$net = @{
    Name = 'vnet-1'
    ResourceGroupName = 'test-rg'
}
$vnet = Get-AzVirtualNetwork @net

## Enable encryption on the virtual network ##
$vnet.Encryption = @{
    Enabled = 'true'
    Enforcement = 'allowUnencrypted'
}
$vnet | Set-AzVirtualNetwork
You can also enable encryption on an existing virtual network by using az network vnet update. This step isn't necessary if you created the virtual network with encryption enabled in the previous steps.
  az network vnet update \
    --resource-group test-rg \
    --name vnet-1 \
    --enable-encryption true \
    --encryption-enforcement-policy allowUnencrypted
Verify that encryption is enabled
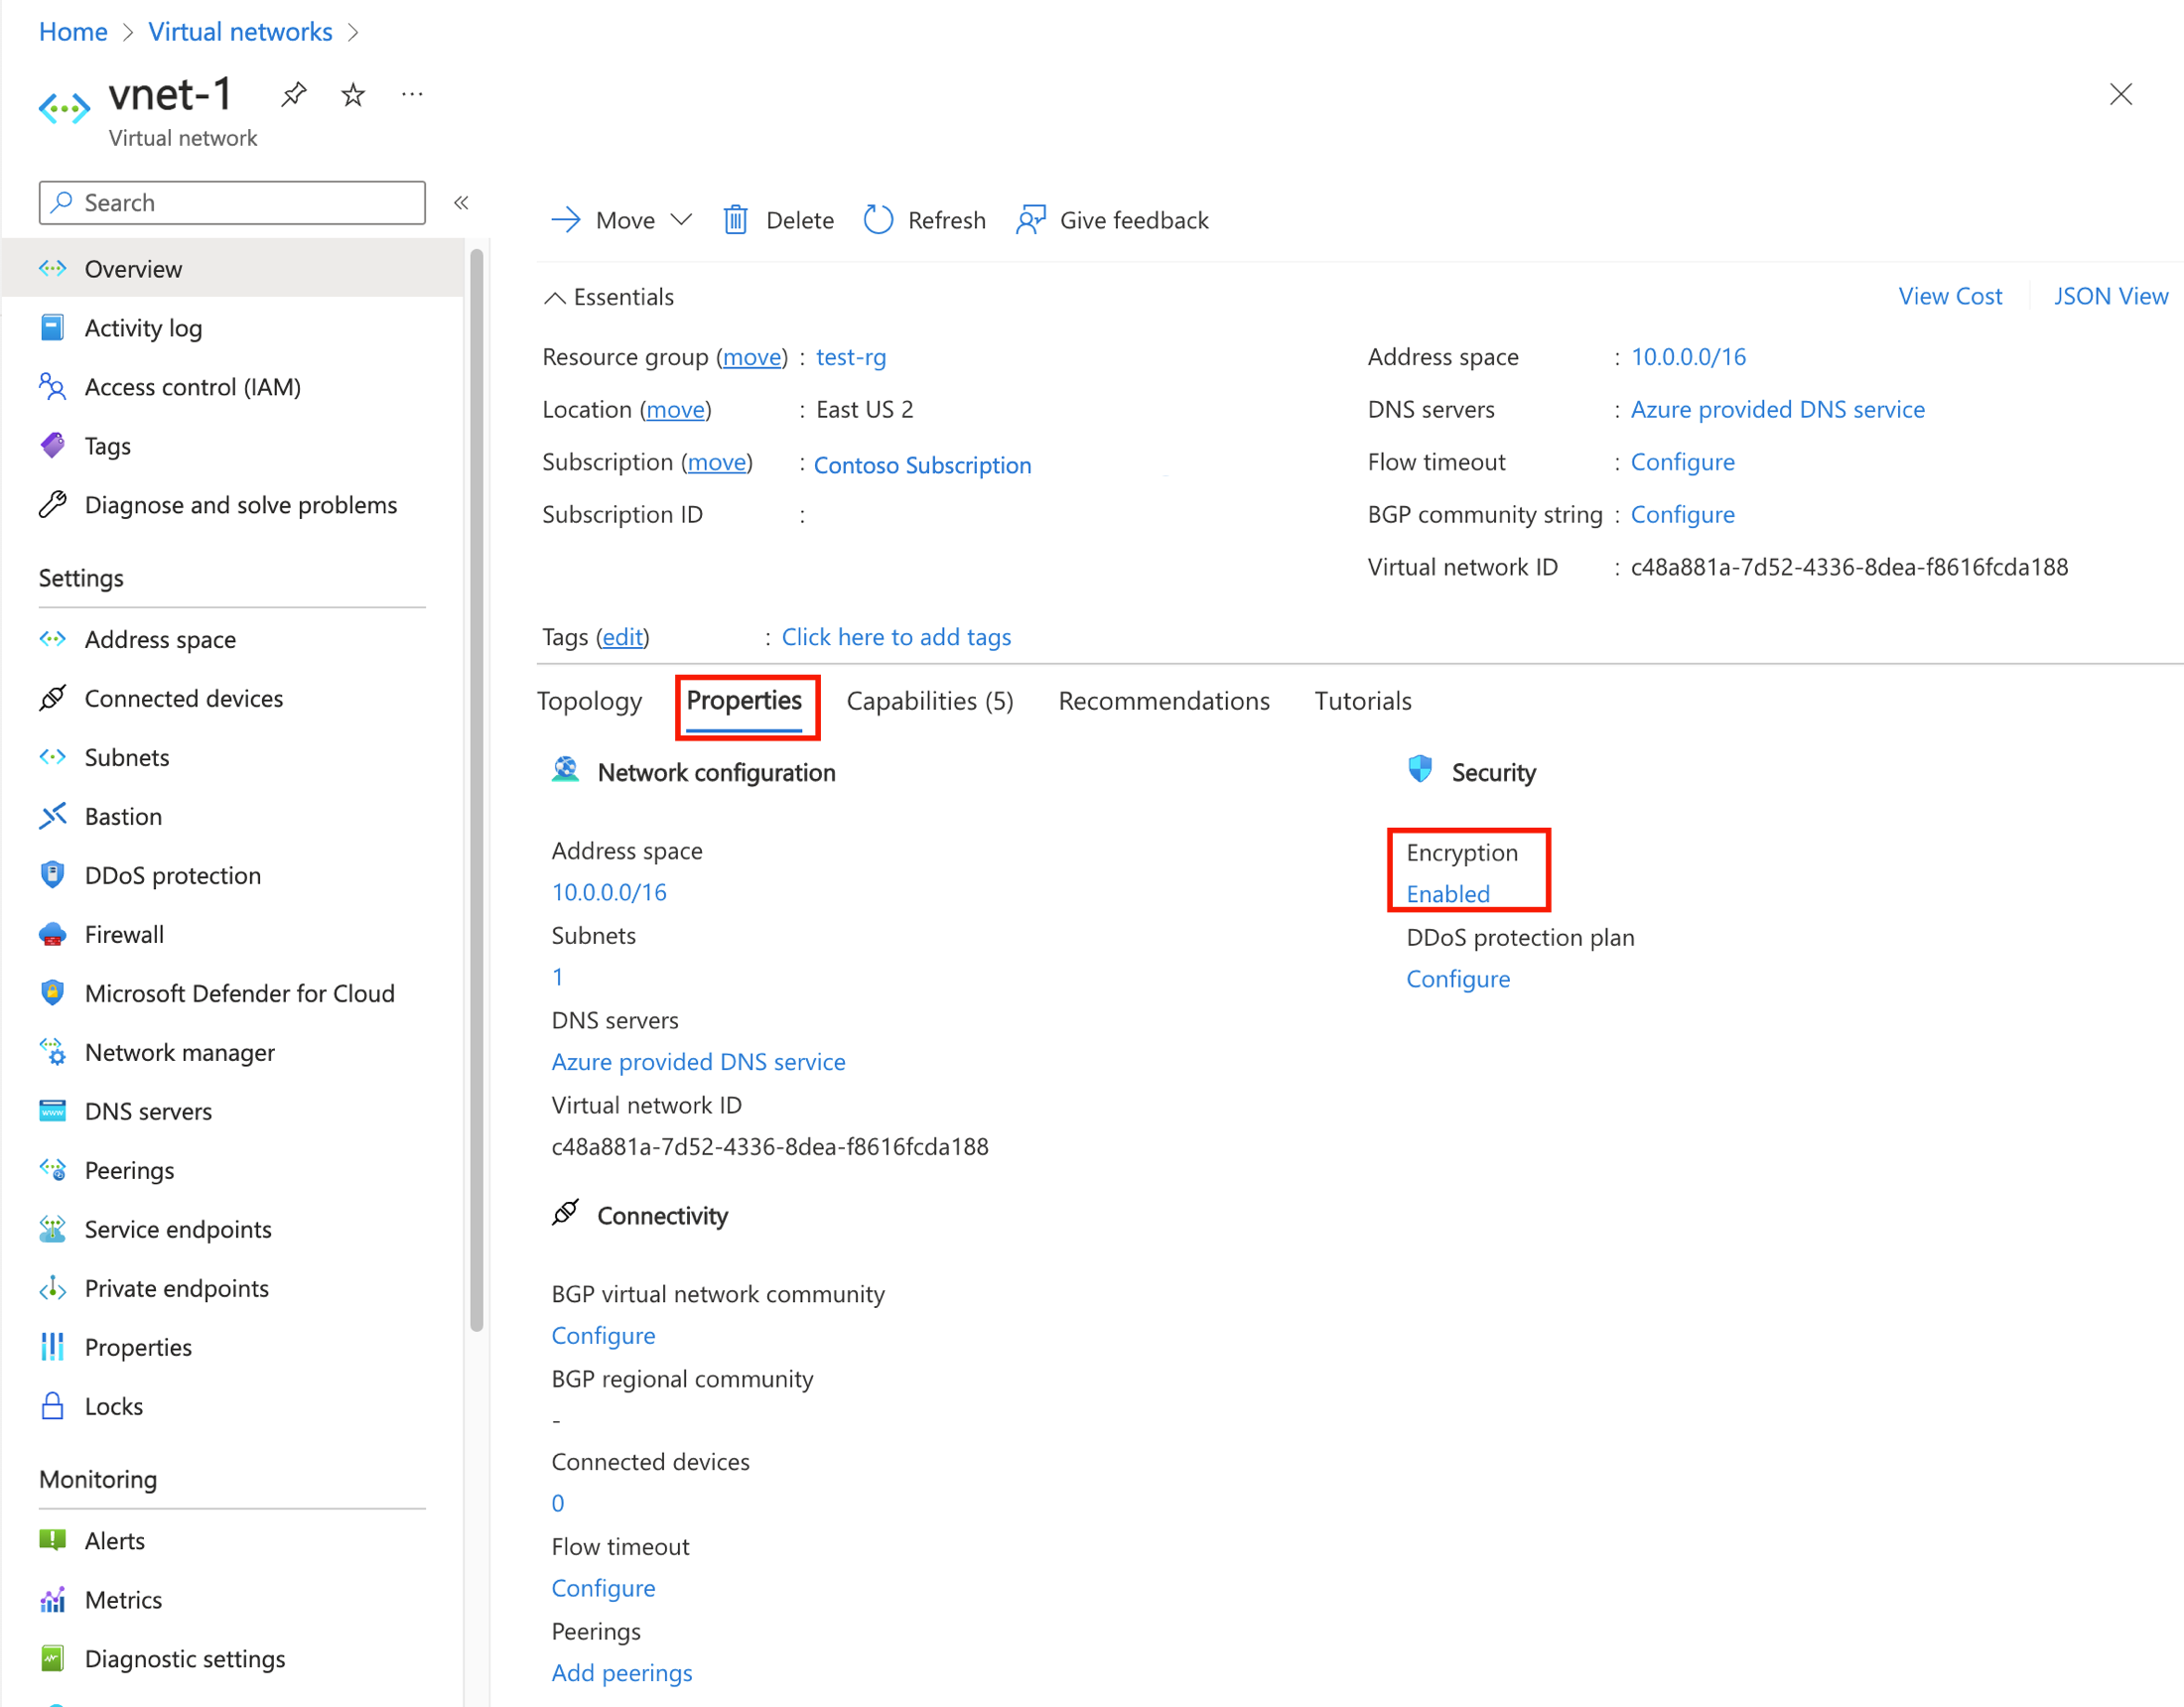
In the search box at the top of the portal, begin to enter Virtual networks. When Virtual networks appears in the search results, select it.
Select vnet-1 to open the vnet-1 pane.
On the service menu, select Overview, and then select the Properties tab.
Verify that Encryption is set to Enabled.

Use Get-AzVirtualNetwork to view the encryption parameter for the virtual network you created previously.
## Place the virtual network configuration into a variable. ##
$net = @{
    Name = 'vnet-1'
    ResourceGroupName = 'test-rg'
}
$vnet = Get-AzVirtualNetwork @net
To view the parameter for encryption, enter the following information:
$vnet.Encryption
Enabled Enforcement
------- -----------
True   allowUnencrypted
Use az network vnet show to view the encryption parameter for the virtual network you created previously.
  az network vnet show \
    --resource-group test-rg \
    --name vnet-1 \
    --query encryption \
    --output tsv
user@Azure:~$ az network vnet show \
    --resource-group test-rg \
    --name vnet-1 \
    --query encryption \
    --output tsv
True   AllowUnencrypted
Clean up resources
Clean up resources
When you finish using the resources that you created, you can delete the resource group and all its resources:
In the Azure portal, search for and select Resource groups.
On the Resource groups page, select the test-rg resource group.
On the test-rg page, select Delete resource group.
Enter test-rg in Enter resource group name to confirm deletion, and then select Delete.
When you no longer need this resource group, use Remove-AzResourceGroup to remove the resource group and all the resources it contains.
$cleanup = @{
  Name  = "test-rg"
}
Remove-AzResourceGroup @cleanup -Force
When you finish with the virtual network, use az group delete to remove the resource group and all its resources.
az group delete \
    --name test-rg \
    --yes
Related content


