Create a virtual machine with a static private IP address using the Azure portal
When you create a virtual machine (VM), it's automatically assigned a private IP address from a range that you specify. This IP address is based on the subnet in which the VM is deployed, and the VM keeps this address until the VM is deleted. Azure dynamically assigns the next available private IP address from the subnet you create a VM in. If you want to assign a specific IP address in this subnet for your VM, use a static IP address.
Prerequisites
- An Azure account with an active subscription. You can create an account for trial.
Create a VM
Use the following steps to create a VM, and its virtual network and subnet:
Sign in to the Azure portal.
In the search box at the top of the portal, enter Windows Server 2019 Datacenter (Gen2). Select Windows Server 2019 Datacenter (Gen2) in the search results.
Select Create.
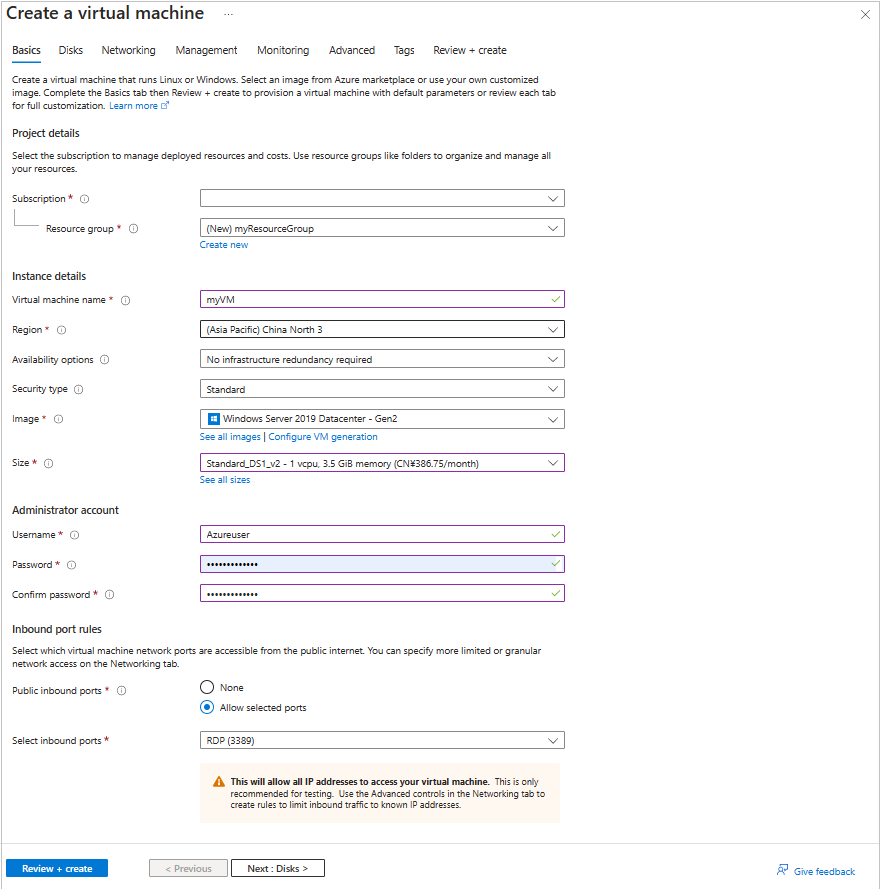
On the Basics tab of the Create a virtual machine screen, enter or select the following values:
- Subscription: Keep the default or select a different subscription.
- Resource group: Select Create new, and then name the group myResourceGroup.
- Virtual machine name: Enter myVM.
- Region: Select China North 3.
- Availability options: Select No infrastructure redundancy required.
- Image: Select Windows Server 2019 Datacenter - Gen2.
- Size: Accept the default, or drop down and select a size.
- Username, Password, and Confirm password: Enter an admin username and password for the VM.
- Public inbound ports: Select Allow selected ports.
- Select inbound ports: Select RDP (3389).
Warning
In this example, you open port 3389 to enable remote access to the Windows Server VM from the internet. However, opening port 3389 to the internet is not recommended to manage production workloads. For information about secure access to Azure VMs, see What is Azure Bastion?.
Select the Networking tab at the top of the page.
On the Networking page, enter or select the following values:
- Virtual network: Accept the default network name.
- Subnet: Select default if not already selected.
- Public IP: Accept the default public IP configuration.
- Public inbound ports: Select Allow selected ports.
- Select inbound ports: Select RDP (3389).
Select Review + create. Review the settings, and then select Create.
Note
Azure provides a default outbound access IP for VMs that either aren't assigned a public IP address or are in the backend pool of an internal basic Azure load balancer. The default outbound access IP mechanism provides an outbound IP address that isn't configurable.
The default outbound access IP is disabled when one of the following events happens:
- A public IP address is assigned to the VM.
- The VM is placed in the backend pool of a standard load balancer, with or without outbound rules.
- An Azure Virtual Network NAT gateway resource is assigned to the subnet of the VM.
VMs that you create by using virtual machine scale sets in flexible orchestration mode don't have default outbound access.
For more information about outbound connections in Azure, see Default outbound access in Azure and Use Source Network Address Translation (SNAT) for outbound connections.
Change private IP address to static
In this procedure, you change the private IP address from dynamic to static for the VM you created previously:
In the portal, search for and select Virtual machines.
In Virtual machines, select myVM from the list.
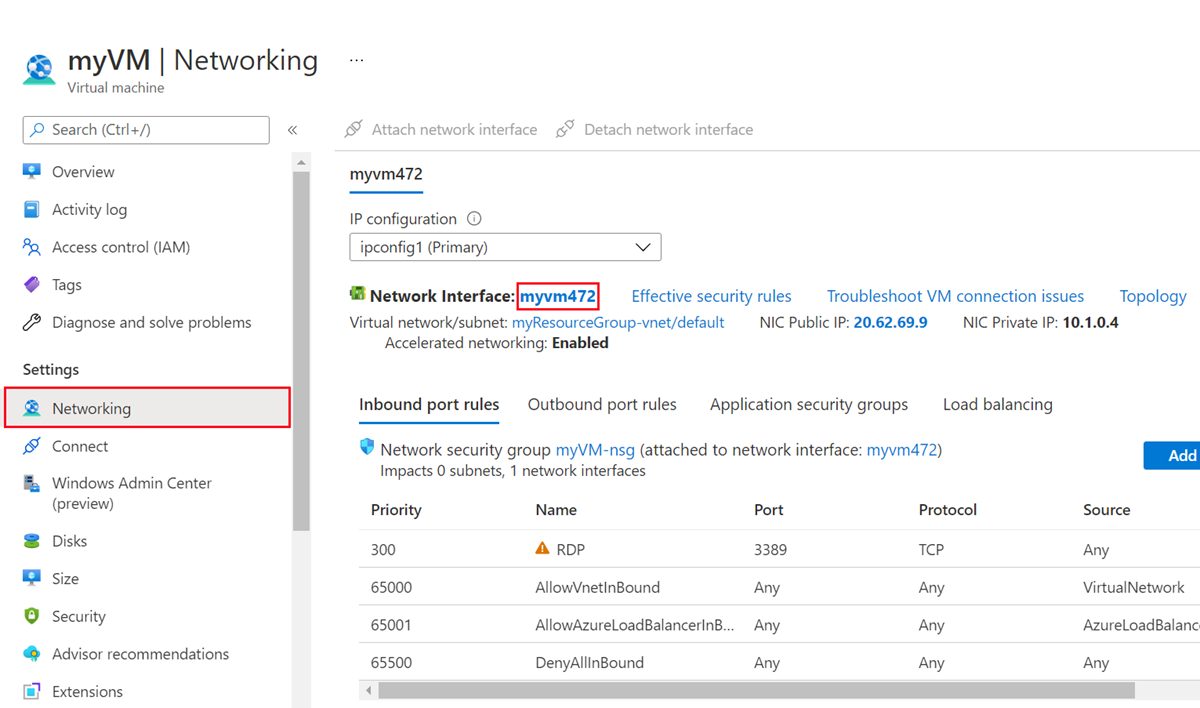
On the myVM page, under Settings, select Networking.
In Networking, select the name of the network interface next to Network interface. In this example, the name of the NIC is myvm472.

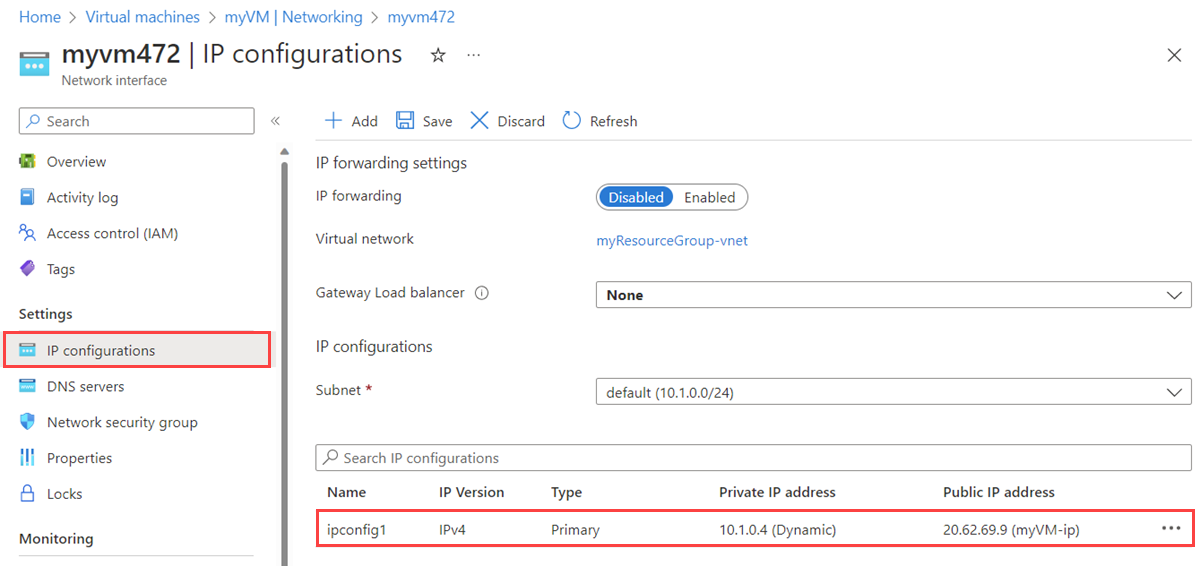
On the Network interface page, under Settings, select IP configurations.
In IP configurations, select ipconfig1 in the list.

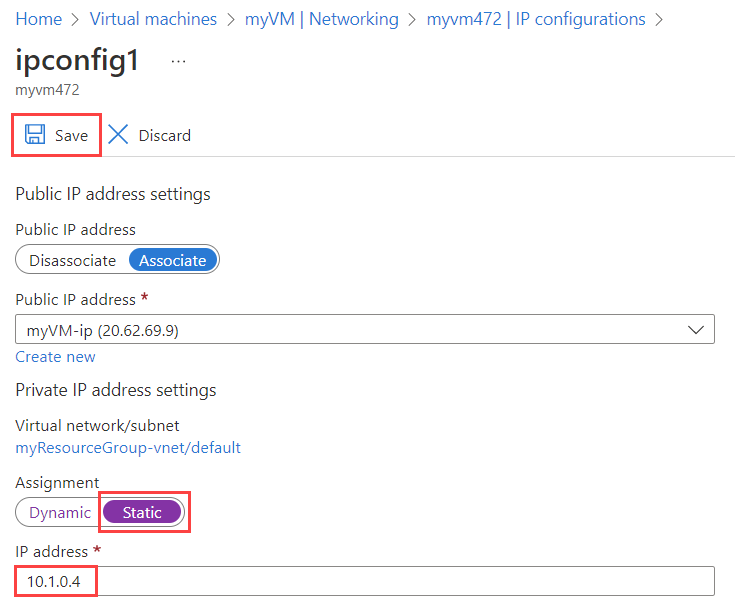
Under Assignment, select Static. Change the private IP address if you want a different one, and then select Save.
Warning
If you change the private IP address, the VM associated with the network interface will be restarted to utilize the new IP address.

Warning
From within the operating system of a VM, avoid associating a static private IP address on an Azure VM. Only assign a static private IP when it's necessary, such as when assigning many IP addresses to VMs.
If you manually set the private IP address within the operating system, make sure it matches the private IP address assigned to the Azure network interface. Otherwise, you can lose connectivity to the VM. For more information, see private IP address settings.
Clean up resources
When you're finished, delete the resource group and all of the resources it contains:
In the portal, search for and select myResourceGroup.
From the myResourceGroup screen, select Delete resource group.
Enter myResourceGroup for Enter resource group name to confirm deletion, and then select Delete.
Next steps
Learn more about static public IP addresses in Azure.
Learn more about public IP addresses in Azure.
Learn more about Azure public IP address settings.
Learn more about private IP addresses and assigning a static private IP address to an Azure VM.
