You can connect virtual networks to each other with virtual network peering. These virtual networks can be in the same region or different regions (also known as global virtual network peering). Once virtual networks are peered, resources in both virtual networks can communicate with each other over a low-latency, high-bandwidth connection using the Microsoft backbone network.
In this tutorial, you learn how to:
- Create virtual networks
- Connect two virtual networks with virtual network peering
- Deploy a virtual machine (VM) into each virtual network
- Communicate between virtual machines
Prerequisites
If you choose to install and use PowerShell locally, this article requires the Azure PowerShell module version 1.0.0 or later. Run Get-Module -ListAvailable Az to find the installed version. If you need to upgrade, see Install Azure PowerShell module. If you're running PowerShell locally, you also need to run Connect-AzAccount -Environment AzureChinaCloud to create a connection with Azure.
If you don't have an Azure trail subscription, create a trial subscription before you begin.
You can use the local Azure CLI.
- This article requires version 2.0.28 or later of the Azure CLI.
Create a resource group
Sign in to the Azure portal.
In the search box at the top of the portal, enter Resource group. Select Resource groups in the search results.
Select + Create.
In the Basics tab of Create a resource group, enter, or select the following information:
| Setting |
Value |
| Subscription |
Select your subscription. |
| Resource group |
Enter test-rg. |
| Region |
Select East US 2. |
Select Review + create.
Select Create.
Create a resource group with New-AzResourceGroup. The following example creates a resource group named test-rg in the chinanorth3 location.
$resourceGroup = @{
    Name = "test-rg"
    Location = "ChinaNorth3"
}
New-AzResourceGroup @resourceGroup
Create a resource group with az group create. The following example creates a resource group named test-rg in the chinanorth3 location.
az group create \
    --name test-rg \
    --location chinanorth3
Create a virtual network
In the search box at the top of the portal, enter Virtual network. Select Virtual networks in the search results.
Select + Create.
On the Basics tab of Create virtual network, enter, or select the following information:
| Setting |
Value |
| Project details |
|
| Subscription |
Select your subscription. |
| Resource group |
Select test-rg. |
| Instance details |
|
| Name |
Enter vnet-1. |
| Region |
Select China North 3. |
Select Next to proceed to the Security tab.
Select Next to proceed to the IP Addresses tab.
In the address space box in Subnets, select the default subnet.
In Edit subnet, enter, or select the following information:
| Setting |
Value |
| Subnet details |
|
| Subnet template |
Leave the default Default. |
| Name |
Enter subnet-1. |
| Starting address |
Leave the default of 10.0.0.0. |
| Subnet size |
Leave the default of /24 (256 addresses). |
Select Save.
Select Review + create at the bottom of the screen, and when validation passes, select Create.
Create a virtual network with New-AzVirtualNetwork. The following example creates a virtual network named vnet-1 with the address prefix 10.0.0.0/16.
$vnet1 = @{
    ResourceGroupName = "test-rg"
    Location = "ChinaNorth3"
    Name = "vnet-1"
    AddressPrefix = "10.0.0.0/16"
}
$virtualNetwork1 = New-AzVirtualNetwork @vnet1
Create a subnet configuration with Add-AzVirtualNetworkSubnetConfig. The following example creates a subnet configuration with a 10.0.0.0/24 address prefix:
$subConfig = @{
    Name = "subnet-1"
    AddressPrefix = "10.0.0.0/24"
    VirtualNetwork = $virtualNetwork1
}
$subnetConfig1 = Add-AzVirtualNetworkSubnetConfig @subConfig
Create a subnet configuration for Azure Bastion with Add-AzVirtualNetworkSubnetConfig. The following example creates a subnet configuration with a 10.0.1.0/24 address prefix:
$subBConfig = @{
    Name = "AzureBastionSubnet"
    AddressPrefix = "10.0.1.0/24"
    VirtualNetwork = $virtualNetwork1
}
$subnetConfig2 = Add-AzVirtualNetworkSubnetConfig @subBConfig
Write the subnet configuration to the virtual network with Set-AzVirtualNetwork, which creates the subnet:
$virtualNetwork1 | Set-AzVirtualNetwork
Create a virtual network with az network vnet create. The following example creates a virtual network named vnet-1 with the address prefix 10.0.0.0/16.
az network vnet create \
    --name vnet-1 \
    --resource-group test-rg \
    --address-prefixes 10.0.0.0/16 \
    --subnet-name subnet-1 \
    --subnet-prefix 10.0.0.0/24
Create the Bastion subnet with az network vnet subnet create.
# Create a bastion subnet.
az network vnet subnet create \
    --vnet-name vnet-1 \
    --resource-group test-rg \
    --name AzureBastionSubnet \
    --address-prefix 10.0.1.0/24
Create a second virtual network
Repeat the previous steps to create a second virtual network with the following values:
Note
The second virtual network can be in the same region as the first virtual network or in a different region. You can skip the Bastion deployment for the second virtual network. After the virtual network peering is established, you can connect to both virtual machines with the same Bastion deployment.
| Setting |
Value |
| Name |
vnet-2 |
| Address space |
10.1.0.0/16 |
| Resource group |
test-rg |
| Subnet name |
subnet-1 |
| Subnet address range |
10.1.0.0/24 |
Create a second virtual network with New-AzVirtualNetwork. The following example creates a virtual network named vnet-2 with the address prefix 10.1.0.0/16.
Note
The second virtual network can be in the same region as the first virtual network or in a different region. You don't need a Bastion deployment for the second virtual network. After the virtual network peering is established, you can connect to both virtual machines with the same Bastion deployment.
$vnet2 = @{
    ResourceGroupName = "test-rg"
    Location = "ChinaNorth3"
    Name = "vnet-2"
    AddressPrefix = "10.1.0.0/16"
}
$virtualNetwork2 = New-AzVirtualNetwork @vnet2
Create a subnet configuration with Add-AzVirtualNetworkSubnetConfig. The following example creates a subnet configuration with a 10.1.0.0/24 address prefix:
$subConfig = @{
    Name = "subnet-1"
    AddressPrefix = "10.1.0.0/24"
    VirtualNetwork = $virtualNetwork2
}
$subnetConfig = Add-AzVirtualNetworkSubnetConfig @subConfig
Write the subnet configuration to the virtual network with Set-AzVirtualNetwork, which creates the subnet:
$virtualNetwork2 | Set-AzVirtualNetwork
Create a second virtual network with az network vnet create. The following example creates a virtual network named vnet-2 with the address prefix 10.1.0.0/16.
Note
The second virtual network can be in the same region as the first virtual network or in a different region. You don't need a Bastion deployment for the second virtual network. After the virtual network peering is established, you can connect to both virtual machines with the same Bastion deployment.
az network vnet create \
    --name vnet-2 \
    --resource-group test-rg \
    --address-prefixes 10.1.0.0/16 \
    --subnet-name subnet-1 \
    --subnet-prefix 10.1.0.0/24
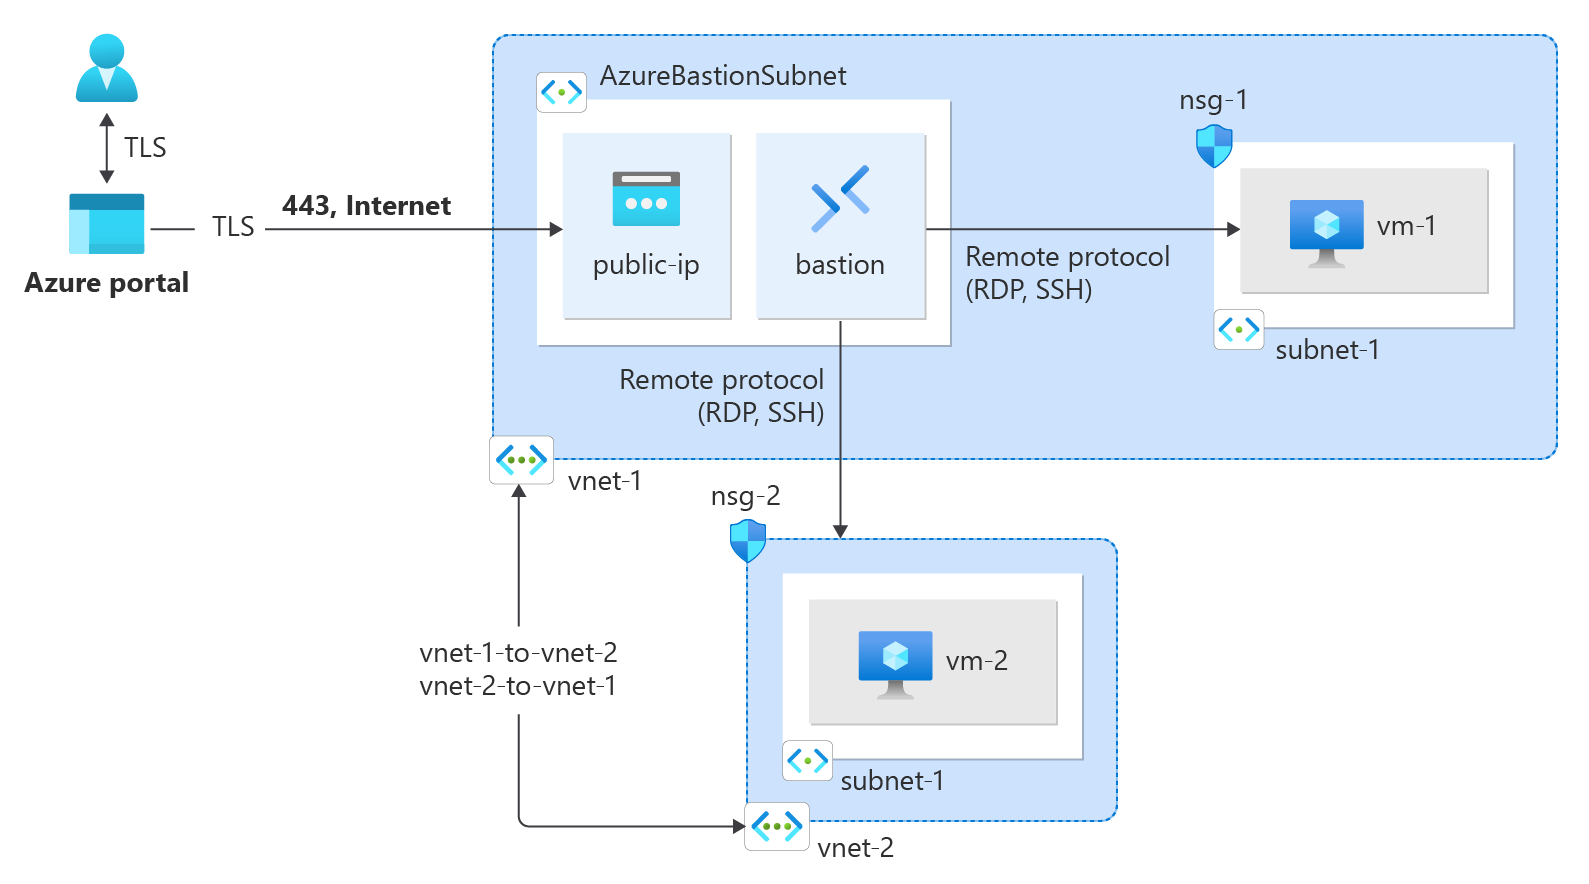
Deploy Azure Bastion
Azure Bastion uses your browser to connect to virtual machines (VMs) in your virtual network over secure shell (SSH) or remote desktop protocol (RDP) by using their private IP addresses. The virtual machines don't need public IP addresses, client software, or special configuration. For more information about Azure Bastion, see Azure Bastion.
Note
Hourly pricing starts from the moment that Bastion is deployed, regardless of outbound data usage. For more information, see Pricing and SKUs. If you're deploying Bastion as part of a tutorial or test, we recommend that you delete this resource after you finish using it.
In the search box at the top of the portal, enter Bastion. Select Bastions in the search results.
Select + Create.
In the Basics tab of Create a Bastion, enter, or select the following information:
| Setting |
Value |
| Project details |
|
| Subscription |
Select your subscription. |
| Resource group |
Select test-rg. |
| Instance details |
|
| Name |
Enter bastion. |
| Region |
Select China North 3. |
| Tier |
Select Developer. |
| Configure virtual networks |
|
| Virtual network |
Select vnet-1. |
| Subnet |
The AzureBastionSubnet is created automatically with an address space of /26 or larger. |
Select Review + create.
Select Create.
Create a public IP address for the Azure Bastion host with New-AzPublicIpAddress. The following example creates a public IP address named public-ip-bastion in the vnet-1 virtual network.
$publicIpParams = @{
    ResourceGroupName = "test-rg"
    Name = "public-ip-bastion"
    Location = "chinanorth3"
    AllocationMethod = "Static"
    Sku = "Standard"
}
New-AzPublicIpAddress @publicIpParams
Create an Azure Bastion host with New-AzBastion. The following example creates an Azure Bastion host named bastion in the AzureBastionSubnet subnet of the vnet-1 virtual network. Azure Bastion is used to securely connect Azure virtual machines without exposing them to the public internet.
$bastionParams = @{
    ResourceGroupName = "test-rg"
    Name = "bastion"
    VirtualNetworkName = "vnet-1"
    PublicIpAddressName = "public-ip-bastion"
    PublicIpAddressRgName = "test-rg"
    VirtualNetworkRgName = "test-rg"
    Sku = "Basic"
}
New-AzBastion @bastionParams -AsJob
Create a public IP address for the Azure Bastion host with az network public-ip create. The following example creates a public IP address named public-ip-bastion in the vnet-1 virtual network.
az network public-ip create \
    --resource-group test-rg \
    --name public-ip-bastion \
    --location chinanorth3 \
    --allocation-method Static \
    --sku Standard
Create an Azure Bastion host with az network bastion create. The following example creates an Azure Bastion host named bastion in the AzureBastionSubnet subnet of the vnet-1 virtual network. Azure Bastion is used to securely connect Azure virtual machines without exposing them to the public internet.
az network bastion create \
    --resource-group test-rg \
    --name bastion \
    --vnet-name vnet-1 \
    --public-ip-address public-ip-bastion \
    --location chinanorth3 \
    --sku Basic \
    --no-wait
Peer virtual networks
Create virtual network peer
Use the following steps to create a two way network peer between vnet1 and vnet2.
In the search box at the top of the portal, enter Virtual network. Select Virtual networks in the search results.
Select vnet-1.
In Settings select Peerings.
Select + Add.
Enter or select the following information in Add peering:
| Setting |
Value |
| This virtual network |
|
| Peering link name |
Enter vnet-1-to-vnet-2. |
| Allow 'vnet-1' to access 'vnet-2' |
Leave the default of selected. |
| Allow 'vnet-1' to receive forwarded traffic from 'vnet-2' |
Select the checkbox. |
| Allow gateway in 'vnet-1' to forward traffic to 'vnet-2' |
Leave the default of cleared. |
| Enable 'vnet-1' to use 'vnet-2' remote gateway |
Leave the default of cleared. |
| Remote virtual network |
|
| Peering link name |
Enter vnet-2-to-vnet-1. |
| Virtual network deployment model |
Leave the default of Resource Manager. |
| Subscription |
Select your subscription. |
| Virtual network |
Select vnet-2. |
| Allow 'vnet-2' to access 'vnet-1' |
Leave the default of selected. |
| Allow 'vnet-2' to receive forwarded traffic from 'vnet-1' |
Select the checkbox. |
| Allow gateway in 'vnet-2' to forward traffic to 'vnet-1' |
Leave the default of cleared. |
| Enable 'vnet-2' to use 'vnet-1's' remote gateway |
Leave the default of cleared. |

Select Add.
Create a peering with Add-AzVirtualNetworkPeering. The following example peers vnet-1 to vnet-2.
$peerConfig1 = @{
    Name = "vnet-1-to-vnet-2"
    VirtualNetwork = $virtualNetwork1
    RemoteVirtualNetworkId = $virtualNetwork2.Id
}
Add-AzVirtualNetworkPeering @peerConfig1
In the output returned after the previous command executes, you see the PeeringState is Initiated. The peering remains in the Initiated state until you create the peering from vnet-2 to vnet-1. Create a peering from vnet-2 to vnet-1.
$peerConfig2 = @{
    Name = "vnet-2-to-vnet-1"
    VirtualNetwork = $virtualNetwork2
    RemoteVirtualNetworkId = $virtualNetwork1.Id
}
Add-AzVirtualNetworkPeering @peerConfig2
In the output returned after the previous command executes, you see the PeeringState is Connected. Azure also changed the peering state of the vnet-1-to-vnet-2 peering to Connected. Confirm the peering state for the vnet-1-to-vnet-2 peering changed to Connected with Get-AzVirtualNetworkPeering.
$peeringState = @{
    ResourceGroupName = "test-rg"
    VirtualNetworkName = "vnet-1"
}
Get-AzVirtualNetworkPeering @peeringState | Select PeeringState
Resources in one virtual network can't communicate with resources in the other virtual network until the PeeringState for the peerings in both virtual networks is Connected.
Peerings are established between virtual network resource IDs. Obtain the ID of each virtual network with az network vnet show and store the resource IDs in their respective variables.
# Get the id for vnet-1.
vNet1Id=$(az network vnet show \
  --resource-group test-rg \
  --name vnet-1 \
  --query id --out tsv)

# Get the id for vnet-2.
vNet2Id=$(az network vnet show \
  --resource-group test-rg \
  --name vnet-2 \
  --query id \
  --out tsv)
Create a peering from vnet-1 to vnet-2 with az network vnet peering create. If the --allow-vnet-access parameter isn't specified, a peering is established, but no communication can flow through it.
az network vnet peering create \
  --name vnet-1-to-vnet-2 \
  --resource-group test-rg \
  --vnet-name vnet-1 \
  --remote-vnet $vNet2Id \
  --allow-vnet-access
In the output returned after the previous command executes, you see the peeringState is Initiated. The peering remains in the Initiated state until you create the peering from vnet-2 to vnet-1. Create a peering from vnet-2 to vnet-1.
az network vnet peering create \
  --name vnet-2-to-vnet-1 \
  --resource-group test-rg \
  --vnet-name vnet-2 \
  --remote-vnet $vNet1Id \
  --allow-vnet-access
In the output returned after the previous command executes, you see the peeringState is Connected. Azure also changed the peering state of the vnet-1-to-vnet-2 peering to Connected. Confirm the peering state for the vnet-1-to-vnet-2 peering changed to Connected with az network vnet peering show.
az network vnet peering show \
  --name vnet-1-to-vnet-2 \
  --resource-group test-rg \
  --vnet-name vnet-1 \
  --query peeringState
Resources in one virtual network can't communicate with resources in the other virtual network until the peeringState for the peerings in both virtual networks is Connected.
Create virtual machines
Test the communication between the virtual machines by creating a virtual machine in each virtual network. The virtual machines can communicate with each other over the virtual network peering you created.
In the search box at the top of the portal, enter Virtual machine. Select Virtual machines in the search results.
Select + Create then Azure virtual machine.
In Create a virtual machine enter, or select the following information in the Basics tab:
| Setting |
Value |
| Project details |
|
| Subscription |
Select your subscription. |
| Resource group |
Select test-rg. |
| Instance details |
|
| Virtual machine name |
Enter vm-1. |
| Region |
Select (Asia) China North 3. |
| Availability options |
Select No infrastructure redundancy required. |
| Security type |
Select Standard. |
| Image |
Select Ubuntu Server 24.04 LTS - x64 Gen2. |
| VM architecture |
Leave the default of x64. |
| Size |
Select a size. |
| Administrator account |
|
| Authentication type |
Select SSH public key. |
| Username |
Enter a username. |
| SSH public key source |
Select Generate new key pair. |
| Key pair name |
Enter vm-1-key. |
| Inbound port rules |
|
| Public inbound ports |
Select None. |
Select Next: Disks then Next: Networking.
In the Networking tab, enter, or select the following information:
| Setting |
Value |
| Network interface |
|
| Virtual network |
Select vnet-1. |
| Subnet |
Select subnet-1 (10.0.0.0/24). |
| Public IP |
Select None. |
| Network interface (NIC) network security group |
Select Advanced. |
| Configure network security group |
Select Create new.
In Name enter nsg-1.
Select OK. |
Leave the rest of the options at the defaults and select Review + create.
Select Create.
Repeat the previous steps to create a second virtual machine in the second virtual network with the following values:
| Setting |
Value |
| Virtual machine name |
vm-2 |
| Region |
China North 3 or same region as vnet-2. |
| SSH public key source |
Generate new key pair. |
| Key pair name |
vm-2-key. |
| Virtual network |
Select vnet-2. |
| Subnet |
Select subnet-1 (10.1.0.0/24). |
| Public IP |
None |
| Network security group name |
nsg-2 |
Create the first virtual machine
Create a virtual machine with New-AzVM. The following example creates a virtual machine named vm-1 in the vnet-1 virtual network. When prompted, enter the username and password for the virtual machine.
# Create a credential object
$cred = Get-Credential

# Define the virtual machine parameters
$vmParams = @{
    ResourceGroupName = "test-rg"
    Location = "chinanorth3"
    Name = "vm-1"
    Image = "Ubuntu2204"
    Size = "Standard_DS1_v2"
    Credential = $cred
    VirtualNetworkName = "vnet-1"
    SubnetName = "subnet-1"
    PublicIpAddressName = ""  # No public IP address
    SshKeyName = "vm-1-ssh-key"
    GenerateSshKey = $true
}

# Create the virtual machine
New-AzVM @vmParams
Create the second virtual machine
# Create a credential object
$cred = Get-Credential

# Define the virtual machine parameters
$vmParams = @{
    ResourceGroupName = "test-rg"
    Location = "chinanorth3"
    Name = "vm-2"
    Image = "Ubuntu2204"
    Size = "Standard_DS1_v2"
    Credential = $cred
    VirtualNetworkName = "vnet-2"
    SubnetName = "subnet-1"
    PublicIpAddressName = ""  # No public IP address
    SshKeyName = "vm-2-ssh-key"
    GenerateSshKey = $true
}

# Create the virtual machine
New-AzVM @vmParams
Create the first virtual machine
Create a virtual machine with az vm create. The following example creates a virtual machine named vm-1 in the vnet-1 virtual network. If SSH keys don't already exist in a default key location, the command creates them. The --no-wait option creates the virtual machine in the background, so you can continue to the next step.
az vm create \
    --resource-group test-rg \
    --name vm-1 \
    --image Ubuntu2204 \
    --vnet-name vnet-1 \
    --subnet subnet-1 \
    --public-ip-address "" \
    --admin-username azureuser \
    --generate-ssh-keys \
    --no-wait
Create the second virtual machine
Create a virtual machine in the vnet-2 virtual network.
az vm create \
    --resource-group test-rg \
    --name vm-2 \
    --image Ubuntu2204 \
    --vnet-name vnet-2 \
    --subnet subnet-1 \
    --public-ip-address "" \
    --admin-username azureuser \
    --generate-ssh-keys
The virtual machine takes a few minutes to create.
Wait for the virtual machines to be created before continuing with the next steps.
Connect to a virtual machine
In the search box at the top of the portal, enter Virtual machine. Select Virtual machines in the search results.
In Virtual machines, select vm-1.
Select Connect then Connect via Bastion in the Overview section.
In the Bastion connection page, enter or select the following information:
| Setting |
Value |
| Authentication Type |
Select SSH Private Key from Local File. |
| Username |
Enter the username you created. |
| Local File |
Select the vm-1-key private key file you downloaded. |
Select Connect.
Communicate between virtual machines
At the bash prompt for vm-1, enter ping -c 4 10.1.0.4.
You get a reply similar to the following message:
azureuser@vm-1:~$ ping -c 4 10.1.0.4
PING 10.1.0.4 (10.1.0.4) 56(84) bytes of data.
64 bytes from 10.1.0.4: icmp_seq=1 ttl=64 time=2.29 ms
64 bytes from 10.1.0.4: icmp_seq=2 ttl=64 time=1.06 ms
64 bytes from 10.1.0.4: icmp_seq=3 ttl=64 time=1.30 ms
64 bytes from 10.1.0.4: icmp_seq=4 ttl=64 time=0.998 ms

--- 10.1.0.4 ping statistics ---
4 packets transmitted, 4 received, 0% packet loss, time 3004ms
rtt min/avg/max/mdev = 0.998/1.411/2.292/0.520 ms
Close the Bastion session.
In the search box at the top of the portal, enter Virtual machine. Select Virtual machines in the search results.
In Virtual machines, select vm-2.
Select Connect then Connect via Bastion in the Overview section.
In the Bastion connection page, enter or select the following information:
| Setting |
Value |
| Authentication Type |
Select SSH Private Key from Local File. |
| Username |
Enter the username you created. |
| Local File |
Select the vm-2-key private key file you downloaded. |
Select Connect.
At the bash prompt for vm-2, enter ping -c 4 10.0.0.4.
You get a reply similar to the following message:
azureuser@vm-2:~$ ping -c 4 10.0.0.4
PING 10.0.0.4 (10.0.0.4) 56(84) bytes of data.
64 bytes from 10.0.0.4: icmp_seq=1 ttl=64 time=1.81 ms
64 bytes from 10.0.0.4: icmp_seq=2 ttl=64 time=3.35 ms
64 bytes from 10.0.0.4: icmp_seq=3 ttl=64 time=0.811 ms
64 bytes from 10.0.0.4: icmp_seq=4 ttl=64 time=1.28 ms
Close the Bastion session.
Clean up resources
When you finish using the resources that you created, you can delete the resource group and all its resources:
In the Azure portal, search for and select Resource groups.
On the Resource groups page, select the test-rg resource group.
On the test-rg page, select Delete resource group.
Enter test-rg in Enter resource group name to confirm deletion, and then select Delete.
When no longer needed, use Remove-AzResourcegroup to remove the resource group and all of the resources it contains.
$rgParams = @{
    Name = "test-rg"
}
Remove-AzResourceGroup @rgParams -Force
When no longer needed, use az group delete to remove the resource group and all of the resources it contains.
az group delete \
    --name test-rg \
    --yes \
    --no-wait
Next steps
In this tutorial, you:
To learn more about virtual network peering:
