You can use a network security group to filter inbound and outbound network traffic to and from Azure resources in an Azure virtual network.
Network security groups contain security rules that filter network traffic by IP address, port, and protocol. When a network security group is associated with a subnet, security rules are applied to resources deployed in that subnet.
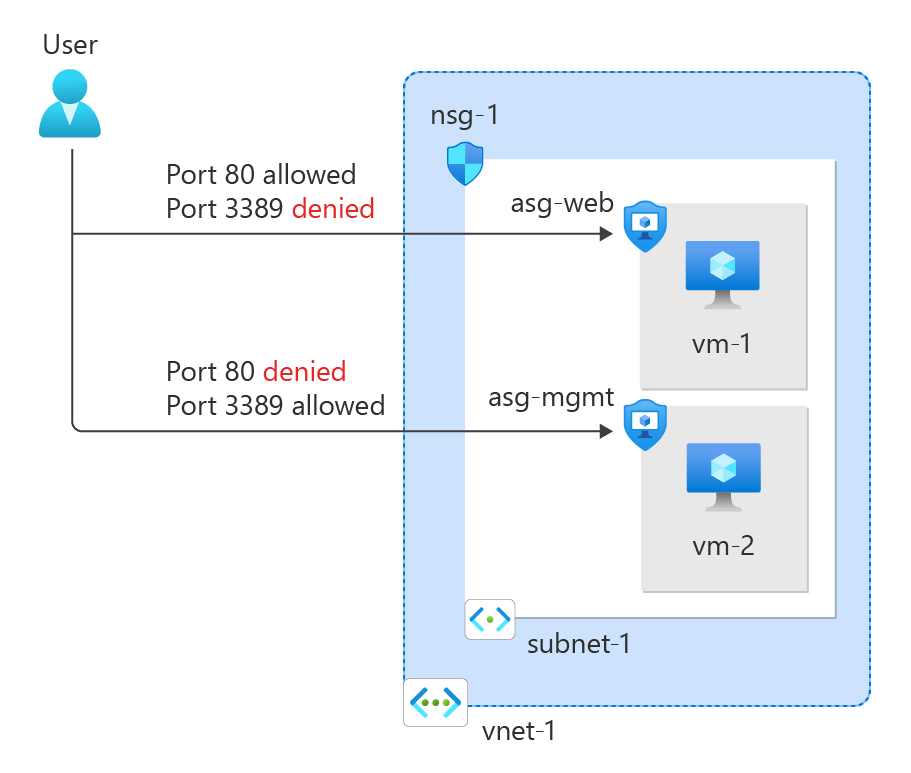
In this tutorial, you learn how to:
- Create a network security group and security rules
- Create application security groups
- Create a virtual network and associate a network security group to a subnet
- Deploy virtual machines and associate their network interfaces to the application security groups
Prerequisites
If you choose to install and use PowerShell locally, this article requires the Azure PowerShell module version 1.0.0 or later. Run Get-Module -ListAvailable Az to find the installed version. If you need to upgrade, see Install Azure PowerShell module. If you're running PowerShell locally, you also need to run Connect-AzAccount -Environment AzureChinaCloud to create a connection with Azure.
If you don't have an Azure trail subscription, create a trial subscription before you begin.
You can use the local Azure CLI.
- This article requires version 2.0.28 or later of the Azure CLI.
Create a virtual network
The following procedure creates a virtual network with a resource subnet.
In the portal, search for and select Virtual networks.
On the Virtual networks page, select + Create.
On the Basics tab of Create virtual network, enter or select the following information:
| Setting |
Value |
| Project details |
|
| Subscription |
Select your subscription. |
| Resource group |
Select Create new.
Enter test-rg in Name.
Select OK. |
| Instance details |
|
| Name |
Enter vnet-1. |
| Region |
Select (Asia Pacific) China East 2. |
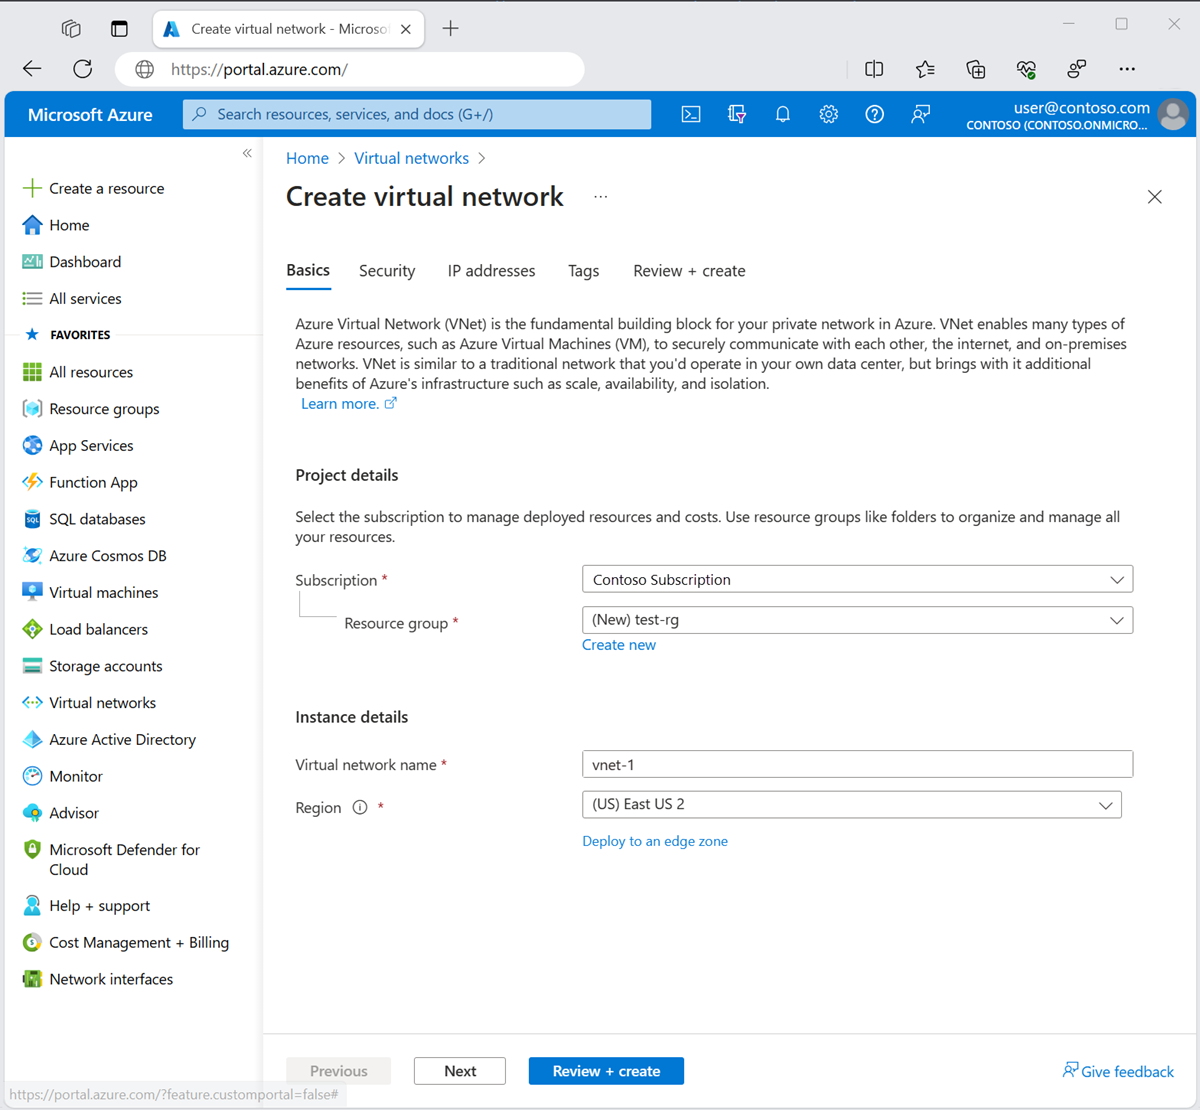
Select Next: IP Addresses to proceed to the IP Addresses tab.
In the address space box in Subnets, select the default subnet.
In Edit subnet, enter or select the following information:
| Setting |
Value |
| Subnet name |
Enter subnet-1. |
| Subnet address range |
Enter 10.0.0.0/24. |
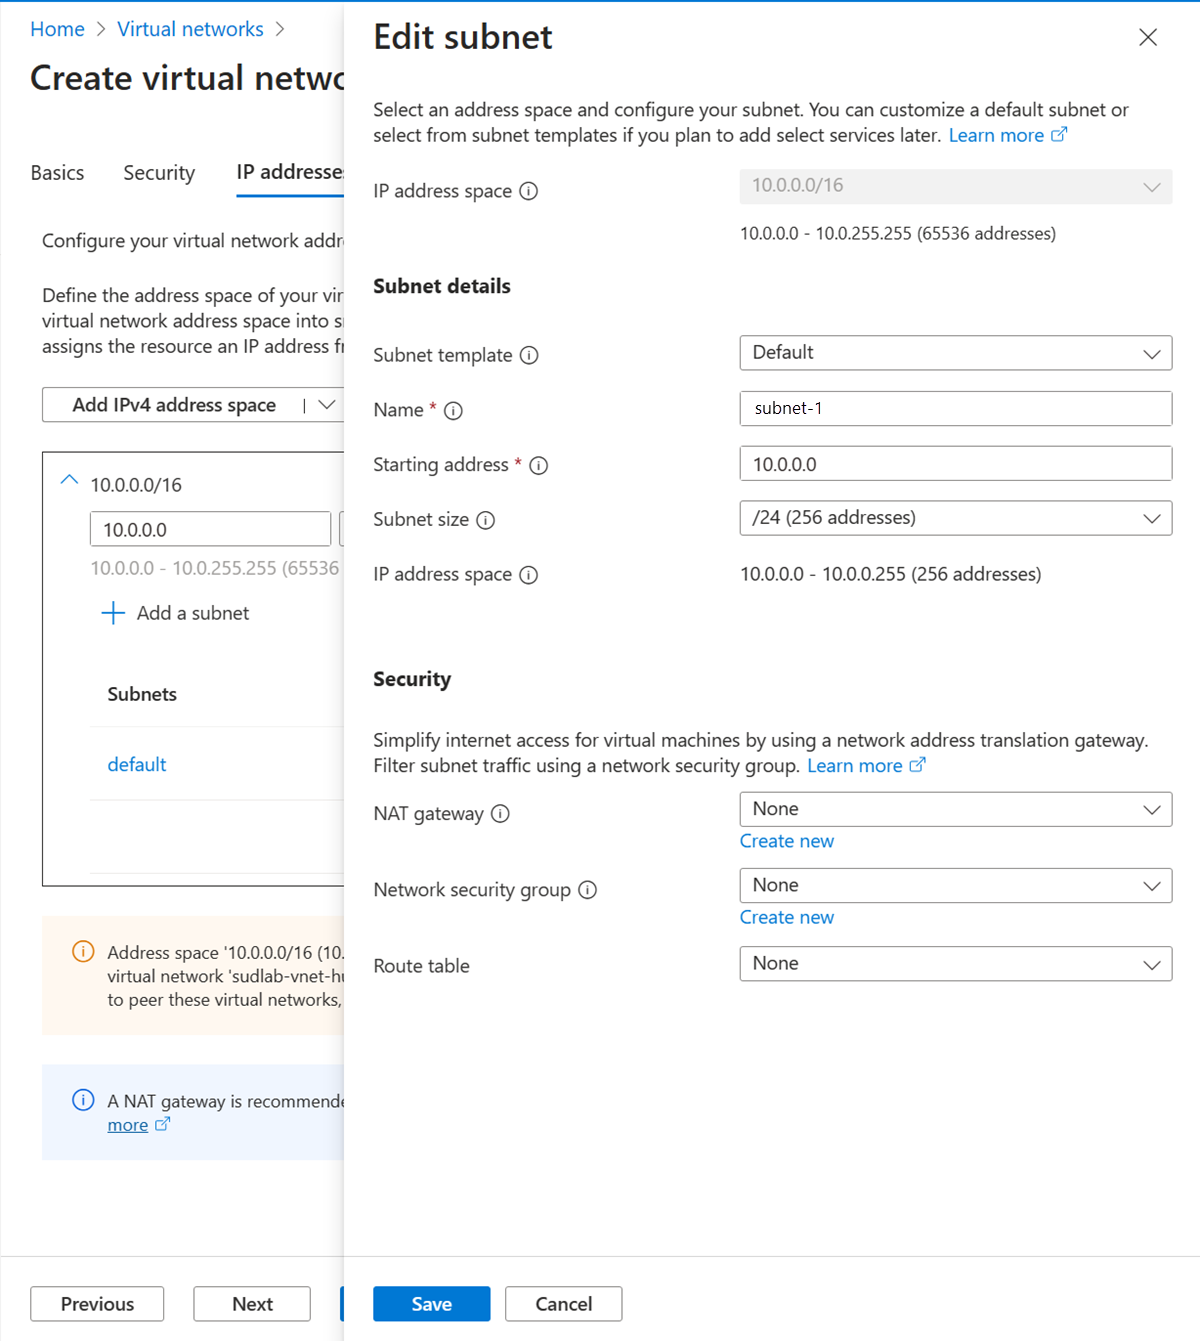
Select Save.
Select Review + create at the bottom of the screen, and when validation passes, select Create.
First create a resource group for all the resources created in this article with New-AzResourceGroup. The following example creates a resource group in the westus2 location:
$rg = @{
    ResourceGroupName = "test-rg"
    Location = "westus2"
}

New-AzResourceGroup @rg
Create a virtual network with New-AzVirtualNetwork. The following example creates a virtual named vnet-1:
$vnet = @{
    ResourceGroupName = "test-rg"
    Location = "westus2"
    Name = "vnet-1"
    AddressPrefix = "10.0.0.0/16"
}

$virtualNetwork = New-AzVirtualNetwork @vnet
Create a subnet configuration with New-AzVirtualNetworkSubnetConfig, and then write the subnet configuration to the virtual network with Set-AzVirtualNetwork. The following example adds a subnet named subnet-1 to the virtual network and associates the nsg-1 network security group to it:
$subnet = @{
    Name = "subnet-1"
    VirtualNetwork = $virtualNetwork
    AddressPrefix = "10.0.0.0/24"
}
Add-AzVirtualNetworkSubnetConfig @subnet

$virtualNetwork | Set-AzVirtualNetwork
First create a resource group for all the resources created in this article with az group create. The following example creates a resource group in the westus2 location:
az group create \
  --name test-rg \
  --location westus2
Create a virtual network with az network vnet create. The following example creates a virtual named vnet-1:
az network vnet create \
  --name vnet-1 \
  --resource-group test-rg \
  --address-prefixes 10.0.0.0/16
Add a subnet to a virtual network with az network vnet subnet create. The following example adds a subnet named subnet-1 to the virtual network and associates the nsg-1 network security group to it:
az network vnet subnet create \
  --vnet-name vnet-1 \
  --resource-group test-rg \
  --name subnet-1 \
  --address-prefix 10.0.0.0/24
Create application security groups
An application security group (ASGs) enables you to group together servers with similar functions, such as web servers.
In the search box at the top of the portal, enter Application security group. Select Application security groups in the search results.
Select + Create.
On the Basics tab of Create an application security group, enter, or select this information:
| Setting |
Value |
| Project details |
|
| Subscription |
Select your subscription. |
| Resource group |
Select test-rg. |
| Instance details |
|
| Name |
Enter asg-web. |
| Region |
Select (Asia Pacific) China North 2. |
Select Review + create.
Select + Create.
Repeat the previous steps, specifying the following values:
| Setting |
Value |
| Project details |
|
| Subscription |
Select your subscription. |
| Resource group |
Select test-rg. |
| Instance details |
|
| Name |
Enter asg-mgmt. |
| Region |
Select (Asia Pacific) China North 2. |
Select Review + create.
Select Create.
Create an application security group with New-AzApplicationSecurityGroup. An application security group enables you to group servers with similar port filtering requirements. The following example creates two application security groups.
$web = @{
    ResourceGroupName = "test-rg"
    Name = "asg-web"
    Location = "chinanorth2"
}
$webAsg = New-AzApplicationSecurityGroup @web

$mgmt = @{
    ResourceGroupName = "test-rg"
    Name = "asg-mgmt"
    Location = "chinanorth2"
}
$mgmtAsg = New-AzApplicationSecurityGroup @mgmt
Create an application security group with az network asg create. An application security group enables you to group servers with similar port filtering requirements. The following example creates two application security groups.
az network asg create \
  --resource-group test-rg \
  --name asg-web \
  --location chinanorth2

az network asg create \
  --resource-group test-rg \
  --name asg-mgmt \
  --location chinanorth2
Create a network security group
A network security group (NSG) secures network traffic in your virtual network.
In the search box at the top of the portal, enter Network security group. Select Network security groups in the search results.
Note
In the search results for Network security groups, you may see Network security groups (classic). Select Network security groups.
Select + Create.
On the Basics tab of Create network security group, enter, or select this information:
| Setting |
Value |
| Project details |
|
| Subscription |
Select your subscription. |
| Resource group |
Select test-rg. |
| Instance details |
|
| Name |
Enter nsg-1. |
| Location |
Select (Asia Pacific) China North 2. |
Select Review + create.
Select Create.
Create a network security group with New-AzNetworkSecurityGroup. The following example creates a network security group named nsg-1:
$nsgParams = @{
    ResourceGroupName = "test-rg"
    Location = "westus2"
    Name = "nsg-1"
}
$nsg = New-AzNetworkSecurityGroup @nsgParams
Create a network security group with az network nsg create. The following example creates a network security group named nsg-1:
# Create a network security group
az network nsg create \
  --resource-group test-rg \
  --name nsg-1
Associate network security group to subnet
In this section, you associate the network security group with the subnet of the virtual network you created earlier.
In the search box at the top of the portal, enter Network security group. Select Network security groups in the search results.
Select nsg-1.
Select Subnets from the Settings section of nsg-1.
In the Subnets page, select + Associate:
Under Associate subnet, select vnet-1 (test-rg) for Virtual network.
Select subnet-1 for Subnet, and then select OK.
Use Get-AzVirtualNetwork to retrieve the virtual network object, and then use Set-AzVirtualNetworkSubnetConfig to associate the network security group with the subnet. The following example retrieves the virtual network object and updates the subnet configuration to associate the network security group:
# Retrieve the virtual network
$vnet = Get-AzVirtualNetwork -Name "vnet-1" -ResourceGroupName "test-rg"

# Update the subnet configuration to associate the network security group
$subnetConfigParams = @{
    VirtualNetwork = $vnet
    Name = "subnet-1"
    AddressPrefix = $vnet.Subnets[0].AddressPrefix
    NetworkSecurityGroup = Get-AzNetworkSecurityGroup -Name "nsg-1" -ResourceGroupName "test-rg"
}
Set-AzVirtualNetworkSubnetConfig @subnetConfigParams

# Update the virtual network with the new subnet configuration
$vnet | Set-AzVirtualNetwork
Use az network vnet subnet update to associate the network security group with the subnet. The following example associates the nsg-1 network security group with the subnet-1 subnet:
az network vnet subnet update \
  --resource-group test-rg \
  --vnet-name vnet-1 \
  --name subnet-1 \
  --network-security-group nsg-1
Create security rules
Select Inbound security rules from the Settings section of nsg-1.
In Inbound security rules page, select + Add.
Create a security rule that allows ports 80 and 443 to the asg-web application security group. In Add inbound security rule page, enter or select the following information:
| Setting |
Value |
| Source |
Leave the default of Any. |
| Source port ranges |
Leave the default of (*). |
| Destination |
Select Application security group. |
| Destination application security groups |
Select asg-web. |
| Service |
Leave the default of Custom. |
| Destination port ranges |
Enter 80,443. |
| Protocol |
Select TCP. |
| Action |
Leave the default of Allow. |
| Priority |
Leave the default of 100. |
| Name |
Enter allow-web-all. |
Select Add.
Complete the previous steps with the following information:
| Setting |
Value |
| Source |
Leave the default of Any. |
| Source port ranges |
Leave the default of (*). |
| Destination |
Select Application security group. |
| Destination application security group |
Select asg-mgmt. |
| Service |
Select RDP. |
| Action |
Leave the default of Allow. |
| Priority |
Leave the default of 110. |
| Name |
Enter allow-rdp-all. |
Select Add.
Caution
In this article, RDP (port 3389) is exposed to the internet for the VM that is assigned to the asg-mgmt application security group.
For production environments, instead of exposing port 3389 to the internet, it's recommended that you connect to Azure resources that you want to manage using a VPN, private network connection, or Azure Bastion.
For more information on Azure Bastion, see What is Azure Bastion?.
Create a security rule with New-AzNetworkSecurityRuleConfig. The following example creates a rule that allows traffic inbound from the internet to the asg-web application security group over ports 80 and 443:
$webAsgParams = @{
    Name = "asg-web"
    ResourceGroupName = "test-rg"
}
$webAsg = Get-AzApplicationSecurityGroup @webAsgParams

$webRuleParams = @{
    Name = "Allow-Web-All"
    Access = "Allow"
    Protocol = "Tcp"
    Direction = "Inbound"
    Priority = 100
    SourceAddressPrefix = "Internet"
    SourcePortRange = "*"
    DestinationApplicationSecurityGroupId = $webAsg.id
    DestinationPortRange = 80,443
}
$webRule = New-AzNetworkSecurityRuleConfig @webRuleParams
The following example creates a rule that allows traffic inbound from the internet to the asg-mgmt application security group over port 3389:
$mgmtAsgParams = @{
    Name = "asg-mgmt"
    ResourceGroupName = "test-rg"
}
$mgmtAsg = Get-AzApplicationSecurityGroup @mgmtAsgParams

$mgmtRuleParams = @{
    Name = "Allow-RDP-All"
    Access = "Allow"
    Protocol = "Tcp"
    Direction = "Inbound"
    Priority = 110
    SourceAddressPrefix = "Internet"
    SourcePortRange = "*"
    DestinationApplicationSecurityGroupId = $mgmtAsg.id
    DestinationPortRange = 3389
}
$mgmtRule = New-AzNetworkSecurityRuleConfig @mgmtRuleParams
Use Get-AzNetworkSecurityGroup to retrieve the existing network security group, and then add the new rules with the += operator. Finally, update the network security group with Set-AzNetworkSecurityGroup:
# Retrieve the existing network security group
$nsg = Get-AzNetworkSecurityGroup -Name "nsg-1" -ResourceGroupName "test-rg"

# Add the new rules to the security group
$nsg.SecurityRules += $webRule
$nsg.SecurityRules += $mgmtRule

# Update the network security group with the new rules
Set-AzNetworkSecurityGroup -NetworkSecurityGroup $nsg
Caution
In this article, RDP (port 3389) is exposed to the internet for the VM that is assigned to the asg-mgmt application security group.
For production environments, instead of exposing port 3389 to the internet, it's recommended that you connect to Azure resources that you want to manage using a VPN, private network connection, or Azure Bastion.
For more information on Azure Bastion, see What is Azure Bastion?.
Create a security rule with az network nsg rule create. The following example creates a rule that allows traffic inbound from the internet to the asg-web application security group over ports 80 and 443:
az network nsg rule create \
  --resource-group test-rg \
  --nsg-name nsg-1 \
  --name Allow-Web-All \
  --access Allow \
  --protocol Tcp \
  --direction Inbound \
  --priority 100 \
  --source-address-prefix Internet \
  --source-port-range "*" \
  --destination-asgs "asg-web" \
  --destination-port-range 80 443
The following example creates a rule that allows traffic inbound from the Internet to the asg-mgmt application security group over port 22:
az network nsg rule create \
  --resource-group test-rg \
  --nsg-name nsg-1 \
  --name Allow-SSH-All \
  --access Allow \
  --protocol Tcp \
  --direction Inbound \
  --priority 110 \
  --source-address-prefix Internet \
  --source-port-range "*" \
  --destination-asgs "asg-mgmt" \
  --destination-port-range 22
Caution
In this article, SSH (port 22) is exposed to the internet for the VM that is assigned to the asg-mgmt application security group.
For production environments, instead of exposing port 22 to the internet, it's recommended that you connect to Azure resources that you want to manage using a VPN, private network connection, or Azure Bastion.
For more information on Azure Bastion, see What is Azure Bastion?.
Create virtual machines
Create two virtual machines (VMs) in the virtual network.
In the portal, search for and select Virtual machines.
In Virtual machines, select + Create, then Azure virtual machine.
In Create a virtual machine, enter or select this information in the Basics tab:
| Setting |
Value |
| Project details |
|
| Subscription |
Select your subscription. |
| Resource group |
Select test-rg. |
| Instance details |
|
| Virtual machine name |
Enter vm-web. |
| Region |
Select (Asia Pacific) China North 2. |
| Availability options |
Leave the default of No infrastructure redundancy required. |
| Security type |
Select Standard. |
| Image |
Select Windows Server 2022 Datacenter - x64 Gen2. |
| Azure Spot instance |
Leave the default of unchecked. |
| Size |
Select a size. |
| Administrator account |
|
| Username |
Enter a username. |
| Password |
Enter a password. |
| Confirm password |
Reenter password. |
| Inbound port rules |
|
| Select inbound ports |
Select None. |
Select Next: Disks then Next: Networking.
In the Networking tab, enter or select the following information:
| Setting |
Value |
| Network interface |
|
| Virtual network |
Select vnet-1. |
| Subnet |
Select subnet-1 (10.0.0.0/24). |
| Public IP |
Leave the default of a new public IP. |
| NIC network security group |
Select None. |
Select the Review + create tab, or select the blue Review + create button at the bottom of the page.
Select Create. The VM might take a few minutes to deploy.
Repeat the previous steps to create a second virtual machine named vm-mgmt.
Before creating the VMs, retrieve the virtual network object with the subnet with Get-AzVirtualNetwork:
$virtualNetworkParams = @{
    Name = "vnet-1"
    ResourceGroupName = "test-rg"
}
$virtualNetwork = Get-AzVirtualNetwork @virtualNetworkParams
Create a public IP address for each VM with New-AzPublicIpAddress:
$publicIpWebParams = @{
    AllocationMethod = "Static"
    ResourceGroupName = "test-rg"
    Location = "chinanorth2"
    Name = "public-ip-vm-web"
}
$publicIpWeb = New-AzPublicIpAddress @publicIpWebParams

$publicIpMgmtParams = @{
    AllocationMethod = "Static"
    ResourceGroupName = "test-rg"
    Location = "chinanorth2"
    Name = "public-ip-vm-mgmt"
}
$publicIpMgmt = New-AzPublicIpAddress @publicIpMgmtParams
Create two network interfaces with New-AzNetworkInterface, and assign a public IP address to the network interface. The following example creates a network interface, associates the public-ip-vm-web public IP address to it.
$webNicParams = @{
    Location = "chinanorth2"
    Name = "vm-web-nic"
    ResourceGroupName = "test-rg"
    SubnetId = $virtualNetwork.Subnets[0].Id
    PublicIpAddressId = $publicIpWeb.Id
}
$webNic = New-AzNetworkInterface @webNicParams
The following example creates a network interface, associates the public-ip-vm-mgmt public IP address to it.
$mgmtNicParams = @{
    Location = "chinanorth2"
    Name = "vm-mgmt-nic"
    ResourceGroupName = "test-rg"
    SubnetId = $virtualNetwork.Subnets[0].Id
    PublicIpAddressId = $publicIpMgmt.Id
}
$mgmtNic = New-AzNetworkInterface @mgmtNicParams
Create two VMs in the virtual network so you can validate traffic filtering in a later step.
Create a VM configuration with New-AzVMConfig, then create the VM with New-AzVM. The following example creates a VM that serves as a web server. The -AsJob option creates the VM in the background, so you can continue to the next step:
# Create user object
$cred = Get-Credential -Message "Enter a username and password for the virtual machine."

$webVmConfigParams = @{
    VMName = "vm-web"
    VMSize = "Standard_DS1_V2"
}

$vmOSParams = @{
    ComputerName = "vm-web"
    Credential = $cred
}

$vmImageParams = @{
    PublisherName = "MicrosoftWindowsServer"
    Offer = "WindowsServer"
    Skus = "2022-Datacenter"
    Version = "latest"
}

$webVmConfig = New-AzVMConfig @webVmConfigParams | Set-AzVMOperatingSystem -Windows @vmOSParams | Set-AzVMSourceImage @vmImageParams | Add-AzVMNetworkInterface -Id $webNic.Id

$webVmParams = @{
    ResourceGroupName = "test-rg"
    Location = "chinanorth2"
    VM = $webVmConfig
}

New-AzVM @webVmParams -AsJob
Create a VM to serve as a management server:
# Create user object
$cred = Get-Credential -Message "Enter a username and password for the virtual machine."

$webVmConfigParams = @{
    VMName = "vm-mgmt"
    VMSize = "Standard_DS1_V2"
}

$vmOSParams = @{
    ComputerName = "vm-mgmt"
    Credential = $cred
}

$vmImageParams = @{
    PublisherName = "MicrosoftWindowsServer"
    Offer = "WindowsServer"
    Skus = "2022-Datacenter"
    Version = "latest"
}

$mgmtVmConfig = New-AzVMConfig @webVmConfigParams | Set-AzVMOperatingSystem -Windows @vmOSParams | Set-AzVMSourceImage @vmImageParams | Add-AzVMNetworkInterface -Id $mgmtNic.Id

$mgmtVmParams = @{
    ResourceGroupName = "test-rg"
    Location = "chinanorth2"
    VM = $mgmtVmConfig
}

New-AzVM @mgmtVmParams
The virtual machine takes a few minutes to create. Don't continue with the next step until Azure finishes creating the VM.
Create two VMs in the virtual network so you can validate traffic filtering in a later step.
Create a VM with az vm create. The following example creates a VM that serves as a web server. The --nsg "" option is specified to prevent Azure from creating a default network security group for the network interface Azure creates when it creates the VM. The command prompts you to create a password for the VM. SSH keys aren't used in this example to facilitate the later steps in this article. In a production environment, use SSH keys for security.
az vm create \
  --resource-group test-rg \
  --name vm-web \
  --image Ubuntu2204 \
  --vnet-name vnet-1 \
  --subnet subnet-1 \
  --nsg "" \
  --admin-username azureuser \
  --authentication-type password \
  --assign-identity
The VM takes a few minutes to create. After the VM is created, output similar to the following example is returned:
{
  "fqdns": "",
  "id": "/subscriptions/00000000-0000-0000-0000-000000000000/resourceGroups/test-rg/providers/Microsoft.Compute/virtualMachines/vm-web",
  "location": "chinanorth2",
  "macAddress": "00-0D-3A-23-9A-49",
  "powerState": "VM running",
  "privateIpAddress": "10.0.0.4",
  "publicIpAddress": "203.0.113.24",
  "resourceGroup": "test-rg"
}
Create a VM with az vm create. The following example creates a VM that serves as a management server.
The following example creates a VM and adds a user account. The --generate-ssh-keys parameter causes the CLI to look for an available ssh key in ~/.ssh. If one is found, that key is used. If not, one is generated and stored in ~/.ssh. Finally, we deploy the latest Ubuntu 22.04 image.
az vm create \
  --resource-group test-rg \
  --name vm-mgmt \
  --image Ubuntu2204 \
  --vnet-name vnet-1 \
  --subnet subnet-1 \
  --nsg "" \
  --admin-username azureuser \
  --generate-ssh-keys \
  --assign-identity
The VM takes a few minutes to create. Don't continue with the next step until Azure finishes creating the VM.
Associate network interfaces to an ASG
When you created the VMs, Azure created a network interface for each VM, and attached it to the VM.
Add the network interface of each VM to one of the application security groups you created previously:
In the search box at the top of the portal, enter Virtual machine. Select Virtual machines in the search results, then select vm-web.
Select Application security groups from the Networking section of vm-web.
Select Add application security groups, then in the Add application security groups tab, select asg-web. Finally, select Add.
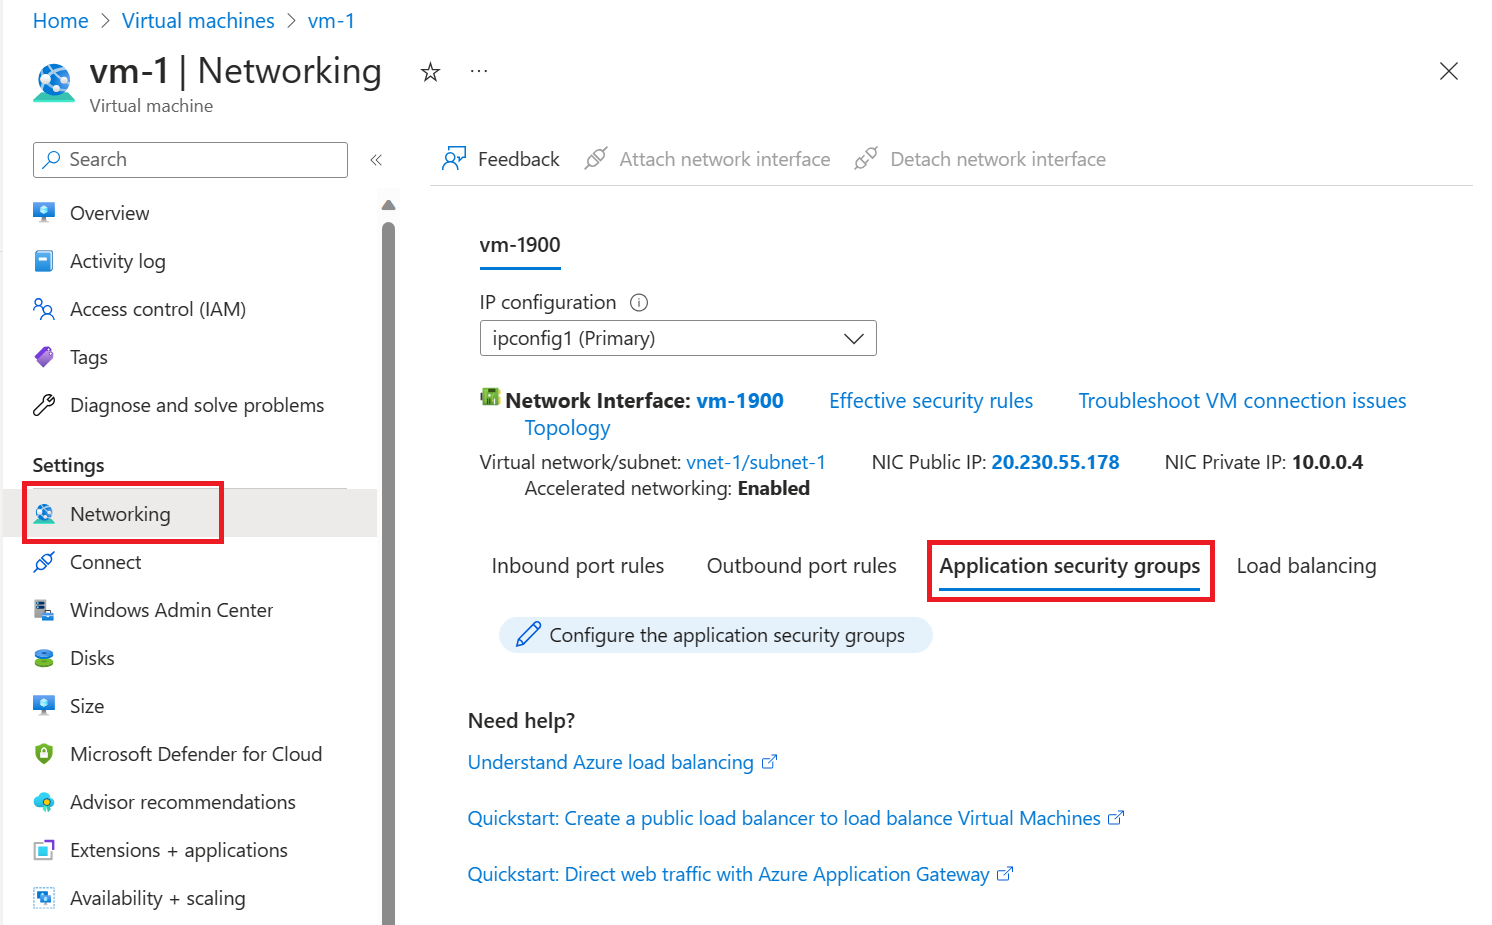
Repeat the previous steps for vm-mgmt, selecting asg-mgmt in the Add application security groups tab.
Use Get-AzNetworkInterface to retrieve the network interface of the virtual machine, and then use Get-AzApplicationSecurityGroup to retrieve the application security group. Finally, use Set-AzNetworkInterface to associate the application security group with the network interface. The following example associates the asg-web application security group with the vm-web-nic network interface:
$params1 = @{
    Name = "vm-web-nic"
    ResourceGroupName = "test-rg"
}
$nic = Get-AzNetworkInterface @params1

$params2 = @{
    Name = "asg-web"
    ResourceGroupName = "test-rg"
}
$asg = Get-AzApplicationSecurityGroup @params2

$nic.IpConfigurations[0].ApplicationSecurityGroups = @($asg)

$params3 = @{
    NetworkInterface = $nic
}
Set-AzNetworkInterface @params3
Repeat the command to associate the asg-mgmt application security group with the vm-mgmt-nic network interface.
$params1 = @{
    Name = "vm-mgmt-nic"
    ResourceGroupName = "test-rg"
}
$nic = Get-AzNetworkInterface @params1

$params2 = @{
    Name = "asg-mgmt"
    ResourceGroupName = "test-rg"
}
$asg = Get-AzApplicationSecurityGroup @params2

$nic.IpConfigurations[0].ApplicationSecurityGroups = @($asg)

$params3 = @{
    NetworkInterface = $nic
}
Set-AzNetworkInterface @params3
Use az network nic update to associate the network interface with the application security group. The following example associates the asg-web application security group with the vm-web-nic network interface:
# Retrieve the network interface name associated with the virtual machine
nic_name=$(az vm show --resource-group test-rg --name vm-web --query 'networkProfile.networkInterfaces[0].id' -o tsv | xargs basename)

# Associate the application security group with the network interface
az network nic ip-config update \
    --name ipconfigvm-web \
    --nic-name $nic_name \
    --resource-group test-rg \
    --application-security-groups asg-web
Repeat the command to associate the asg-mgmt application security group with the vm-mgmt-nic network interface.
# Retrieve the network interface name associated with the virtual machine
nic_name=$(az vm show --resource-group test-rg --name vm-mgmt --query 'networkProfile.networkInterfaces[0].id' -o tsv | xargs basename)

# Associate the application security group with the network interface
az network nic ip-config update \
    --name ipconfigvm-mgmt \
    --nic-name $nic_name \
    --resource-group test-rg \
    --application-security-groups asg-mgmt
Test traffic filters
In the search box at the top of the portal, enter Virtual machine. Select Virtual machines in the search results.
Select vm-mgmt.
On the Overview page, select the Connect button and then select Native RDP.
Select Download RDP file.
Open the downloaded rdp file and select Connect. Enter the username and password you specified when creating the VM.
Select OK.
You might receive a certificate warning during the connection process. If you receive the warning, select Yes or Continue, to continue with the connection.
The connection succeeds, because inbound traffic from the internet to the asg-mgmt application security group is allowed through port 3389.
The network interface for vm-mgmt is associated with the asg-mgmt application security group and allows the connection.
Open a PowerShell session on vm-mgmt. Connect to vm-web using the following:
mstsc /v:vm-web
The RDP connection from vm-mgmt to vm-web succeeds because virtual machines in the same network can communicate with each other over any port by default.
You can't create an RDP connection to the vm-web virtual machine from the internet. The security rule for the asg-web prevents connections to port 3389 inbound from the internet. Inbound traffic from the Internet is denied to all resources by default.
To install Microsoft IIS on the vm-web virtual machine, enter the following command from a PowerShell session on the vm-web virtual machine:
Install-WindowsFeature -name Web-Server -IncludeManagementTools
After the IIS installation is complete, disconnect from the vm-web virtual machine, which leaves you in the vm-mgmt virtual machine remote desktop connection.
Disconnect from the vm-mgmt VM.
Search for vm-web in the portal search box.
On the Overview page of vm-web, note the Public IP address for your VM. The address shown in the following example is 203.0.113.103. Your address is different:
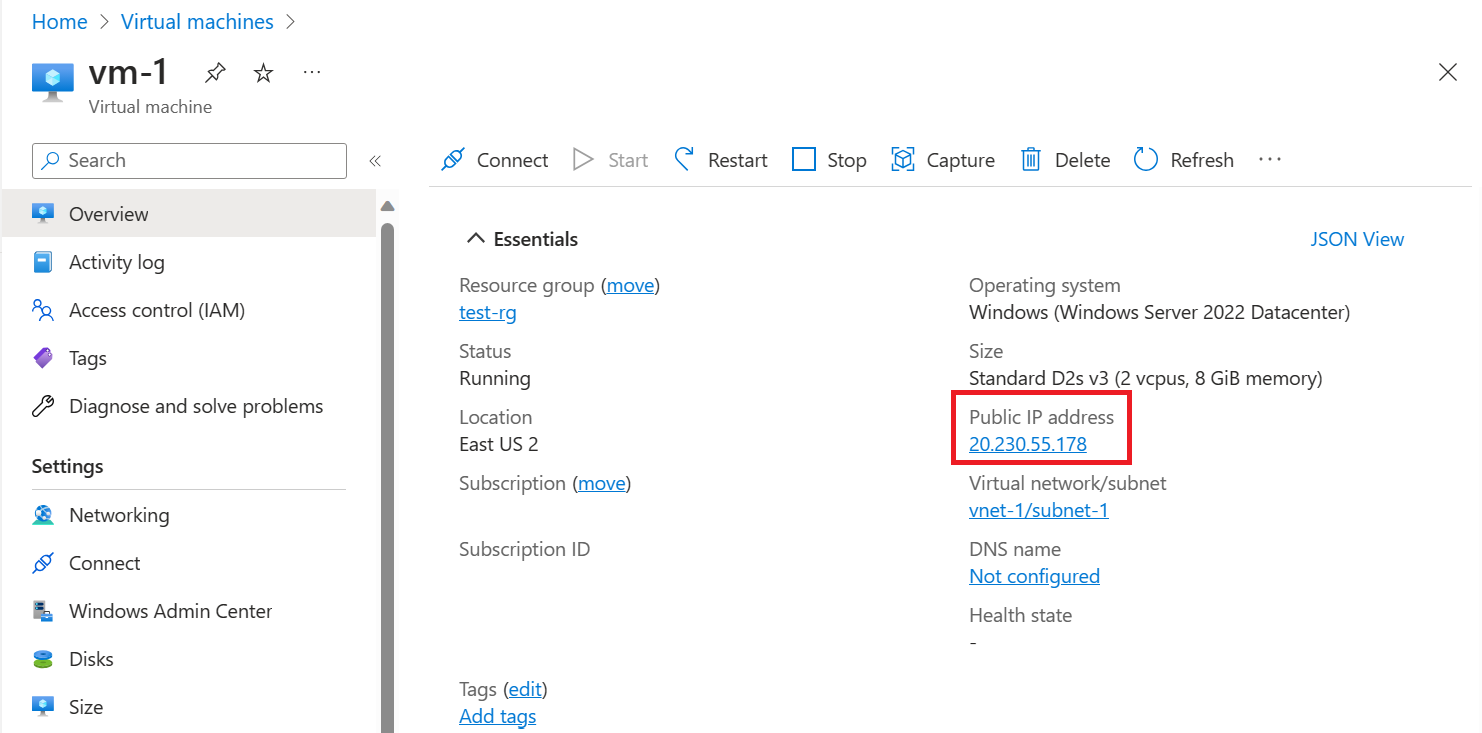
To confirm that you can access the vm-web web server from the internet, open an internet browser on your computer and browse to http://<public-ip-address-from-previous-step>.
You see the IIS default page, because inbound traffic from the internet to the asg-web application security group is allowed through port 80.
The network interface attached for vm-web is associated with the asg-web application security group and allows the connection.
Use Get-AzPublicIpAddress to return the public IP address of a VM. The following example returns the public IP address of the vm-mgmt VM:
$params = @{
    Name = "public-ip-vm-mgmt"
    ResourceGroupName = "test-rg"
}
$publicIP = Get-AzPublicIpAddress @params | Select IpAddress
Use the following command to create a remote desktop session with the vm-mgmt VM from your local computer.
mstsc /v:$publicIP
Enter the user name and password you specified when creating the VM (you might need to select More choices, then Use a different account, to specify the credentials you entered when you created the VM), then select OK. You might receive a certificate warning during the sign-in process. Select Yes to proceed with the connection.
The connection succeeds. Port 3389 is allowed inbound from the internet to the asg-mgmt application security group. The network interface attached to the vm-mgmt VM is in this group.
Use the following command to create a remote desktop connection to the vm-web VM, from the vm-mgmt VM, with the following command, from PowerShell:
mstsc /v:vm-web
The connection succeeds because a default security rule within each network security group allows traffic over all ports between all IP addresses within a virtual network. You can't create a remote desktop connection to the vm-web VM from the internet because the security rule for the asg-web doesn't allow port 3389 inbound from the internet.
Use the following command to install Microsoft IIS on the vm-web VM from PowerShell:
Install-WindowsFeature -name Web-Server -IncludeManagementTools
After the IIS installation is complete, disconnect from the vm-web VM, which leaves you in the vm-mgmt VM remote desktop connection. To view the IIS welcome screen, open an internet browser and browse to http://vm-web.
Disconnect from the vm-mgmt VM.
On your computer, enter the following command from PowerShell to retrieve the public IP address of the vm-web server:
$params = @{
    Name = "public-ip-vm-web"
    ResourceGroupName = "test-rg"
}
Get-AzPublicIpAddress @params | Select IpAddress
To confirm that you can access the vm-web web server from outside of Azure, open an internet browser on your computer and browse to http://<public-ip-address-from-previous-step>. The connection succeeds. Port 80 is allowed inbound from the internet to the asg-web application security group. The network interface attached to the vm-web VM is in this group.
Using an SSH client of your choice, connect to the VMs created previously. For example, the following command can be used from a command line interface such as Windows Subsystem for Linux to create an SSH session with the vm-mgmt VM. You can sign-in to the virtual machines using your Microsoft Entra ID credentials or you can use the SSH key that you used to create the VMs. In the following example, we use the SSH key to sign in to management VM and then sign in to the web VM from the management VM with a password.
For more information about how to SSH to a Linux VM and sign in with Microsoft Entra ID, see Sign in to a Linux virtual machine in Azure by using Microsoft Entra ID and OpenSSH.
Store IP address of VM in order to SSH
Run the following command to store the IP address of the VM as an environment variable:
export IP_ADDRESS=$(az vm show --show-details --resource-group test-rg --name vm-mgmt --query publicIps --output tsv)
ssh -o StrictHostKeyChecking=no azureuser@$IP_ADDRESS
The connection succeeds because the network interface attached to the vm-mgmt VM is in the asg-mgmt application security group, which allows port 22 inbound from the Internet.
Use the following command to SSH to the vm-web VM from the vm-mgmt VM:
ssh -o StrictHostKeyChecking=no azureuser@vm-web
The connection succeeds because a default security rule within each network security group allows traffic over all ports between all IP addresses within a virtual network. You can't SSH to the vm-web VM from the Internet because the security rule for the asg-web doesn't allow port 22 inbound from the Internet.
Use the following commands to install the nginx web server on the vm-web VM:
# Update package source
sudo apt-get -y update

# Install NGINX
sudo apt-get -y install nginx
The vm-web VM is allowed outbound to the Internet to retrieve nginx because a default security rule allows all outbound traffic to the Internet. Exit the vm-web SSH session, which leaves you at the username@vm-mgmt:~$ prompt of the vm-mgmt VM. To retrieve the nginx welcome screen from the vm-web VM, enter the following command:
curl vm-web
Sign out of the vm-mgmt VM. To confirm that you can access the vm-web web server from outside of Azure, enter curl <publicIpAddress> from your own computer. The connection succeeds because the asg-web application security group, which the network interface attached to the vm-web VM is in, allows port 80 inbound from the Internet.
Clean up resources
When you finish using the resources that you created, you can delete the resource group and all its resources:
In the Azure portal, search for and select Resource groups.
On the Resource groups page, select the test-rg resource group.
On the test-rg page, select Delete resource group.
Enter test-rg in Enter resource group name to confirm deletion, and then select Delete.
When no longer needed, you can use Remove-AzResourceGroup to remove the resource group and all of the resources it contains:
$params = @{
    Name = "test-rg"
    Force = $true
}
Remove-AzResourceGroup @params
When no longer needed, use az group delete to remove the resource group and all of the resources it contains.
az group delete \
    --name test-rg \
    --yes \
    --no-wait
Next steps
In this tutorial, you:
- Created a network security group and associated it to a virtual network subnet.
- Created application security groups for web and management.
- Created two virtual machines and associated their network interfaces with the application security groups.
- Tested the application security group network filtering.
To learn more about network security groups, see Network security group overview and Manage a network security group.
Azure routes traffic between subnets by default. You might instead, choose to route traffic between subnets through a VM, serving as a firewall, for example.
To learn how to create a route table, advance to the next tutorial.


