Note
Access to this page requires authorization. You can try signing in or changing directories.
Access to this page requires authorization. You can try changing directories.
This article helps you add or remove site-to-site (S2S) connections for a VPN gateway. You can also add S2S connections to a VPN gateway that already has a S2S connection, point-to-site connection, or VNet-to-VNet connection. There are some limitations when adding connections. Check the Prerequisites section in this article to verify before you start your configuration.
About ExpressRoute/site-to-site coexisting connections
- You can use the steps in this article to add a new VPN connection to an already existing ExpressRoute/site-to-site coexisting connection.
- You can't use the steps in this article to configure a new ExpressRoute/site-to-site coexisting connection. To create a new coexisting connection, see: ExpressRoute/S2S coexisting connections.
Prerequisites
Verify the following items:
- You're NOT configuring a new coexisting ExpressRoute and VPN Gateway site-to-site connection.
- You have a virtual network that was created using the Resource Manager deployment model with an existing connection.
- The virtual network gateway for your virtual network is RouteBased. If you have a PolicyBased VPN gateway, you must delete the virtual network gateway and create a new VPN gateway as RouteBased.
- None of the address ranges overlap for any of the virtual networks that this virtual network is connecting to.
- You have compatible VPN device and someone who is able to configure it. See About VPN Devices. If you aren't familiar with configuring your VPN device, or are unfamiliar with the IP address ranges located in your on-premises network configuration, you need to coordinate with someone who can provide those details for you.
- You have an externally facing public IP address for your VPN device.
Create a local network gateway
The local network gateway is a specific object deployed to Azure that represents your on-premises location (the site) for routing purposes. You give the site a name by which Azure can refer to it, then specify the IP address of the on-premises VPN device to which you'll create a connection. You also specify the IP address prefixes that will be routed through the VPN gateway to the VPN device. The address prefixes you specify are the prefixes located on your on-premises network. If your on-premises network changes or you need to change the public IP address for the VPN device, you can easily update the values later.
Create a local network gateway using the following example values:
- Name: Site1
- Resource Group: TestRG1
- Location: China East 2
Configuration considerations:
- VPN Gateway supports only one IPv4 address for each FQDN. If the domain name resolves to multiple IP addresses, VPN Gateway uses the first IP address returned by the DNS servers. To eliminate the uncertainty, we recommend that your FQDN always resolve to a single IPv4 address. IPv6 isn't supported.
- VPN Gateway maintains a DNS cache that's refreshed every 5 minutes. The gateway tries to resolve the FQDNs for disconnected tunnels only. Resetting the gateway also triggers FQDN resolution.
- Although VPN Gateway supports multiple connections to different local network gateways with different FQDNs, all FQDNs must resolve to different IP addresses.
In the portal, go to Local network gateways and open the Create local network gateway page.
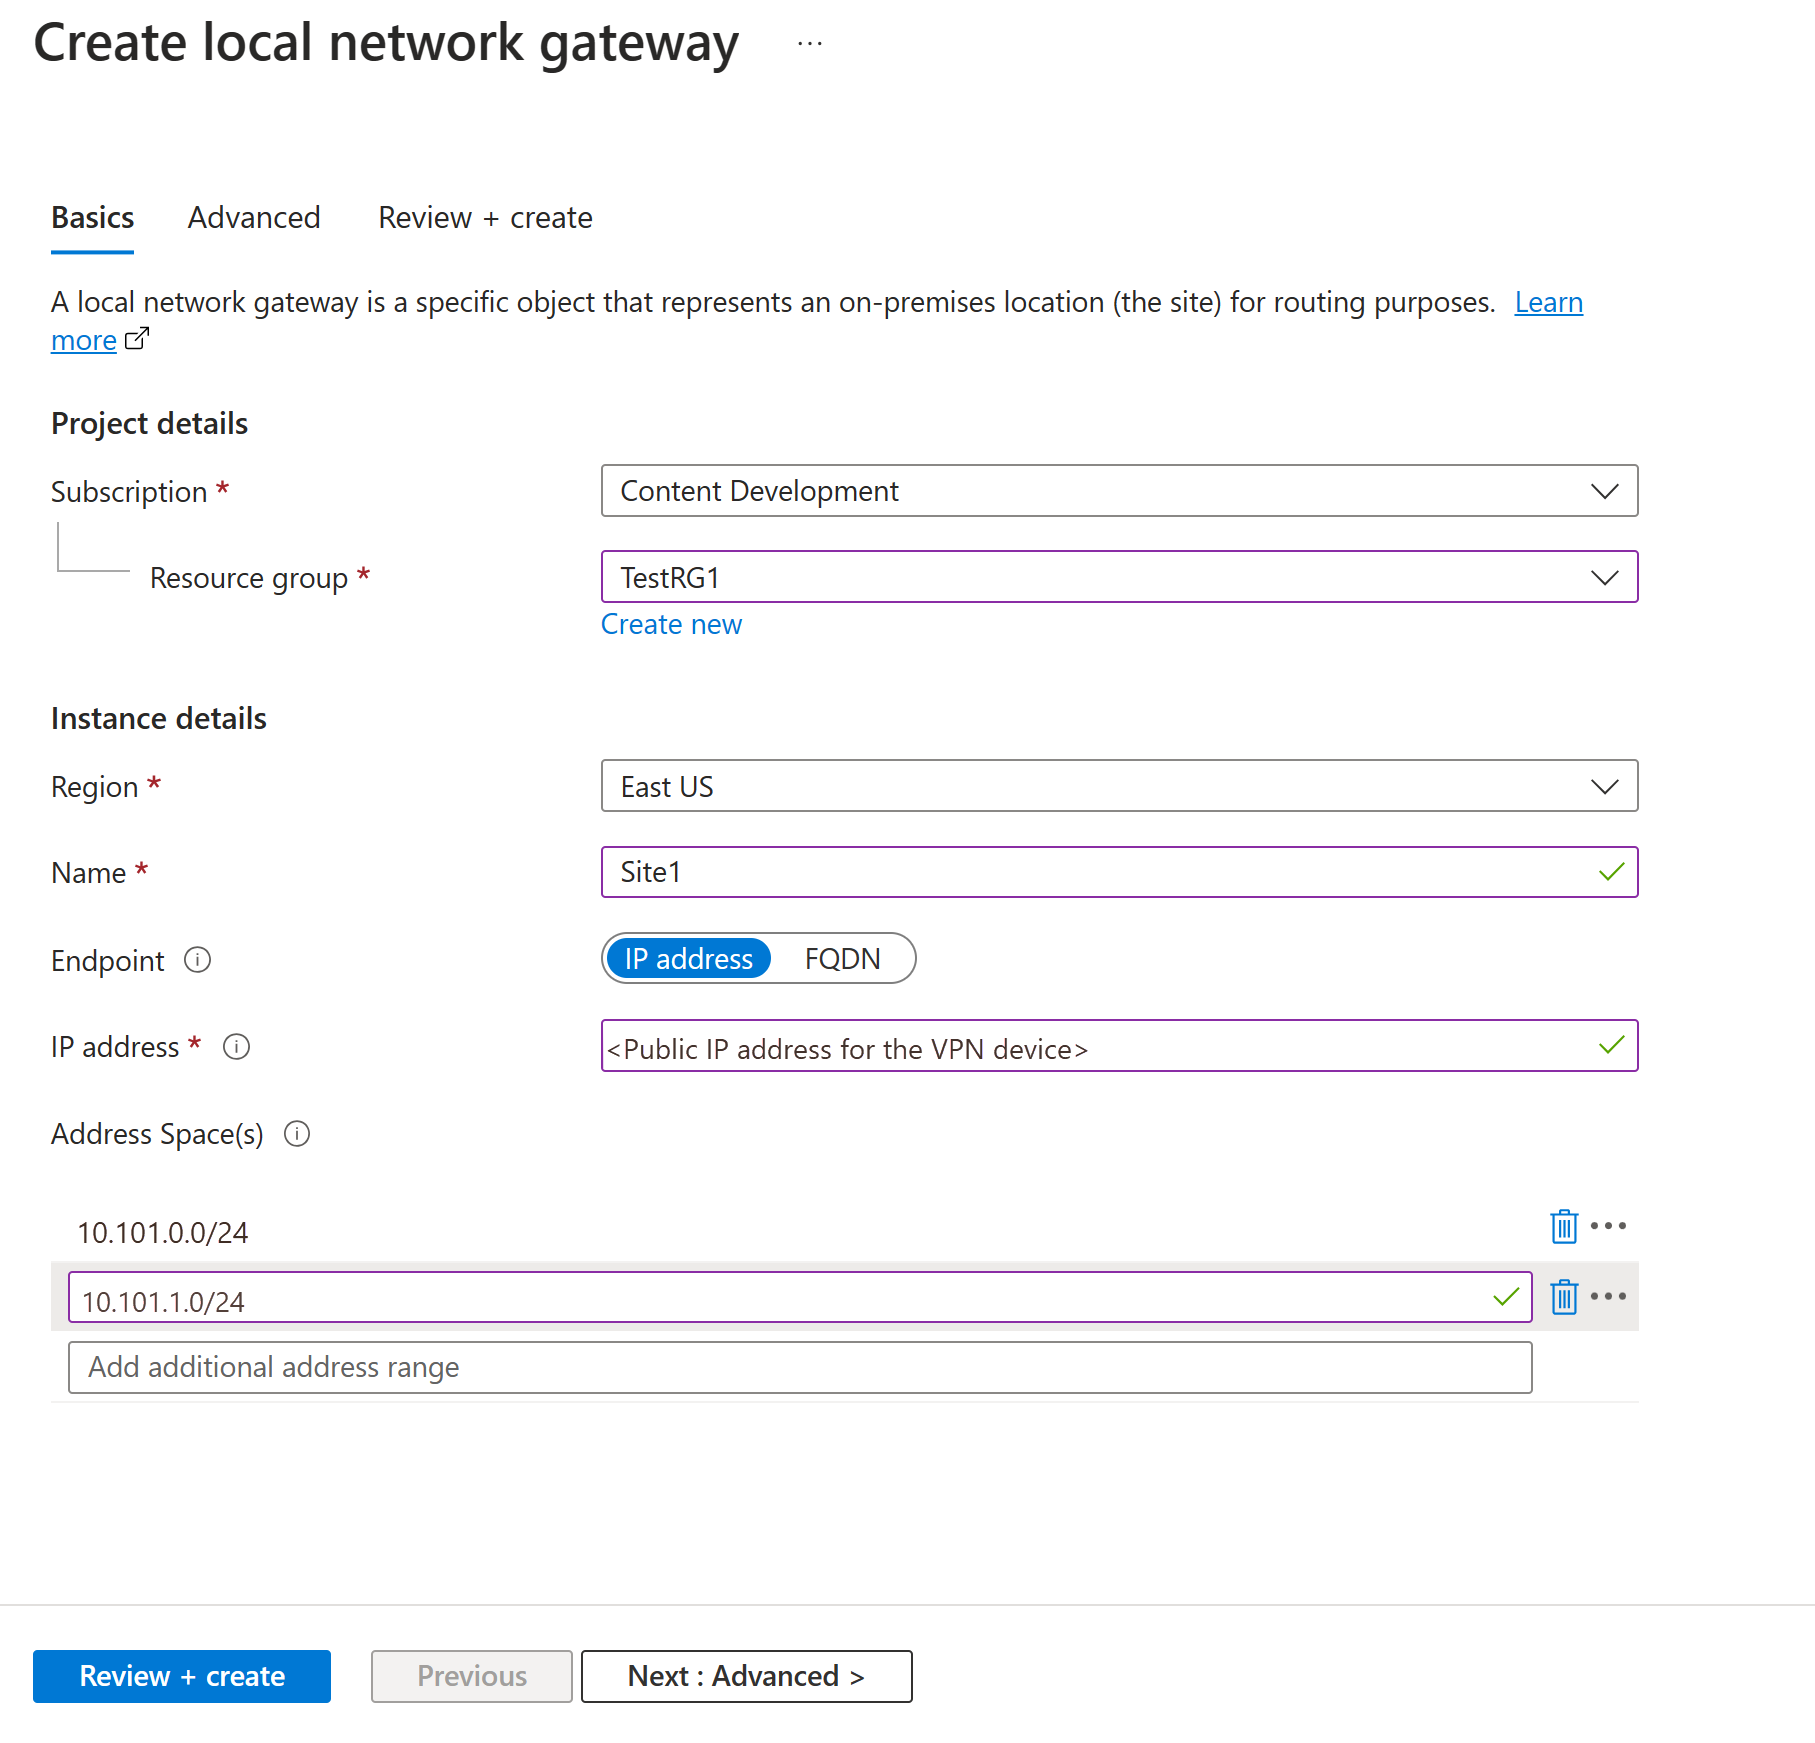
On the Basics tab, specify the values for your local network gateway.
- Subscription: Verify that the correct subscription is showing.
- Resource group: Select the resource group that you want to use. You can either create a new resource group or select one that you've already created.
- Region: Select the region for this object. You might want to select the same location where your virtual network resides, but you aren't required to do so.
- Name: Specify a name for your local network gateway object.
- Endpoint: Select the endpoint type for the on-premises VPN device as IP address or FQDN (Fully Qualified Domain Name).
- IP address: If you have a static public IP address allocated from your internet service provider (ISP) for your VPN device, select the IP address option. Fill in the IP address as shown in the example. This address is the public IP address of the VPN device that you want Azure VPN Gateway to connect to. If you don't have the IP address right now, you can use the values shown in the example. Later, you must go back and replace your placeholder IP address with the public IP address of your VPN device. Otherwise, Azure can't connect.
- FQDN: If you have a dynamic public IP address that could change after a certain period of time, often determined by your ISP, you can use a constant DNS name with a Dynamic DNS service to point to your current public IP address of your VPN device. Your Azure VPN gateway resolves the FQDN to determine the public IP address to connect to.
- Address space: The address space refers to the address ranges for the network that this local network represents. You can add multiple address space ranges. Make sure that the ranges you specify here don't overlap with ranges of other networks that you want to connect to. Azure routes the address range that you specify to the on-premises VPN device IP address. Use your own values here if you want to connect to your on-premises site, not the values shown in the example.
On the Advanced tab, you can configure BGP settings, if needed.
After you specify the values, select Review + create at the bottom of the page to validate the page.
Select Create to create the local network gateway object.
Configure your VPN device
Site-to-site connections to an on-premises network require a VPN device. In this step, you configure your VPN device. When configuring your VPN device, you need the following values:
- A shared key. This is the same shared key that you specify when creating your site-to-site VPN connection. In our examples, we use a basic shared key. We recommend that you generate a more complex key to use.
- The public IP address of your virtual network gateway. You can view the public IP address by using the Azure portal, PowerShell, or CLI. To find the public IP address of your VPN gateway using the Azure portal, go to Virtual network gateways, then select the name of your gateway.
Depending on the VPN device that you have, you might be able to download a VPN device configuration script. For more information, see Download VPN device configuration scripts.
For more configuration information, see the following links:
- For information about compatible VPN devices, see VPN devices.
- For links to device configuration settings, see Validated VPN devices. The device configuration links are provided on a best-effort basis. It's always best to check with your device manufacturer for the latest configuration information. The list shows the versions we've tested. If your OS isn't on that list, it's still possible that the version is compatible. Check with your device manufacturer to verify that the OS version for your VPN device is compatible.
- For an overview of VPN device configuration, see Overview of third-party VPN device configurations.
- For information about editing device configuration samples, see Editing samples.
- For cryptographic requirements, see About cryptographic requirements and Azure VPN gateways.
- For information about IPsec/IKE parameters, see About VPN devices and IPsec/IKE parameters for site-to-site VPN gateway connections. This link shows information about IKE version, Diffie-Hellman Group, authentication method, encryption and hashing algorithms, SA lifetime, PFS, and DPD, in addition to other parameter information that you need to complete your configuration.
- For IPsec/IKE policy configuration steps, see Configure IPsec/IKE policy for site-to-site VPN or VNet-to-VNet connections.
- To connect multiple policy-based VPN devices, see Connect Azure VPN gateways to multiple on-premises policy-based VPN devices using PowerShell.
Configure a connection
Create a site-to-site VPN connection between your virtual network gateway and your on-premises VPN device. In this section, we use the following example values:
- Local network gateway name: Site1
- Connection name: VNet1toSite1
- Shared key: For this example, we use abc123. But, you can use whatever is compatible with your VPN hardware. The important thing is that the values match on both sides of the connection.
In the portal, go to the virtual network gateway and open it.
On the page for the gateway, select Connections.
At the top of the Connections page, select + Add to open the Create connection page.
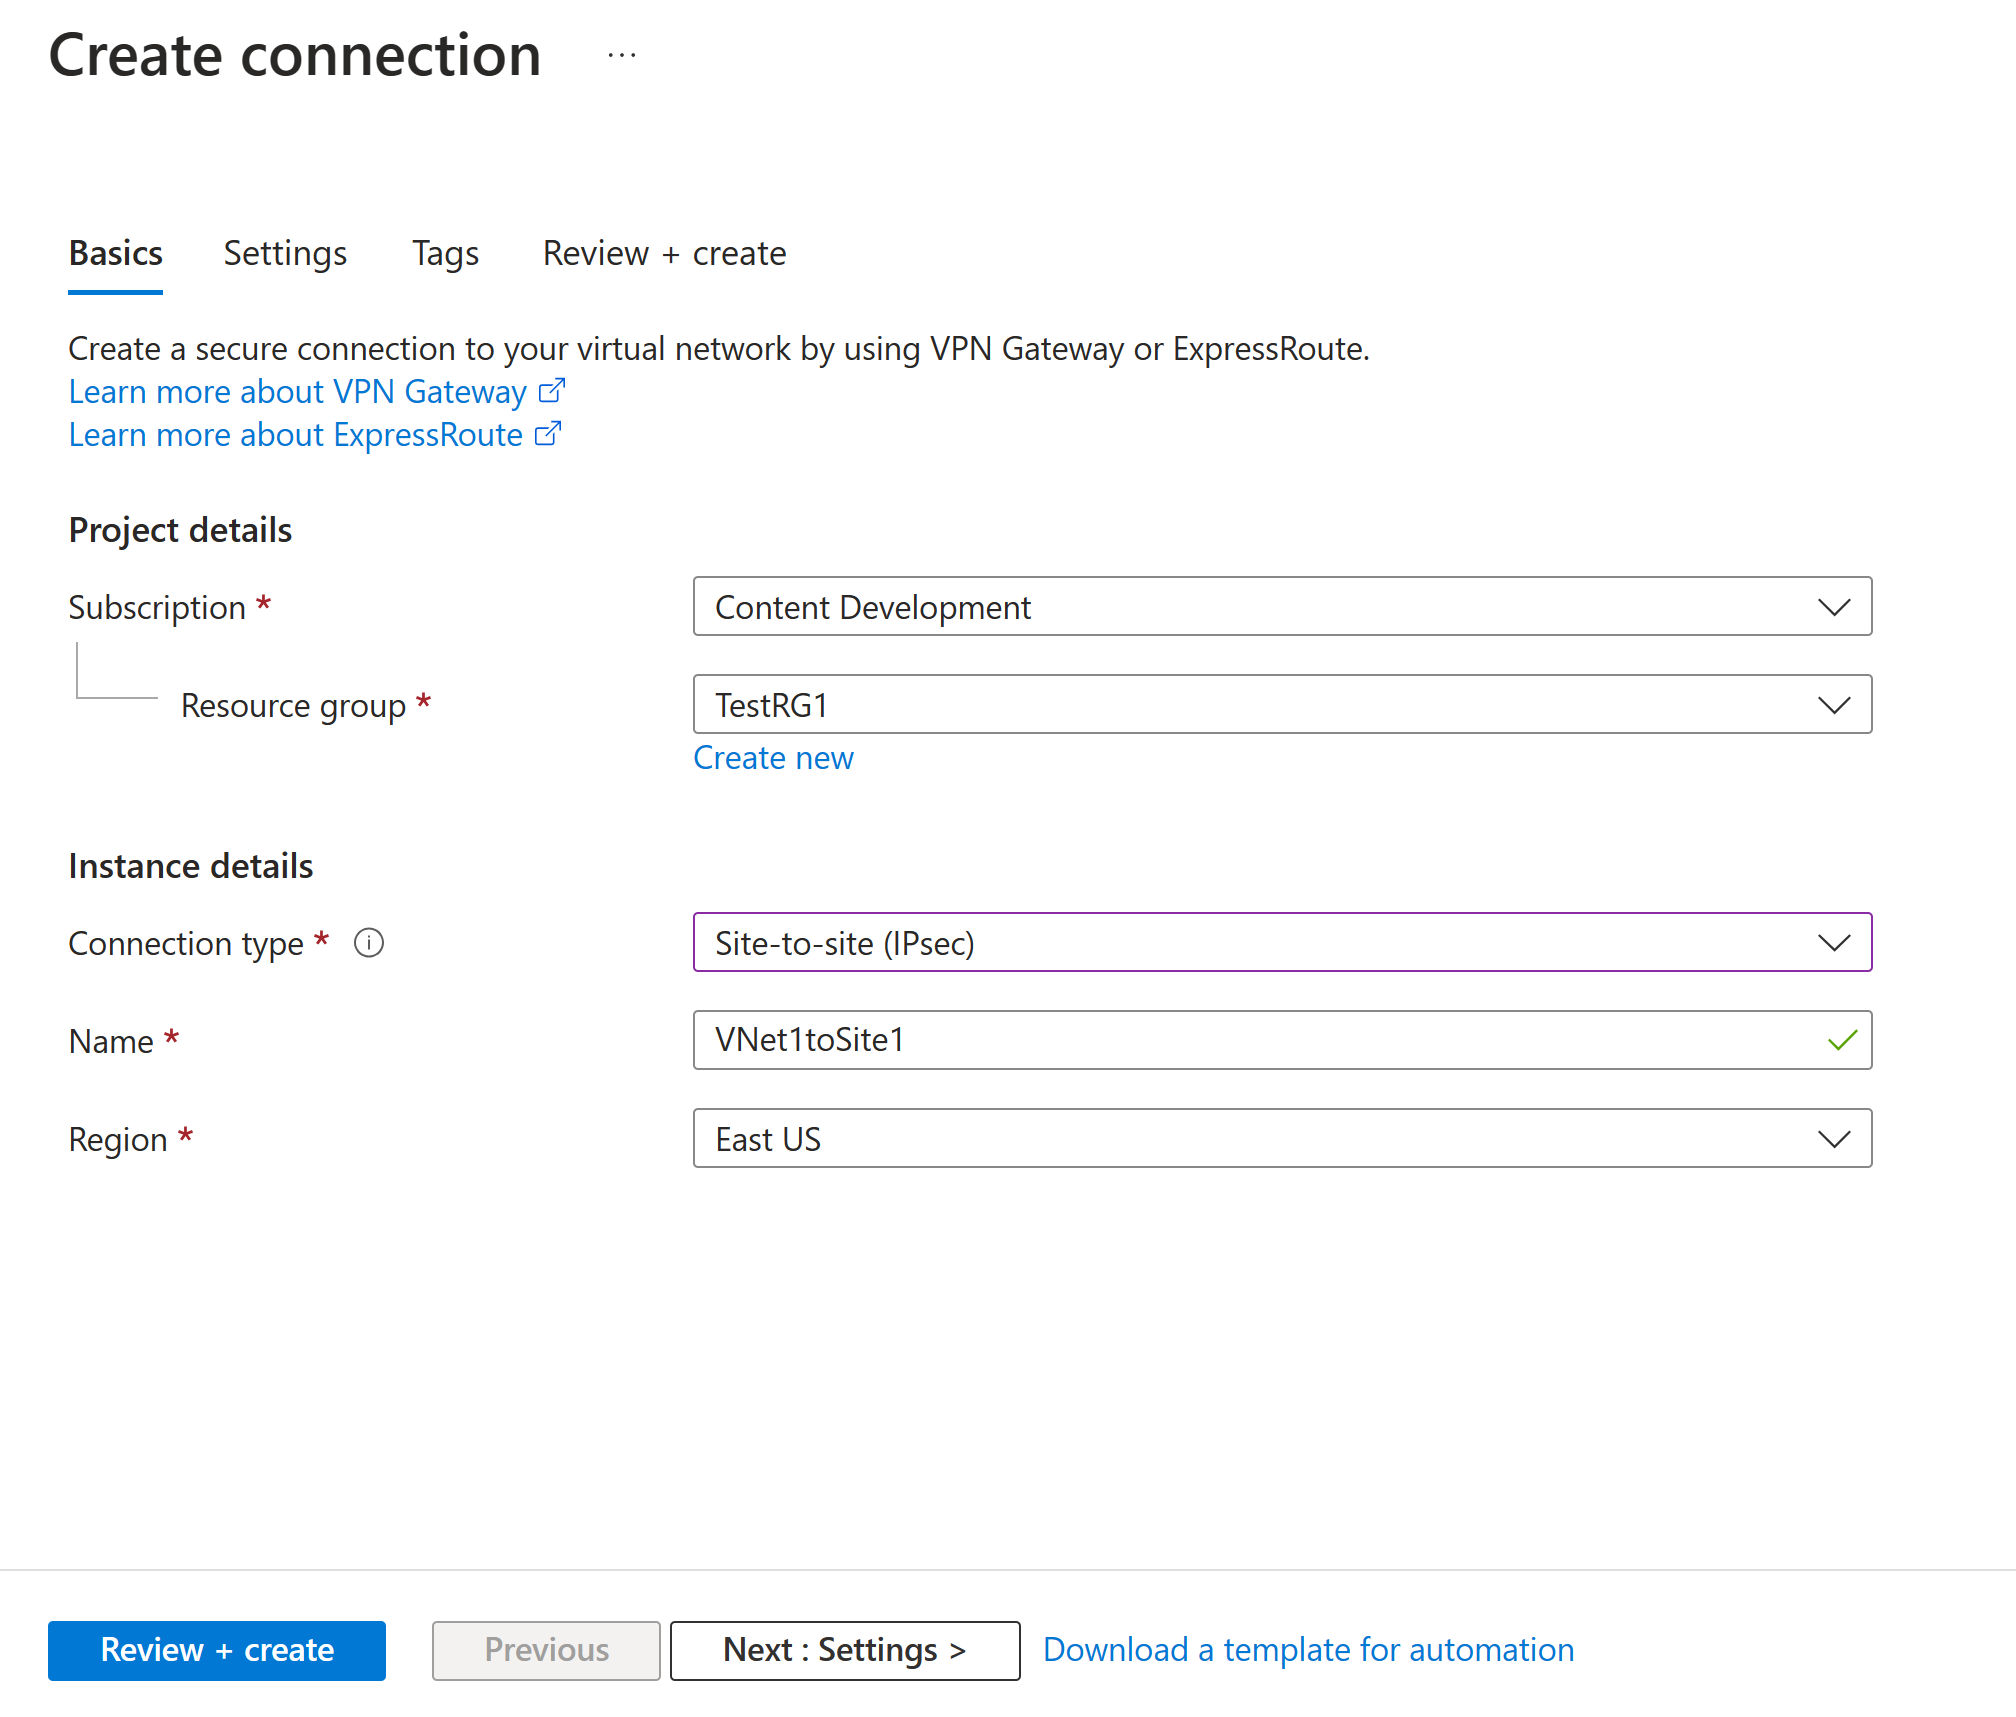
On the Create connection page, on the Basics tab, configure the values for your connection:
Under Project details, select the subscription and the resource group where your resources are located.
Under Instance details, configure the following settings:
- Connection type: Select Site-to-site (IPSec).
- Name: Name your connection.
- Region: Select the region for this connection.
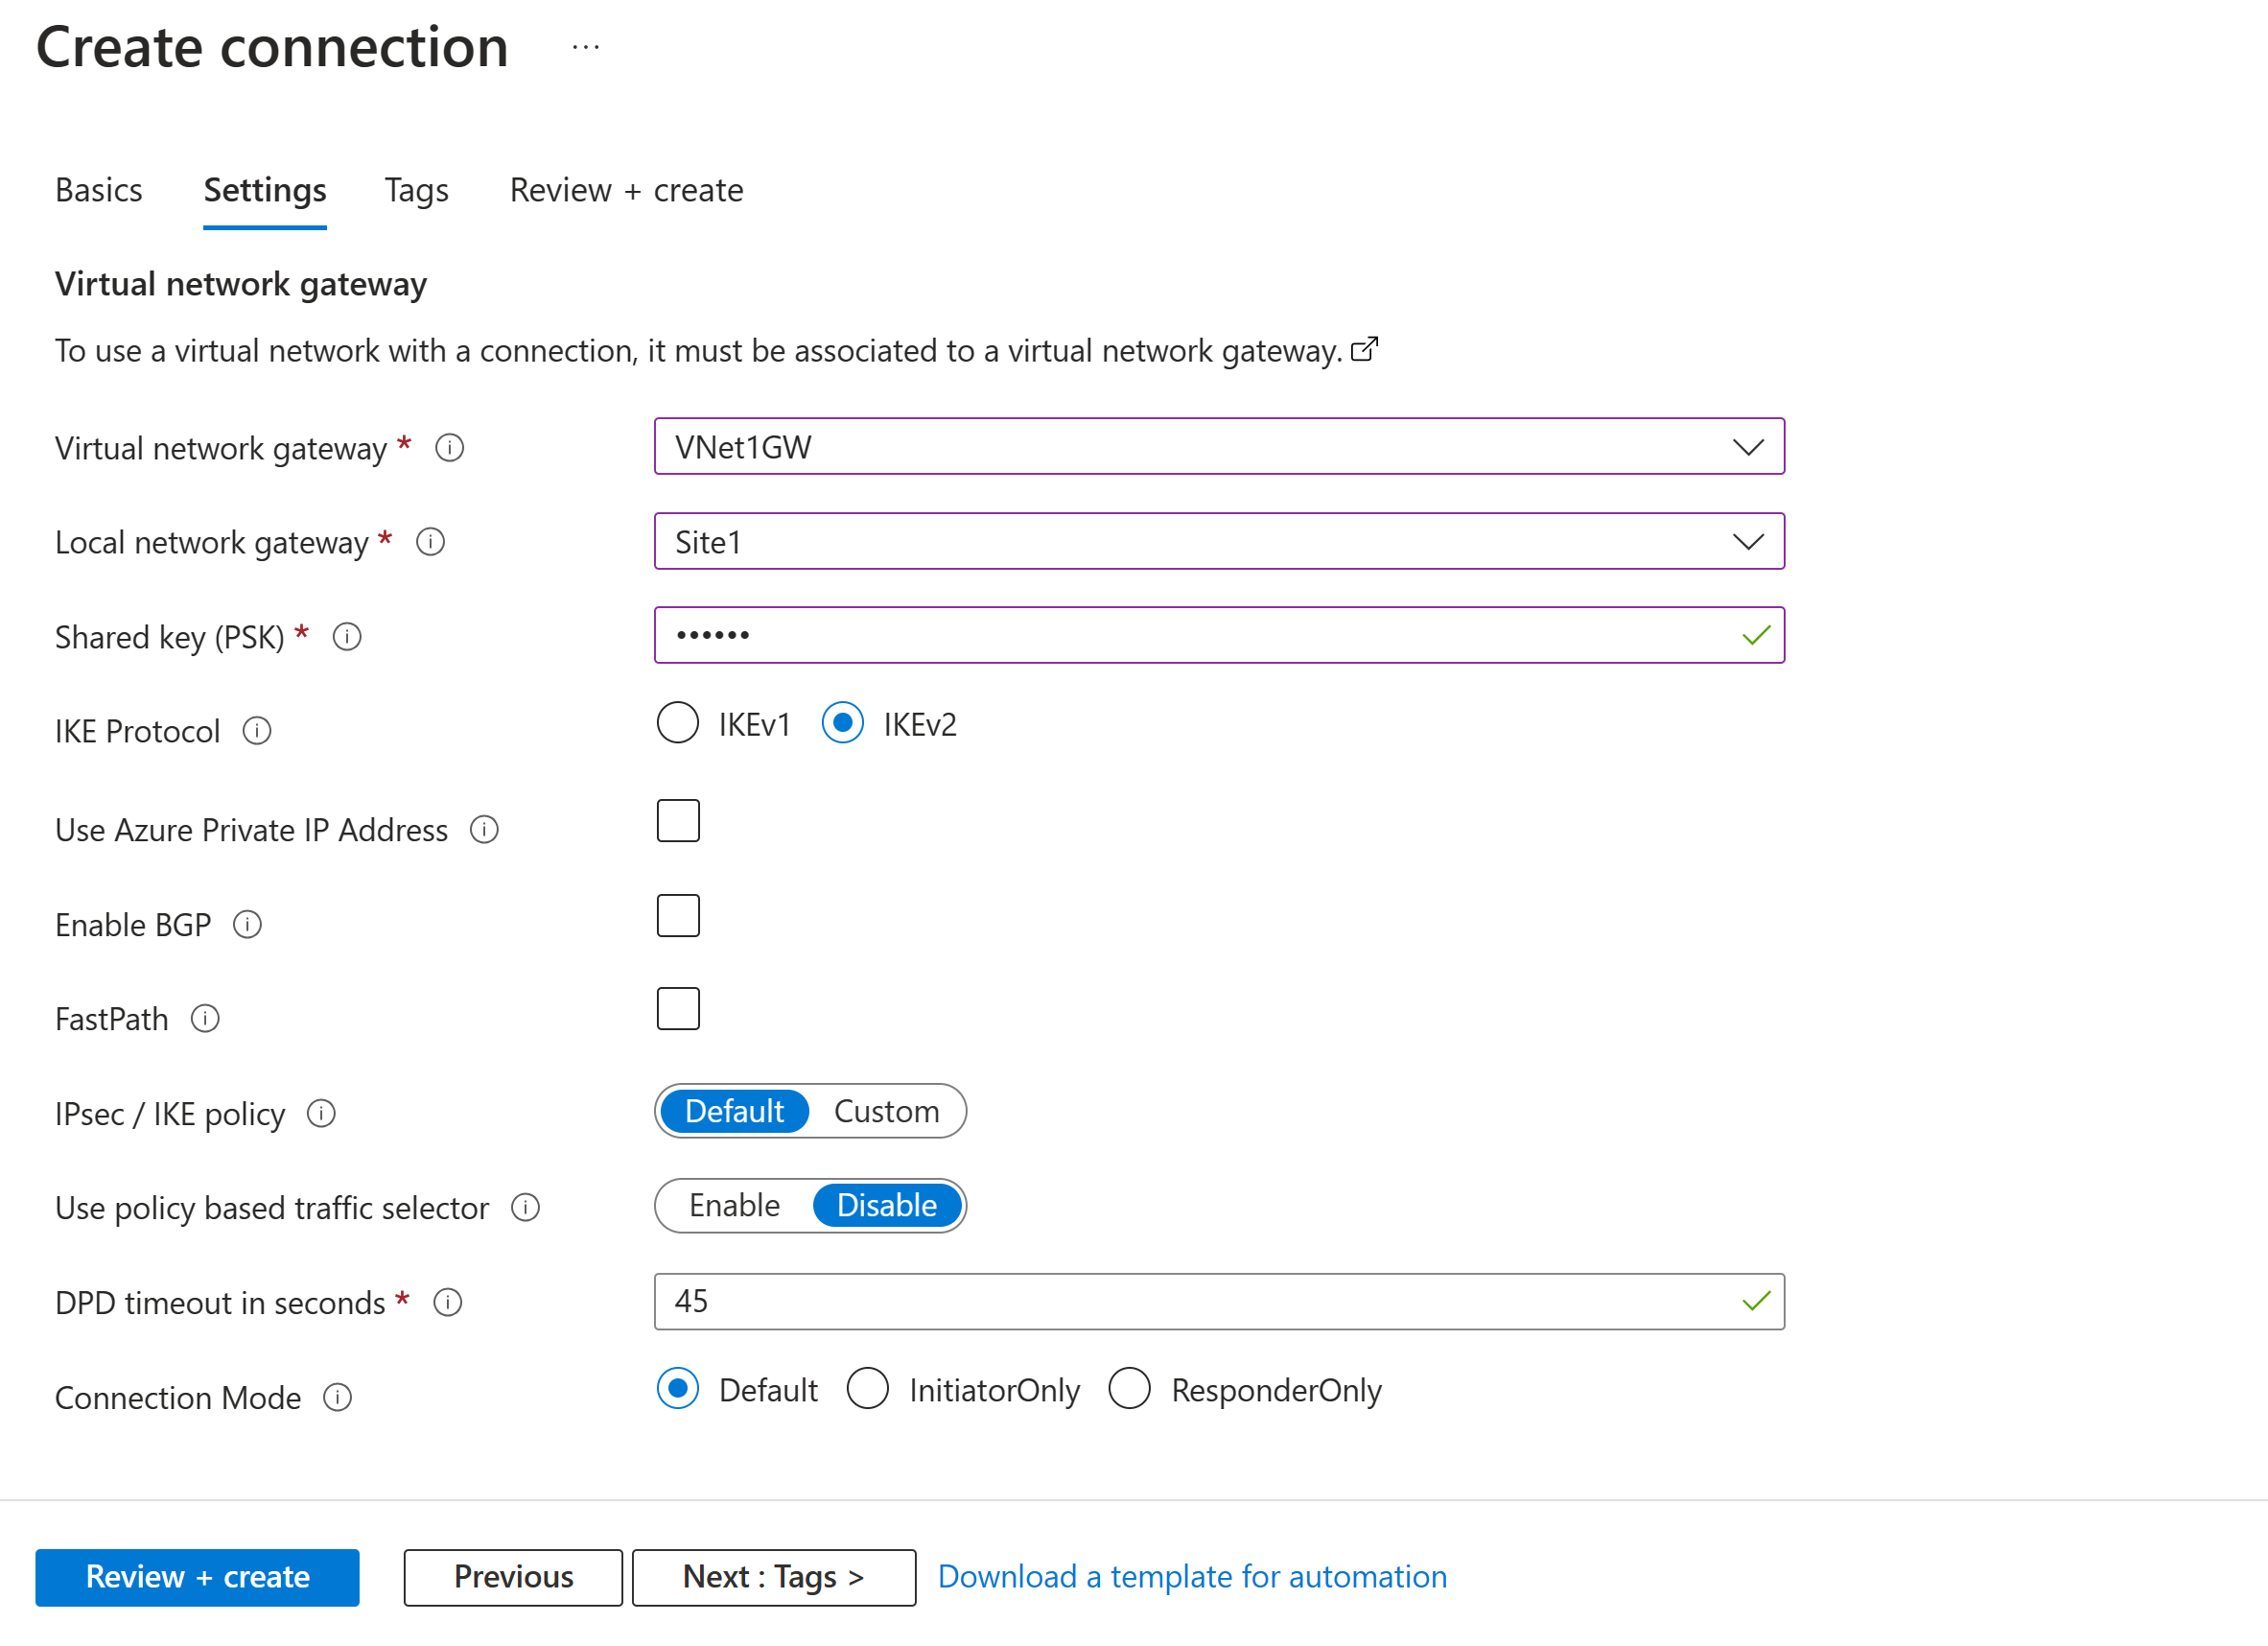
Select the Settings tab and configure the following values:
- Virtual network gateway: Select the virtual network gateway from the dropdown list.
- Local network gateway: Select the local network gateway from the dropdown list.
- Shared key: The value here must match the value that you're using for your local on-premises VPN device. If this field doesn't appear on your portal page, or you want to later update this key, you can do so once the connection object is created. Go to the connection object you created (example name: VNet1toSite1) and update the key on the Authentication page.
- IKE Protocol: Select IKEv2.
- Use Azure Private IP Address: Don't select.
- Enable BGP: Don't select.
- FastPath: Don't select.
- IPsec/IKE policy: Select Default.
- Use policy based traffic selector: Select Disable.
- DPD timeout in seconds: Select 45.
- Connection Mode: Select Default. This setting is used to specify which gateway can initiate the connection. For more information, see VPN Gateway settings - Connection modes.
For NAT Rules Associations, leave both Ingress and Egress as 0 selected.
Select Review + create to validate your connection settings.
Select Create to create the connection.
After the deployment is finished, you can view the connection on the Connections page of the virtual network gateway. The status changes from Unknown to Connecting and then to Succeeded.
View and verify the VPN connection
In the Azure portal, you can view the connection status of a VPN gateway by going to the connection. The following steps show one way to go to your connection and verify.
- On the Azure portal menu, select All resources or search for and select All resources from any page.
- Select your virtual network gateway.
- On the pane for your virtual network gateway, select Connections. You can see the status of each connection.
- Select the name of the connection that you want to verify to open Essentials. On the Essentials pane, you can view more information about your connection. The status is Succeeded and Connected after you make a successful connection.
Remove a connection
- In the portal, go to your VPN gateway Connections page.
- Click the connection you want to remove. This opens the page for the connection.
- Click Delete to remove the connection.
Next steps
For more information about site-to-site VPN gateway configurations, see Tutorial: Configure a site-to-site VPN gateway configuration.


