Note
Access to this page requires authorization. You can try signing in or changing directories.
Access to this page requires authorization. You can try changing directories.
The Azure VPN Gateway High Bandwidth tunnels feature, part of the Advanced Connectivity capabilities, delivers enhanced tunnel throughput for high-performance IPsec connections between your on-premises network and Azure virtual network. These tunnels are established between your on-premises VPN device and the Azure VPN Gateway, with traffic transiting through ExpressRoute private peering. High Bandwidth tunnels use private IP addresses on-premises to establish a secure, encrypted overlay network between your on-premises infrastructure and Azure.
High Bandwidth tunnels provide end-to-end encryption to meet security compliance requirements and eliminate encryption bottlenecks. This feature enables you to establish up to four IPsec tunnels between the Azure VPN Gateway and your on-premises VPN device-organized as two Connections, each supporting two tunnels. Each tunnel can deliver up to 5 Gbps of encrypted throughput, for a combined maximum of 20 Gbps. The following network diagram illustrates this configuration:

Prerequisites
To use VPN Gateway High Bandwidth tunnels, your ExpressRoute Connection must have FastPath enabled. FastPath is currently supported only on ExpressRoute Direct port pairs. As a result, your ExpressRoute circuit must be provisioned on an ExpressRoute Direct port pair to support this solution.
This article assumes that your Azure subscription already includes:
- An ExpressRoute circuit deployed on a Direct port pair with private peering.
- A virtual network with the address space
10.1.0.0/16and a Gateway subnet of10.1.0.0/26.
The required Azure resources for this deployment are:
- ExpressRoute Direct Port
- ExpressRoute Circuit
- ExpressRoute Virtual Network Gateway
- Connection between the ExpressRoute circuit and the virtual network gateway with FastPath enabled
- VPN Gateway (SKU: VpnGw5AZ) with Advanced Connectivity enabled
- VPN Local Network Gateway
- (optional) User Defined Route (UDR) to direct ExpressRoute traffic to the VPN Gateway
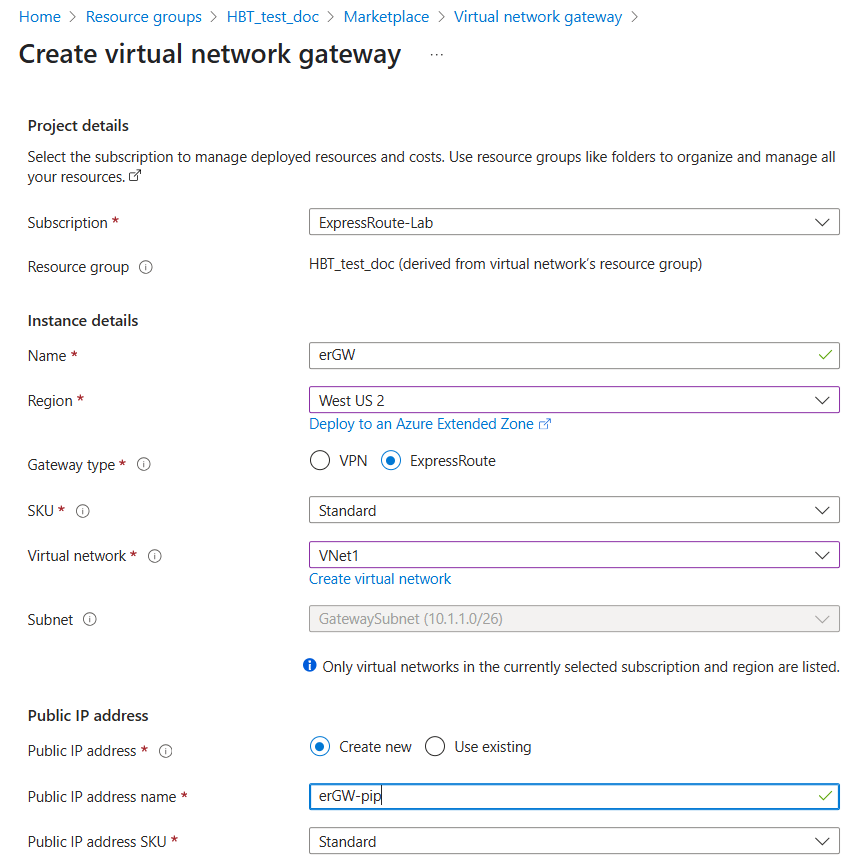
Create an ExpressRoute Gateway
The ExpressRoute Gateway must be deployed in the GatewaySubnet of your virtual network. When creating the ExpressRoute Gateway, choose one of the following supported SKUs:
- UltraPerformance
- ErGw3AZ These SKUs are required to support high bandwidth and advanced connectivity features.
Create an ExpressRoute Connection
The ExpressRoute connection links your ExpressRoute Gateway to the ExpressRoute circuit. To enable the FastPath feature on this connection, use the following PowerShell commands:
Connect-AzAccount -Environment AzureChinaCloud
Set-AzContext -SubscriptionId <your-subscription-id>

$connection = Get-AzVirtualNetworkGatewayConnection -Name '<ER_CONNECTION_NAME>' -ResourceGroupName '<RESOURCE_GROUP_NAME>'
$connection.ExpressRouteGatewayBypass = $true
Set-AzVirtualNetworkGatewayConnection -VirtualNetworkGatewayConnection $connection
After running these commands, verify that $connection.ExpressRouteGatewayBypass is set to $true.
You can also confirm FastPath is enabled in the Azure portal. Go to your ExpressRoute circuit, select Connections, then under Settings > Configuration, ensure that the FastPath setting is set to Enable.
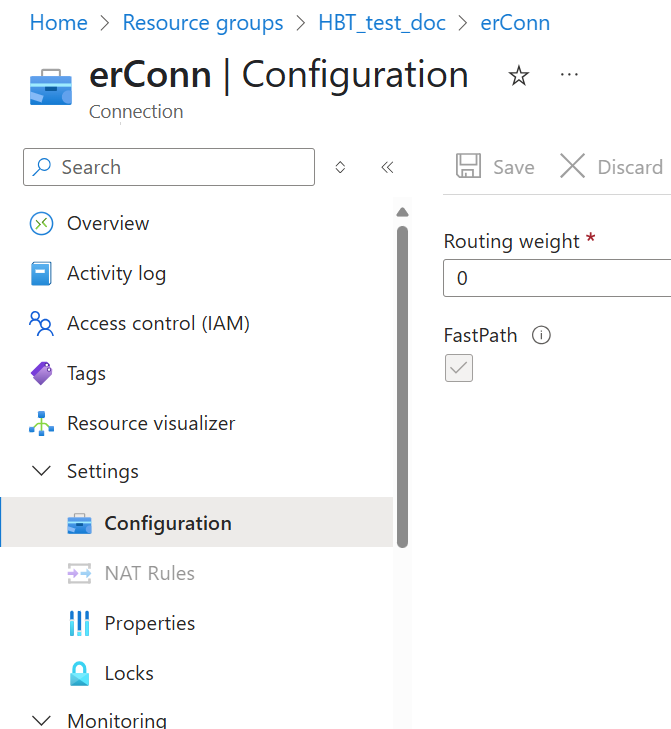
To enable support for High Bandwidth tunnels, you must activate the EnablePrivateLinkFastPath attribute on your ExpressRoute connection. Use the following PowerShell commands:
$connection.EnablePrivateLinkFastPath = $true
Set-AzVirtualNetworkGatewayConnection -VirtualNetworkGatewayConnection $connection
After you complete this step, your Azure virtual network will be connected to your on-premises networks, and ExpressRoute will be configured to support High Bandwidth tunnels.
Advertise on-premises network to ExpressRoute
When using IPsec tunnels that transit ExpressRoute private peering, you must advertise only the private IP addresses of your on-premises VPN devices from your edge routers to the Microsoft Enterprise Edge (MSEE) routers. Do not advertise other on-premises network prefixes over ExpressRoute, as this configuration can cause traffic to bypass the VPN Gateway and reach Azure unencrypted via the ExpressRoute gateway.
To ensure all traffic between Azure and your on-premises network is encrypted, configure routing so that only the VPN device tunnel IPs are advertised over ExpressRoute. The actual on-premises network prefixes should be routed through the VPN Gateway, either using static routes or BGP. This approach ensures that on-premises to Azure traffic is always encrypted inside the VPN tunnel before it enters the ExpressRoute data path.
If you advertise on-premises network prefixes to ExpressRoute through BGP, those routes can bypass the VPN Gateway, resulting in unencrypted traffic. To prevent this issue, use a user-defined route (UDR) on your Azure virtual network to direct traffic to the VPN Gateway as the next hop. This configuration guarantees that all traffic is encrypted before transiting ExpressRoute.
Create a VPN gateway High Bandwidth tunnel
To create a VPN gateway with High Bandwidth tunnels for your virtual network, follow these steps. High Bandwidth tunnels are supported only on the VpnGw5AZ SKU.
In the Azure portal:
In the top search bar, enter Virtual network gateway and select it from the results.
Select Create to start configuring a new VPN gateway.
Use the following settings for the High Bandwidth configuration:
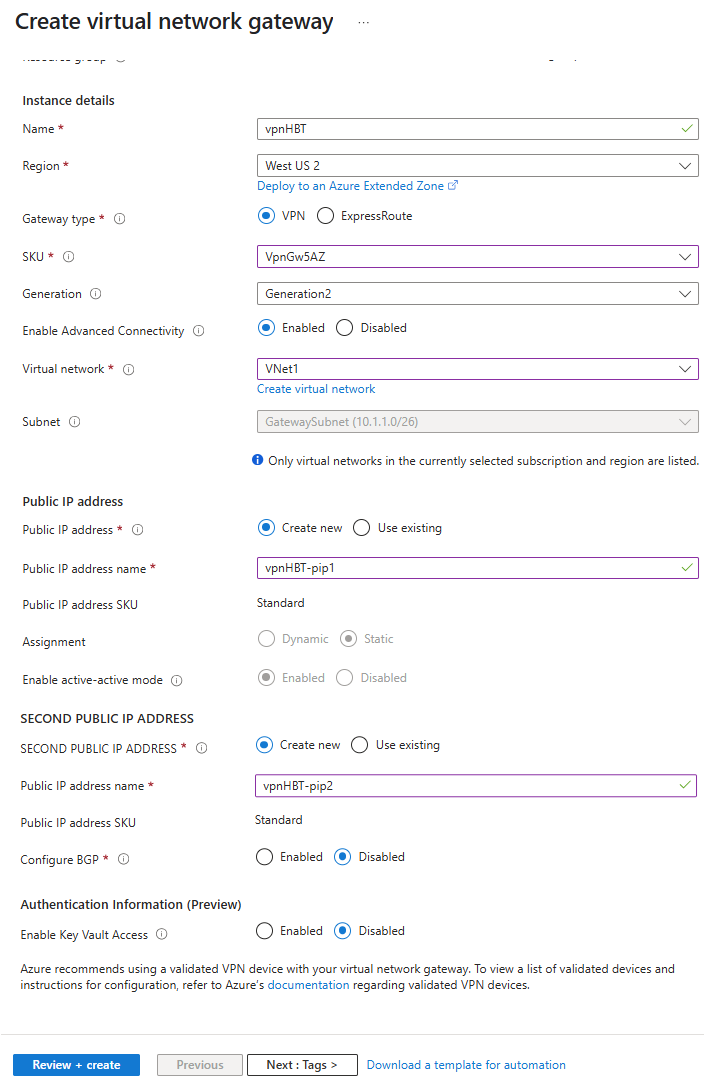
- Name:
vpnHB - Gateway type:
VPN - SKU:
VpnGw5AZ - Generation:
Generation 2 - Enable Advanced Connectivity:
Enabled - Virtual network:
VNet1 - Gateway subnet address range:
10.1.0.0/26 - Public IP address:
Create new - Public IP address name:
vpnHBT-pip1 - Public IP address SKU:
Standard - Assignment:
Static - Second Public IP address:
Create new - Second Public IP address name:
vpnHBT-pip2 - Public IP address SKU:
Standard - Assignment:
Static - Configure BGP:
Disabled
- Name:
Review your settings and select Review + create. Then select Create to deploy the VPN gateway.
Note
- To deploy a High Bandwidth VPN Gateway in the Azure portal, you must enable the Enable Advanced Connectivity option when creating the gateway. Selecting this option automatically configures the gateway in active-active mode.
- High Bandwidth tunnels support both static routing and BGP, but are only available on route-based VPN Gateway SKUs.
Deployment of the gateway can take 45 minutes or longer. You can monitor progress on the gateway's Overview page in the Azure portal.
In a High Bandwidth VPN Gateway configuration, IPsec tunnel traffic flows through the private IP addresses assigned to the VPN Gateway instances. While two public IP addresses are still provisioned, their sole purpose is to support Azure control plane operations-they aren't used for IPsec tunnel establishment.
Create a local network gateway
A local network gateway is an Azure resource that represents your on-premises site for routing traffic. When you create a local network gateway, you provide:
- A name for Azure to reference.
- The IP address of your on-premises VPN device.
- The address prefixes for your on-premises network that should be routed through the VPN gateway.
If your on-premises VPN device has multiple IP addresses you want to connect to, you must create a separate local network gateway for each IP address.
Note
You can only create the local network gateways after you know the IP addresses assigned to the outbound interfaces of your on-premises VPN device.
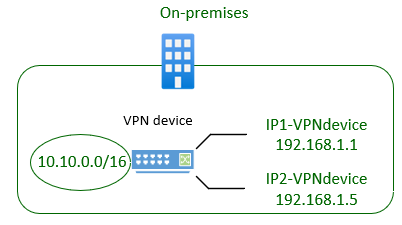
Create two local network gateways with the following settings:
Local Network Gateway 1
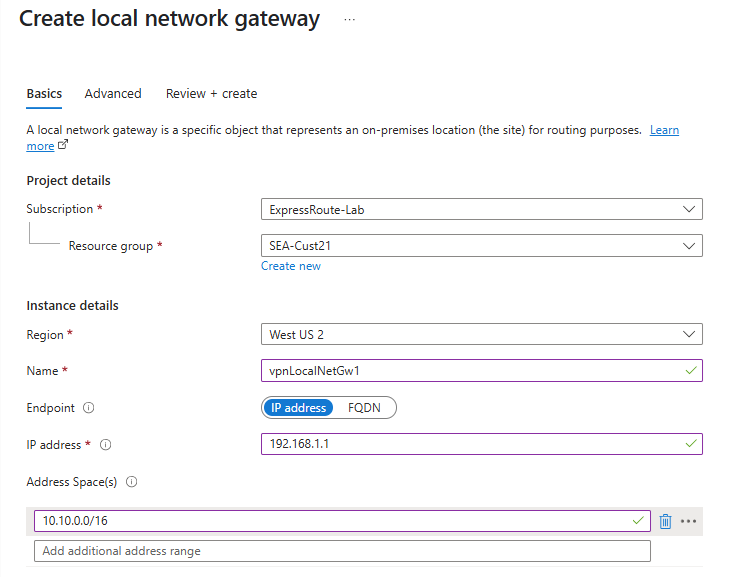
- Name:
vpnLocalNetGw1 - Location:
China North 3 - IP address:
192.168.1.1(on-premises VPN device) - Address space:
10.10.0.0/16(on-premises network) - BGP settings: Not configured
Local Network Gateway 2
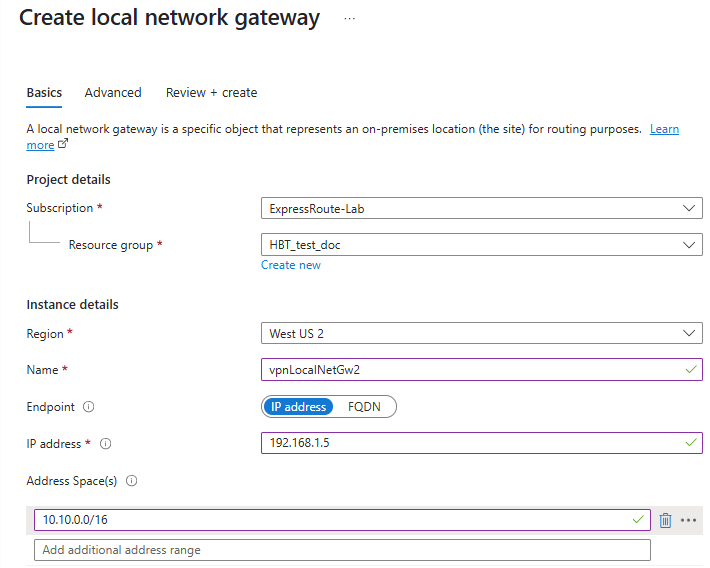
- Name:
vpnLocalNetGw2 - Location:
China North 3 - IP address:
192.168.1.5(on-premises VPN device) - Address space:
10.10.0.0/16(on-premises network) - BGP settings: Not configured
After deploying both Local Network Gateways, you can proceed to create the VPN Connections between your Azure VPN Gateway and your on-premises VPN devices.
Create VPN Connections
The High Bandwidth VPN Gateway supports up to two VPN Connections, with each connection capable of establishing two tunnels to your on-premises VPN device. To maximize throughput and redundancy, create two site-to-site VPN Connections using the following settings:
Connection 1
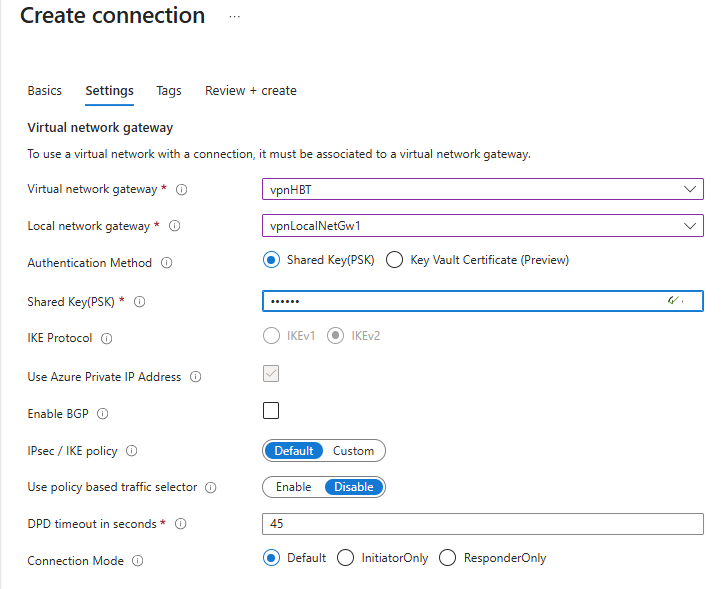
- Connection type: Site-to-site
- Name:
vpnConn1 - Virtual network gateway:
vpnHB - Local network gateway:
vpnLocalNetGw1 - Shared key (PSK):
abc123(example; use a strong, matching key on both sides)
Connection 2
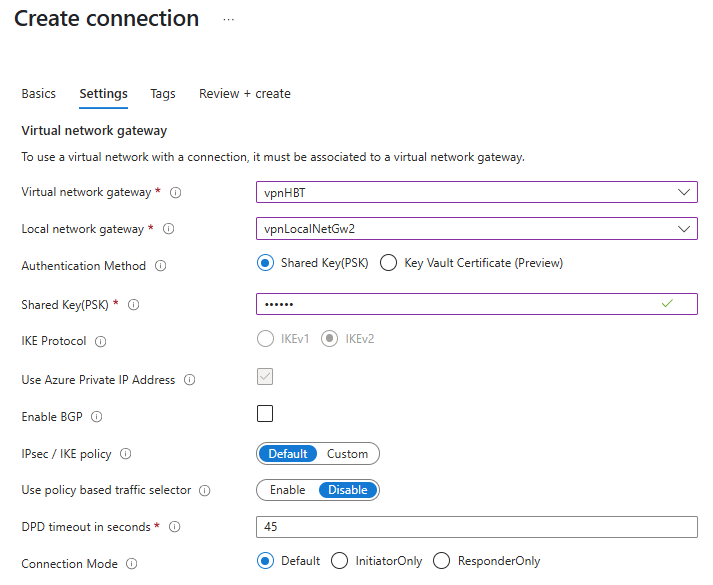
- Connection type: Site-to-site
- Name:
vpnConn2 - Virtual network gateway:
vpnHB - Local network gateway:
vpnLocalNetGw2 - Shared key (PSK):
abc123(example; use a strong, matching key on both sides)
Note
The shared key must be identical on both the Azure and on-premises VPN device configurations. Replace abc123 with a secure key appropriate for your environment.
After you create both connections, each will establish two IPsec tunnels, for a total of four tunnels between Azure and your on-premises VPN device.
Note
Only after the deployment of two VPN Connections, through the Azure portal you can discover the private IP addresses assigned to the VPN Gateway instances.
In the Azure portal, navigate to your VPN Gateway, then select Settings > Connections.
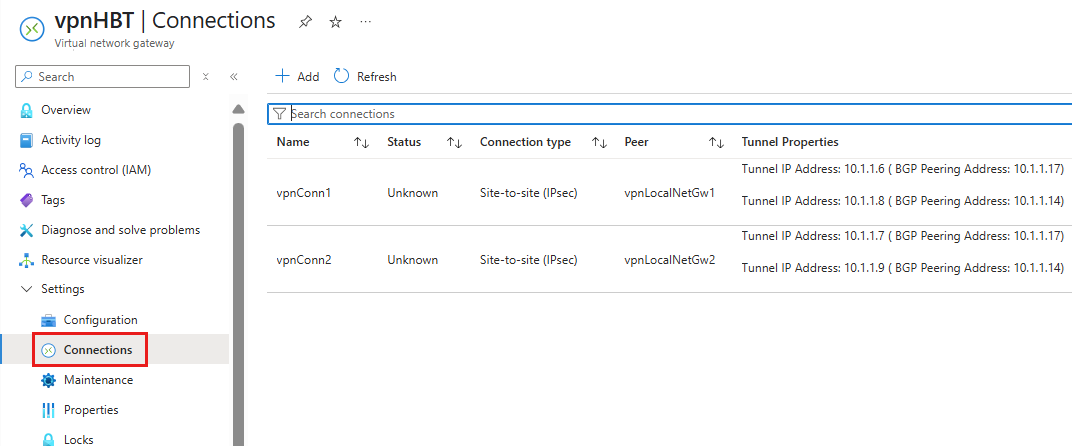
The Connections view displays the private tunnel IP addresses assigned to the VPN Gateway and shows how each is paired with its corresponding Local Network Gateway. For a High Bandwidth VPN Gateway configuration, the tunnel IPs are mapped as follows:
- Tunnel IP
10.1.6is paired with Local Network GatewayvpnLocalNetGw1 - Tunnel IP
10.1.8is paired with Local Network GatewayvpnLocalNetGw1 - Tunnel IP
10.1.7is paired with Local Network GatewayvpnLocalNetGw2 - Tunnel IP
10.1.9is paired with Local Network GatewayvpnLocalNetGw2
This mapping illustrates how each tunnel IP address is associated with a specific local network gateway, enabling the establishment of multiple site-to-site VPN tunnels for increased bandwidth and redundancy.
Configure your VPN device on-premises
Configuring your on-premises VPN device is the final step. At this stage, you should have all the necessary information to complete the device setup.

When configuring your VPN device, you need the following details:
- Shared key (preshared key): This key is specified when you create your site-to-site VPN connections. While the examples use a simple key, we recommend generating a complex, secure key for production environments.
- Private tunnel IP addresses of the Azure VPN Gateway: Each VPN Gateway instance provides two private tunnel IPs, for a total of four IPsec tunnels in a High Bandwidth configuration. Many VPN devices support this setup using Virtual Tunnel Interfaces (VTIs), allowing each on-premises outbound interface IP to be associated with up to two VTIs.
- Azure virtual network address space: The address range assigned to your Azure virtual network.
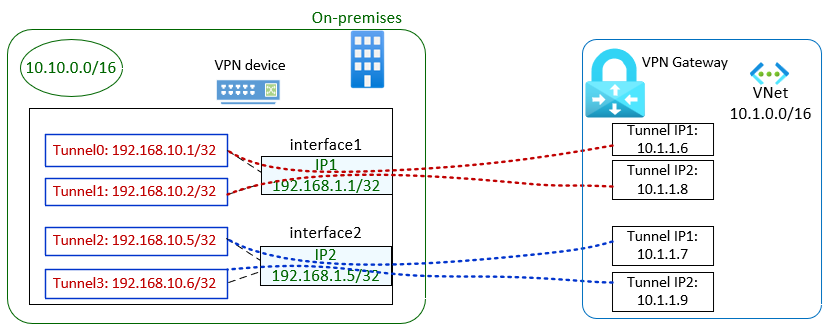
A sample configuration for your on-premises VPN device might look like:
interface 1
  ip address 192.168.1.1/32

interface 2
  ip address 192.168.1.5/32

interface tunnel  0
  ip address 192.168.10.1/32
  tunnel source 192.168.1.1
  tunnel destination 10.1.1.6

interface tunnel 1
  ip address 192.168.10.2/32
  source address 192.168.1.1
  destination address 10.1.1.8

interface tunnel 2
  ip address 192.168.10.5/32
  source address 192.168.1.5
  destination address 10.1.1.7

interface tunnel 3
  ip address 192.168.10.6/32
  source address 192.168.1.5
  destination address 10.1.1.9

static routing:
    10.1.0.0/24 next-hop: tunnel 0
    10.1.0.0/24 next-hop: tunnel 1
    10.1.0.0/24 next-hop: tunnel 2
    10.1.0.0/24 next-hop: tunnel 3
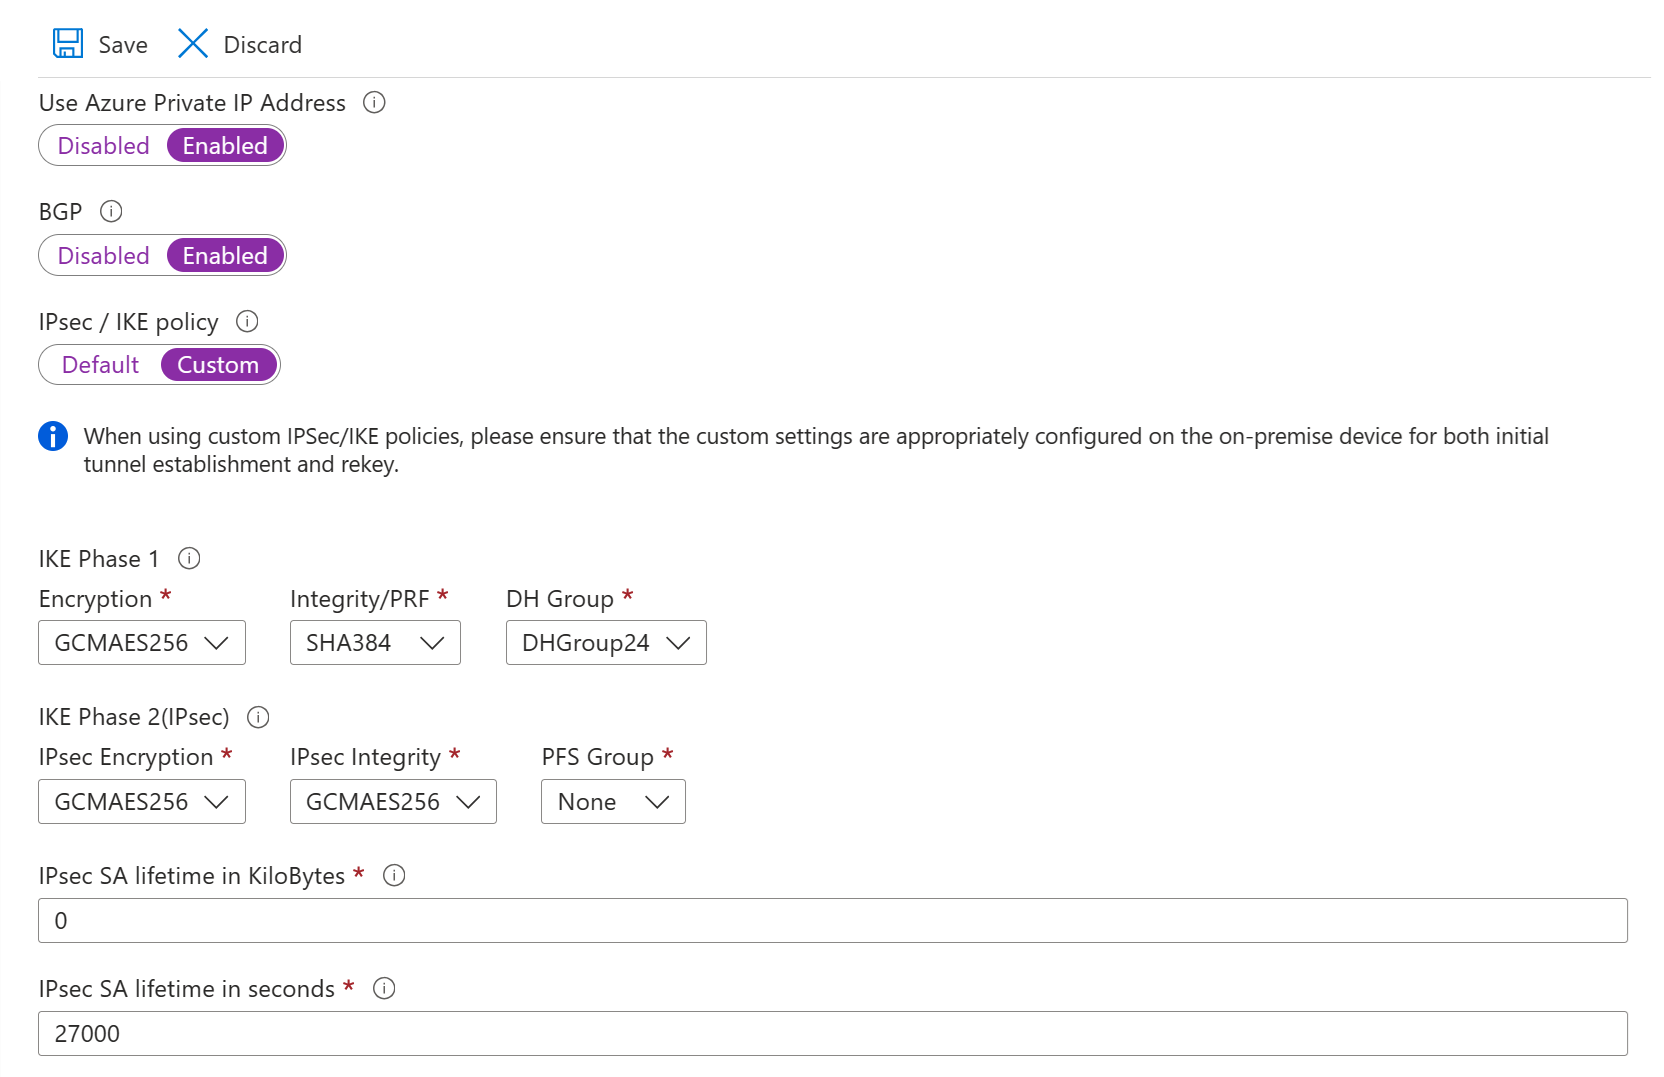
Configure custom encryption algorithms (optional)
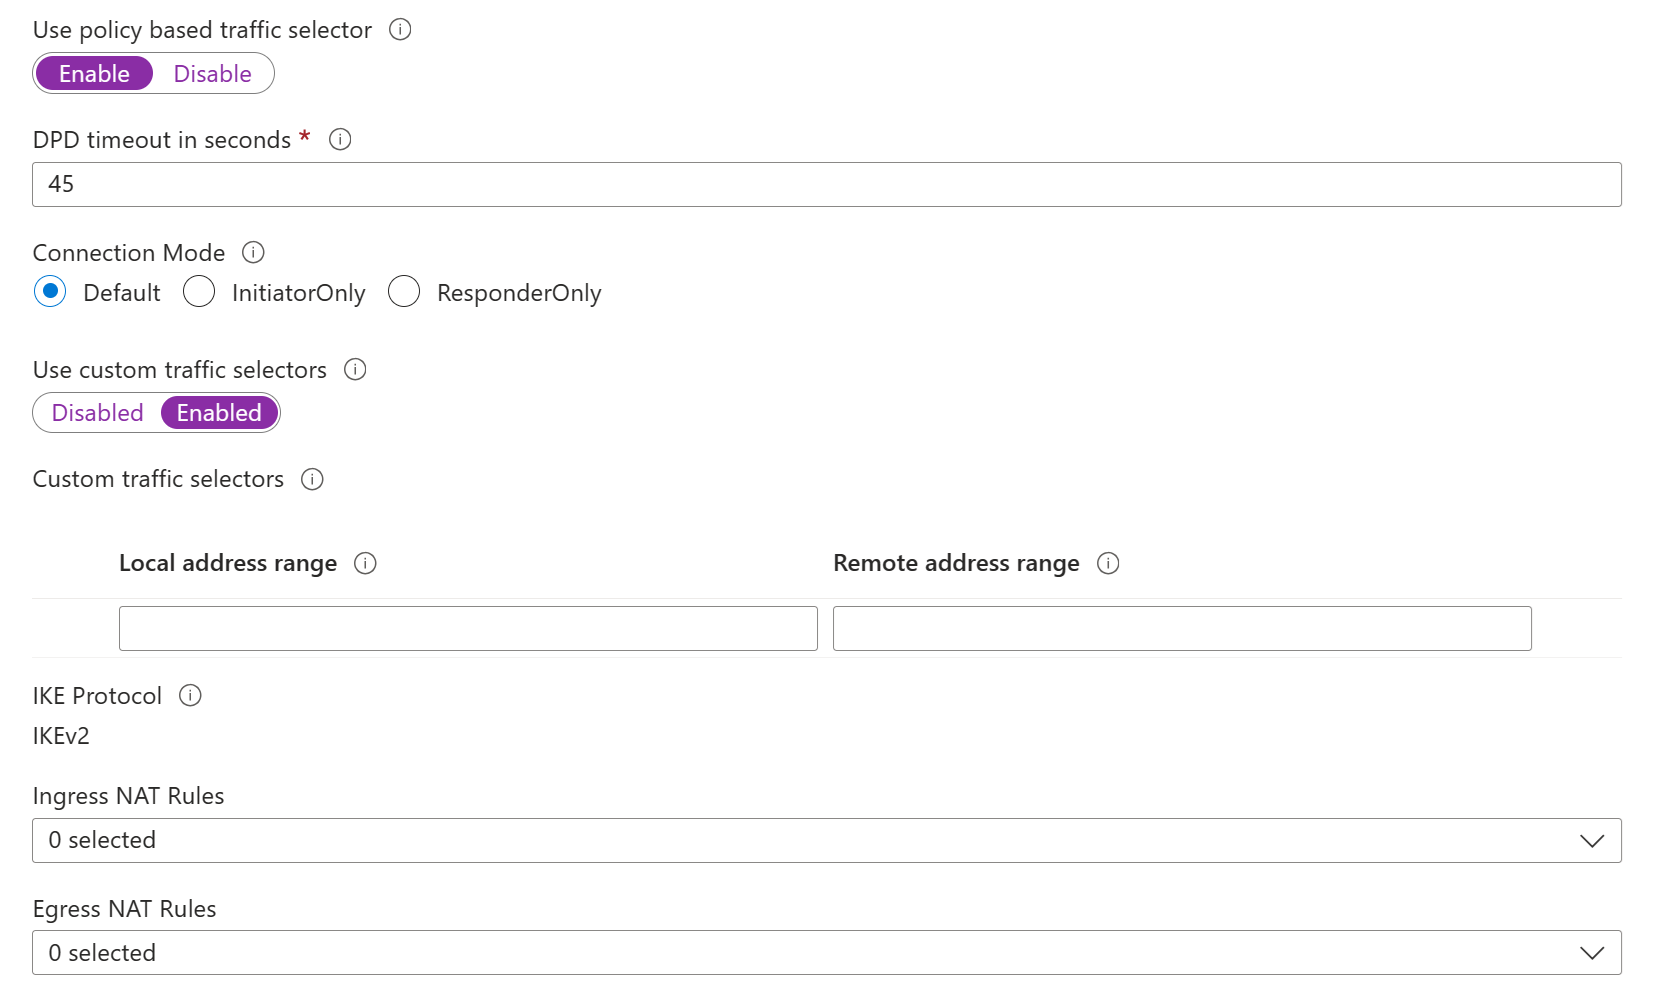
In each VPN Connection, you can define a custom IKEv2 and IPsec policy to match the encryption requirements. For more information, see Configure custom IPsec/IKE connection policies.
Go to your virtual network gateway and select Connections to open the Connections page.
Select the name of the connection you want to configure to open the Connection page.
On the left side of the Connection page, select Configuration to open the Configuration page. Make any necessary changes and then select Save.
In the following screenshots, the settings are enabled so that you can see the configuration settings that are available in the portal. Select the screenshot to see the expanded view. When you configure your connections, only configure the settings that you require. Otherwise, leave the default settings in place.
Verify the VPN connection
In the Azure portal, you can view the connection status of a VPN gateway by going to the connection. The following steps show one way to go to your connection and verify.
- On the Azure portal menu, select All resources or search for and select All resources from any page.
- Select your virtual network gateway.
- On the pane for your virtual network gateway, select Connections. You can see the status of each connection.
- Select the name of the connection that you want to verify to open Essentials. On the Essentials pane, you can view more information about your connection. The status is Succeeded and Connected after you make a successful connection.
More configuration considerations
You can customize site-to-site configurations in various ways. For more information, see the following articles:
- For information about BGP, see the BGP overview and How to configure BGP.
- For information about how to limit network traffic to resources in a virtual network, see Network security.
- For information about how Azure routes traffic between Azure, on-premises, and internet resources, see Virtual network traffic routing.
Clean up resources
If you no longer need the resources you created, you can delete them to avoid unnecessary charges.
- In the Azure portal, enter the name of your resource group in the Search box at the top and select it from the results.
- On the resource group page, select Delete resource group.
- When prompted, type the name of the resource group to confirm, then select Delete. This action permanently removes the resource group and all resources it contains.
Next steps
For more information about VPN Gateway, see the VPN Gateway FAQ.
