Nota:
El acceso a esta página requiere autorización. Puede intentar iniciar sesión o cambiar directorios.
El acceso a esta página requiere autorización. Puede intentar cambiar los directorios.
注意
Azure 自动化 State Configuration 将于 2027 年 9 月 30 日停用,请在该日期之前转换到 Azure 计算机配置。 有关详细信息,请参阅博客文章公告。 Azure Machine Configuration 服务结合了 DSC 扩展、Azure Automation State Configuration 以及客户反馈中最常请求的功能。 Azure Machine Configuration 还包括通过已启用 Arc 的服务器提供的混合计算机支持。
重要
“添加”、“Compose 配置”和“库”导航链接将于 2025 年 3 月 31 日从门户中删除。
注意
适用于 Linux 的 Azure Automation DSC 已于 2023 年 9 月 30 日停用。
本文介绍如何设置通过 Azure Automation State Configuration 进行管理的计算机。 若要详细了解此服务,请参阅 [Azure Automation State Configuration 概述][17]。
启用 Azure VM
Azure Automation State Configuration 让你能够使用 Azure 门户、Azure 资源管理器模板或 PowerShell 轻松启用 Azure VM 以进行配置管理。 Azure VM Desired State Configuration 扩展将通过 Azure Automation State Configuration 自动注册 VM。 由于 Azure 扩展以异步方式运行,因此 [检查 VM 设置状态][11] 中提供了跟踪其进度的步骤。
注意
将 DSC 部署到 Linux 节点时,要使用 /tmp 文件夹。 临时下载 nxautomation 等模块进行验证,然后再将它们安装到适当的位置。 为确保正确安装模块,适用于 Linux 的 Log Analytics 代理需要具有 /tmp 文件夹的读/写权限。 适用于 Linux 的 Log Analytics 代理以 omsagent 用户身份运行。
若要向 > 用户授予 omsagent写入权限,请运行命令 setfacl -m u:omsagent:rwx /tmp。
使用 Azure 门户启用 VM
若要使 Azure VM 能够通过 [Azure 门户][24] 进行状态配置,请执行以下操作:
- 导航至要在其中启用 VM 的 Azure 自动化帐户。
- 在“State Configuration”页中,选择“节点”选项卡,然后选择“添加”。
- 选择要启用的 VM。
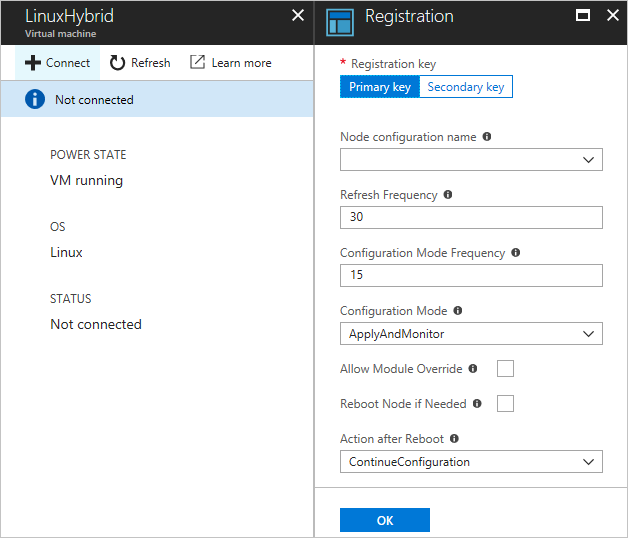
- 如果计算机未安装 PowerShell 所需状态扩展且电源状态为“正在运行”,请单击“连接”。
- 在“注册”下,输入用例所需的 PowerShell DSC 本地配置管理器值。 可以选择性地输入要分配给 VM 的节点配置。

使用 Azure 资源管理器模板启用 VM
可以使用 Azure 资源管理器模板安装和启用 VM 以用于 State Configuration。 有关启用现有 VM 以用于 State Configuration 的示例模板,请参阅 [Desired State Configuration 服务管理的服务器][21]。 如果要管理虚拟机规模集,请参阅 [Azure 自动化管理虚拟机规模集配置][22] 中的示例模板。
使用 PowerShell 启用虚拟机
可以在 PowerShell 中使用 [Register-AzAutomationDscNode][09] cmdlet,以启用用于 State Configuration 的 VM。
注意
当前仅为运行 Windows 的计算机实施 Register-AzAutomationDscNode cmdlet,因为它仅触发 Windows 扩展。
在各 Azure 订阅中注册 VM
从其他 Azure 订阅中注册 VM 的最佳方式是使用 Azure 资源管理器部署模板中的 DSC 扩展。 Desired State Configuration 扩展与 Azure 资源管理器模板中提供了相关示例。
使用 DSC 元配置注册混合计算机
可以通过 DSC 元配置为 Azure 自动化帐户安全地启用计算机。 DSC 中实现的协议使用元配置中的信息向 Azure 自动化状态配置进行身份验证。 节点将注册到位于注册 URL 的服务,并使用注册密钥进行身份验证。 在注册期间,DSC 节点和 DSC 服务会协商唯一证书,在注册后,节点将使用该证书向服务器进行身份验证。 此过程可防止启用的节点彼此模拟,例如当节点遭到入侵并且具有恶意行为时。 注册之后,注册密钥不再用于身份验证,而是从节点中删除。
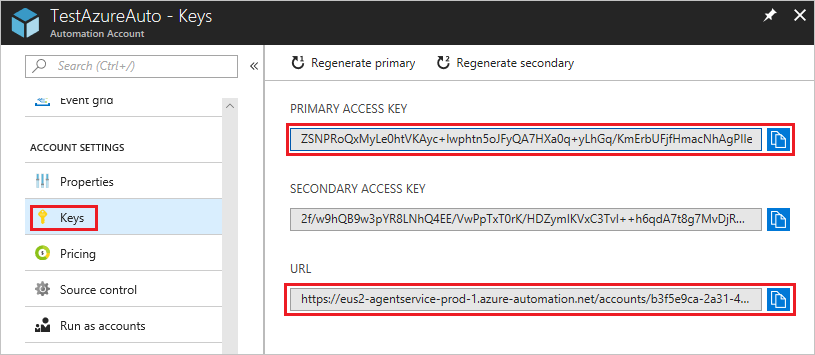
可以从 Azure 门户中“帐户设置”下的“密钥”中获取 State Configuration 注册协议所需的信息。

- “注册 URL”是“密钥”页中的“URL”字段。
- 注册密钥是“密钥”页上的“主访问密钥”或“辅助访问密钥”字段值。 可以使用其中的任一密钥。
为了增加安全性,可以随时在“密钥”页上重新生成自动化帐户的主访问密钥和辅助访问密钥。 密钥重新生成阻止日后的节点注册使用以前的密钥。
生成 DSC 元配置
若要启用任何计算机以用于 State Configuration,可以生成 DSC 元配置。 此配置通知 DSC 代理从 Azure Automation State Configuration 提取信息和/或向其报告。 Azure Automation State Configuration 的 DSC 元配置可以使用 PowerShell DSC 配置或 Azure 自动化 PowerShell cmdlet 生成。
注意
DSC 元配置包含在自动化帐户中启用计算机以便进行管理所需的机密。 请务必适当保护所创建的任何 DSC 元配置,或者在使用后将其删除。
本地 Configuration Manager (LCM) 控制对元配置的代理支持。 LCM 在所有的目标节点上运行,负责调用 DSC 元配置脚本中包含的配置资源。 通过在 ProxyURL、ProxyCredential 和 ConfigurationRepositoryWeb 块中根据需要包含 ResourceRepositoryWeb 和 ReportServerWeb 属性的定义,可以在元配置中包含代理支持。 例如,URL 设置为 ProxyURL = "http://172.16.3.6:3128";。
ProxyCredential 属性设置为 PSCredential 对象,如 [在 Azure 自动化中管理凭据][25] 中所述。
使用 DSC 配置生成 DSC 元配置
以管理员身份在本地环境中的计算机上打开文本编辑器,例如 Visual Studio Code (VS Code)。 计算机上必须已安装最新版本的 [WMF 5][19]。
在本地复制以下脚本。 此脚本包含用于创建元配置的 PowerShell DSC 配置,以及用于开始执行元配置创建操作的命令。
注意
State Configuration 节点配置名称在 Azure 门户中区分大小写。 如果节点名称大小写不匹配,节点将不会显示在“节点”选项卡下。此过程适用于非 Azure 虚拟机。 将 Azure VM 注册为混合节点将导致 DSC 费用。
# The DSC configuration that will generate metaconfigurations
[DscLocalConfigurationManager()]
Configuration DscMetaConfigs
{
     param
     (
         [Parameter(Mandatory=$True)]
         [String]$RegistrationUrl,

         [Parameter(Mandatory=$True)]
         [String]$RegistrationKey,

         [Parameter(Mandatory=$True)]
         [String[]]$ComputerName,

         [Int]$RefreshFrequencyMins = 30,

         [Int]$ConfigurationModeFrequencyMins = 15,

         [String]$ConfigurationMode = 'ApplyAndMonitor',

         [String]$NodeConfigurationName,

         [Boolean]$RebootNodeIfNeeded= $False,

         [String]$ActionAfterReboot = 'ContinueConfiguration',

         [Boolean]$AllowModuleOverwrite = $False,

         [Boolean]$ReportOnly
     )

     if(!$NodeConfigurationName -or $NodeConfigurationName -eq '')
     {
         $ConfigurationNames = $null
     }
     else
     {
         $ConfigurationNames = @($NodeConfigurationName)
     }

     if($ReportOnly)
     {
         $RefreshMode = 'PUSH'
     }
     else
     {
         $RefreshMode = 'PULL'
     }

     Node $ComputerName
     {
         Settings
         {
             RefreshFrequencyMins           = $RefreshFrequencyMins
             RefreshMode                    = $RefreshMode
             ConfigurationMode              = $ConfigurationMode
             AllowModuleOverwrite           = $AllowModuleOverwrite
             RebootNodeIfNeeded             = $RebootNodeIfNeeded
             ActionAfterReboot              = $ActionAfterReboot
             ConfigurationModeFrequencyMins = $ConfigurationModeFrequencyMins
         }

         if(!$ReportOnly)
         {
         ConfigurationRepositoryWeb AzureAutomationStateConfiguration
             {
                 ServerUrl          = $RegistrationUrl
                 RegistrationKey    = $RegistrationKey
                 ConfigurationNames = $ConfigurationNames
             }

             ResourceRepositoryWeb AzureAutomationStateConfiguration
             {
                 ServerUrl       = $RegistrationUrl
                 RegistrationKey = $RegistrationKey
             }
         }

         ReportServerWeb AzureAutomationStateConfiguration
         {
             ServerUrl       = $RegistrationUrl
             RegistrationKey = $RegistrationKey
         }
     }
}

# Create the metaconfigurations
# NOTE: DSC Node Configuration names are case sensitive in the portal.
# TODO: edit the below as needed for your use case
$Params = @{
     RegistrationUrl = '<fill me in>';
     RegistrationKey = '<fill me in>';
     ComputerName = @('<some VM to onboard>', '<some other VM to onboard>');
     NodeConfigurationName = 'SimpleConfig.webserver';
     RefreshFrequencyMins = 30;
     ConfigurationModeFrequencyMins = 15;
     RebootNodeIfNeeded = $False;
     AllowModuleOverwrite = $False;
     ConfigurationMode = 'ApplyAndMonitor';
     ActionAfterReboot = 'ContinueConfiguration';
     ReportOnly = $False;  # Set to $True to have machines only report to AA DSC but not pull from it
}

# Use PowerShell splatting to pass parameters to the DSC configuration being invoked
# For more info about splatting, run: Get-Help -Name about_Splatting
DscMetaConfigs @Params
填写自动化帐户的注册密钥和 URL,以及要启用的计算机名称。 所有其他参数都是可选的。 若要查找自动化帐户的注册密钥和注册 URL,请参阅 [使用 DSC 元配置注册混合计算机][13]。
如果希望计算机向 Azure Automation State Configuration 报告 DSC 状态信息但不提取配置或 PowerShell 模块,请将
ReportOnly参数设置为 true。如果未设置
ReportOnly,计算机将向 Azure Automation State Configuration 报告 DSC 状态信息并拉取配置或 PowerShell 模块。 在ConfigurationRepositoryWeb、ResourceRepositoryWeb和ReportServerWeb块中相应地设置参数。运行该脚本。 现在,应有一个名为 DscMetaConfigs 的工作目录文件夹,其中包含要启用的计算机的 PowerShell DSC 元配置(作为管理员)。
Set-DscLocalConfigurationManager -Path ./DscMetaConfigs
使用 Azure 自动化 cmdlet 生成 DSC 元配置
可以在以下条件下使用 Azure 自动化 cmdlet 生成 DSC 元配置:
- LCM 默认值与用例匹配
- 你希望计算机既能从 Azure Automation State Configuration 中拉取数据,又能向其报告
使用以下步骤生成元配置:
在本地环境中,以计算机管理员身份打开 PowerShell 控制台或 VS Code。
使用 [Connect-AzAccount -Environment AzureChinaCloud][07] 连接到 Azure 资源管理器。
从要设置节点的目标自动化帐户下载想要启用的计算机的 PowerShell DSC 元配置。
# Define the parameters for Get-AzAutomationDscOnboardingMetaconfig using PowerShell Splatting
$Params = @{
    ResourceGroupName = 'ContosoResources' # The Resource Group that contains your Azure Automation account
    AutomationAccountName = 'ContosoAutomation'; # The Azure Automation account where you want to onboard the node
    ComputerName = @('web01', 'web02', 'sql01'); # The computers to generate the metaconfigurations for
    OutputFolder = "$env:UserProfile\Desktop\";
}
# Use PowerShell splatting to pass parameters to the Azure Automation cmdlet being invoked
# For more info about splatting, run: Get-Help -Name about_Splatting
Get-AzAutomationDscOnboardingMetaconfig @Params
现在,应有一个名为 DscMetaConfigs 的文件夹,其中包含要启用的计算机的 PowerShell DSC 元配置(作为管理员)。
Set-DscLocalConfigurationManager -Path $env:UserProfile\Desktop\DscMetaConfigs
启用 Windows 物理/虚拟计算机
可以启用在本地或其他云环境(包括 AWS EC2 实例)中运行的 Windows 服务器,以便 Azure Automation State Configuration。 服务器必须具有 [Azure 的出站访问权限][18]。
确保在为 State Configuration 启用的计算机上安装了新版本的 [WMF 5][19]。 此外,必须在用于启用计算机的计算机上安装 WMF 5。
若要创建一个包含所需 DSC 元配置的文件夹,请按照 [生成 DSC 元配置][12] 中的说明执行操作。
使用以下 cmdlet 将 PowerShell DSC 元配置远程应用于要启用的计算机。
Set-DscLocalConfigurationManager -Path C:\Users\joe\Desktop\DscMetaConfigs -ComputerName MyServer1, MyServer2如果无法从远程应用 PowerShell DSC 元配置,请将“元配置”文件夹复制到要启用的计算机。 然后添加代码以在计算机上本地调用 [Set-DscLocalConfigurationManager][10]。
使用 Azure 门户或 cmdlet,验证计算机是否显示为在 Azure 自动化帐户中注册的“State Configuration”节点。
启用 Linux 物理/虚拟计算机
可以为 State Configuration 启用在本地或其他云环境中运行的 Linux 服务器。 服务器必须具有 [Azure 的出站访问权限][18]。
确保在为 State Configuration 启用的计算机上安装了 [适用于 Linux 的 PowerShell Desired State Configuration][23] 的最新版本。
如果 PowerShell DSC 本地配置管理器默认值与用例匹配,并且想要启用计算机以便从 State Configuration 提取信息并向其报告:
在要启用的每个 Linux 计算机上,使用
Register.py启用使用 PowerShell DSC 本地配置管理器默认值的计算机。/opt/microsoft/dsc/Scripts/Register.py <Automation account registration key> <Automation account registration URL>若要查找自动化帐户的注册密钥和注册 URL,请参阅 [使用 DSC 元配置注册混合计算机][13]。
如果 PowerShell DSC 本地配置管理器 (LCM) 默认值与用例不匹配,或者想要启用仅向 Azure Automation State Configuration 报告的计算机,请按照步骤 4-7 进行操作。 否则,请直接跳到步骤 7。
请按照 [生成 DSC 元配置][12] 部分中的说明创建一个包含所需 DSC 元配置的文件夹。
确保在计算机上安装了新版本的 [WMF 5][19],该计算机用于为 State Configuration 启用虚拟机。
添加如下代码,将 PowerShell DSC 元配置远程应用于要启用的计算机。
$SecurePass = ConvertTo-SecureString -String '<root password>' -AsPlainText -Force
$Cred = New-Object System.Management.Automation.PSCredential 'root', $SecurePass
$Opt = New-CimSessionOption -UseSsl -SkipCACheck -SkipCNCheck -SkipRevocationCheck
# need a CimSession for each Linux machine to onboard
$Session = New-CimSession -Credential $Cred -ComputerName <your Linux machine> -Port 5986 -Authentication basic -SessionOption $Opt
Set-DscLocalConfigurationManager -CimSession $Session -Path C:\Users\joe\Desktop\DscMetaConfigs
如果无法远程应用 PowerShell DSC 元配置,请将与远程计算机相对应的元配置从步骤 4 中所述的文件夹复制到 Linux 计算机。
添加代码,在为 State Configuration 启用的每台 Linux 计算机上本地调用
Set-DscLocalConfigurationManager.py。/opt/microsoft/dsc/Scripts/SetDscLocalConfigurationManager.py -configurationmof <path to metaconfiguration file>确保计算机在 Azure 自动化帐户中显示为注册的 DSC 节点。 可以使用 Azure 门户或 cmdlet。
重新注册节点
在将计算机注册为 Azure Automation State Configuration 中的 DSC 节点之后,有多种原因可能促使你需要将来重新注册该节点。
证书续订。 对于 Windows Server 2019 之前的 Windows Server 版本,每个节点会自动协商唯一的身份验证证书,该证书于一年之后过期。 如果证书过期但未续订,则该节点将无法与 Azure 自动化通信,并将标记为
Unresponsive。 目前,当证书即将过期时,PowerShell DSC 注册协议无法自动续订证书,因此需要在一年之后重新注册这些节点。 重新注册之前,请确保每个节点运行的是 WMF 5 RTM。如果你在证书过期前 90 天内或在证书过期后的任意时间点重新注册,将生成并使用一个新证书。 此问题在 Windows Server 2019 及更高版本中已修复。
DSC LCM 值的更改。 可能需要更改在节点初始注册期间设置的 PowerShell DSC LCM 值,例如
ConfigurationMode。 目前,只能通过重新注册更改这些 DSC 代理值。 节点配置值是一种例外情况。 可以直接在 Azure Automation DSC 中更改此值。
可以使用本文介绍的任何方法重新注册节点,就和最初注册节点一样。 重新注册节点之前,不需要从 Azure Automation State Configuration 中注销节点。
检查 VM 设置的状态
State Configuration 可让你轻松启用 Azure Windows VM 以进行配置管理。 在幕后,Azure VM Desired State Configuration 扩展用于向 Azure Automation State Configuration 注册 VM。 由于 Azure VM Desired State Configuration 以异步方式运行,跟踪其进度和排查其执行问题可能很重要。
注意
对于使用了 Azure VM Desired State Configuration 扩展的适于 State Configuration 的 Azure Windows VM,任何启用方法可能都需要花费多达一小时的时间,Azure 自动化才将 VM 显示为已注册。 之所以出现上述延迟,是因为 Azure VM Desired State Configuration 扩展在 VM 上安装了 WMF 5,这是启用适于 State Configuration 的 VM 的必要条件。
若要查看 Azure VM Desired State Configuration 扩展的状态,请执行以下操作:
- 在 Azure 门户中,导航到要启用的 VM。
- 选择“设置”下面的“扩展” 。
- 现在选择 DSC 或 DSCForLinux,具体取决于操作系统。
- 有关详细信息,可以选择“查看详细状态”。
后续步骤
- 有关入门信息,请参阅 [Azure Automation State Configuration 入门][16]。
- 若要了解如何编译 DSC 配置,以便将它们分配给目标节点,请参阅 [在 Azure Automation State Configuration 中编译 DSC 配置][15]。
- 有关 PowerShell cmdlet 参考,请参阅 [Az.Automation][08]。
- 有关定价信息,请参阅 [Azure Automation State Configuration 定价][20]。
- 若要查看在持续部署管道中使用 Azure Automation State Configuration 的示例,请参阅 [使用 Chocolatey 设置持续部署][14]。
- 有关疑难解答信息,请参阅 Azure Automation State Configuration 疑难解答。
[07]: https://learn.microsoft.com/powershell/module/Az.Accounts/Connect-AzAccount -Environment AzureChinaCloud [08]: https://learn.microsoft.com/powershell/module/az.automationhttps://learn.microsoft.com/powershell/module/az.automation/register-azautomationdscnode [09]: https://learn.microsoft.com/powershell/module/psdesiredstateconfiguration/set-dsclocalconfigurationmanager [10]: #check-status-of-vm-setup [11]: #generate-dsc-metaconfigurations [12]: #use-dsc-metaconfiguration-to-register-hybrid-machines [13]: automation-dsc-cd-chocolatey.md [14]: automation-dsc-compile.md [15]: automation-dsc-getting-started.md [16]: automation-dsc-overview.md [17]: automation-dsc-overview.md#network-planning [18]: https://aka.ms/wmf5latest [19]: https://www.azure.cn/pricing/details/automation/ [20]: https://azure.microsoft.com/resources/templates/automation-configuration/ [21]: https://azure.microsoft.com/resources/templates/vmss-automation-dsc/ [22]: https://github.com/Microsoft/PowerShell-DSC-for-Linux [23]: https://portal.azure.cn/ [24]: shared-resources/credentials.md