Nota:
El acceso a esta página requiere autorización. Puede intentar iniciar sesión o cambiar directorios.
El acceso a esta página requiere autorización. Puede intentar cambiar los directorios.
Azure 自动化使用适用于 Azure 资源管理器资源的 Get-AzAutomationCertificate cmdlet 安全地存储可供 runbook 和 DSC 配置访问的证书。 通过安全的证书存储,可以创建使用证书进行身份验证的 runbook 和 DSC 配置,也可以将证书添加到 Azure 或第三方资源。
注释
Azure 自动化中的安全资产包括凭据、证书、连接和加密的变量。 这些资产已使用针对每个自动化帐户生成的唯一密钥加密,并存储在自动化中。 自动化将密钥存储在系统管理的 Key Vault 服务中。 在存储安全资产之前,自动化会从 Key Vault 加载密钥,然后使用该密钥加密资产。
用于访问证书的 PowerShell cmdlet
下表中的 cmdlet 使用 PowerShell 创建和管理自动化证书。 它们作为 Az 模块的一部分提供。
| Cmdlet (命令行工具) | DESCRIPTION |
|---|---|
| Get-AzAutomationCertificate | 检索有关要在 Runbook 或 DSC 配置中使用的证书的信息。 只能使用内部 Get-AutomationCertificate cmdlet 来检索证书。 |
| New-AzAutomationCertificate | 在自动化中创建新证书。 |
| Remove-AzAutomationCertificate | 从自动化中删除证书。 |
| Set-AzAutomationCertificate | 设置现有证书的属性,包括上传证书文件和设置 .pfx 文件的密码。 |
用于访问证书的内部 cmdlet
下表中的内部 cmdlet 用于在 runbook 中访问证书。 此 cmdlet 附带全局模块 Orchestrator.AssetManagement.Cmdlets。 有关详细信息,请参阅内部 cmdlet。
| 内部 Cmdlet | DESCRIPTION |
|---|---|
Get-AutomationCertificate |
在 Runbook 或 DSC 配置中获取要使用的证书。 返回一个 System.Security.Cryptography.X509Certificates.X509Certificate2 对象。 |
注释
应避免在 runbook 或 DSC 配置中 Name 的 Get-AutomationCertificate 参数中使用变量。 如果使用变量,可能会导致在设计时发现 runbook 或 DSC 配置与自动化变量之间的依赖关系的过程变得复杂。
用于访问证书的 Python 函数
使用下表中的函数可在 Python 2 和 3 runbook 中访问证书。 Python 3 Runbook 目前处于预览阶段。
| 功能 | DESCRIPTION |
|---|---|
automationassets.get_automation_certificate |
检索有关证书资产的信息。 |
注释
必须在 Python Runbook 的开头部分导入 automationassets 模块才能访问资产函数。
创建新证书
创建新证书时,需要将 .cer 或 .pfx 文件上传到自动化。 将证书标记为可导出后,可以将其转出自动化证书存储区。 如果证书不可导出,则它只可用于在 runbook 或 DSC 配置中签名。
注释
Azure 自动化要求证书具有提供程序 Microsoft 增强的 RSA 和 AES 加密提供程序。
使用 Azure 门户创建新证书
- 在自动化帐户的左侧窗格中,选择“共享资源”下的“证书” 。
- 在“证书”页上,选择“添加证书”。
- 在“名称”字段中,键入证书的名称。
- 若要查找 .cer 或 .pfx 文件,请选择“上传证书文件”下的“选择文件” 。 如果选择了 .pfx 文件,请指定密码,以及是否允许导出。 如果使用 Azure 自动化门户上传证书,则合作伙伴 (CSP) 帐户可能会失败。 建议使用 PowerShell cmdlet 作为解决此问题的变通方法。
- 单击“创建”保存新的证书资产。
使用 PowerShell 创建新证书
以下示例演示了如何创建新的自动化证书并将其标记为可导出。 在该示例中,会导入现有的 .pfx 文件。
$certificateName = 'MyCertificate'
$PfxCertPath = '.\MyCert.pfx'
$CertificatePassword = ConvertTo-SecureString -String 'P@$$w0rd' -AsPlainText -Force
$ResourceGroup = "ResourceGroup01"

New-AzAutomationCertificate -AutomationAccountName "MyAutomationAccount" -Name $certificateName -Path $PfxCertPath -Password $CertificatePassword -Exportable -ResourceGroupName $ResourceGroup
使用资源管理器模板创建新的工作区
下面的示例演示如何通过 PowerShell 使用资源管理器模板将证书部署到自动化帐户:
$AutomationAccountName = "<automation account name>"
$PfxCertPath = '<PFX cert path and filename>'
$CertificatePassword = '<password>'
$certificateName = '<certificate name>' #A name of your choosing
$ResourceGroupName = '<resource group name>' #The one that holds your automation account
$flags = [System.Security.Cryptography.X509Certificates.X509KeyStorageFlags]::Exportable `
    -bor [System.Security.Cryptography.X509Certificates.X509KeyStorageFlags]::PersistKeySet `
    -bor [System.Security.Cryptography.X509Certificates.X509KeyStorageFlags]::MachineKeySet
# Load the certificate into memory
$PfxCert = New-Object -TypeName System.Security.Cryptography.X509Certificates.X509Certificate2 -ArgumentList @($PfxCertPath, $CertificatePassword, $flags)
# Export the certificate and convert into base 64 string
$Base64Value = [System.Convert]::ToBase64String($PfxCert.Export([System.Security.Cryptography.X509Certificates.X509ContentType]::Pkcs12))
$Thumbprint = $PfxCert.Thumbprint


$json = @"
{
    '`$schema': 'https://schema.management.azure.com/schemas/2015-01-01/deploymentTemplate.json#',
    'contentVersion': '1.0.0.0',
    'resources': [
        {
            'name': '$AutomationAccountName/$certificateName',
            'type': 'Microsoft.Automation/automationAccounts/certificates',
            'apiVersion': '2015-10-31',
            'properties': {
                'base64Value': '$Base64Value',
                'thumbprint': '$Thumbprint',
                'isExportable': true
            }
        }
    ]
}
"@

$json | out-file .\template.json
New-AzResourceGroupDeployment -Name NewCert -ResourceGroupName $ResourceGroupName -TemplateFile .\template.json
获取证书
若要检索证书,请使用内部 Get-AutomationCertificate cmdlet。 不能使用 Get-AzAutomationCertificate cmdlet,因为它会返回有关证书资产的信息,而不是证书本身的信息。
文本 Runbook 示例
以下示例代码演示了如何将证书添加到 runbook 中的云服务。 在此示例中,已从加密的自动化变量检索了密码。
$serviceName = 'MyCloudService'
$cert = Get-AutomationCertificate -Name 'MyCertificate'
$certPwd = Get-AzAutomationVariable -ResourceGroupName "ResourceGroup01" `
-AutomationAccountName "MyAutomationAccount" -Name 'MyCertPassword'
Add-AzureCertificate -ServiceName $serviceName -CertToDeploy $cert
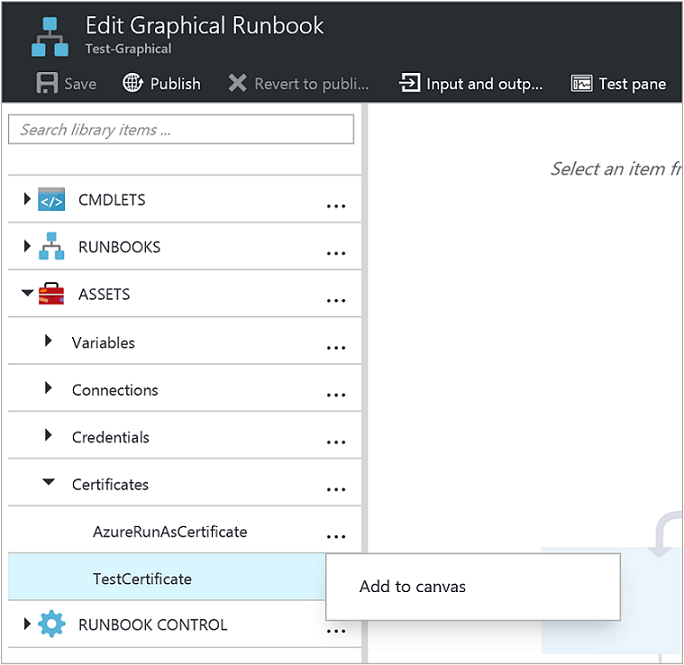
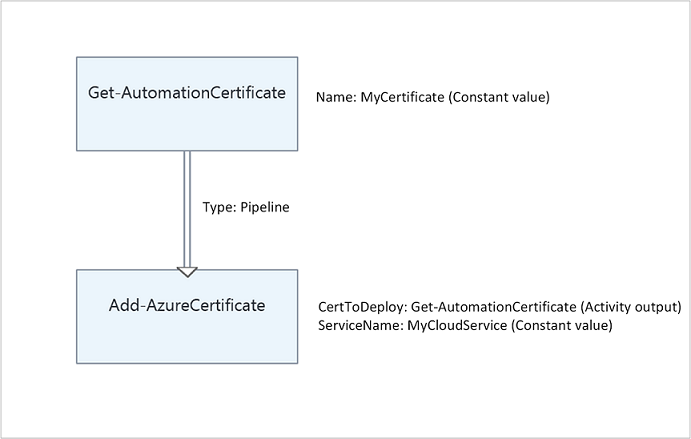
图形 Runbook 示例
通过在“库”窗格中右键单击证书并选择“添加到画布”,可以将内部 Get-AutomationCertificate cmdlet 的活动添加到图形 runbook。
下图显示了在图形 Runbook 中使用证书的示例。
后续步骤
- 若要了解有关用于访问凭据的 cmdlet 的详细信息,请参阅在 Azure 自动化中管理模块。
- 有关 Runbook 的常规信息,请参阅在 Azure 自动化中执行 Runbook。
- 有关 DSC 配置的详细信息,请参阅 Azure 自动化 State Configuration 概述。