Nota:
El acceso a esta página requiere autorización. Puede intentar iniciar sesión o cambiar directorios.
El acceso a esta página requiere autorización. Puede intentar cambiar los directorios.
在部署过程中,可以从 Azure Key Vault 中检索一个安全值,而不是直接在模板或参数文件中放置该值(如密码)。 通过引用参数文件中的密钥保管库和密钥来检索值。 值永远不会公开,因为仅引用其密钥保管库 ID。
重要
本文重点介绍如何将敏感值作为模板参数传递。 机密作为参数传递时,密钥保管库与部署到的资源组不需要位于同一订阅中。
本文并不涉及如何将虚拟机属性设置为密钥保管库中证书的 URL。 有关该方案的快速入门模板,请参阅在虚拟机上安装来自 Azure Key Vault 的证书。
部署密钥保管库和机密
若要在模板部署期间访问密钥保管库,请将密钥保管库上的 enabledForTemplateDeployment 设置为 true。
如果你已有密钥保管库,请确保它允许进行模板部署。
az keyvault update --name ExampleVault --enabled-for-template-deployment true
若要创建新的密钥保管库并添加机密,请使用:
az group create --name ExampleGroup --location chinaeast
az keyvault create \
  --name ExampleVault \
  --resource-group ExampleGroup \
  --location chinaeast \
  --enabled-for-template-deployment true
az keyvault secret set --vault-name ExampleVault --name "ExamplePassword" --value "hVFkk965BuUv"
作为密钥保管库的所有者,你可以自动获得创建机密的权限。 如果需要让其他用户创建机密,请使用:
az keyvault set-policy \
  --upn <user-principal-name> \
  --name ExampleVault \
  --secret-permissions set delete get list
如果用户部署的是用于检索机密的模板,则不需要访问策略。 仅在用户需要直接处理机密时,才将用户添加到访问策略。 部署权限在下一节中定义。
若要详细了解如何创建密钥保管库和添加机密,请参阅:
授予对机密的部署访问权限
部署模板的用户必须在资源组和密钥保管库范围内具有 Microsoft.KeyVault/vaults/deploy/action 权限。 勾选此访问权限后,Azure 资源管理器就可以通过传入密钥保管库的资源 ID 来防止未经批准的用户访问机密。 你可以向用户授予部署访问权限,而不授予对机密的写访问权限。
所有者和参与者角色均授予该访问权限。 如果是你创建了密钥保管库,那么你就是所有者且具有相关权限。
对于其他用户,请授予 Microsoft.KeyVault/vaults/deploy/action 权限。 以下过程展示了如何创建具有最小权限的角色,并将其分配给用户。
- 创建自定义角色定义 JSON 文件:
{
  "Name": "Key Vault resource manager template deployment operator",
  "IsCustom": true,
  "Description": "Lets you deploy a resource manager template with the access to the secrets in the Key Vault.",
  "Actions": [
    "Microsoft.KeyVault/vaults/deploy/action"
  ],
  "NotActions": [],
  "DataActions": [],
  "NotDataActions": [],
  "AssignableScopes": [
    "/subscriptions/aaaa0a0a-bb1b-cc2c-dd3d-eeeeee4e4e4e"
  ]
}
将“00000000-0000-0000-0000-000000000000”替换为订阅 ID。
- 使用 JSON 文件创建新角色:
az role definition create --role-definition "<path-to-role-file>"
az role assignment create \
  --role "Key Vault resource manager template deployment operator" \
  --scope /subscriptions/<Subscription-id>/resourceGroups/<resource-group-name> \
  --assignee <user-principal-name> \
  --resource-group ExampleGroup
此示例在资源组级别为用户分配自定义角色。
使用密钥保管库部署托管应用程序的模板时,必须授予对设备资源提供程序服务主体的访问权限。 有关详细信息,请参阅部署 Azure 托管应用程序时访问 Key Vault 机密。
通过静态 ID 引用机密
使用此方法,可以在参数文件(而不是在模板)中引用密钥保管库。 下图显示了参数文件如何引用机密并将该值传递到模板。

教程:在资源管理器模板部署中集成 Azure Key Vault 使用了此方法。
以下模板部署包含管理员密码的 SQL Server。 密码参数设置为安全字符串。 但是,此模板未指定该值的来源。
{
  "$schema": "https://schema.management.azure.com/schemas/2019-04-01/deploymentTemplate.json#",
  "contentVersion": "1.0.0.0",
  "parameters": {
    "sqlServerName": {
      "type": "string"
    },
    "location": {
      "type": "string",
      "defaultValue": "[resourceGroup().location]"
    },
    "adminLogin": {
      "type": "string"
    },
    "adminPassword": {
      "type": "securestring"
    }
  },
  "resources": [
    {
      "type": "Microsoft.Sql/servers",
      "apiVersion": "2024-05-01-preview",
      "name": "[parameters('sqlServerName')]",
      "location": "[parameters('location')]",
      "properties": {
        "administratorLogin": "[parameters('adminLogin')]",
        "administratorLoginPassword": "[parameters('adminPassword')]",
        "version": "12.0"
      }
    }
  ]
}
现在,为上述模板创建参数文件。 在参数文件中,指定与模板中的参数名称匹配的参数。 对于参数值,请从 key vault 中引用机密。 可以通过传递密钥保管库的资源标识符和机密的名称来引用机密:
在以下参数文件中,密钥保管库机密必须已存在,而且你为其资源 ID 提供了静态值。
{
  "$schema": "https://schema.management.azure.com/schemas/2019-04-01/deploymentParameters.json#",
  "contentVersion": "1.0.0.0",
  "parameters": {
    "adminLogin": {
      "value": "exampleadmin"
    },
    "adminPassword": {
      "reference": {
        "keyVault": {
          "id": "/subscriptions/<subscription-id>/resourceGroups/<rg-name>/providers/Microsoft.KeyVault/vaults/<vault-name>"
        },
        "secretName": "ExamplePassword"
      }
    },
    "sqlServerName": {
      "value": "<your-server-name>"
    }
  }
}
如果需要使用当前版本以外的机密版本,请包括 secretVersion 属性。
"secretName": "ExamplePassword",
"secretVersion": "cd91b2b7e10e492ebb870a6ee0591b68"
部署模板并传入参数文件:
az group create --name SqlGroup --location chinanorth2
az deployment group create \
  --resource-group SqlGroup \
  --template-uri <template-file-URI> \
  --parameters <parameter-file>
通过动态 ID 引用机密
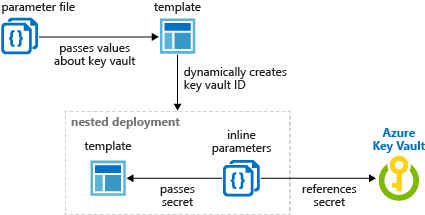
上一部分介绍了如何通过参数传递密钥保管库机密的静态资源 ID。 在某些情况下,需要引用随当前部署而变的密钥保管库机密。 或者,需要将参数值传递到模板而不是在参数文件中创建引用参数。 解决方案是使用链接的模板来动态生成密钥保管库机密的资源 ID。
不能在参数文件中动态生成资源 ID,因为参数文件中不允许使用模板表达式。
在父模板中添加嵌套模板,然后传入包含动态生成的资源 ID 的参数。 下图显示链接模板中的参数如何引用机密。

以下模板动态创建 Key Vault ID 并将其作为参数传递。
{
  "$schema": "https://schema.management.azure.com/schemas/2019-04-01/deploymentTemplate.json#",
  "contentVersion": "1.0.0.0",
  "parameters": {
      "location": {
        "type": "string",
        "defaultValue": "[resourceGroup().location]",
        "metadata": {
          "description": "The location where the resources will be deployed."
        }
      },
      "vaultName": {
        "type": "string",
        "metadata": {
          "description": "The name of the keyvault that contains the secret."
        }
      },
      "secretName": {
        "type": "string",
        "metadata": {
          "description": "The name of the secret."
        }
      },
      "vaultResourceGroupName": {
        "type": "string",
        "metadata": {
          "description": "The name of the resource group that contains the keyvault."
        }
      },
      "vaultSubscription": {
        "type": "string",
        "defaultValue": "[subscription().subscriptionId]",
        "metadata": {
          "description": "The name of the subscription that contains the keyvault."
        }
      }
  },
  "resources": [
    {
      "type": "Microsoft.Resources/deployments",
      "apiVersion": "2025-04-01",
      "name": "dynamicSecret",
      "properties": {
        "mode": "Incremental",
        "expressionEvaluationOptions": {
          "scope": "inner"
        },
        "template": {
          "$schema": "https://schema.management.azure.com/schemas/2019-04-01/deploymentTemplate.json#",
          "contentVersion": "1.0.0.0",
          "parameters": {
            "adminLogin": {
              "type": "string"
            },
            "adminPassword": {
              "type": "securestring"
            },
            "location": {
              "type": "string"
            }
          },
          "variables": {
            "sqlServerName": "[concat('sql-', uniqueString(resourceGroup().id, 'sql'))]"
          },
          "resources": [
            {
              "type": "Microsoft.Sql/servers",
              "apiVersion": "2024-05-01-preview",
              "name": "[variables('sqlServerName')]",
              "location": "[parameters('location')]",
              "properties": {
                "administratorLogin": "[parameters('adminLogin')]",
                "administratorLoginPassword": "[parameters('adminPassword')]"
              }
            }
          ],
          "outputs": {
            "sqlFQDN": {
              "type": "string",
              "value": "[reference(variables('sqlServerName')).fullyQualifiedDomainName]"
            }
          }
        },
        "parameters": {
          "location": {
            "value": "[parameters('location')]"
          },
          "adminLogin": {
            "value": "ghuser"
          },
          "adminPassword": {
            "reference": {
              "keyVault": {
                "id": "[resourceId(parameters('vaultSubscription'), parameters('vaultResourceGroupName'), 'Microsoft.KeyVault/vaults', parameters('vaultName'))]"
              },
              "secretName": "[parameters('secretName')]"
            }
          }
        }
      }
    }
  ]
}
后续步骤
- 有关密钥保管库的一般信息,请参阅什么是 Azure 密钥保管库?
- 有关引用密钥机密的完整示例,请参阅 GitHub 上的密钥保管库示例。