Nota:
El acceso a esta página requiere autorización. Puede intentar iniciar sesión o cambiar directorios.
El acceso a esta página requiere autorización. Puede intentar cambiar los directorios.
APPLIES TO:
 Azure CLI ml extension v2 (current)
 Python SDK azure-ai-ml v2 (current)
In this article, you learn to manage resource usage in a deployment by configuring autoscaling based on metrics and schedules. The autoscale process lets you automatically run the right amount of resources to handle the load on your application. Online endpoints in Azure Machine Learning support autoscaling through integration with the autoscale feature in Azure Monitor.
Azure Monitor autoscale allows you to set rules that trigger one or more autoscale actions when conditions of the rules are met. You can configure metrics-based scaling (such as CPU utilization greater than 70%), schedule-based scaling (such as scaling rules for peak business hours), or a combination of the two. For more information, see Overview of autoscale in Azure.

You can currently manage autoscaling by using the Azure CLI, the REST APIs, Azure Resource Manager, the Python SDK, or the browser-based Azure portal.
Prerequisites
A deployed endpoint. For more information, see Deploy and score a machine learning model by using an online endpoint.
To use autoscale, the role
microsoft.insights/autoscalesettings/writemust be assigned to the identity that manages autoscale. You can use any built-in or custom roles that allow this action. For general guidance on managing roles for Azure Machine Learning, see Manage users and roles. For more on autoscale settings from Azure Monitor, see Microsoft.Insights autoscalesettings.To use the Python SDK to manage the Azure Monitor service, install the
azure-mgmt-monitorpackage with the following command:pip install azure-mgmt-monitor
Define autoscale profile
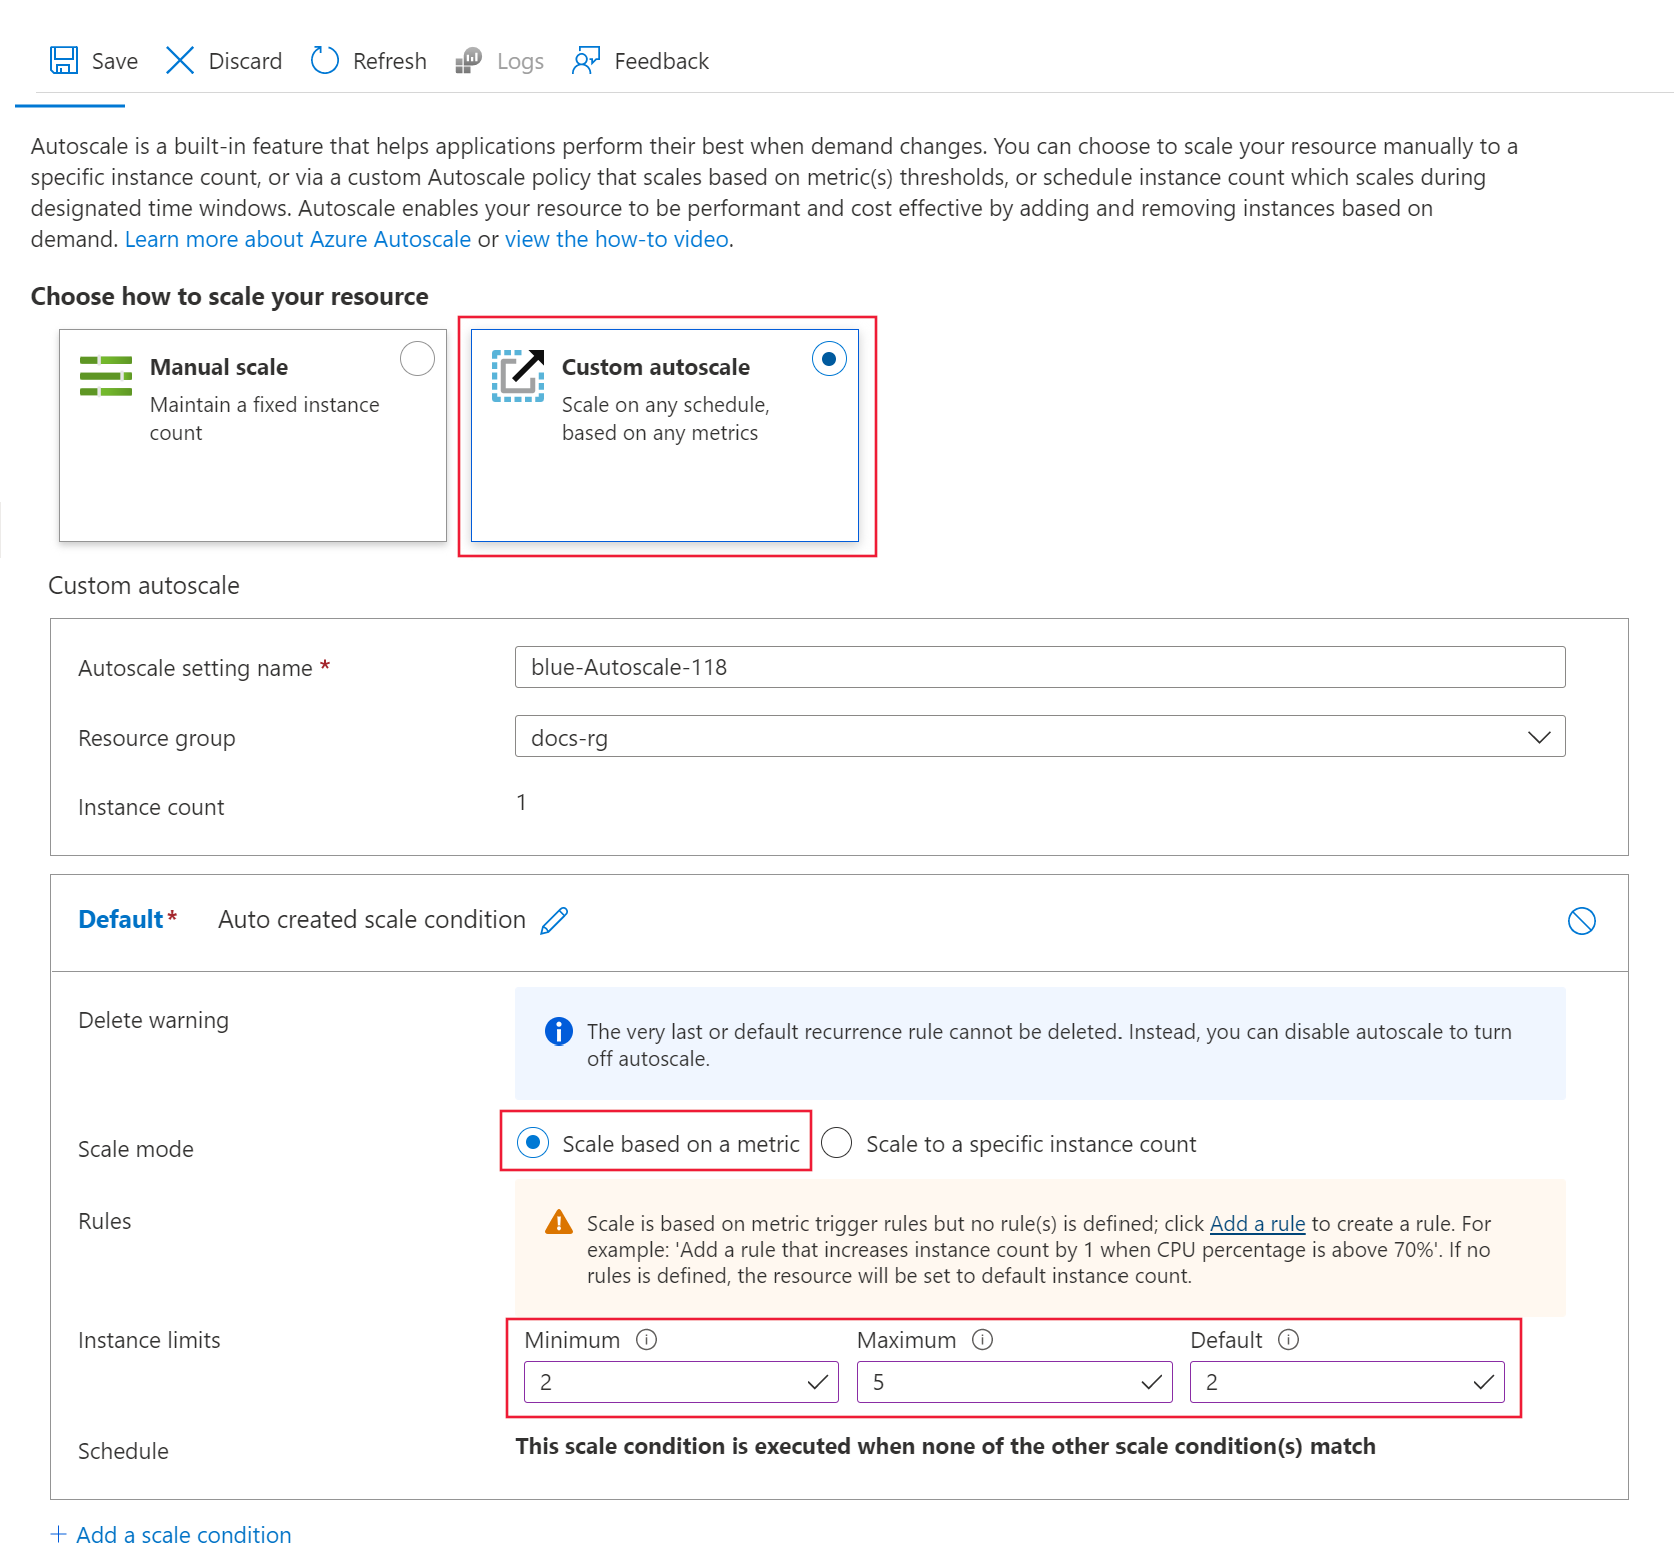
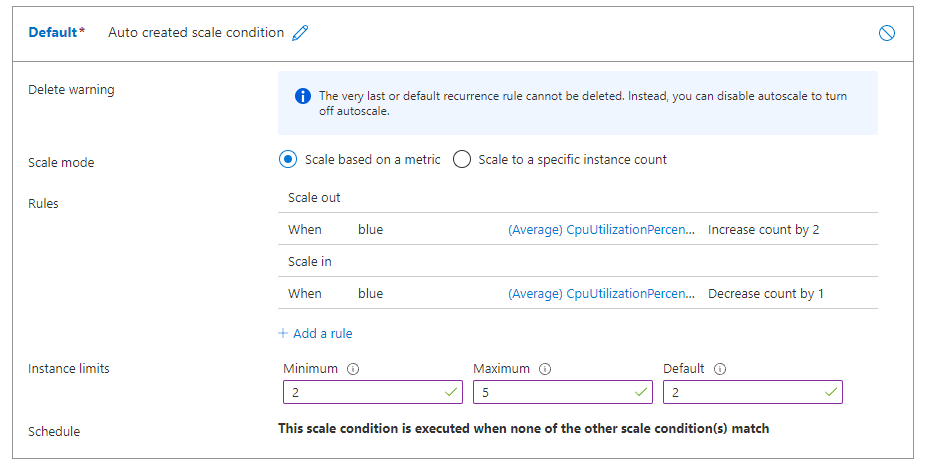
To enable autoscale for an online endpoint, you first define an autoscale profile. The profile specifies the default, minimum, and maximum scale set capacity. The following example shows how to set the number of virtual machine (VM) instances for the default, minimum, and maximum scale capacity.
APPLIES TO:  Azure CLI ml extension v2 (current)
- Set the endpoint and deployment names:
# set your existing endpoint name
ENDPOINT_NAME=your-endpoint-name
DEPLOYMENT_NAME=blue
- Get the Azure Resource Manager ID of the deployment and endpoint:
# Note: this is based on the deploy-managed-online-endpoint.sh: it just adds autoscale settings in the end
set -e

#set the endpoint name from the how-to-deploy excercise
# <set_endpoint_deployment_name>
# set your existing endpoint name
ENDPOINT_NAME=your-endpoint-name
DEPLOYMENT_NAME=blue
# </set_endpoint_deployment_name>

export ENDPOINT_NAME=autoscale-endpt-`echo $RANDOM`

# create endpoint and deployment
az ml online-endpoint create --name $ENDPOINT_NAME -f endpoints/online/managed/sample/endpoint.yml
az ml online-deployment create --name blue --endpoint $ENDPOINT_NAME -f endpoints/online/managed/sample/blue-deployment.yml --all-traffic
az ml online-endpoint show -n $ENDPOINT_NAME

# <set_other_env_variables>
# ARM id of the deployment
DEPLOYMENT_RESOURCE_ID=$(az ml online-deployment show -e $ENDPOINT_NAME -n $DEPLOYMENT_NAME -o tsv --query "id")
# ARM id of the deployment. todo: change to --query "id"
ENDPOINT_RESOURCE_ID=$(az ml online-endpoint show -n $ENDPOINT_NAME -o tsv --query "properties.\"azureml.onlineendpointid\"")
# set a unique name for autoscale settings for this deployment. The below will append a random number to make the name unique.
AUTOSCALE_SETTINGS_NAME=autoscale-$ENDPOINT_NAME-$DEPLOYMENT_NAME-`echo $RANDOM`
# </set_other_env_variables>

# create autoscale settings. Note if you followed the how-to-deploy doc example, the instance count would have been 1. Now after applying this poilcy, it will scale up 2 (since min count and count are 2).
# <create_autoscale_profile>
az monitor autoscale create \
  --name $AUTOSCALE_SETTINGS_NAME \
  --resource $DEPLOYMENT_RESOURCE_ID \
  --min-count 2 --max-count 5 --count 2
# </create_autoscale_profile>

# Add rule to default profile: scale up if cpu util > 70 %
# <scale_out_on_cpu_util>
az monitor autoscale rule create \
  --autoscale-name $AUTOSCALE_SETTINGS_NAME \
  --condition "CpuUtilizationPercentage > 70 avg 5m" \
  --scale out 2
# </scale_out_on_cpu_util>

# Add rule to default profile: scale down if cpu util < 25 %
# <scale_in_on_cpu_util>
az monitor autoscale rule create \
  --autoscale-name $AUTOSCALE_SETTINGS_NAME \
  --condition "CpuUtilizationPercentage < 25 avg 5m" \
  --scale in 1
# </scale_in_on_cpu_util>

# add rule to default profile: scale up based on avg. request latency (endpoint metric)
# <scale_up_on_request_latency>
az monitor autoscale rule create \
 --autoscale-name $AUTOSCALE_SETTINGS_NAME \
 --condition "RequestLatency > 70 avg 5m" \
 --scale out 1 \
 --resource $ENDPOINT_RESOURCE_ID
# </scale_up_on_request_latency>

# create weekend profile: scale to 2 nodes in weekend
# <weekend_profile>
az monitor autoscale profile create \
  --name weekend-profile \
  --autoscale-name $AUTOSCALE_SETTINGS_NAME \
  --min-count 2 --count 2 --max-count 2 \
  --recurrence week sat sun --timezone "Pacific Standard Time"
# </weekend_profile>

# disable the autoscale profile
# <disable_profile>
az monitor autoscale update \
  --autoscale-name $AUTOSCALE_SETTINGS_NAME \
  --enabled false
# </disable_profile>

# <delete_endpoint>
# delete the autoscaling profile
az monitor autoscale delete -n "$AUTOSCALE_SETTINGS_NAME"

# delete the endpoint
az ml online-endpoint delete --name $ENDPOINT_NAME --yes --no-wait
# </delete_endpoint>
- Create the autoscale profile:
az monitor autoscale create --name $AUTOSCALE_SETTINGS_NAME --resource $DEPLOYMENT_RESOURCE_ID --min-count 2 --max-count 5 --count 2
Note
For more information, see the az monitor autoscale reference.
Create scale-out rule based on deployment metrics
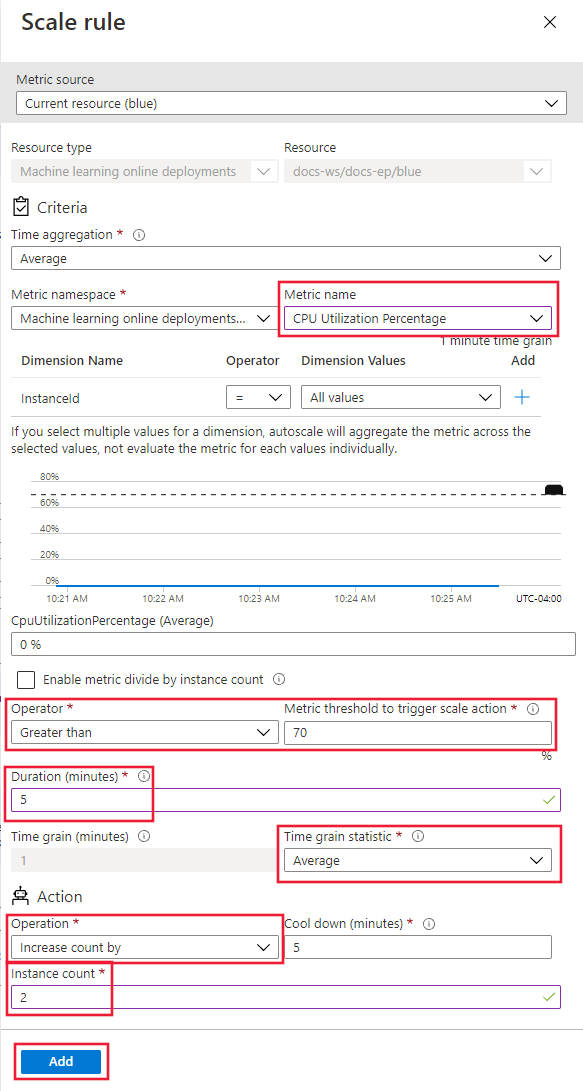
A common scale-out rule is to increase the number of VM instances when the average CPU load is high. The following example shows how to allocate two more nodes (up to the maximum) if the CPU average load is greater than 70% for 5 minutes:
APPLIES TO:  Azure CLI ml extension v2 (current)
# Note: this is based on the deploy-managed-online-endpoint.sh: it just adds autoscale settings in the end
set -e

#set the endpoint name from the how-to-deploy excercise
# <set_endpoint_deployment_name>
# set your existing endpoint name
ENDPOINT_NAME=your-endpoint-name
DEPLOYMENT_NAME=blue
# </set_endpoint_deployment_name>

export ENDPOINT_NAME=autoscale-endpt-`echo $RANDOM`

# create endpoint and deployment
az ml online-endpoint create --name $ENDPOINT_NAME -f endpoints/online/managed/sample/endpoint.yml
az ml online-deployment create --name blue --endpoint $ENDPOINT_NAME -f endpoints/online/managed/sample/blue-deployment.yml --all-traffic
az ml online-endpoint show -n $ENDPOINT_NAME

# <set_other_env_variables>
# ARM id of the deployment
DEPLOYMENT_RESOURCE_ID=$(az ml online-deployment show -e $ENDPOINT_NAME -n $DEPLOYMENT_NAME -o tsv --query "id")
# ARM id of the deployment. todo: change to --query "id"
ENDPOINT_RESOURCE_ID=$(az ml online-endpoint show -n $ENDPOINT_NAME -o tsv --query "properties.\"azureml.onlineendpointid\"")
# set a unique name for autoscale settings for this deployment. The below will append a random number to make the name unique.
AUTOSCALE_SETTINGS_NAME=autoscale-$ENDPOINT_NAME-$DEPLOYMENT_NAME-`echo $RANDOM`
# </set_other_env_variables>

# create autoscale settings. Note if you followed the how-to-deploy doc example, the instance count would have been 1. Now after applying this poilcy, it will scale up 2 (since min count and count are 2).
# <create_autoscale_profile>
az monitor autoscale create \
  --name $AUTOSCALE_SETTINGS_NAME \
  --resource $DEPLOYMENT_RESOURCE_ID \
  --min-count 2 --max-count 5 --count 2
# </create_autoscale_profile>

# Add rule to default profile: scale up if cpu util > 70 %
# <scale_out_on_cpu_util>
az monitor autoscale rule create \
  --autoscale-name $AUTOSCALE_SETTINGS_NAME \
  --condition "CpuUtilizationPercentage > 70 avg 5m" \
  --scale out 2
# </scale_out_on_cpu_util>

# Add rule to default profile: scale down if cpu util < 25 %
# <scale_in_on_cpu_util>
az monitor autoscale rule create \
  --autoscale-name $AUTOSCALE_SETTINGS_NAME \
  --condition "CpuUtilizationPercentage < 25 avg 5m" \
  --scale in 1
# </scale_in_on_cpu_util>

# add rule to default profile: scale up based on avg. request latency (endpoint metric)
# <scale_up_on_request_latency>
az monitor autoscale rule create \
 --autoscale-name $AUTOSCALE_SETTINGS_NAME \
 --condition "RequestLatency > 70 avg 5m" \
 --scale out 1 \
 --resource $ENDPOINT_RESOURCE_ID
# </scale_up_on_request_latency>

# create weekend profile: scale to 2 nodes in weekend
# <weekend_profile>
az monitor autoscale profile create \
  --name weekend-profile \
  --autoscale-name $AUTOSCALE_SETTINGS_NAME \
  --min-count 2 --count 2 --max-count 2 \
  --recurrence week sat sun --timezone "Pacific Standard Time"
# </weekend_profile>

# disable the autoscale profile
# <disable_profile>
az monitor autoscale update \
  --autoscale-name $AUTOSCALE_SETTINGS_NAME \
  --enabled false
# </disable_profile>

# <delete_endpoint>
# delete the autoscaling profile
az monitor autoscale delete -n "$AUTOSCALE_SETTINGS_NAME"

# delete the endpoint
az ml online-endpoint delete --name $ENDPOINT_NAME --yes --no-wait
# </delete_endpoint>
The rule is part of the my-scale-settings profile, where autoscale-name matches the name portion of the profile. The value of the rule condition argument indicates the rule triggers when "The average CPU consumption among the VM instances exceeds 70% for 5 minutes." When the condition is satisfied, two more VM instances are allocated.
Note
For more information, see the az monitor autoscale Azure CLI syntax reference.
Create scale-in rule based on deployment metrics
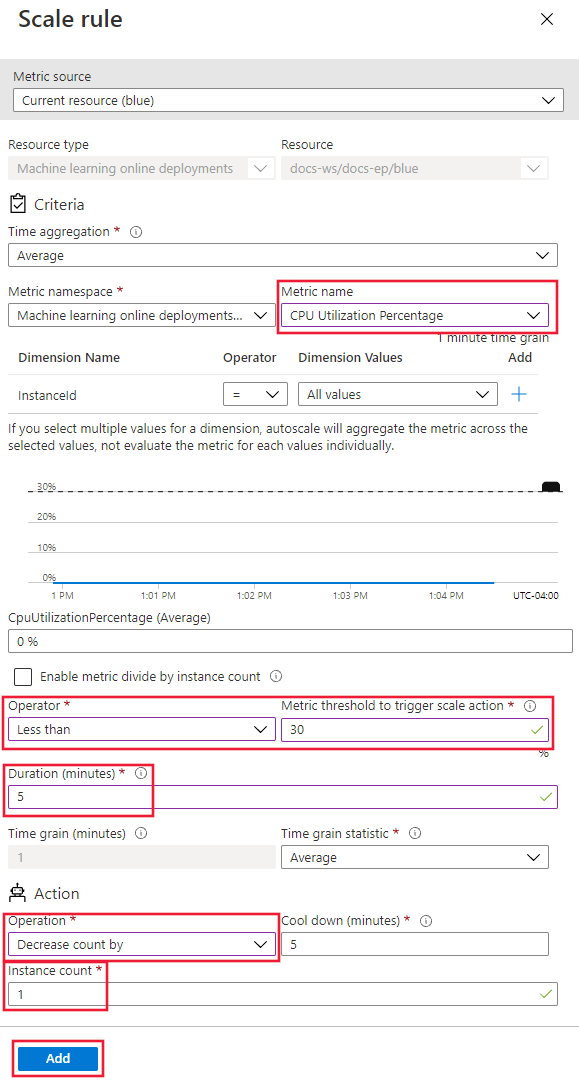
When the average CPU load is light, a scale-in rule can reduce the number of VM instances. The following example shows how to release a single node down to a minimum of two, if the CPU load is less than 30% for 5 minutes.
APPLIES TO:  Azure CLI ml extension v2 (current)
az monitor autoscale rule create --autoscale-name $AUTOSCALE_SETTINGS_NAME --condition "CpuUtilizationPercentage < 25 avg 5m" --scale in 1
Create scale rule based on endpoint metrics
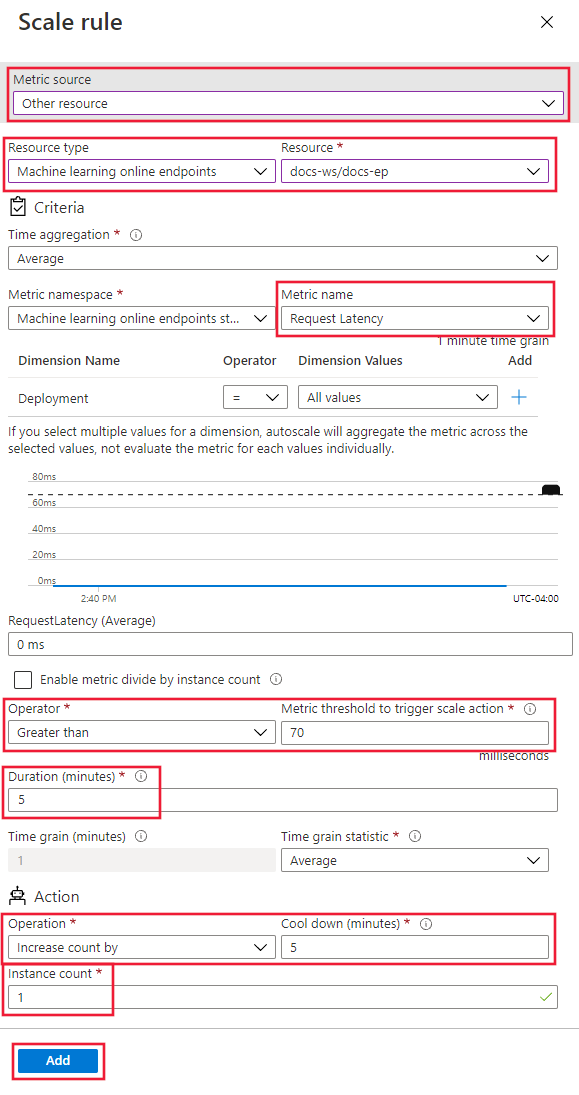
In the previous sections, you created rules to scale in or out based on deployment metrics. You can also create a rule that applies to the deployment endpoint. In this section, you learn how to allocate another node when the request latency is greater than an average of 70 milliseconds for 5 minutes.
APPLIES TO:  Azure CLI ml extension v2 (current)
az monitor autoscale rule create --autoscale-name $AUTOSCALE_SETTINGS_NAME --condition "RequestLatency > 70 avg 5m" --scale out 1 --resource $ENDPOINT_RESOURCE_ID
Find IDs for supported metrics
You can use other metrics when you use the Azure CLI or the SDK to set up autoscale rules.
- For the names of endpoint metrics to use in code, see the values in the Name in REST API column in the table in Supported metrics for Microsoft.MachineLearningServices/workspaces/onlineEndpoints.
- For the names of deployment metrics to use in code, see the values in the Name in REST API column in the tables in Supported metrics for Microsoft.MachineLearningServices/workspaces/onlineEndpoints/deployments.
Create scale rule based on schedule
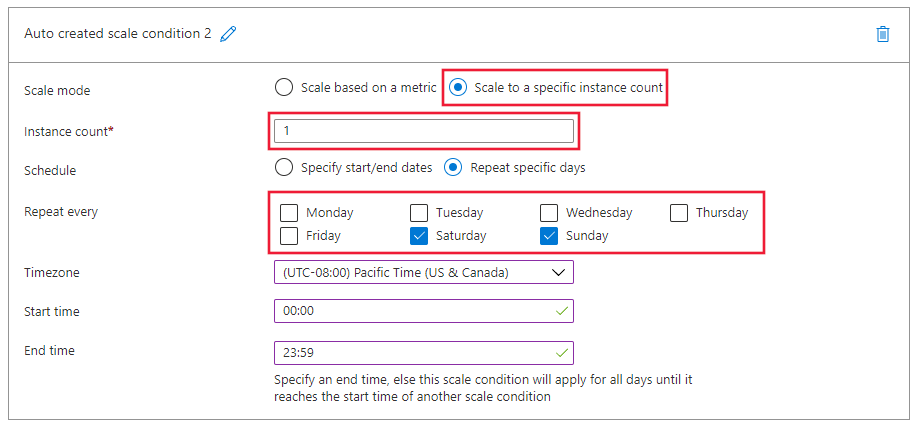
You can also create rules that apply only on certain days or at certain times. In this section, you create a rule that sets the node count to 2 on the weekends.
APPLIES TO:  Azure CLI ml extension v2 (current)
az monitor autoscale profile create --name weekend-profile --autoscale-name $AUTOSCALE_SETTINGS_NAME --min-count 2 --count 2 --max-count 2 --recurrence week sat sun --timezone "Pacific Standard Time"
Enable or disable autoscale
You can enable or disable a specific autoscale profile.
APPLIES TO:  Azure CLI ml extension v2 (current)
# Note: this is based on the deploy-managed-online-endpoint.sh: it just adds autoscale settings in the end
set -e

#set the endpoint name from the how-to-deploy excercise
# <set_endpoint_deployment_name>
# set your existing endpoint name
ENDPOINT_NAME=your-endpoint-name
DEPLOYMENT_NAME=blue
# </set_endpoint_deployment_name>

export ENDPOINT_NAME=autoscale-endpt-`echo $RANDOM`

# create endpoint and deployment
az ml online-endpoint create --name $ENDPOINT_NAME -f endpoints/online/managed/sample/endpoint.yml
az ml online-deployment create --name blue --endpoint $ENDPOINT_NAME -f endpoints/online/managed/sample/blue-deployment.yml --all-traffic
az ml online-endpoint show -n $ENDPOINT_NAME

# <set_other_env_variables>
# ARM id of the deployment
DEPLOYMENT_RESOURCE_ID=$(az ml online-deployment show -e $ENDPOINT_NAME -n $DEPLOYMENT_NAME -o tsv --query "id")
# ARM id of the deployment. todo: change to --query "id"
ENDPOINT_RESOURCE_ID=$(az ml online-endpoint show -n $ENDPOINT_NAME -o tsv --query "properties.\"azureml.onlineendpointid\"")
# set a unique name for autoscale settings for this deployment. The below will append a random number to make the name unique.
AUTOSCALE_SETTINGS_NAME=autoscale-$ENDPOINT_NAME-$DEPLOYMENT_NAME-`echo $RANDOM`
# </set_other_env_variables>

# create autoscale settings. Note if you followed the how-to-deploy doc example, the instance count would have been 1. Now after applying this poilcy, it will scale up 2 (since min count and count are 2).
# <create_autoscale_profile>
az monitor autoscale create \
  --name $AUTOSCALE_SETTINGS_NAME \
  --resource $DEPLOYMENT_RESOURCE_ID \
  --min-count 2 --max-count 5 --count 2
# </create_autoscale_profile>

# Add rule to default profile: scale up if cpu util > 70 %
# <scale_out_on_cpu_util>
az monitor autoscale rule create \
  --autoscale-name $AUTOSCALE_SETTINGS_NAME \
  --condition "CpuUtilizationPercentage > 70 avg 5m" \
  --scale out 2
# </scale_out_on_cpu_util>

# Add rule to default profile: scale down if cpu util < 25 %
# <scale_in_on_cpu_util>
az monitor autoscale rule create \
  --autoscale-name $AUTOSCALE_SETTINGS_NAME \
  --condition "CpuUtilizationPercentage < 25 avg 5m" \
  --scale in 1
# </scale_in_on_cpu_util>

# add rule to default profile: scale up based on avg. request latency (endpoint metric)
# <scale_up_on_request_latency>
az monitor autoscale rule create \
 --autoscale-name $AUTOSCALE_SETTINGS_NAME \
 --condition "RequestLatency > 70 avg 5m" \
 --scale out 1 \
 --resource $ENDPOINT_RESOURCE_ID
# </scale_up_on_request_latency>

# create weekend profile: scale to 2 nodes in weekend
# <weekend_profile>
az monitor autoscale profile create \
  --name weekend-profile \
  --autoscale-name $AUTOSCALE_SETTINGS_NAME \
  --min-count 2 --count 2 --max-count 2 \
  --recurrence week sat sun --timezone "Pacific Standard Time"
# </weekend_profile>

# disable the autoscale profile
# <disable_profile>
az monitor autoscale update \
  --autoscale-name $AUTOSCALE_SETTINGS_NAME \
  --enabled false
# </disable_profile>

# <delete_endpoint>
# delete the autoscaling profile
az monitor autoscale delete -n "$AUTOSCALE_SETTINGS_NAME"

# delete the endpoint
az ml online-endpoint delete --name $ENDPOINT_NAME --yes --no-wait
# </delete_endpoint>
Delete resources
If you're not going to use your deployments, delete the resources with the following steps.
APPLIES TO:  Azure CLI ml extension v2 (current)
# Note: this is based on the deploy-managed-online-endpoint.sh: it just adds autoscale settings in the end
set -e

#set the endpoint name from the how-to-deploy excercise
# <set_endpoint_deployment_name>
# set your existing endpoint name
ENDPOINT_NAME=your-endpoint-name
DEPLOYMENT_NAME=blue
# </set_endpoint_deployment_name>

export ENDPOINT_NAME=autoscale-endpt-`echo $RANDOM`

# create endpoint and deployment
az ml online-endpoint create --name $ENDPOINT_NAME -f endpoints/online/managed/sample/endpoint.yml
az ml online-deployment create --name blue --endpoint $ENDPOINT_NAME -f endpoints/online/managed/sample/blue-deployment.yml --all-traffic
az ml online-endpoint show -n $ENDPOINT_NAME

# <set_other_env_variables>
# ARM id of the deployment
DEPLOYMENT_RESOURCE_ID=$(az ml online-deployment show -e $ENDPOINT_NAME -n $DEPLOYMENT_NAME -o tsv --query "id")
# ARM id of the deployment. todo: change to --query "id"
ENDPOINT_RESOURCE_ID=$(az ml online-endpoint show -n $ENDPOINT_NAME -o tsv --query "properties.\"azureml.onlineendpointid\"")
# set a unique name for autoscale settings for this deployment. The below will append a random number to make the name unique.
AUTOSCALE_SETTINGS_NAME=autoscale-$ENDPOINT_NAME-$DEPLOYMENT_NAME-`echo $RANDOM`
# </set_other_env_variables>

# create autoscale settings. Note if you followed the how-to-deploy doc example, the instance count would have been 1. Now after applying this poilcy, it will scale up 2 (since min count and count are 2).
# <create_autoscale_profile>
az monitor autoscale create \
  --name $AUTOSCALE_SETTINGS_NAME \
  --resource $DEPLOYMENT_RESOURCE_ID \
  --min-count 2 --max-count 5 --count 2
# </create_autoscale_profile>

# Add rule to default profile: scale up if cpu util > 70 %
# <scale_out_on_cpu_util>
az monitor autoscale rule create \
  --autoscale-name $AUTOSCALE_SETTINGS_NAME \
  --condition "CpuUtilizationPercentage > 70 avg 5m" \
  --scale out 2
# </scale_out_on_cpu_util>

# Add rule to default profile: scale down if cpu util < 25 %
# <scale_in_on_cpu_util>
az monitor autoscale rule create \
  --autoscale-name $AUTOSCALE_SETTINGS_NAME \
  --condition "CpuUtilizationPercentage < 25 avg 5m" \
  --scale in 1
# </scale_in_on_cpu_util>

# add rule to default profile: scale up based on avg. request latency (endpoint metric)
# <scale_up_on_request_latency>
az monitor autoscale rule create \
 --autoscale-name $AUTOSCALE_SETTINGS_NAME \
 --condition "RequestLatency > 70 avg 5m" \
 --scale out 1 \
 --resource $ENDPOINT_RESOURCE_ID
# </scale_up_on_request_latency>

# create weekend profile: scale to 2 nodes in weekend
# <weekend_profile>
az monitor autoscale profile create \
  --name weekend-profile \
  --autoscale-name $AUTOSCALE_SETTINGS_NAME \
  --min-count 2 --count 2 --max-count 2 \
  --recurrence week sat sun --timezone "Pacific Standard Time"
# </weekend_profile>

# disable the autoscale profile
# <disable_profile>
az monitor autoscale update \
  --autoscale-name $AUTOSCALE_SETTINGS_NAME \
  --enabled false
# </disable_profile>

# <delete_endpoint>
# delete the autoscaling profile
az monitor autoscale delete -n "$AUTOSCALE_SETTINGS_NAME"

# delete the endpoint
az ml online-endpoint delete --name $ENDPOINT_NAME --yes --no-wait
# </delete_endpoint>
