创建具有加速网络的 Azure 虚拟机
本文介绍如何使用 Azure CLI 命令行接口创建启用了加速网络(AccelNet)的 Linux 或 Windows 虚拟机(VM)。
先决条件
- 拥有有效订阅的 Azure 帐户。 可以创建帐户。
- 拥有有效订阅的 Azure 帐户。 可以创建帐户。
如果选择在本地安装和使用 PowerShell,本文需要 Azure PowerShell 模块版本 1.0.0 或更高版本。 运行 Get-Module -ListAvailable Az 查找已安装的版本。 如果需要升级,请参阅安装 Azure PowerShell 模块。 如果在本地运行 PowerShell,则还需运行 Connect-AzAccount -Environment AzureChinaCloud 以创建与 Azure 的连接。
如果您还没有 Azure 试用订阅,请在开始之前创建一个试用订阅。
可以使用本地 Azure CLI。
- 本文需要 Azure CLI 2.0.28 或更高版本。
创建资源组和虚拟网络
创建资源组
登录到 Azure 门户。
在门户顶部的搜索框中输入“资源组”。 在搜索结果中选择“资源组”。
选择+ 新建。
在“创建资源组的”基本信息“选项卡中,输入或选择以下信息:
| 设置 |
价值 |
|
Subscription |
选择订阅。 |
|
资源组 |
输入 test-rg。 |
|
Region |
选择“中国北部 3”。 |
选择“查看 + 创建”。
选择 创建。
创建虚拟网络
在门户顶部的搜索框中,输入 Virtual network。 在搜索结果中,选择“虚拟网络”。
选择+ 新建。
在创建虚拟网络的基本信息选项卡上输入或选择以下信息:
| 设置 |
价值 |
|
Subscription |
选择订阅。 |
|
资源组 |
选择 test-rg。 |
|
名称 |
输入“vnet-1”。 |
|
Region |
选择“中国北部 3”。 |
选择“下一步”,转到“安全性”选项卡。
选择下一步,转到IP 地址选项卡。
在“子网”的地址空间框中,选择“默认”子网。
在编辑子网中,输入或选择以下信息:
| 设置 |
价值 |
|
名称 |
输入subnet-1。 |
|
起始地址 |
输入“10.0.0.0”。 |
|
子网大小 |
保留默认值 /24(256 个地址)。 |
选择“保存”。
选择屏幕底部的“查看 + 创建”,然后在验证通过时选择“创建”。
创建 Azure Bastion
Azure Bastion 使用浏览器通过其专用 IP 地址通过安全外壳(SSH)或远程桌面协议(RDP)连接到虚拟网络中的 VM。 VM 不需要公共 IP 地址、客户端软件或特殊配置。 有关 Azure Bastion 的详细信息,请参阅 Azure Bastion。
注释
小时定价从部署 Bastion 的时刻开始计算,而无论出站数据使用情况如何。 有关详细信息,请参阅 定价 和 SKU。 如果要将 Bastion 部署为教程或测试的一部分,建议在使用完此资源后将其删除。
在门户顶部的搜索框中,输入“堡垒”。 在搜索结果中选择 Bastions 。
选择+ 新建。
在“创建 Bastion”的“基本信息”选项卡中,输入或选择以下信息:
| 设置 |
价值 |
|
Subscription |
选择订阅。 |
|
资源组 |
选择 test-rg。 |
|
名称 |
输入 堡垒。 |
|
Region |
选择“中国北部 3”。 |
|
级 |
选择 “开发人员”。 |
|
虚拟网络 |
选择“vnet-1”。 |
选择“查看 + 创建”。
选择 创建。
在创建虚拟网络之前,必须创建虚拟网络的资源组,以及本文中创建的所有其他资源。 使用 New-AzResourceGroup 创建资源组。 以下示例在 chinanorth3 位置创建名为 test-rg 的资源组。
$resourceGroup = @{
    Name = "test-rg"
    Location = "chinanorth3"
}
New-AzResourceGroup @resourceGroup
使用 New-AzVirtualNetwork 创建虚拟网络。 以下示例创建名为 vnet-1 的虚拟网络,其地址前缀 为 10.0.0.0/16。
$vnet1 = @{
    ResourceGroupName = "test-rg"
    Location = "chinanorth3"
    Name = "vnet-1"
    AddressPrefix = "10.0.0.0/16"
}
$virtualNetwork1 = New-AzVirtualNetwork @vnet1
使用 Add-AzVirtualNetworkSubnetConfig 创建子网配置。 以下示例创建具有 10.0.0.0/24 地址前缀的子网配置:
$subConfig = @{
    Name = "subnet-1"
    AddressPrefix = "10.0.0.0/24"
    VirtualNetwork = $virtualNetwork1
}
$subnetConfig1 = Add-AzVirtualNetworkSubnetConfig @subConfig
使用 Add-AzVirtualNetworkSubnetConfig 为 Azure Bastion 创建子网配置。 以下示例创建具有 10.0.1.0/24 地址前缀的子网配置:
$subBConfig = @{
    Name = "AzureBastionSubnet"
    AddressPrefix = "10.0.1.0/24"
    VirtualNetwork = $virtualNetwork1
}
$subnetConfig2 = Add-AzVirtualNetworkSubnetConfig @subBConfig
使用 Set-AzVirtualNetwork 将子网配置写入虚拟网络,这会创建子网:
$virtualNetwork1 | Set-AzVirtualNetwork
创建 Azure Bastion
使用 New-AzPublicIpAddress 为 Azure Bastion 主机创建公共 IP 地址。 以下示例在 vnet-1 虚拟网络中创建名为 public-ip-bastion 的公共 IP 地址。
$publicIpParams = @{
    ResourceGroupName = "test-rg"
    Name = "public-ip-bastion"
    Location = "chinanorth3"
    AllocationMethod = "Static"
    Sku = "Standard"
}
New-AzPublicIpAddress @publicIpParams
使用 New-AzBastion 创建 Azure Bastion 主机。 以下示例在 vnet-1 虚拟网络的 AzureBastionSubnet 子网中创建名为 Bastion 的 Azure Bastion 主机。 Azure Bastion 用于安全连接 Azure 虚拟机,而无需将其公开到公共 Internet。
$bastionParams = @{
    ResourceGroupName = "test-rg"
    Name = "bastion"
    VirtualNetworkName = "vnet-1"
    PublicIpAddressName = "public-ip-bastion"
    PublicIpAddressRgName = "test-rg"
    VirtualNetworkRgName = "test-rg"
    Sku = "Basic"
}
New-AzBastion @bastionParams -AsJob
使用 az group create 创建包含资源的资源组。 请务必选择 Windows 和 Linux 加速网络中列出的受支持的 Windows 或 Linux 区域。
export RANDOM_SUFFIX=$(openssl rand -hex 3)
export RESOURCE_GROUP_NAME="test-rg$RANDOM_SUFFIX"
export REGION="chinanorth3"

az group create \
    --name $RESOURCE_GROUP_NAME \
    --location $REGION
结果:
{
  "id": "/subscriptions/xxxxxxxx-xxxx-xxxx-xxxx-xxxxxxxxxxxx/resourceGroups/test-rg69e367",
  "location": "chinanorth3",
  "managedBy": null,
  "name": "test-rg69e367",
  "properties": {
    "provisioningState": "Succeeded"
  },
  "tags": null,
  "type": "Microsoft.Resources/resourceGroups"
}
使用 az network vnet create 创建包含资源组中一个子网的虚拟网络:
 export RESOURCE_GROUP_NAME="test-rg$RANDOM_SUFFIX"
 export VNET_NAME="vnet-1$RANDOM_SUFFIX"
 export SUBNET_NAME="subnet-1$RANDOM_SUFFIX"
 export VNET_ADDRESS_PREFIX="10.0.0.0/16"
 export SUBNET_ADDRESS_PREFIX="10.0.0.0/24"

 az network vnet create \
     --resource-group $RESOURCE_GROUP_NAME \
     --name $VNET_NAME \
     --address-prefix $VNET_ADDRESS_PREFIX \
     --subnet-name $SUBNET_NAME \
     --subnet-prefix $SUBNET_ADDRESS_PREFIX
结果:
{
  "newVNet": {
    "addressSpace": {
      "addressPrefixes": [
        "10.0.0.0/16"
      ]
    },
    "enableDdosProtection": false,
    "etag": "W/\"300c6da1-ee4a-47ee-af6e-662d3a0230a1\"",
    "id": "/subscriptions/xxxxxxxx-xxxx-xxxx-xxxx-xxxxxxxxxxxx/resourceGroups/test-rg69e367/providers/Microsoft.Network/virtualNetworks/vnet-169e367",
    "location": "chinanorth3",
    "name": "vnet-169e367",
    "provisioningState": "Succeeded",
    "resourceGroup": "test-rg69e367",
    "resourceGuid": "3d64254d-70d4-47e3-a129-473d70ea2ab8",
    "subnets": [
      {
        "addressPrefix": "10.0.0.0/24",
        "delegations": [],
        "etag": "W/\"300c6da1-ee4a-47ee-af6e-662d3a0230a1\"",
        "id": "/subscriptions/xxxxxxxx-xxxx-xxxx-xxxx-xxxxxxxxxxxx/resourceGroups/test-rg69e367/providers/Microsoft.Network/virtualNetworks/vnet-169e367/subnets/subnet-169e367",
        "name": "subnet-169e367",
        "privateEndpointNetworkPolicies": "Disabled",
        "privateLinkServiceNetworkPolicies": "Enabled",
        "provisioningState": "Succeeded",
        "resourceGroup": "test-rg69e367",
        "type": "Microsoft.Network/virtualNetworks/subnets"
      }
    ],
    "type": "Microsoft.Network/virtualNetworks",
    "virtualNetworkPeerings": []
  }
}
使用 az network vnet subnet create 创建 Bastion 子网。
export RESOURCE_GROUP_NAME="test-rg$RANDOM_SUFFIX"
export VNET_NAME="vnet-1$RANDOM_SUFFIX"
export SUBNET_NAME="AzureBastionSubnet"
export SUBNET_ADDRESS_PREFIX="10.0.1.0/24"

az network vnet subnet create \
    --vnet-name $VNET_NAME \
    --resource-group $RESOURCE_GROUP_NAME \
    --name AzureBastionSubnet \
    --address-prefix $SUBNET_ADDRESS_PREFIX
结果:
{
  "addressPrefix": "10.0.1.0/24",
  "delegations": [],
  "etag": "W/\"a2863964-0276-453f-a104-b37391e8088b\"",
  "id": "/subscriptions/xxxxxxxx-xxxx-xxxx-xxxx-xxxxxxxxxxxx/resourceGroups/test-rg69e367/providers/Microsoft.Network/virtualNetworks/vnet-169e367/subnets/AzureBastionSubnet",
  "name": "AzureBastionSubnet",
  "privateEndpointNetworkPolicies": "Disabled",
  "privateLinkServiceNetworkPolicies": "Enabled",
  "provisioningState": "Succeeded",
  "resourceGroup": "test-rg69e367",
  "type": "Microsoft.Network/virtualNetworks/subnets"
}
创建 Azure Bastion
使用 az network public-ip create 为 Azure Bastion 主机创建公共 IP 地址。
export RESOURCE_GROUP_NAME="test-rg$RANDOM_SUFFIX"
export PUBLIC_IP_NAME="public-ip-bastion$RANDOM_SUFFIX"
export LOCATION="chinanorth3"
export ALLOCATION_METHOD="Static"
export SKU="Standard"

az network public-ip create \
  --resource-group $RESOURCE_GROUP_NAME \
  --name $PUBLIC_IP_NAME \
  --location $LOCATION \
  --allocation-method $ALLOCATION_METHOD \
  --sku $SKU
结果:
{
  "publicIp": {
    "ddosSettings": {
      "protectionMode": "VirtualNetworkInherited"
    },
    "etag": "W/\"efa750bf-63f9-4c02-9ace-a747fc405d0f\"",
    "id": "/subscriptions/xxxxxxxx-xxxx-xxxx-xxxx-xxxxxxxxxxxx/resourceGroups/test-rg69e367/providers/Microsoft.Network/publicIPAddresses/public-ip-bastion69e367",
    "idleTimeoutInMinutes": 4,
    "ipAddress": "203.0.113.173",
    "ipTags": [],
    "location": "chinanorth3",
    "name": "public-ip-bastion69e367",
    "provisioningState": "Succeeded",
    "publicIPAddressVersion": "IPv4",
    "publicIPAllocationMethod": "Static",
    "resourceGroup": "test-rg69e367",
    "resourceGuid": "fc809493-80c8-482c-9f5a-9d6442472a99",
    "sku": {
      "name": "Standard",
      "tier": "Regional"
    },
    "type": "Microsoft.Network/publicIPAddresses"
  }
}
使用 az network bastion create 创建 Azure Bastion 主机。 Azure Bastion 用于安全连接 Azure 虚拟机,而无需将其公开到公共 Internet。
export RESOURCE_GROUP_NAME="test-rg$RANDOM_SUFFIX"
export BASTION_NAME="bastion$RANDOM_SUFFIX"
export VNET_NAME="vnet-1$RANDOM_SUFFIX"
export PUBLIC_IP_NAME="public-ip-bastion$RANDOM_SUFFIX"
export LOCATION="chinanorth3"

az network bastion create \
  --resource-group $RESOURCE_GROUP_NAME \
  --name $BASTION_NAME \
  --vnet-name $VNET_NAME \
  --public-ip-address $PUBLIC_IP_NAME \
  --location $LOCATION
结果:
{
  "disableCopyPaste": false,
  "dnsName": "bst-cc1d5c1d-9496-44fa-a8b3-3b2130efa306.bastion.azure.com",
  "enableFileCopy": false,
  "enableIpConnect": false,
  "enableKerberos": false,
  "enableSessionRecording": false,
  "enableShareableLink": false,
  "enableTunneling": false,
  "etag": "W/\"229bd068-160b-4935-b23d-eddce4bb31ed\"",
  "id": "/subscriptions/xxxxxxxx-xxxx-xxxx-xxxx-xxxxxxxxxxxx/resourceGroups/test-rg69e367/providers/Microsoft.Network/bastionHosts/bastion69e367",
  "ipConfigurations": [
    {
      "etag": "W/\"229bd068-160b-4935-b23d-eddce4bb31ed\"",
      "id": "/subscriptions/xxxxxxxx-xxxx-xxxx-xxxx-xxxxxxxxxxxx/resourceGroups/test-rg69e367/providers/Microsoft.Network/bastionHosts/bastion69e367/bastionHostIpConfigurations/bastion_ip_config",
      "name": "bastion_ip_config",
      "privateIPAllocationMethod": "Dynamic",
      "provisioningState": "Succeeded",
      "publicIPAddress": {
        "id": "/subscriptions/xxxxxxxx-xxxx-xxxx-xxxx-xxxxxxxxxxxx/resourceGroups/test-rg69e367/providers/Microsoft.Network/publicIPAddresses/public-ip-bastion69e367",
        "resourceGroup": "test-rg69e367"
      },
      "resourceGroup": "test-rg69e367",
      "subnet": {
        "id": "/subscriptions/xxxxxxxx-xxxx-xxxx-xxxx-xxxxxxxxxxxx/resourceGroups/test-rg69e367/providers/Microsoft.Network/virtualNetworks/vnet-169e367/subnets/AzureBastionSubnet",
        "resourceGroup": "test-rg69e367"
      },
      "type": "Microsoft.Network/bastionHosts/bastionHostIpConfigurations"
    }
  ],
  "location": "chinanorth3",
  "name": "bastion69e367",
  "provisioningState": "Succeeded",
  "resourceGroup": "test-rg69e367",
  "scaleUnits": 2,
  "sku": {
    "name": "Standard"
  },
  "type": "Microsoft.Network/bastionHosts"
}
使用加速网络创建网络接口
在创建虚拟机期间,门户中启用了加速网络。 在以下部分中创建虚拟机。
注释
- 门户中的“加速网络”设置显示了用户选择的状态。 即使虚拟机大小需要启用加速网络,在门户中仍可以选择禁用加速网络。 无论门户中的用户设置如何,需要加速网络的 VM 大小都会在运行时启用加速网络。 加速网络功能是用于一般目的的 v5 或更高版本的 VM 大小所必需的功能。
使用 New-AzNetworkInterface 创建启用了加速网络的网络接口(NIC),并将公共 IP 地址分配给 NIC。
$vnetParams = @{
    ResourceGroupName = "test-rg"
    Name = "vnet-1"
    }
$vnet = Get-AzVirtualNetwork @vnetParams

$nicParams = @{
    ResourceGroupName = "test-rg"
    Name = "nic-1"
    Location = "chinanorth3"
    SubnetId = $vnet.Subnets[0].Id
    EnableAcceleratedNetworking = $true
    }
$nic = New-AzNetworkInterface @nicParams
使用 az network nic create 创建启用了加速网络的网络接口(NIC)。 以下示例在虚拟网络的子网中创建 NIC。
 export RESOURCE_GROUP_NAME="test-rg$RANDOM_SUFFIX"
 export NIC_NAME="nic-1$RANDOM_SUFFIX"
 export VNET_NAME="vnet-1$RANDOM_SUFFIX"
 export SUBNET_NAME="subnet-1$RANDOM_SUFFIX"

 az network nic create \
     --resource-group $RESOURCE_GROUP_NAME \
     --name $NIC_NAME \
     --vnet-name $VNET_NAME \
     --subnet $SUBNET_NAME \
     --accelerated-networking true
结果:
{
  "NewNIC": {
    "auxiliaryMode": "None",
    "auxiliarySku": "None",
    "disableTcpStateTracking": false,
    "dnsSettings": {
      "appliedDnsServers": [],
      "dnsServers": [],
      "internalDomainNameSuffix": "juswipouodrupijji24xb0rkxa.cx.internal.chinacloudapp.cn"
    },
    "enableAcceleratedNetworking": true,
    "enableIPForwarding": false,
    "etag": "W/\"0e24b553-769b-4350-b1aa-ab4cd04100bf\"",
    "hostedWorkloads": [],
    "id": "/subscriptions/xxxxxxxx-xxxx-xxxx-xxxx-xxxxxxxxxxxx/resourceGroups/test-rg69e367/providers/Microsoft.Network/networkInterfaces/nic-169e367",
    "ipConfigurations": [
      {
        "etag": "W/\"0e24b553-769b-4350-b1aa-ab4cd04100bf\"",
        "id": "/subscriptions/xxxxxxxx-xxxx-xxxx-xxxx-xxxxxxxxxxxx/resourceGroups/test-rg69e367/providers/Microsoft.Network/networkInterfaces/nic-169e367/ipConfigurations/ipconfig1",
        "name": "ipconfig1",
        "primary": true,
        "privateIPAddress": "10.0.0.4",
        "privateIPAddressVersion": "IPv4",
        "privateIPAllocationMethod": "Dynamic",
        "provisioningState": "Succeeded",
        "resourceGroup": "test-rg69e367",
        "subnet": {
          "id": "/subscriptions/xxxxxxxx-xxxx-xxxx-xxxx-xxxxxxxxxxxx/resourceGroups/test-rg69e367/providers/Microsoft.Network/virtualNetworks/vnet-169e367/subnets/subnet-169e367",
          "resourceGroup": "test-rg69e367"
        },
        "type": "Microsoft.Network/networkInterfaces/ipConfigurations"
      }
    ],
    "location": "chinanorth3",
    "name": "nic-169e367",
    "nicType": "Standard",
    "provisioningState": "Succeeded",
    "resourceGroup": "test-rg69e367",
    "resourceGuid": "6798a335-bd66-42cc-a92a-bb678d4d146e",
    "tapConfigurations": [],
    "type": "Microsoft.Network/networkInterfaces",
    "vnetEncryptionSupported": false
  }
}
创建 VM 并附加 NIC
在门户顶部的搜索框中,输入 虚拟机。 在搜索结果中,选择“虚拟机”。
选择+ 创建,然后选择Azure虚拟机。
在“创建虚拟机”的“基本信息”选项卡中,输入或选择以下信息:
| 设置 |
价值 |
|
项目详细信息 |
|
| Subscription |
选择订阅。 |
| 资源组 |
选择 test-rg。 |
|
实例详细信息 |
|
| 虚拟机名称 |
输入 vm-1。 |
| 区域 |
选择“(亚洲)中国北部 3”。 |
| 可用性选项 |
选择 “不需要基础结构冗余”。 |
| 安全类型 |
选择“标准” 。 |
| 图像 |
选择“Ubuntu Server 24.04 LTS - x64 Gen2”。 |
| VM 架构 |
保留默认值 x64。 |
| 尺寸 |
选择大小。 |
|
管理员帐户 |
|
| 身份验证类型 |
选择“SSH 公钥”。 |
| 用户名 |
输入用户名。 |
| SSH 公钥源 |
选择“生成新密钥对”。 |
| 密钥对名称 |
输入 vm-1-key。 |
|
入站端口规则 |
|
| 公共入站端口 |
选择“无”。 |
选择“下一步: 磁盘”,然后选择“下一步: 网络”。
在“网络”中,输入或选择以下信息:
| 设置 |
价值 |
|
网络接口 |
|
| 虚拟网络 |
选择“vnet-1”。 |
| 子网 |
选择子网 1(10.0.0.0/24)。 |
| 公共 IP |
选择“无”。 |
| 网络接口 (NIC) 网络安全组 |
选择 “高级”。 |
| 配置网络安全组 |
选择“新建”。
在 “名称” 中输入 nsg-1。
选择“确定”。 |
将其余选项保留为默认值,然后选择“查看 + 创建”。
选择 创建。
出现“ 生成新密钥对 ”弹出窗口时,选择“ 下载私钥”并创建资源。 密钥文件下载为 vm-1-key.pem。 记下文件的下载位置 .pem 。 在后续步骤中使用 Azure Bastion 连接到虚拟机时需要私钥。
使用 New-AzVMConfig 定义 VM 大小,该 VM 大小支持加速网络,如 Windows 加速网络中列出的。 有关所有 VM 大小和特征的列表,请参阅 VM 大小。
$vmConfigParams = @{
    VMName = "vm-1"
    VMSize = "Standard_DS4_v2"
}
$vmConfig = New-AzVMConfig @vmConfigParams
使用 Set-AzVMOperatingSystem 和 Set-AzVMSourceImage 创建 VM 配置的其余部分。 以下示例使用 SSH 密钥身份验证创建 Ubuntu Server 虚拟机:
# Create a credential object with username
$cred = Get-Credential

$osParams = @{
    VM = $vmConfig
    ComputerName = "vm-1"
    Credential = $cred
}
$vmConfig = Set-AzVMOperatingSystem @osParams -Linux -DisablePasswordAuthentication

$imageParams = @{
    VM = $vmConfig
    PublisherName = "Canonical"
    Offer = "ubuntu-24_04-lts"
    Skus = "server"
    Version = "latest"
}
$vmConfig = Set-AzVMSourceImage @imageParams
使用 Add-AzVMNetworkInterface 将之前创建的 NIC 附加到 VM。
# Get the network interface object
$nicParams = @{
    ResourceGroupName = "test-rg"
    Name = "nic-1"
}
$nic = Get-AzNetworkInterface @nicParams

$vmConfigParams = @{
    VM = $vmConfig
    Id = $nic.Id
}
$vmConfig = Add-AzVMNetworkInterface @vmConfigParams
使用 New-AzVM 创建启用了加速网络的 VM。 该命令为虚拟机生成用于登录的 SSH 密钥。 记下私钥的位置。 在后续步骤中使用 Azure Bastion 连接到虚拟机时需要私钥。
$vmParams = @{
    VM = $vmConfig
    ResourceGroupName = "test-rg"
    Location = "chinanorth3"
    SshKeyName = "vm-1-ssh-key"
}
New-AzVM @vmParams -GenerateSshKey
使用 az vm create 创建 VM ,并使用 --nics 选项附加创建的 NIC。 确保选择 Windows 和 Linux 加速网络中列出的 VM 大小和分发版。 有关所有 VM 大小和特征的列表,请参阅 Azure 中虚拟机的大小。
以下示例创建一个虚拟机(VM),其大小为 Standard_DS4_v2,支持加速网络。 该命令将为虚拟机生成用于登录的 SSH 密钥。 记下私钥的位置。 在后续步骤中使用 Azure Bastion 连接到虚拟机时需要私钥。
export RESOURCE_GROUP_NAME="test-rg$RANDOM_SUFFIX"
export VM_NAME="vm-1$RANDOM_SUFFIX"
export IMAGE="Ubuntu2204"
export SIZE="Standard_DS4_v2"
export ADMIN_USER="azureuser"
export NIC_NAME="nic-1$RANDOM_SUFFIX"

az vm create \
   --resource-group $RESOURCE_GROUP_NAME \
   --name $VM_NAME \
   --image $IMAGE \
   --size $SIZE \
   --admin-username $ADMIN_USER \
   --generate-ssh-keys \
   --nics $NIC_NAME
注释
若要创建 Windows VM,请将--image Ubuntu2204替换为--image Win2019Datacenter。
结果:
{
    "fqdns": "",
    "id": "/subscriptions/xxxxxxxx-xxxx-xxxx-xxxx-xxxxxxxxxxxx/resourceGroups/test-rg69e367/providers/Microsoft.Compute/virtualMachines/vm-169e367",
    "location": "chinanorth3",
    "macAddress": "60-45-BD-84-F0-D5",
    "powerState": "VM running",
    "privateIpAddress": "10.0.0.4",
    "publicIpAddress": "",
    "resourceGroup": "test-rg69e367",
    "zones": ""
}
确认已启用加速网络
Linux
在 Azure 门户中,搜索并选择“虚拟机”。
在 “虚拟机 ”页上,选择新的 VM。
在 VM 的“概述”页上,选择“连接”,然后通过 Bastion 进行连接。
在 Bastion 连接屏幕中,将身份验证类型从本地文件更改为 SSH 私钥。
输入创建虚拟机时使用的 用户名 。 在此示例中,用户命名为 azureuser,替换为创建的用户名。
在 “本地文件”中,选择文件夹图标并浏览到创建 VM 时生成的私钥文件。 私钥文件通常命名 id_rsa 或 id_rsa.pem。
选择 连接。
此时会打开一个新的浏览器窗口,其中包含与 VM 的 Bastion 连接。
在远程 VM 上的 shell 中,输入 uname -r 并确认内核版本是以下版本之一,或更高版本之一:
-
Ubuntu 16.04:4.11.0-1013。
-
SLES SP3:4.4.92-6.18。
-
RHEL:3.10.0-693、2.6.32-573。 如果 Linux Integration Services 4.3+ 之前安装了 Mellanox VF 版本 4.5+ ,则支持 RHEL 6.7-6.10。
lspci使用命令确认 Mellanox VF 设备已向 VM 公开。 返回的输出应类似于以下示例:
0000:00:00.0 Host bridge: Intel Corporation 440BX/ZX/DX - 82443BX/ZX/DX Host bridge (AGP disabled) (rev 03)
0000:00:07.0 ISA bridge: Intel Corporation 82371AB/EB/MB PIIX4 ISA (rev 01)
0000:00:07.1 IDE interface: Intel Corporation 82371AB/EB/MB PIIX4 IDE (rev 01)
0000:00:07.3 Bridge: Intel Corporation 82371AB/EB/MB PIIX4 ACPI (rev 02)
0000:00:08.0 VGA compatible controller: Microsoft Corporation Hyper-V virtual VGA
0001:00:02.0 Ethernet controller: Mellanox Technologies MT27500/MT27520 Family [ConnectX-3/ConnectX-3 Pro Virtual Function]
使用ethtool -S eth0 | grep vf_ 命令检查虚拟函数(VF)上的活动。 如果启用了加速网络并处于活动状态,则会收到类似于以下示例的输出:
vf_rx_packets: 992956
vf_rx_bytes: 2749784180
vf_tx_packets: 2656684
vf_tx_bytes: 1099443970
vf_tx_dropped: 0
关闭与 VM 的 Bastion 连接。
Windows操作系统
在 Azure 中创建 VM 后,连接到 VM 并确认以太网控制器已安装在 Windows 中。
在 Azure 门户中,搜索并选择“虚拟机”。
在 “虚拟机 ”页上,选择新的 VM。
在 VM 的“概述”页上,选择“连接”,然后通过 Bastion 进行连接。
输入创建 VM 时使用的凭据,然后选择“ 连接”。
此时会打开一个新的浏览器窗口,其中包含与 VM 的 Bastion 连接。
在远程 VM 上,右键单击“ 启动 ”并选择 “设备管理器”。
在 “设备管理器 ”窗口中,展开 网络适配器 节点。
请确认 Mellanox ConnectX-4 Lx 虚拟以太网适配器 出现,如下图所示:
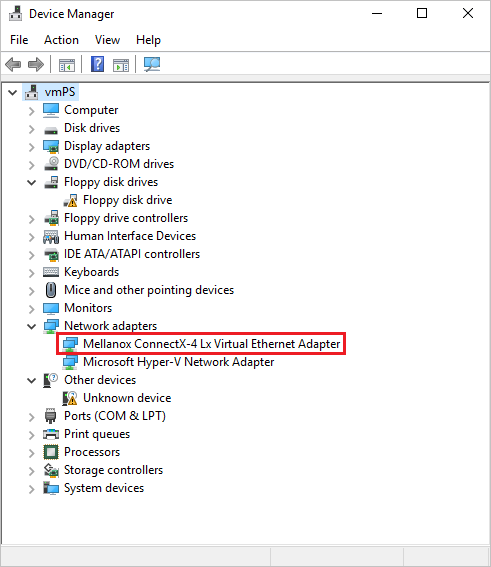
适配器的存在确认已为 VM 启用加速网络。
验证数据包是否通过 VF 接口流动,并查看以下命令输出以确认:
PS C:\ > Get-NetAdapter | Where-Object InterfaceDescription –like "*Mellanox*Virtual*" | Get-NetAdapterStatistics

Name                             ReceivedBytes ReceivedUnicastPackets       SentBytes SentUnicastPackets
----                             ------------- ----------------------       --------- ------------------
Ethernet 2                           492447549                 347643         7468446              34991
注释
如果 Mellanox 适配器无法启动,请在远程 VM 上打开管理员命令提示符并输入以下命令:
netsh int tcp set global rss = enabled
关闭与 VM 的 Bastion 连接。
后续步骤
Ressources supplémentaires
-
Last updated on
2026-03-12