网络观察程序代理虚拟机扩展是某些 Azure 网络观察程序功能所必需的,这些功能捕获网络流量以诊断和监视 Azure 虚拟机 (VM)。 有关详细信息,请参阅 什么是 Azure 网络观察程序?
在本文中,您将学习如何安装、更新和卸载Windows和Linux版的网络观察程序代理。 代理的安装不会中断虚拟机的运行,也不需要重新启动虚拟机。 如果虚拟机是由 Azure 服务部署的,请查看该服务的文档,以确定该服务是否允许在虚拟机中安装扩展。
Note
网络观察程序 Agent 扩展不支持 AKS 集群。
先决条件
一个运行支持操作系统的 Azure 虚拟机(VM)。 更多信息请参见 支持的操作系统。
对 169.254.169.254 的出站 TCP 连接通过 port 80,对 168.63.129.16 的连接通过 port 8037。 该代理使用这些 IP 地址与 Azure 平台进行通信。
互联网连接:网络观察程序 Agent 需要互联网连接才能正常工作。 例如,系统需要连接到存储帐户才能上传抓包。
一个运行支持操作系统的 Azure 虚拟机(VM)。 更多信息请参见 支持的操作系统。
对 169.254.169.254 的出站 TCP 连接通过 port 80,对 168.63.129.16 的连接通过 port 8037。 该代理使用这些 IP 地址与 Azure 平台进行通信。
互联网连接:网络观察程序 Agent 需要互联网连接才能正常工作。 例如,系统需要连接到存储帐户才能上传抓包。
Azure CLI。
可以在本地安装 Azure CLI 以运行命令。 如果在本地运行Azure CLI,请使用 az login 命令登录到Azure。
一个运行支持操作系统的 Azure 虚拟机(VM)。 更多信息请参见 支持的操作系统。
对 169.254.169.254 的出站 TCP 连接通过 port 80,对 168.63.129.16 的连接通过 port 8037。 该代理使用这些 IP 地址与 Azure 平台进行通信。
互联网连接:网络观察程序 Agent 需要互联网连接才能正常工作。 例如,系统需要连接到存储帐户才能上传抓包。
在本地安装 Azure PowerShell 或 Azure CLI 以部署模板。
受支持的操作系统
您可以在以下操作系统上安装网络观察程序代理扩展Windows:
- Windows Server 2012、2012 R2、2016、2019、2022 和 2025 版本。
- Windows 10 和 11 版本发布。
扩展架构
以下 JSON 显示了网络观察程序代理扩展的架构。 该扩展不要求也不支持用户提供的设置,依赖默认配置。
{
    "name": "[concat(parameters('vmName'), '/AzureNetworkWatcherExtension')]",
    "type": "Microsoft.Compute/virtualMachines/extensions",
    "apiVersion": "2023-03-01",
    "location": "[resourceGroup().location]",
    "dependsOn": [
        "[concat('Microsoft.Compute/virtualMachines/', parameters('vmName'))]"
    ],
    "properties": {
        "autoUpgradeMinorVersion": true,
        "publisher": "Microsoft.Azure.NetworkWatcher",
        "type": "NetworkWatcherAgentWindows",
        "typeHandlerVersion": "1.4"
    }
}
{
    "name": "[concat(parameters('vmName'), '/AzureNetworkWatcherExtension')]",
    "type": "Microsoft.Compute/virtualMachines/extensions",
    "apiVersion": "2023-03-01",
    "location": "[resourceGroup().location]",
    "dependsOn": [
        "[concat('Microsoft.Compute/virtualMachines/', parameters('vmName'))]"
    ],
    "properties": {
        "autoUpgradeMinorVersion": true,
        "publisher": "Microsoft.Azure.NetworkWatcher",
        "type": "NetworkWatcherAgentLinux",
        "typeHandlerVersion": "1.4"
    }
}
列出已安装的扩展
在 Azure 门户的虚拟机页面,您可以按照以下步骤查看已安装的扩展:
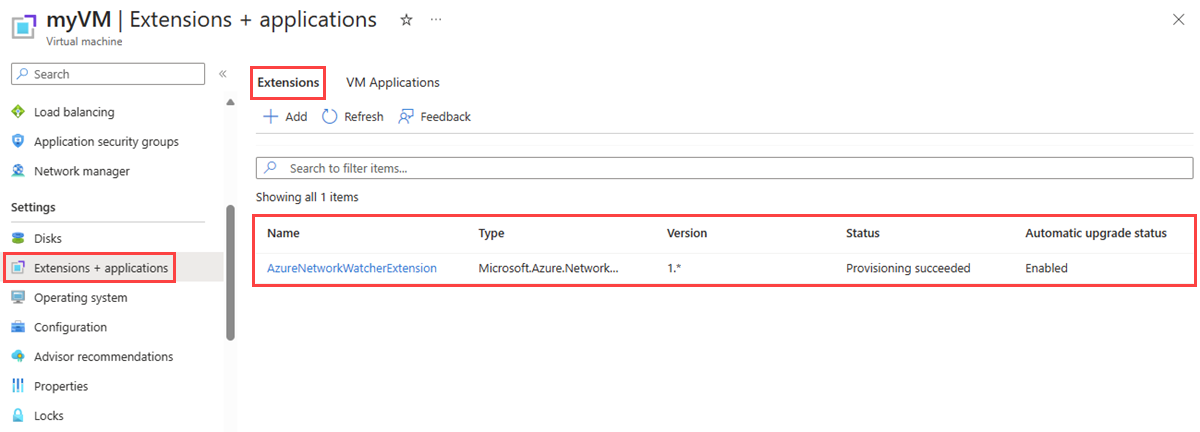
在“设置”下,选择“扩展 + 应用程序”。
在“扩展”选项卡中,可以看到虚拟机上所有已安装的扩展。 如果列表很长,使用搜索框筛选。
使用 Get-AzVMExtension cmdlet 列出虚拟机上所有已安装的扩展。
# List the installed extensions on the virtual machine.
Get-AzVMExtension -ResourceGroupName 'myResourceGroup' -VMName 'myVM' | format-table Name, Publisher, ExtensionType, AutoUpgradeMinorVersion, EnableAutomaticUpgrade
cmdlet 的输出将列出已安装的扩展:
Name                         Publisher                      ExtensionType              AutoUpgradeMinorVersion EnableAutomaticUpgrade
---- ---------                      ------------- ----------------------- ----------------------
AzureNetworkWatcherExtension Microsoft.Azure.NetworkWatcher NetworkWatcherAgentWindows                    True                   True
Name                         Publisher                      ExtensionType            AutoUpgradeMinorVersion EnableAutomaticUpgrade
---- ---------                      ------------- ----------------------- ----------------------
AzureNetworkWatcherExtension Microsoft.Azure.NetworkWatcher NetworkWatcherAgentLinux                    True                   True
使用 az vm extension list 命令列出虚拟机上所有已安装的扩展。
# List the installed extensions on the virtual machine.
az vm extension list --resource-group 'myResourceGroup' --vm-name 'myVM' --out table
该命令的输出将列出已安装的扩展:
Name                          ProvisioningState    Publisher                       Version    AutoUpgradeMinorVersion
---------------------------- -------------------  ------------------------------ ---------  -------------------------
AzureNetworkWatcherExtension  Succeeded            Microsoft.Azure.NetworkWatcher  1.4        True
安装 网络观察程序 Agent VM 扩展
在 Azure 门户中的虚拟机页中,可以按照以下步骤安装网络观察程序代理 VM 扩展:
在“设置”下,选择“扩展 + 应用程序”。
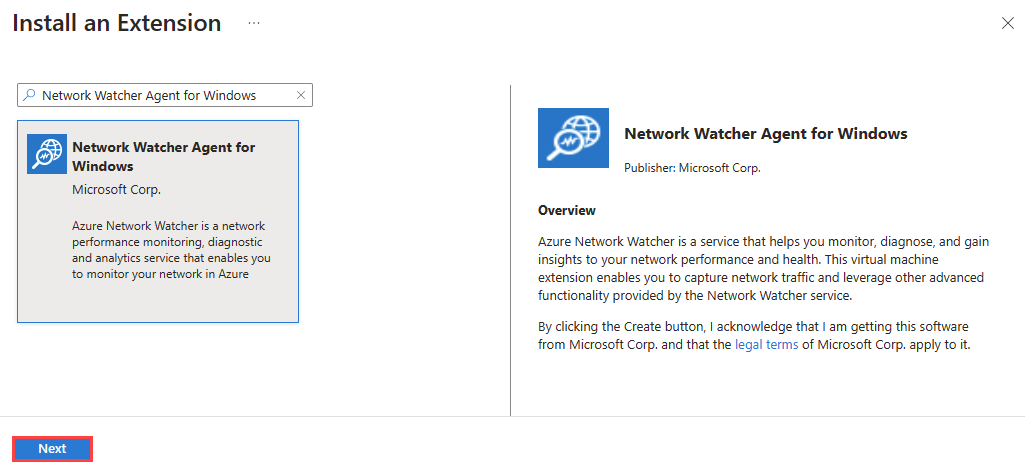
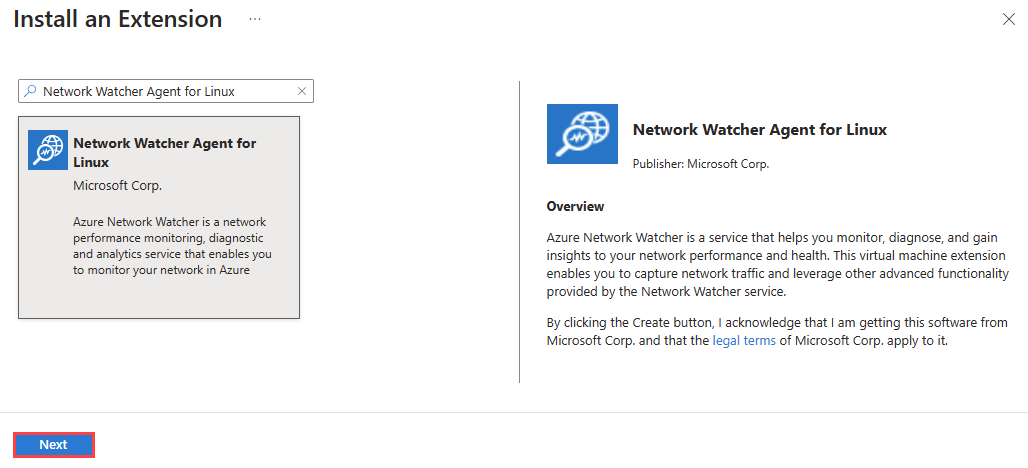
选择 + 添加,搜索 网络观察程序 Agent,然后安装。 如果扩展已安装,将显示在扩展列表中。
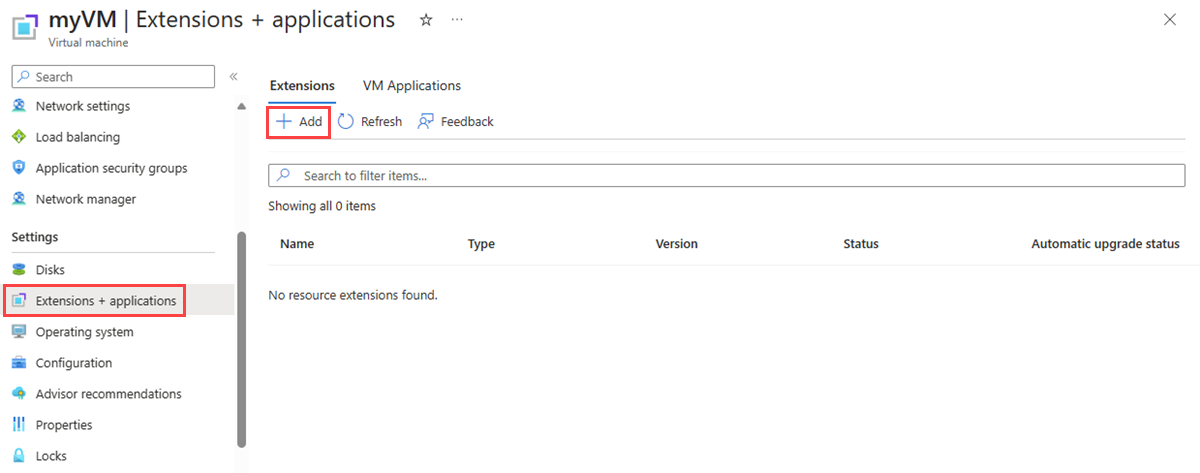
在“安装扩展”的搜索框中,输入“网络观察程序 Agent”,从列表中选择与你操作系统匹配的扩展,然后选择“下一步”。
选择“查看 + 创建”,然后选择“创建” 。
使用 Set-AzVMExtension cmdlet 在虚拟机上安装 网络观察程序 Agent VM 扩展:
# Install Network Watcher Agent for Windows on the virtual machine.
Set-AzVMExtension -Name 'AzureNetworkWatcherExtension' -Publisher 'Microsoft.Azure.NetworkWatcher' -ExtensionType 'NetworkWatcherAgentWindows' -EnableAutomaticUpgrade 1 -TypeHandlerVersion '1.4' -ResourceGroupName 'myResourceGroup' -VMName 'myVM'
# Install Network Watcher Agent for Linux on the virtual machine.
Set-AzVMExtension -Name 'AzureNetworkWatcherExtension' -Publisher 'Microsoft.Azure.NetworkWatcher' -ExtensionType 'NetworkWatcherAgentLinux' -EnableAutomaticUpgrade 1 -TypeHandlerVersion '1.4' -ResourceGroupName 'myResourceGroup' -VMName 'myVM'
安装完成后,你会看到以下输出:
RequestId IsSuccessStatusCode StatusCode ReasonPhrase
--------- ------------------- ---------- ------------
                         True         OK
使用az vm extension set命令在虚拟机上安装网络观察程序代理虚拟机扩展:
# Install Network Watcher Agent for Windows on the virtual machine.
az vm extension set --name 'NetworkWatcherAgentWindows' --extension-instance-name 'AzureNetworkWatcherExtension' --publisher 'Microsoft.Azure.NetworkWatcher' --enable-auto-upgrade 'true' --version '1.4' --resource-group 'myResourceGroup' --vm-name 'myVM'
# Install Network Watcher Agent for Linux on the virtual machine.
az vm extension set --name 'NetworkWatcherAgentLinux' --extension-instance-name 'AzureNetworkWatcherExtension' --publisher 'Microsoft.Azure.NetworkWatcher' --enable-auto-upgrade 'true' --version '1.4' --resource-group 'myResourceGroup' --vm-name 'myVM'
使用以下 Azure 资源管理器 模板(ARM 模板)在虚拟机上安装 网络观察程序 Agent VM 扩展:
{
    "$schema": "https://schema.management.azure.com/schemas/2019-04-01/deploymentTemplate.json#",
    "contentVersion": "1.0.0.0",
    "parameters": {
        "vmName": {
            "type": "string"
        }
    },
    "resources": [
        {
            "name": "[concat(parameters('vmName'), '/AzureNetworkWatcherExtension')]",
            "type": "Microsoft.Compute/virtualMachines/extensions",
            "apiVersion": "2024-07-01",
            "location": "[resourceGroup().location]",
            "properties": {
                "autoUpgradeMinorVersion": true,
                "publisher": "Microsoft.Azure.NetworkWatcher",
                "type": "NetworkWatcherAgentWindows",
                "typeHandlerVersion": "1.4"
            }
        }
    ]
}
{
    "$schema": "https://schema.management.azure.com/schemas/2019-04-01/deploymentTemplate.json#",
    "contentVersion": "1.0.0.0",
    "parameters": {
        "vmName": {
            "type": "string"
        }
    },
    "resources": [
        {
            "name": "[concat(parameters('vmName'), '/AzureNetworkWatcherExtension')]",
            "type": "Microsoft.Compute/virtualMachines/extensions",
            "apiVersion": "2024-07-01",
            "location": "[resourceGroup().location]",
            "properties": {
                "autoUpgradeMinorVersion": true,
                "publisher": "Microsoft.Azure.NetworkWatcher",
                "type": "NetworkWatcherAgentLinux",
                "typeHandlerVersion": "1.4"
            }
        }
    ]
}
可以使用 Azure PowerShell 或 Azure CLI 部署资源管理器模板:
# Deploy the JSON template file using Azure PowerShell.
New-AzResourceGroupDeployment -ResourceGroupName 'myResourceGroup' -TemplateFile 'agent.json'
# Deploy the JSON template file using the Azure CLI.
az deployment group create --resource-group 'myResourceGroup' --template-file 'agent.json'
更新 网络观察程序 代理虚拟机扩展
检查扩展版本
可使用 Azure 门户、Azure CLI 或 PowerShell 检查扩展版本。
在 Azure 门户中访问虚拟机的扩展 + 应用。
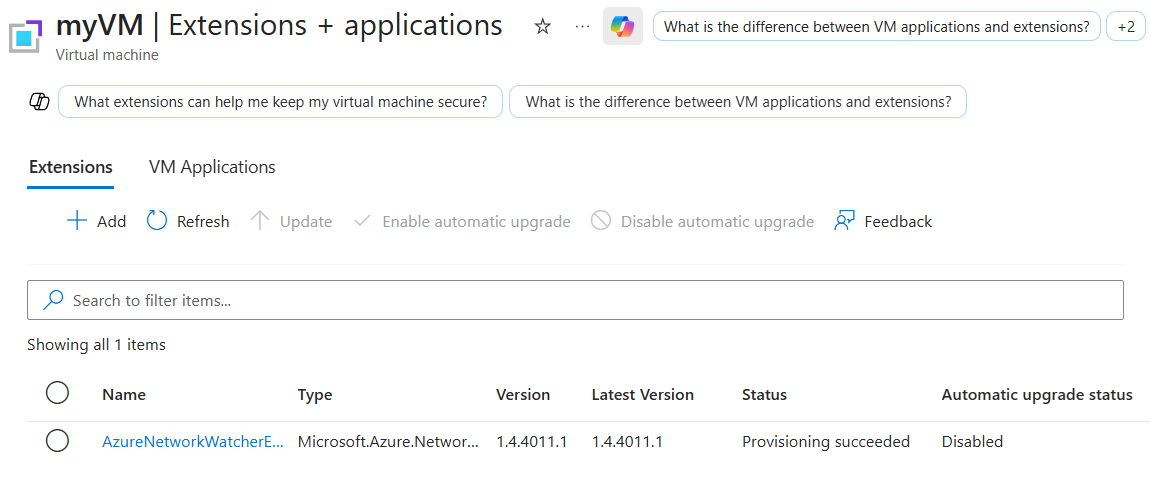
在扩展列表中,查看 AzureNetworkWatcherExtension 的版本栏。 如果有新版本可用,最新版本栏显示为(更新可用)。
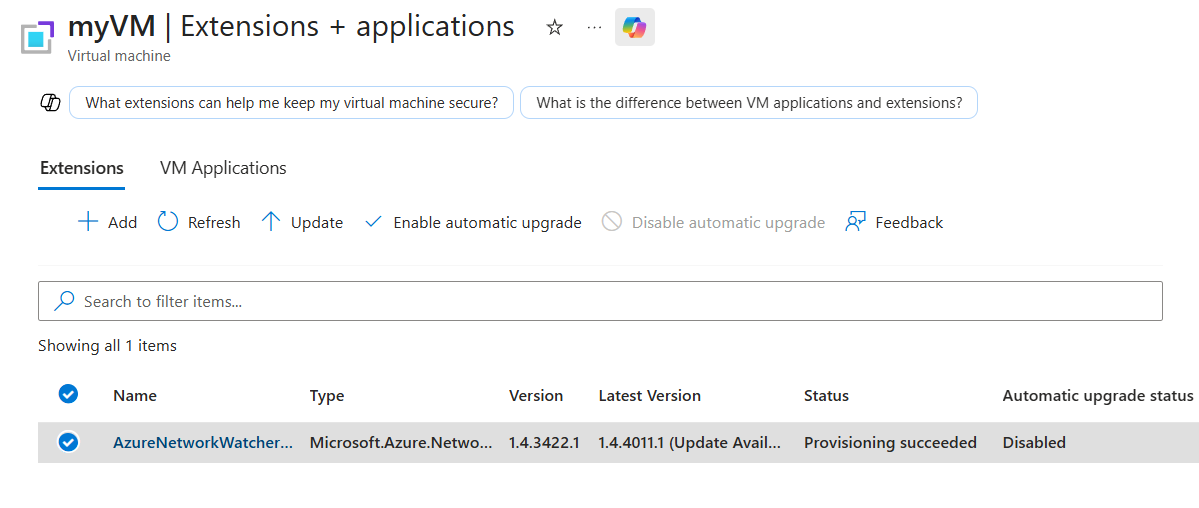
使用 Get-AzVM cmdlet 检查扩展已安装的版本:
(Get-AzVM -ResourceGroupName 'myResourceGroup' -Name 'myVM' -Status).Extensions | Where-Object { $_.Name -eq 'AzureNetworkWatcherExtension' } | Select-Object Name, TypeHandlerVersion
使用 Get-AzVMExtensionImage 命令,查找虚拟机操作系统和区域的最新可用扩展:
Get-AzVMExtensionImage -Location '<region>' -PublisherName 'Microsoft.Azure.NetworkWatcher' -Type 'NetworkWatcherAgentWindows' | Sort-Object -Property { [Version]$_.Version } -Descending | Select-Object -First 1
Get-AzVMExtensionImage -Location '<region>' -PublisherName 'Microsoft.Azure.NetworkWatcher' -Type 'NetworkWatcherAgentLinux' | Sort-Object -Property { [Version]$_.Version } -Descending | Select-Object -First 1
使用 az vm get-instance-view 命令检查扩展已安装的版本:
az vm get-instance-view --resource-group 'myResourceGroup' --name 'myVM' --query "extensions[?name=='AzureNetworkWatcherExtension'].typeHandlerVersion" --output tsv
使用 az vm extension image list 命令查找适用于您的虚拟机操作系统的该扩展的最新可用版本:
az vm extension image list --name 'NetworkWatcherAgentWindows' --publisher 'Microsoft.Azure.NetworkWatcher' --latest
az vm extension image list --name 'NetworkWatcherAgentLinux' --publisher 'Microsoft.Azure.NetworkWatcher' --latest
Note
网络观察程序扩展的最新版本为 1.4.3914.3。
启用自动升级
自动升级让 Azure 平台无需手动干预即可将扩展升级到最新版本。 请按以下步骤检查是否已启用自动升级;如果未启用,请将其启用。
在Azure门户的虚拟机设置中,选择扩展+应用。
从扩展列表中选择 AzureNetworkWatcherExtension ,并勾选 自动升级状态 栏。
如果显示 “禁用”,请从工具栏中选择 “启用自动升级 ”。
选择是以确认。
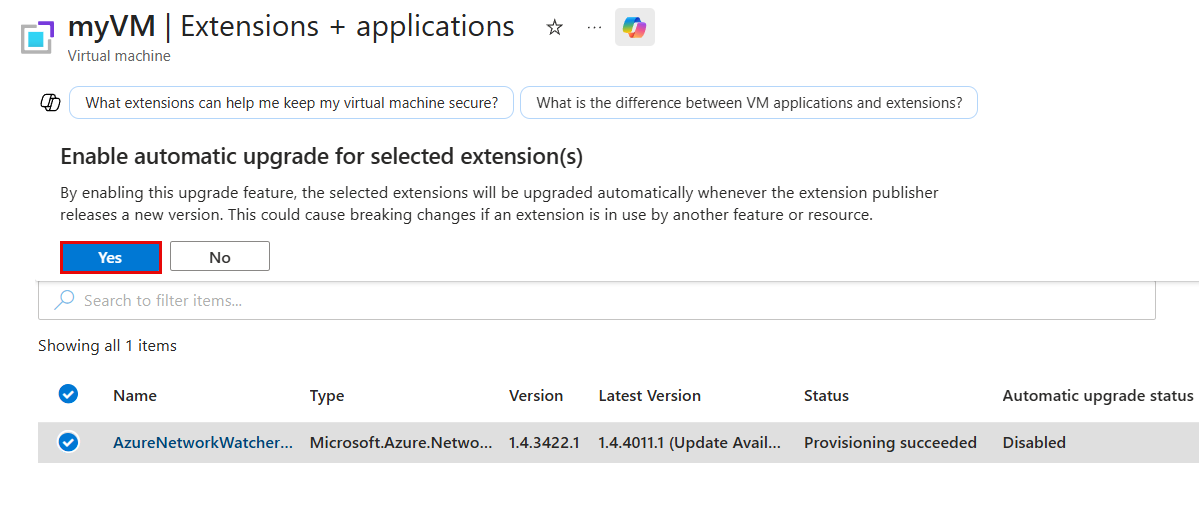
使用 Get-AzVMExtension cmdlet 检查是否启用自动升级:
Get-AzVMExtension -ResourceGroupName 'myResourceGroup' -VMName 'myVM' -Name 'AzureNetworkWatcherExtension' | Select-Object Name, EnableAutomaticUpgrade
如果 EnableAutomaticUpgrade 是 False,则使用 Set-AzVMExtension cmdlet 来启用:
Set-AzVMExtension -ResourceGroupName 'myResourceGroup' -VMName 'myVM' -Name 'AzureNetworkWatcherExtension' -Publisher 'Microsoft.Azure.NetworkWatcher' -ExtensionType 'NetworkWatcherAgentWindows' -EnableAutomaticUpgrade $true
Set-AzVMExtension -ResourceGroupName 'myResourceGroup' -VMName 'myVM' -Name 'AzureNetworkWatcherExtension' -Publisher 'Microsoft.Azure.NetworkWatcher' -ExtensionType 'NetworkWatcherAgentLinux' -EnableAutomaticUpgrade $true
使用 az vm extension show 命令检查是否启用自动升级:
az vm extension show --resource-group 'myResourceGroup' --vm-name 'myVM' --name 'AzureNetworkWatcherExtension' --query 'enableAutomaticUpgrade'
如果该命令返回 false,请使用 az vm extension set 命令启用该功能:
az vm extension set --resource-group 'myResourceGroup' --vm-name 'myVM' --name 'NetworkWatcherAgentWindows' --publisher 'Microsoft.Azure.NetworkWatcher' --enable-auto-upgrade 'true'
az vm extension set --resource-group 'myResourceGroup' --vm-name 'myVM' --name 'NetworkWatcherAgentLinux' --publisher 'Microsoft.Azure.NetworkWatcher' --enable-auto-upgrade 'true'
使用以下 Azure 资源管理器 模板(ARM 模板)来启用 网络观察程序 Agent VM 扩展的自动升级:
{
    "$schema": "https://schema.management.azure.com/schemas/2019-04-01/deploymentTemplate.json#",
    "contentVersion": "1.0.0.0",
    "parameters": {
        "vmName": {
            "type": "string"
        }
    },
    "resources": [
        {
            "name": "[concat(parameters('vmName'), '/AzureNetworkWatcherExtension')]",
            "type": "Microsoft.Compute/virtualMachines/extensions",
            "apiVersion": "2024-07-01",
            "location": "[resourceGroup().location]",
            "properties": {
                "autoUpgradeMinorVersion": true,
                "enableAutomaticUpgrade": true,
                "publisher": "Microsoft.Azure.NetworkWatcher",
                "type": "NetworkWatcherAgentWindows",
                "typeHandlerVersion": "1.4"
            }
        }
    ]
}
{
    "$schema": "https://schema.management.azure.com/schemas/2019-04-01/deploymentTemplate.json#",
    "contentVersion": "1.0.0.0",
    "parameters": {
        "vmName": {
            "type": "string"
        }
    },
    "resources": [
        {
            "name": "[concat(parameters('vmName'), '/AzureNetworkWatcherExtension')]",
            "type": "Microsoft.Compute/virtualMachines/extensions",
            "apiVersion": "2024-07-01",
            "location": "[resourceGroup().location]",
            "properties": {
                "autoUpgradeMinorVersion": true,
                "enableAutomaticUpgrade": true,
                "publisher": "Microsoft.Azure.NetworkWatcher",
                "type": "NetworkWatcherAgentLinux",
                "typeHandlerVersion": "1.4"
            }
        }
    ]
}
可以使用 Azure PowerShell 或 Azure CLI 部署资源管理器模板:
# Deploy the JSON template file using Azure PowerShell.
New-AzResourceGroupDeployment -ResourceGroupName 'myResourceGroup' -TemplateFile 'agent.json'
# Deploy the JSON template file using the Azure CLI.
az deployment group create --resource-group 'myResourceGroup' --template-file 'agent.json'
Note
启用自动升级后,Azure会自动更新扩展,无需重启虚拟机。 新版本发布后,这一流程可能需要长达30天。
手动更新
在Azure门户的虚拟机设置中,选择扩展+应用。
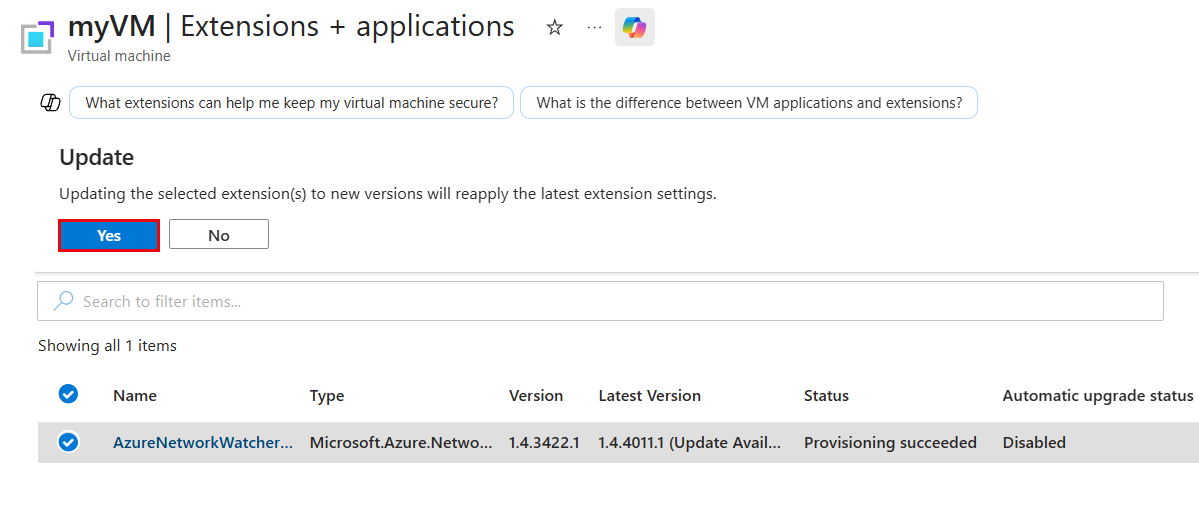
从扩展列表中选择 AzureNetworkWatcherExtension ,然后从工具栏中选择 “更新 ”。
选择是以确认。
更新完成后, 版本 和 最新版本 列显示相同的版本号。
如果更新后没有应用最新版本,请移除扩展并重新安装:
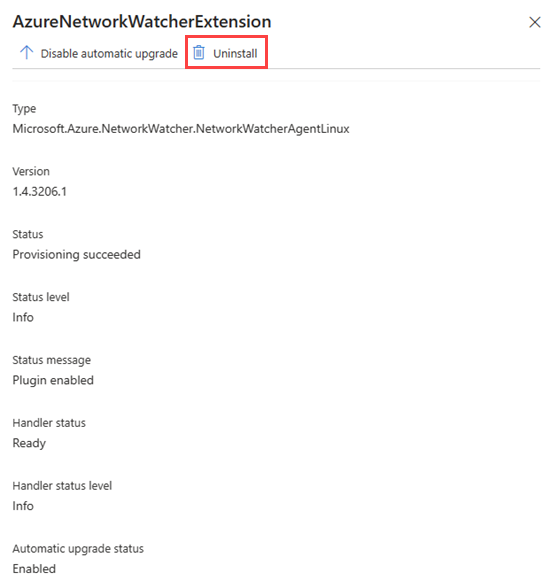
- 从扩展列表中选择 AzureNetworkWatcherExtension,然后选择“卸载”。
- 选择 + 添加,搜索 网络观察程序 Agent,然后重新安装。 平台会自动安装最新版本。 更多信息请参见“安装 网络观察程序 代理虚拟机扩展”。
使用带有-ForceRerun参数的 Set-AzVMExtension cmdlet 重新应用扩展,无需卸载。 每次执行命令时,该 -ForceRerun 值必须与当前值不同,因此使用一个会变化的值,比如当前日期和时间:
Set-AzVMExtension -ResourceGroupName 'myResourceGroup' -VMName 'myVM' -Name 'AzureNetworkWatcherExtension' -Publisher 'Microsoft.Azure.NetworkWatcher' -Type 'NetworkWatcherAgentWindows' -ForceRerun (Get-Date -Format o)
Set-AzVMExtension -ResourceGroupName 'myResourceGroup' -VMName 'myVM' -Name 'AzureNetworkWatcherExtension' -Publisher 'Microsoft.Azure.NetworkWatcher' -Type 'NetworkWatcherAgentLinux' -ForceRerun (Get-Date -Format o)
如果这个条件不会导致扩展更新,请移除它并重新安装以获得最新版本:
Remove-AzVMExtension -ResourceGroupName 'myResourceGroup' -VMName 'myVM' -Name 'AzureNetworkWatcherExtension'
Set-AzVMExtension -ResourceGroupName 'myResourceGroup' -VMName 'myVM' -Name 'AzureNetworkWatcherExtension' -Publisher 'Microsoft.Azure.NetworkWatcher' -Type 'NetworkWatcherAgentWindows'
Set-AzVMExtension -ResourceGroupName 'myResourceGroup' -VMName 'myVM' -Name 'AzureNetworkWatcherExtension' -Publisher 'Microsoft.Azure.NetworkWatcher' -Type 'NetworkWatcherAgentLinux'
使用带有 --force-update 参数的 az vm extension set 命令,在不卸载的情况下重新应用该扩展:
az vm extension set --resource-group 'myResourceGroup' --vm-name 'myVM' --name 'NetworkWatcherAgentWindows' --publisher 'Microsoft.Azure.NetworkWatcher' --force-update
az vm extension set --resource-group 'myResourceGroup' --vm-name 'myVM' --name 'NetworkWatcherAgentLinux' --publisher 'Microsoft.Azure.NetworkWatcher' --force-update
如果这个条件不会导致扩展更新,请移除它并重新安装以获得最新版本:
az vm extension delete --resource-group 'myResourceGroup' --vm-name 'myVM' --name 'AzureNetworkWatcherExtension'
az vm extension set --resource-group 'myResourceGroup' --vm-name 'myVM' --name 'NetworkWatcherAgentWindows' --publisher 'Microsoft.Azure.NetworkWatcher'
az vm extension set --resource-group 'myResourceGroup' --vm-name 'myVM' --name 'NetworkWatcherAgentLinux' --publisher 'Microsoft.Azure.NetworkWatcher'
请使用以下 Azure 资源管理器 模板(ARM 模板)重新应用扩展。 将参数更新 typeHandlerVersion 到你在 “检查你的扩展版本”中识别的最新版本,然后重新部署模板:
{
    "$schema": "https://schema.management.azure.com/schemas/2019-04-01/deploymentTemplate.json#",
    "contentVersion": "1.0.0.0",
    "parameters": {
        "vmName": {
            "type": "string"
        },
        "typeHandlerVersion": {
            "type": "string"
        }
    },
    "resources": [
        {
            "name": "[concat(parameters('vmName'), '/AzureNetworkWatcherExtension')]",
            "type": "Microsoft.Compute/virtualMachines/extensions",
            "apiVersion": "2024-07-01",
            "location": "[resourceGroup().location]",
            "properties": {
                "autoUpgradeMinorVersion": true,
                "publisher": "Microsoft.Azure.NetworkWatcher",
                "type": "NetworkWatcherAgentWindows",
                "typeHandlerVersion": "[parameters('typeHandlerVersion')]"
            }
        }
    ]
}
{
    "$schema": "https://schema.management.azure.com/schemas/2019-04-01/deploymentTemplate.json#",
    "contentVersion": "1.0.0.0",
    "parameters": {
        "vmName": {
            "type": "string"
        },
        "typeHandlerVersion": {
            "type": "string"
        }
    },
    "resources": [
        {
            "name": "[concat(parameters('vmName'), '/AzureNetworkWatcherExtension')]",
            "type": "Microsoft.Compute/virtualMachines/extensions",
            "apiVersion": "2024-07-01",
            "location": "[resourceGroup().location]",
            "properties": {
                "autoUpgradeMinorVersion": true,
                "publisher": "Microsoft.Azure.NetworkWatcher",
                "type": "NetworkWatcherAgentLinux",
                "typeHandlerVersion": "[parameters('typeHandlerVersion')]"
            }
        }
    ]
}
可以使用 Azure PowerShell 或 Azure CLI 部署资源管理器模板:
# Deploy the JSON template file using Azure PowerShell.
New-AzResourceGroupDeployment -ResourceGroupName 'myResourceGroup' -TemplateFile 'agent.json' -typeHandlerVersion '<version>'
# Deploy the JSON template file using the Azure CLI.
az deployment group create --resource-group 'myResourceGroup' --template-file 'agent.json' --parameters typeHandlerVersion='<version>'
用PowerShell脚本进行大规模更新
如果你有大规模部署,可以用PowerShell脚本一次性更新订阅中的多个虚拟机。 以下脚本将更新订阅中所有未更新的虚拟机上的 网络观察程序 扩展:
<#
    .SYNOPSIS
    This script scans all VMs in the provided subscription and upgrades any out-of-date AzureNetworkWatcherExtensions to the latest available version.
    .DESCRIPTION
    This script is a no-op if AzureNetworkWatcherExtensions are already up to date.
    Requires Azure PowerShell 4.2 or higher to be installed.
    .EXAMPLE
    .\UpdateVMAgentsInSub.ps1 -SubID aaaa0a0a-bb1b-cc2c-dd3d-eeeeee4e4e4e -NoUpdate
#>

[CmdletBinding()]
param(
    [Parameter(Mandatory=$true)]
    [string] $SubID,
    [Parameter(Mandatory=$false)]
    [Switch] $NoUpdate = $false
)
function Get-LatestExtensionVersion($location, $extensionType)
{
    $latestImage = Get-AzVMExtensionImage -Location $location -PublisherName "Microsoft.Azure.NetworkWatcher" -Type $extensionType |
        Sort-Object -Property { [Version]$_.Version } -Descending |
        Select-Object -First 1
    return $latestImage.Version
}
Write-Host "Scanning all VMs in the subscription: $($SubID)"
Set-AzContext -SubscriptionId $SubID
$vms = Get-AzVM
$foundVMs = $false
Write-Host "Starting VM search, this may take a while"
foreach ($vmName in $vms)
{
    # Get Detailed VM info
    $vm = Get-AzVM -ResourceGroupName $vmName.ResourceGroupName -Name $vmName.name -Status
    $isitWindows = $vm.OsName -like "*Windows*"
    $type = if ($isitWindows) { "NetworkWatcherAgentWindows" } else { "NetworkWatcherAgentLinux" }
    $latestVersion = Get-LatestExtensionVersion -location $vmName.Location -extensionType $type

    foreach ($extension in $vm.Extensions)
    {
        if ($extension.Name -eq "AzureNetworkWatcherExtension")
        {
            if ([Version]$extension.TypeHandlerVersion -lt [Version]$latestVersion)
            {
                $foundVMs = $true
                if (-not ($NoUpdate))
                {
                    Write-Host "Found VM that needs to be updated: subscriptions/$($SubID)/resourceGroups/$($vm.ResourceGroupName)/providers/Microsoft.Compute/virtualMachines/$($vm.Name) -> Updating to $latestVersion " -NoNewline
                    Remove-AzVMExtension -ResourceGroupName $vm.ResourceGroupName -VMName $vm.Name -Name "AzureNetworkWatcherExtension" -Force
                    Write-Host "... " -NoNewline
                    Set-AzVMExtension -ResourceGroupName $vm.ResourceGroupName -Location $vmName.Location -VMName $vm.Name -Name "AzureNetworkWatcherExtension" -Publisher "Microsoft.Azure.NetworkWatcher" -Type $type -TypeHandlerVersion $latestVersion
                    Write-Host "Done"
                }
                else
                {
                    Write-Host "Found $(if ($isitWindows) {"Windows"} else {"Linux"}) VM that needs to be updated to $($latestVersion): subscriptions/$($SubID)/resourceGroups/$($vm.ResourceGroupName)/providers/Microsoft.Compute/virtualMachines/$($vm.Name)"
                }
            }
        }
    }
}

if ($foundVMs)
{
    Write-Host "Finished $(if ($NoUpdate) {"searching"} else {"updating"}) out of date AzureNetworkWatcherExtension on VMs"
}
else
{
    Write-Host "All AzureNetworkWatcherExtensions up to date"
}
卸载 网络观察程序 代理 VM 扩展
你可以在 Azure 门户的虚拟机页上,按照以下步骤卸载 网络观察程序 代理 VM 扩展:
在“设置”下,选择“扩展 + 应用程序”。
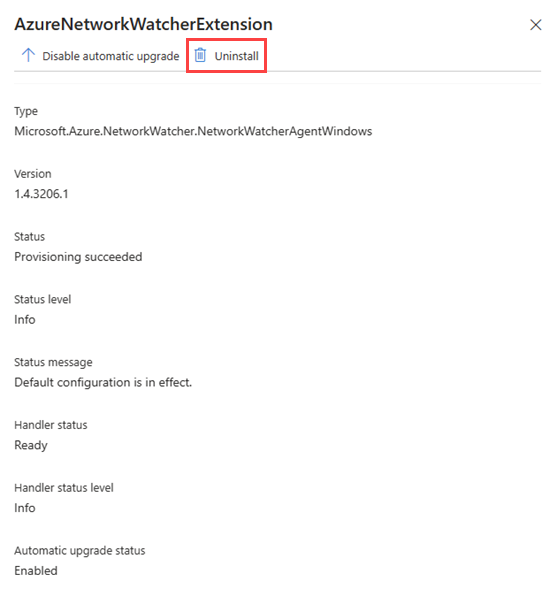
从扩展列表中选择 AzureNetworkWatcherExtension,然后选择“卸载”。
Note
你可能会看到 网络观察程序 Agent VM 扩展的名称不同于 AzureNetworkWatcherExtension。
使用 Remove-AzVMExtension cmdlet 从虚拟机中移除 网络观察程序 Agent VM 扩展:
# Uninstall Network Watcher Agent VM extension.
Remove-AzVMExtension -Name 'AzureNetworkWatcherExtension' -ResourceGroupName 'myResourceGroup' -VMName 'myVM'
使用az vm extension delete命令将虚拟机中的网络观察程序 Agent虚拟机扩展移除:
# Uninstall Network Watcher Agent VM extension.
az vm extension delete --name 'AzureNetworkWatcherExtension' --resource-group 'myResourceGroup' --vm-name 'myVM'
常见问题 (FAQ)
要解答关于网络观察程序 Agent的最常见问题,请参阅网络观察程序 Agent常见问题解答。
相关内容