开始使用 Azure Virtual Network Manager,通过 Bicep 管理所有虚拟网络的连接。
在本快速入门中,部署三个虚拟网络,并使用 Azure Virtual Network Manager 创建网格网络拓扑。 然后验证是否应用了连接配置。

此示例的 Bicep 解决方案被拆分为多个模块,以支持在资源组和订阅两个作用域级别进行部署。 以下章节介绍了 Azure Virtual Network Manager 独有的组件。 除了这些组件外,该解决方案还部署了虚拟网络、用户指定的身份和角色分配。
定义虚拟网络管理器资源
此资源会在 API 版本 Microsoft.Network/networkManagers 创建 2022-09-01 实例,以便实现虚拟网络间连接的已连接组。 将 networkManagerScopes 设置为该实例管理的订阅或管理组,并将 Connectivity 保留在 networkManagerScopeAccesses 中,以便该实例能够部署连接配置。
@description('This is the Azure Virtual Network Manager which will be used to implement the connected group for inter-vnet connectivity.')
resource networkManager 'Microsoft.Network/networkManagers@2022-09-01' = {
  name: 'vnm-learn-prod-${location}-001'
  location: location
  properties: {
    networkManagerScopeAccesses: [
      'Connectivity'
    ]
    networkManagerScopes: {
      subscriptions: [
        '/subscriptions/${subscription().subscriptionId}'
      ]
      managementGroups: []
    }
  }
}
定义静态和动态网络组
该解决方案支持静态成员网络组或动态成员网络组。 参数 networkGroupMembershipType 决定部署哪一个;两个资源中只创建一个。
静态会员网络组
静态网络组资源在 Microsoft.Network/networkManagers/networkGroups API版本 2022-09-01中明确命名其成员。 嵌套的 staticMembers 资源通过资源 ID 添加辐射型虚拟网络 A、B 和 C,以及中心虚拟网络。 要针对自己的虚拟网络,可以更改 spokeNetworkGroupMembers 和 hubVnetId 参数。
@description('This is the static network group for the all VNETs.')
resource networkGroupSpokesStatic 'Microsoft.Network/networkManagers/networkGroups@2022-09-01' = if (networkGroupMembershipType == 'static') {
  name: 'ng-learn-prod-${location}-static001'
  parent: networkManager
  properties: {
    description: 'Network Group - Static'
  }

  // add spoke vnets A, B, and C to the static network group
  resource staticMemberSpoke 'staticMembers@2022-09-01' = [for spokeMember in spokeNetworkGroupMembers: if (contains(groupedVNETs,last(split(spokeMember,'/')))) {
    name: 'sm-${(last(split(spokeMember, '/')))}'
    properties: {
      resourceId: spokeMember
    }
  }]

  resource staticMemberHub 'staticMembers@2022-09-01' = {
    name: 'sm-${(toLower(last(split(hubVnetId, '/'))))}'
    properties: {
      resourceId: hubVnetId
    }
  }
}
动态成员身份网络组
动态网络组资源声明无成员。 成员身份由定义动态成员政策中描述的 Azure Policy 定义填充。
@description('This is the dynamic group for all VNETs.')
resource networkGroupSpokesDynamic 'Microsoft.Network/networkManagers/networkGroups@2022-09-01' = if (networkGroupMembershipType == 'dynamic') {
  name: 'ng-learn-prod-${location}-dynamic001'
  parent: networkManager
  properties: {
    description: 'Network Group - Dynamic'
  }
}
定义网格连接配置
在API版本Microsoft.Network/networkManagers/connectivityConfigurations中,连接配置资源2022-09-01将网络组与网状网络拓扑关联起来。 属性 appliesToGroups 引用你部署的网络组,你将 设置为 connectivityTopologyMesh。
@description('This connectivity configuration defines the connectivity between VNETs using Direct Connection. The hub will be part of the mesh, but gateway routes from the hub will not propagate to spokes.')
resource connectivityConfigurationMesh 'Microsoft.Network/networkManagers/connectivityConfigurations@2022-09-01' = {
  name: 'cc-learn-prod-${location}-mesh001'
  parent: networkManager
  properties: {
    description: 'Mesh connectivity configuration'
    appliesToGroups: [
      {
        networkGroupId: (networkGroupMembershipType == 'static') ? networkGroupSpokesStatic.id : networkGroupSpokesDynamic.id
        isGlobal: 'False'
        useHubGateway: 'False'
        groupConnectivity: 'DirectlyConnected'
      }
    ]
    connectivityTopology: 'Mesh'
    deleteExistingPeering: 'True'
    hubs: []
    isGlobal: 'False'
  }
}
用部署脚本提交配置
要将配置部署到目标网络组,可以使用调用 Deploy-AzNetworkManagerCommitPowerShell命令的部署脚本。 部署脚本需要一个身份,拥有足够的权限,才能对虚拟网络管理器运行PowerShell脚本。 Bicep文件创建用户托管标识,并向其授予目标资源组的“参与者”角色。 有关部署脚本及相关身份的更多信息,请参见 ARM 模板中使用部署脚本。
以下资源是在 API 版本 Microsoft.Resources/deploymentScripts 中的 2020-10-01 资源。 它运行一个内联PowerShell脚本,登录时使用用户分配的身份并调用 Deploy-AzNetworkManagerCommit。 更改属性 azPowerShellVersion、retentionInterval 和 timeout,以适应您自己的部署。 更改传递的 arguments值:网络管理器名称、目标位置、配置ID、订阅ID、配置类型和资源组名称。
@description('Create a Deployment Script resource to perform the commit/deployment of the Network Manager connectivity configuration.')
resource deploymentScript 'Microsoft.Resources/deploymentScripts@2020-10-01' = {
  name: deploymentScriptName
  location: location
  kind: 'AzurePowerShell'
  identity: {
    type: 'UserAssigned'
    userAssignedIdentities: {
      '${userAssignedIdentityId}': {}
    }
  }
  properties: {
    azPowerShellVersion: '8.3'
    retentionInterval: 'PT1H'
    timeout: 'PT1H'
    arguments: '-networkManagerName "${networkManagerName}" -targetLocations ${location} -configIds ${configurationId} -subscriptionId ${subscription().subscriptionId} -configType ${configType} -resourceGroupName ${resourceGroup().name}'
    scriptContent: '''
    param (
      # AVNM subscription id
      [parameter(mandatory=$true)][string]$subscriptionId,

      # AVNM resource name
      [parameter(mandatory=$true)][string]$networkManagerName,

      # string with comma-separated list of config ids to deploy. ids must be of the same config type
      [parameter(mandatory=$true)][string[]]$configIds,

      # string with comma-separated list of deployment target regions
      [parameter(mandatory=$true)][string[]]$targetLocations,

      # configuration type to deploy. must be either connectivity or securityadmin
      [parameter(mandatory=$true)][ValidateSet('Connectivity','SecurityAdmin')][string]$configType,

      # AVNM resource group name
      [parameter(mandatory=$true)][string]$resourceGroupName
    )

    $null = Login-AzAccount -Identity -Subscription $subscriptionId

    [System.Collections.Generic.List[string]]$configIdList = @()
    $configIdList.addRange($configIds)
    [System.Collections.Generic.List[string]]$targetLocationList = @() # target locations for deployment
    $targetLocationList.addRange($targetLocations)

    $deployment = @{
        Name = $networkManagerName
        ResourceGroupName = $resourceGroupName
        ConfigurationId = $configIdList
        TargetLocation = $targetLocationList
        CommitType = $configType
    }

    try {
      Deploy-AzNetworkManagerCommit @deployment -ErrorAction Stop
    }
    catch {
      Write-Error "Deployment failed with error: $_"
      throw "Deployment failed with error: $_"
    }
    '''
    }
}
定义动态成员政策
当您将部署配置为使用 dynamic 网络组成员身份时,该解决方案还会部署一项 Azure Policy 定义及其分配。
以下资源是在 API 版本 Microsoft.Authorization/policyDefinitions 中的 2021-06-01 资源。 它使用 Microsoft.Network.Data 策略模式和效果 addToNetworkGroup ,将匹配的虚拟网络添加到由 识别的 networkGroupId网络组中。 策略规则匹配携带该 _avnm_quickstart_deployment 标签且存在于该样本资源组中的虚拟网络。 在条件中 like 更改标签名称和资源组筛选,使其与你自己的环境相匹配。
@description('This is a Policy definition for dynamic group membership')
resource policyDefinition 'Microsoft.Authorization/policyDefinitions@2021-06-01' = {
  name: uniqueString(networkGroupId)
  properties: {
    description: 'AVNM quickstart dynamic group membership Policy'
    displayName: 'AVNM quickstart dynamic group membership Policy'
    mode: 'Microsoft.Network.Data'
    policyRule: {
      if: {
        allof: [
          {
            field: 'type'
            equals: 'Microsoft.Network/virtualNetworks'
          }
          {
            // virtual networks must have a tag where the key is '_avnm_quickstart_deployment'
            field: 'tags[_avnm_quickstart_deployment]'
            exists: true
          }
          {
            // virtual network ids must include this sample's resource group ID - limiting the chance that dynamic membership impacts other vnets in your subscriptions
            field: 'id'
            like: '${subscription().id}/resourcegroups/${resourceGroupName}/*'
          }
        ]
      }
      then: {
        // 'addToNetworkGroup' is a special effect used by AVNM network groups
        effect: 'addToNetworkGroup'
        details: {
          networkGroupId: networkGroupId
        }
      }
    }
  }
}
部署 Bicep 解决方案
部署先决条件
- 拥有有效订阅的 Azure 帐户。 创建账户。
- 在目标订阅范围内创建策略定义和策略分配的权限。 使用部署参数
networkGroupMembershipType=Dynamic部署网络组成员身份所需的策略资源时,需要具备这些权限。 默认值为static,这不会部署任何策略。 - 此解决方案中的所有资源均在Azure示例GitHub存储库中提供。 可以从存储库下载Bicep解决方案,或将存储库克隆到本地计算机。
下载 Bicep 解决方案
- 在此 链接中下载示例存储库的 ZIP 存档。
- 提取下载的 ZIP 文件。 在终端中,进入已解压的
avnm-mesh-connected-group目录。 此解决方案的Bicep文件位于bicep子目录中。
或者,你可以使用 git 克隆仓库:
git clone https://github.com/Azure-Samples/avnm-mesh-connected-group
cd avnm-mesh-connected-group
连接到 Azure
登录到 Azure 帐户,然后选择订阅
要开始配置,请登录到 Azure 帐户:
Connect-AzAccount -Environment AzureChinaCloud
然后,连接到你的订阅:
Set-AzContext -Subscription <subscription name or id>
安装 Azure PowerShell 模块
使用此命令安装最新的 Az.Network Azure PowerShell 模块:
Install-Module -Name Az.Network -RequiredVersion 5.3.0
部署参数
- resourceGroupName:[必需] 要在其中部署虚拟网络管理器和示例虚拟网络的资源组的名称。
- 位置:[必需] 要部署的资源的位置。
-
networkGroupMembershipType:[可选] 要部署的网络组成员身份的类型。 默认值为
static,但对于动态组成员身份,可以使用dynamic。
注释
选择动态组成员身份会部署Azure Policy来管理成员身份,这需要更多的权限。
具有静态网络组成员身份的默认部署
New-AzSubscriptionDeployment -Name avnm-mesh-connected-group -Location <deploymentLocation> -TemplateFile ./bicep/main.bicep -resourceGroupName <newOrExistingResourceGroup>
使用动态网络组成员身份进行部署
若要使用 Azure Policy 动态管理网络组成员身份,请包含值为 networkGroupMembershipType 的部署参数 dynamic。
New-AzSubscriptionDeployment -Name avnm-mesh-connected-group -Location <deploymentLocation> -TemplateFile ./bicep/main.bicep -resourceGroupName <newOrExistingResourceGroup> -networkGroupMembershipType dynamic
验证配置部署情况
使用每个虚拟网络的“网络管理器”部分来验证是否已部署配置:
转到 vnet-learn-prod-{location}-spoke001 虚拟网络。
在“设置”下选择“网络管理器”。
在“连接配置”选项卡上,验证列表中是否显示“cc-learn-prod-{location}-mesh001”。
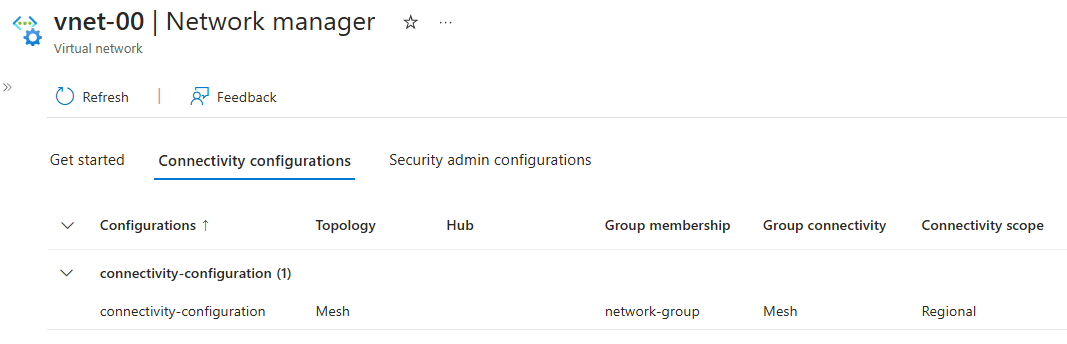
在 vnet-learn-prod-{location}-spoke004 中重复上述步骤,你应该会看到 vnet-learn-prod-{location}-spoke004 从连接配置中排除。
清理资源
如果不再需要Azure Virtual Network Manager和关联的虚拟网络,请通过删除资源组及其资源将其删除。
- 在 Azure 门户中,浏览至你的资源组 - resource-group。
- 选择“resource-group”,然后选择“删除资源组”。
- 在 删除资源组中,通过在文本框中输入 resource-group 确认要删除,然后选择 删除。
- 如果您使用了动态网络组成员资格,请在门户中转到“订阅”,然后选择策略,删除已部署的 Azure Policy 定义和分配。 在“策略”中,找到名为的
AVNM quickstart dynamic group membership Policy并将其删除,然后对名为的AVNM quickstart dynamic group membership Policy执行相同的操作。
后续步骤
创建Azure Virtual Network Manager实例后,了解如何使用安全管理员配置阻止网络流量: