在本快速入门中,你要将 Azure 应用程序配置整合到 Node.js 控制台应用中,以创建功能管理的端到端实现。 可以使用应用配置集中存储所有功能标志并控制其状态。
JavaScript 功能管理库通过功能标志支持扩展了该框架。 它们可以通过其 JavaScript 配置提供程序与应用程序配置无缝集成。 作为示例,本教程演示了如何在 Node.js 应用中使用 JavaScript 功能管理。
先决条件
- 具有活动订阅的 Azure 帐户。 创建试用版订阅。
- 应用配置存储区,如 创建存储区的教程所示。
- LTS 版本的 Node.js。 有关直接在 Windows 上或使用适用于 Linux 的 Windows 子系统 (WSL) 安装 Node.js 的信息,请参阅 Node.js 入门
添加功能标志
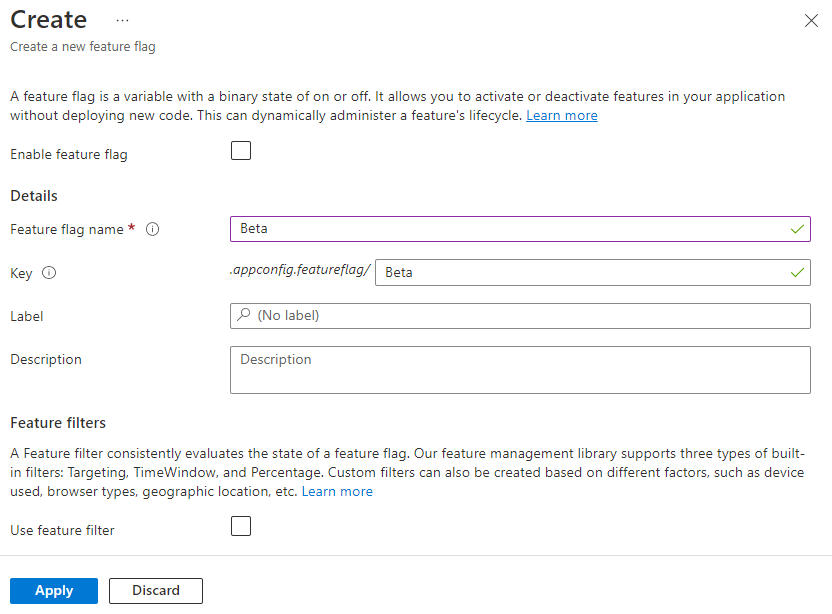
将名为“Beta”的功能标志添加到应用程序配置存储区,并将“标签”和“描述”保留为其默认值。 有关如何使用 Azure 门户或 CLI 将功能标志添加到存储区的详细信息,请转到创建功能标志。

使用功能标志
使用
npm install命令安装功能管理。npm install @microsoft/feature-management创建名为 app.js 的文件,并添加以下代码。
可以使用
DefaultAzureCredential向应用程序配置存储区进行身份验证。 按照说明为凭据分配应用程序配置数据读取者角色。 在运行应用程序之前,请务必留出足够的时间来传播权限。const sleepInMs = require("util").promisify(setTimeout); const { load } = require("@azure/app-configuration-provider"); const { DefaultAzureCredential } = require("@azure/identity"); const { FeatureManager, ConfigurationMapFeatureFlagProvider} = require("@microsoft/feature-management"); const endpoint = process.env.AZURE_APPCONFIG_ENDPOINT; const credential = new DefaultAzureCredential(); async function run() { // Connect to Azure App Configuration using endpoint and token credential const appConfig = await load(endpoint, credential, { featureFlagOptions: { enabled: true, // Note: selectors must be explicitly provided for feature flags. selectors: [{ keyFilter: "*" }], refresh: { enabled: true, refreshIntervalInMs: 10_000 } } }); // Create feature manager with feature flag provider that accesses feature flags from App Configuration const fm = new FeatureManager( new ConfigurationMapFeatureFlagProvider(appConfig)); while (true) { await appConfig.refresh(); // Refresh to get the latest feature flag settings const isEnabled = await fm.isEnabled("Beta"); // Evaluate the feature flag console.log(`Beta is enabled: ${isEnabled}`); await sleepInMs(5000); } } run().catch(console.error);
运行应用程序
设置 环境变量。
将名为 AZURE_APPCONFIG_ENDPOINT 的环境变量设置为 Azure 门户中存储区的“概述”下的应用程序配置存储区的终结点。
如果使用 Windows 命令提示符,则请运行以下命令并重启命令提示符,这样更改才会生效:
setx AZURE_APPCONFIG_ENDPOINT "<endpoint-of-your-app-configuration-store>"如果使用 PowerShell,请运行以下命令:
$Env:AZURE_APPCONFIG_ENDPOINT = "<endpoint-of-your-app-configuration-store>"如果使用 macOS 或 Linux,则请运行以下命令:
export AZURE_APPCONFIG_ENDPOINT='<endpoint-of-your-app-configuration-store>'运行以下命令,以在本地运行应用:
node app.js由于禁用了 Beta 版功能标志,你将看到以下控制台输出。
Beta is enabled: false登录到 Azure 门户。 选择“所有资源”,然后选择先前创建的应用程序配置存储。
选择“功能管理器”并找到“Beta”功能标志。 通过选中“已启用”下的复选框来启用该标志。
等待几秒钟,然后你将看到控制台输出更改。
Beta is enabled: true
后续步骤
有关 JavaScript 功能管理库的完整功能概要,请继续阅读以下文档。
虽然使用功能标志可以在应用中激活或停用功能,但你可能希望根据应用的逻辑自定义功能标志。 使用功能筛选器可以按条件启用功能标志。 有关详细信息,请继续阅读以下教程。
Azure 应用程序配置提供了内置的功能筛选器,使你可以仅在特定的时段或者仅对应用的特定目标受众激活功能标志。 有关详细信息,请继续阅读以下教程。