在本快速入门中,你要将 Azure 应用程序配置合并到 Spring Boot Web 应用中,以创建功能管理的端到端实现。 可以使用应用配置集中存储所有功能标志并控制其状态。
Spring Boot 功能管理库使用全面的功能标志支持扩展了该框架。 这些库不依赖于任何 Azure 库。 它们可以通过其 Spring Boot 配置提供程序无缝集成到应用程序配置。
先决条件
- 具有活动订阅的 Azure 帐户。 创建试用版订阅。
- 应用配置存储区,如 创建存储区的教程所示。
- 支持的 Java 开发工具包 SDK 版本 11。
- Apache Maven 版本 3.0 或更高版本。
添加功能标志
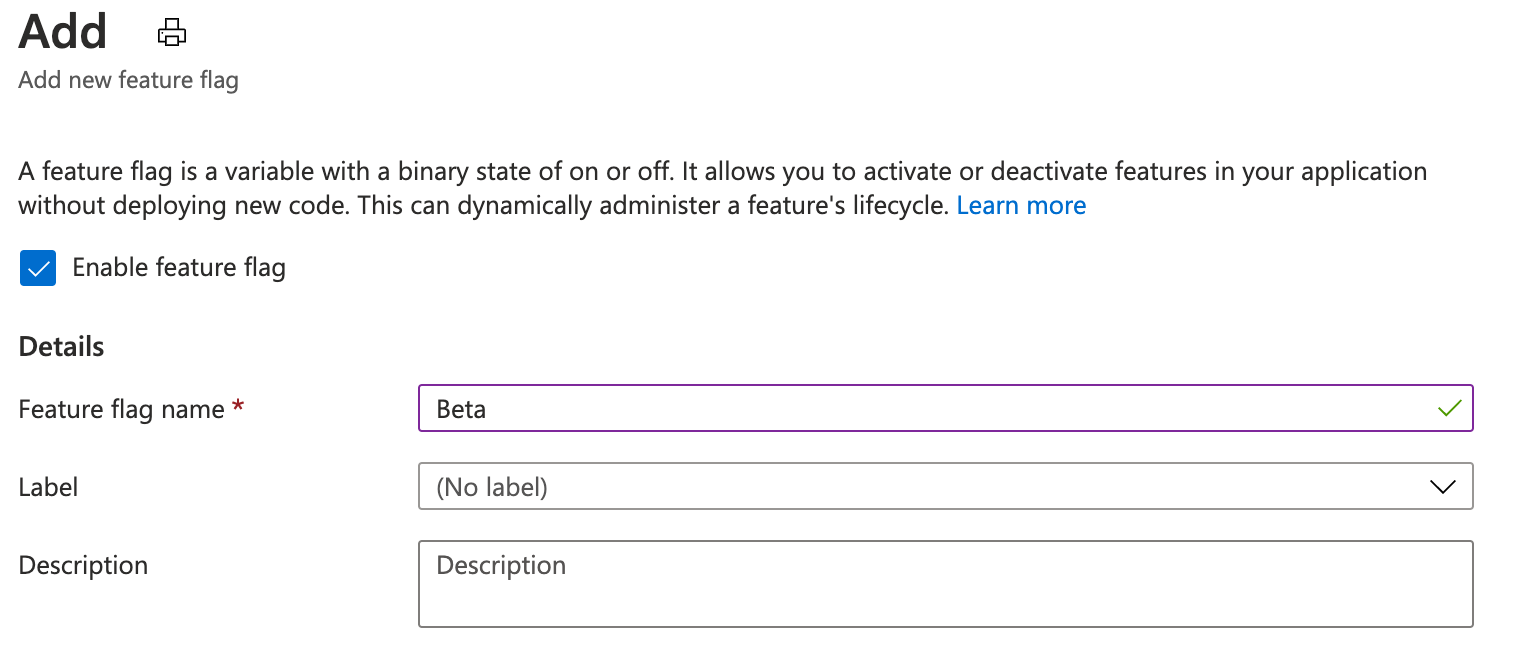
将名为“Beta”的功能标志添加到应用程序配置存储区,并将“标签”和“描述”保留为其默认值。 有关如何使用 Azure 门户或 CLI 将功能标志添加到存储区的详细信息,请转到创建功能标志。

创建 Spring Boot 应用
若要创建新的 Spring Boot 项目:
浏览到 Spring Initializr。
指定以下选项:
- 使用 Java 生成一个 Maven 项目。
- 指定一个其值大于或等于 2.0 的 Spring Boot 版本。
- 指定应用程序的“组”和“项目”名称。 本文使用
com.example和demo。 - 添加 Spring Web 依赖项。
指定上述选项后,选择“生成项目” 。 出现提示时,将项目下载到本地计算机。
添加功能管理
在本地系统中提取文件后,即可对 Spring Boot 应用程序进行编辑。 在应用的根目录中找到 pom.xml。
在文本编辑器中打开 pom.xml 文件,将以下内容添加到 列表中:
<dependency>
    <groupId>com.azure.spring</groupId>
    <artifactId>spring-cloud-azure-appconfiguration-config-web</artifactId>
</dependency>
<dependency>
    <groupId>com.azure.spring</groupId>
    <artifactId>spring-cloud-azure-feature-management-web</artifactId>
</dependency>
<dependency>
    <groupId>org.springframework.boot</groupId>
    <artifactId>spring-boot-starter-thymeleaf</artifactId>
</dependency>

<dependencyManagement>
    <dependencies>
        <dependency>
        <groupId>com.azure.spring</groupId>
        <artifactId>spring-cloud-azure-dependencies</artifactId>
        <version>6.0.0</version>
        <type>pom</type>
        <scope>import</scope>
        </dependency>
    </dependencies>
</dependencyManagement>
注意
- 有一个不依赖于 spring-web 的非 Web 功能管理库。 请参阅 GitHub 的文档来了解差异。
连接到应用程序配置存储区
导航到应用的
resources目录并打开bootstrap.properties或bootstrap.yaml文件。 如果该文件不存在,请创建。你可以使用 Microsoft Entra ID(推荐)或连接字符串连接到应用程序配置存储区。
更新配置文件。
如果使用属性文件,请使用以下代码:
spring.config.import=azureAppConfiguration
spring.cloud.azure.appconfiguration.stores[0].endpoint= ${APP_CONFIGURATION_ENDPOINT}
spring.cloud.azure.appconfiguration.stores[0].feature-flags.enabled=true
如果使用 yaml 文件,请使用以下代码:
spring:
  config:
    import: azureAppConfiguration
  cloud:
    azure:
      appconfiguration:
        stores:
            -
            feature-flags:
                enabled: true
            endpoint: ${APP_CONFIGURATION_ENDPOINT}
可以使用
DefaultAzureCredential向应用程序配置存储区进行身份验证。 按照说明为凭据分配应用程序配置数据读取者角色。 在运行应用程序之前,请务必留出足够的时间来传播权限。如果你不想使用托管标识,请将以下代码添加到你的项目中。 创建一个名为
AppConfigCredential.java: 的新文件:import com.azure.data.appconfiguration.ConfigurationClientBuilder; import com.azure.identity.DefaultAzureCredentialBuilder; import com.azure.spring.cloud.appconfiguration.config.ConfigurationClientCustomizer; public class AppConfigCredential implements ConfigurationClientCustomizer { @Override public void customize(ConfigurationClientBuilder builder, String endpoint) { builder.credential(new DefaultAzureCredentialBuilder().build()); } }创建一个名为
MyConfiguration.java的新文件,并添加以下行:import org.springframework.context.annotation.Bean; import org.springframework.context.annotation.Configuration; @Configuration public class MyConfiguration { @Bean public AppConfigCredential clientSetup() { return new AppConfigCredential(); } }请添加 Bootstrap 配置,通过在
spring.factories目录下创建resources/META-INF文件,添加以下内容,并用您的应用程序包更新com.example.MyConfiguration:org.springframework.cloud.bootstrap.BootstrapConfiguration=\ com.example.MyConfiguration
在应用的包目录中创建新的名为 HelloController.java 的 Java 文件 。
package com.example.demo;

import org.springframework.beans.factory.annotation.Autowired;
import org.springframework.stereotype.Controller;
import org.springframework.ui.Model;
import org.springframework.web.bind.annotation.GetMapping;

import com.azure.spring.cloud.feature.management.FeatureManager;

@Controller
public class HelloController {

    @Autowired
    private FeatureManager featureManager;

    @GetMapping("/welcome")
    public String mainWithParam(Model model) {
        model.addAttribute("Beta", featureManager.isEnabled("Beta"));
        return "welcome";
    }
}
在应用的 templates 目录中,创建名为 welcome.html 的新 HTML 文件。
<!DOCTYPE html> <html lang="en" xmlns:th="http://www.thymeleaf.org"> <head> <meta charset="utf-8"> <meta name="viewport" content="width=device-width, initial-scale=1, shrink-to-fit=no"> <title>Feature Management with Spring Cloud Azure</title> <link rel="stylesheet" href="/css/main.css"> <link rel="stylesheet" href="https://stackpath.bootstrapcdn.com/bootstrap/4.3.1/css/bootstrap.min.css" integrity="sha384-ggOyR0iXCbMQv3Xipma34MD+dH/1fQ784/j6cY/iJTQUOhcWr7x9JvoRxT2MZw1T" crossorigin="anonymous"> <script src="https://code.jquery.com/jquery-3.6.0.min.js" integrity="sha256-/xUj+3OJU5yExlq6GSYGSHk7tPXikynS7ogEvDej/m4=" crossorigin="anonymous"></script> <script src="https://unpkg.com/@popperjs/core@2"></script> <script src="https://cdn.jsdelivr.net/npm/bootstrap@5.1.3/dist/js/bootstrap.bundle.min.js" integrity="sha384-ka7Sk0Gln4gmtz2MlQnikT1wXgYsOg+OMhuP+IlRH9sENBO0LRn5q+8nbTov4+1p" crossorigin="anonymous"></script> </head> <body> <header> <!-- Fixed navbar --> <nav class="navbar navbar-expand-md navbar-dark fixed-top bg-dark"> <a class="navbar-brand" href="#">TestFeatureFlags</a> <button class="navbar-toggler" aria-expanded="false" aria-controls="navbarCollapse" aria-label="Toggle navigation" type="button" data-target="#navbarCollapse" data-toggle="collapse"> <span class="navbar-toggler-icon"></span> </button> <div class="collapse navbar-collapse" id="navbarCollapse"> <ul class="navbar-nav mr-auto"> <li class="nav-item active"> <a class="nav-link" href="#">Home <span class="sr-only">(current)</span></a> </li> <li class="nav-item" th:if="${Beta}"> <a class="nav-link" href="#">Beta</a> </li> <li class="nav-item"> <a class="nav-link" href="#">Privacy</a> </li> </ul> </div> </nav> </header> <div class="container body-content"> <h1 class="mt-5">Welcome</h1> <p>Learn more about <a href="https://github.com/Azure/azure-sdk-for-java/tree/main/sdk/spring/spring-cloud-azure-feature-management/README.md">Feature Management with Spring Cloud Azure</a></p> </div> <footer class="footer"> <div class="container"> <span class="text-muted">© 2019 - Projects</span> </div> </footer> </body> </html>在
static下创建名为 CSS 的新文件夹,并在其中创建名为 main.css 的新 CSS 文件。html { position: relative; min-height: 100%; } body { margin-bottom: 60px; } .footer { position: absolute; bottom: 0; width: 100%; height: 60px; line-height: 60px; background-color: #f5f5f5; } body > .container { padding: 60px 15px 0; } .footer > .container { padding-right: 15px; padding-left: 15px; } code { font-size: 80%; }
在本地生成并运行应用
设置环境变量。
将名为 APP_CONFIGURATION_ENDPOINT 的环境变量设置为 Azure 门户中存储区的“概述”下的应用程序配置存储区的终结点。
如果使用 Windows 命令提示符,则请运行以下命令并重启命令提示符,这样更改才会生效:
setx APP_CONFIGURATION_ENDPOINT "endpoint-of-your-app-configuration-store"如果使用 PowerShell,请运行以下命令:
$Env:APP_CONFIGURATION_ENDPOINT = "<endpoint-of-your-app-configuration-store>"如果使用 macOS 或 Linux,则请运行以下命令:
export APP_CONFIGURATION_ENDPOINT='<endpoint-of-your-app-configuration-store>'重启命令提示符以使更改生效。 输出环境变量的值以验证其设置是否正确。
使用 Maven 生成 Spring Boot 应用程序,然后运行该程序。
mvn clean package
mvn spring-boot:run
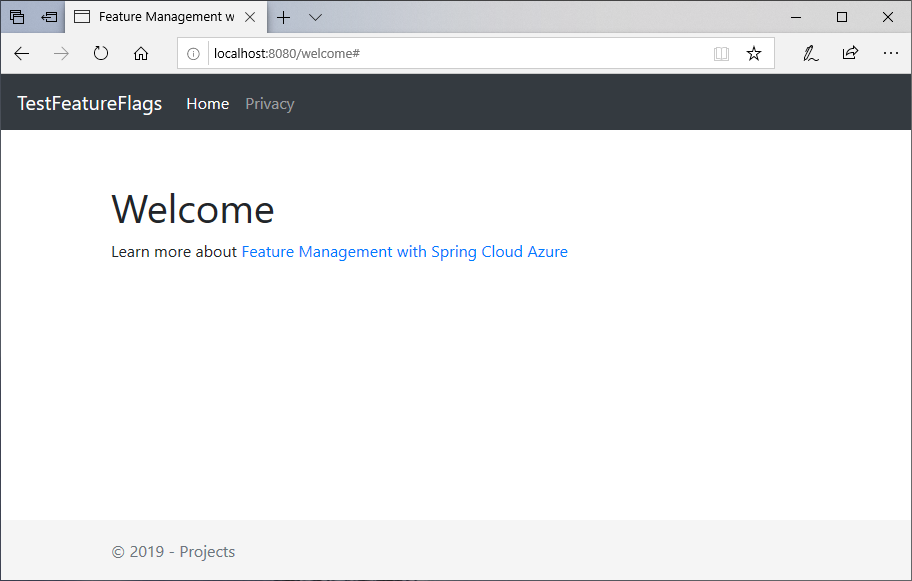
打开浏览器窗口,访问 URL:
http://localhost:8080/welcome。
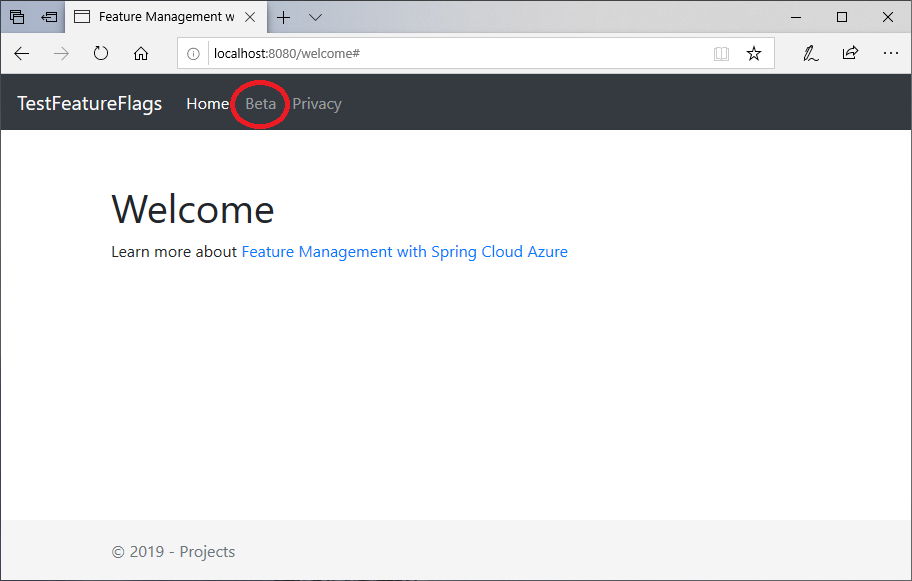
在应用程序配置门户中选择“功能管理器”,并将“Beta”密钥的状态更改为“打开”:
密钥 状态 Beta 启用 刷新浏览器页面,查看新的配置设置。

清理资源
如果不想继续使用本文中创建的资源,请删除此处创建的资源组以避免产生费用。
重要
删除资源组的操作不可逆。 将永久删除资源组以及其中的所有资源。 请确保不要意外删除错误的资源组或资源。 如果在包含要保留的其他资源的资源组中创建了本文的资源,请从相应的窗格中单独删除每个资源,而不是删除该资源组。
- 登录到 Azure 门户,然后选择“资源组”。
- 在“按名称筛选”框中,输入资源组的名称。
- 在结果列表中,选择资源组名称以查看概述。
- 选择“删除资源组”。
- 系统会要求确认是否删除资源组。 重新键入资源组的名称进行确认,然后选择“删除”。
片刻之后,将会删除该资源组及其所有资源。
后续步骤
在本快速入门中,你已创建一个新的应用程序配置存储,并已使用它来通过功能管理库管理 Spring Boot Web 应用中的功能。
- 库参考文档
- 详细了解功能管理。
- 管理功能标志。
- 在 Spring Boot Core 应用中使用功能标志。