MLflow 的 TypeScript SDK 为 TypeScript 和 JavaScript 应用程序带来了 MLflow 跟踪 功能。 使用最少代码变动将面向生产环境的可观测性添加到 GenAI 应用程序,进而利用 Databricks 的强大分析和监控平台。
要求
小窍门
Databricks 建议在使用跟踪技术开发 Node.js 应用程序时安装最新版本的 MLflow 跟踪 TypeScript SDK。
若要使用 MLflow 跟踪检测 Node.js 应用程序,请安装以下内容:
-
mlflow-tracing从 npm 注册表 - Node.js 14 或更高版本
- 有权访问 MLflow 实验的 Databricks 工作区
若要使用 OpenAI 进行自动跟踪,还需要:
-
mlflow-openai从 npm 注册表
设置 SDK
安装软件包
从npm 注册表安装包:
npm install mlflow-tracing
创建 MLflow 实验
- 打开 Databricks 工作区。
- 在左侧边栏中的 “AI/ML”下,单击“ 试验”。
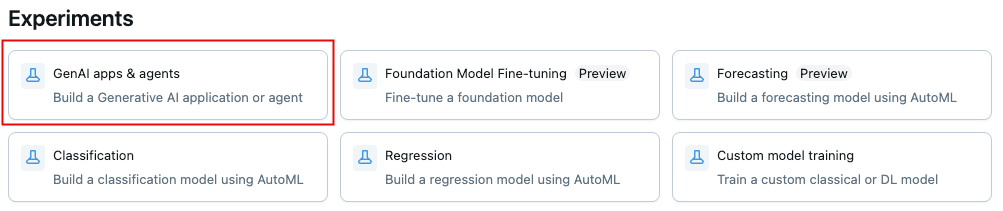
- 在“试验”页顶部,单击 GenAI 应用和代理。
- 单击
 实验名称旁边的图标可查找试验 ID 并记下。
配置身份验证
选择以下身份验证方法之一:
环境变量
- 在 MLflow 试验中,单击
 图标 >将跟踪记录到本地> 单击 "生成 API 密钥"。
 - 在终端中复制并运行生成的代码:
export DATABRICKS_TOKEN=<databricks-personal-access-token>
export DATABRICKS_HOST=https://<workspace-name>.cloud.databricks.com
.env 文件
- 在 MLflow 试验中,单击 图标 >将跟踪记录到本地> 单击 "生成 API 密钥"。
- 将生成的代码复制到
.env项目根目录中的文件:
DATABRICKS_TOKEN=<databricks-personal-access-token>
DATABRICKS_HOST=https://<workspace-name>.cloud.databricks.com
初始化 SDK
在 Node.js 应用程序中,使用试验 ID 初始化 SDK:
import * as mlflow from 'mlflow-tracing';

mlflow.init({
  trackingUri: 'databricks',
  experimentId: '<your-experiment-id>',
});
自动跟踪
添加一行代码以自动跟踪支持的库。 MLflow Tracing TypeScript SDK 当前支持对 OpenAI SDK 的自动跟踪功能。
若要对 OpenAI 使用自动跟踪,请安装 mlflow-openai 包:
npm install mlflow-openai
然后,使用 tracedOpenAI 函数包装 OpenAI 客户端:
import * as mlflow from 'mlflow-tracing';

// Initialize the tracing SDK
mlflow.init({
  trackingUri: 'databricks',
  experimentId: '<your-experiment-id>',
});

import { OpenAI } from 'openai';
import { tracedOpenAI } from 'mlflow-openai';

// Wrap the OpenAI client with the tracedOpenAI function
const client = tracedOpenAI(new OpenAI());

// Invoke the client as usual
const response = await client.chat.completions.create({
  model: 'gpt-4o-mini',
  messages: [
    { role: 'system', content: 'You are a helpful weather assistant.' },
    { role: 'user', content: "What's the weather like in Seattle?" },
  ],
});
手动跟踪
使用 trace API 跟踪函数
若要跟踪函数,API trace 非常有用。
命名函数
import * as mlflow from 'mlflow-tracing';

const getWeather = async (city: string) => {
  return `The weather in ${city} is sunny`;
};

// Wrap the function with mlflow.trace to create a traced function
const tracedGetWeather = mlflow.trace(getWeather, { name: 'get-weather' });

// Invoke the traced function as usual
const result = await tracedGetWeather('San Francisco');
匿名函数
import * as mlflow from 'mlflow-tracing';

const getWeather = mlflow.trace(
  (city: string) => {
    return `The weather in ${city} is sunny`;
  },
  // When wrapping an anonymous function, specify the span name
  { name: 'get-weather' },
);

// Invoke the traced function as usual
const result = getWeather('San Francisco');
在调用跟踪函数时,MLflow 将自动创建捕获的跨度:
- 输入参数
- 返回值
- 异常信息(如果抛出)
- 延迟
捕获嵌套函数调用
如果跟踪嵌套函数,MLflow 将生成具有多个范围的跟踪,其中跨度结构捕获嵌套函数调用。
const sum = mlflow.trace(
  (a: number, b: number) => {
    return a + b;
  },
  { name: 'sum' },
);

const multiply = mlflow.trace(
  (a: number, b: number) => {
    return a * b;
  },
  { name: 'multiply' },
);

const computeArea = mlflow.trace(
  (a: number, b: number, h: number) => {
    const sumOfBase = sum(a, b);
    const area = multiply(sumOfBase, h);
    return multiply(area, 0.5);
  },
  { name: 'compute-area' },
);

computeArea(1, 2, 3);
跟踪如下所示:
- compute-area
  - sum (a=1, b=2)
  - multiply (a=3, b=3)
  - multiply (a=9, b=0.5)
使用 @trace API 跟踪类方法
TypeScript 版本 5.0+ 支持修饰器。 MLflow 跟踪支持此语法来轻松跟踪类方法。 MLflow 将自动创建一个捕获数据的时间段:
- 输入参数
- 返回值
- 异常信息(如果抛出)
- 延迟
import * as mlflow from 'mlflow-tracing';

class MyClass {
  @mlflow.trace({ spanType: mlflow.SpanType.LLM })
  generateText(prompt: string) {
    return "It's sunny in Seattle!";
  }
}

const myClass = new MyClass();
myClass.generateText("What's the weather like in Seattle?");
使用 withSpan API 跟踪代码块
withSpan当想要跟踪代码块而不是函数时,API 非常有用。
import * as mlflow from 'mlflow-tracing';

const question = "What's the weather like in Seattle?";

const result = await mlflow.withSpan(
  async (span: mlflow.Span) => {
    return "It's sunny in Seattle!";
  },
  // Pass name, span type, and inputs as options.
  {
    name: 'generateText',
    spanType: mlflow.SpanType.TOOL,
    inputs: { prompt: question },
  },
);
显式地创建和结束跨度
若要更好地控制 span 的生命周期,可以显式地创建和结束一个 span。
import * as mlflow from 'mlflow-tracing';

const span = mlflow.startSpan({
  name: 'generateText',
  spanType: mlflow.SpanType.LLM,
  inputs: { prompt: question },
});

span.end({
  outputs: { answer: "It's sunny in Seattle!" },
  status: 'OK',
});
按用户和会话对跟踪进行分组
许多实际应用程序使用会话来维护多轮次用户交互。 另一方面,痕迹通常是按请求生成的。 MLflow 支持按用户会话对跟踪进行分组,以帮助了解最终用户的旅程并确定问题。 有关更多详细信息,请参阅 “向跟踪添加上下文 ”指南。
后续步骤
请参阅以下页面: