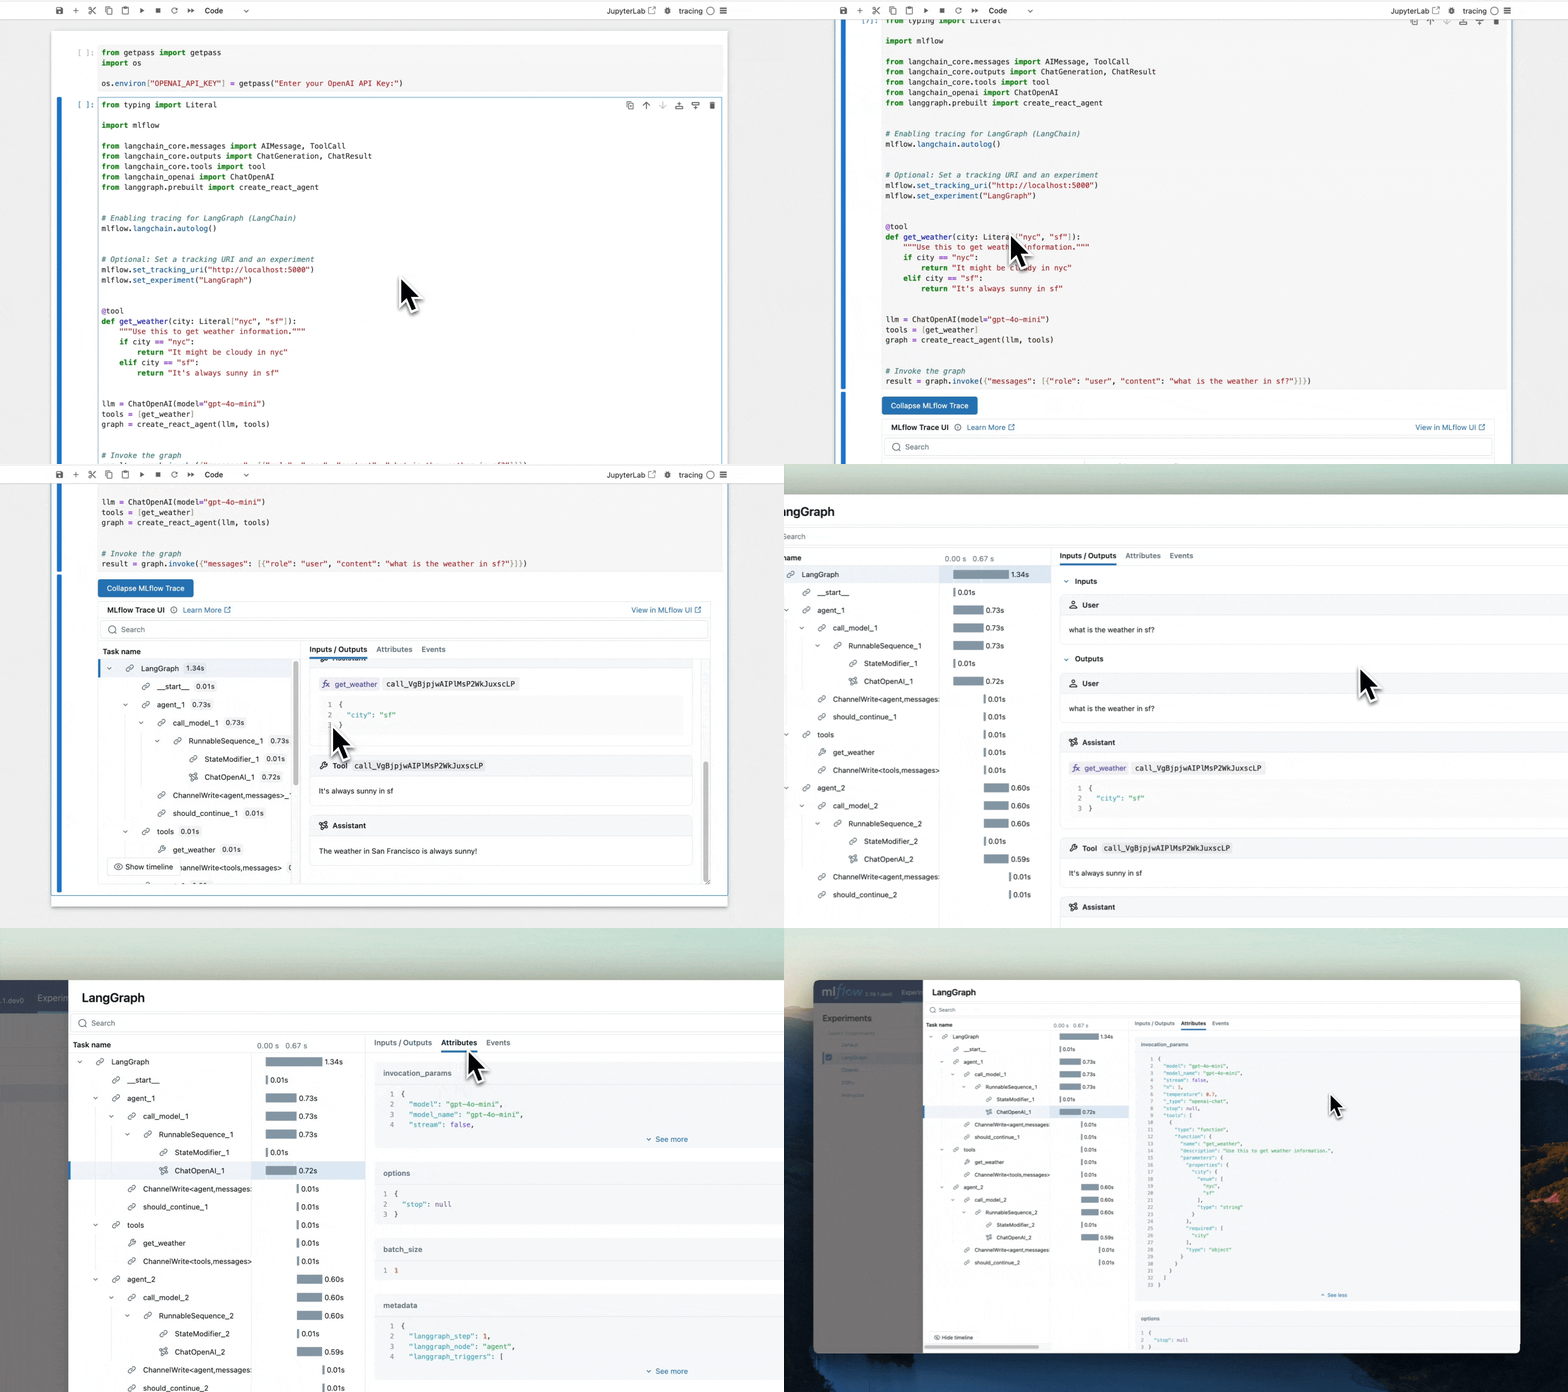
LangGraph 是一个开源库,用于使用 LLM 生成有状态的多执行组件应用程序,用于创建代理和多代理工作流。
MLflow 跟踪 为 LangGraph 提供自动跟踪功能,作为其 LangChain 集成的扩展。 通过调用 mlflow.langchain.autolog 函数为 LangChain 启用自动跟踪,MLflow 会自动将图执行捕获到跟踪中,并将其记录到活动的 MLflow 试验中。
import mlflow

mlflow.langchain.autolog()
注释
在无服务器计算群集上,不会自动启用自动记录。 必须显式调用 mlflow.langchain.autolog() 才能为此集成启用自动跟踪。
先决条件
若要将 MLflow 跟踪与 LangGraph 配合使用,需要安装 MLflow 和相关 LangGraph 和 LangChain 包(例如, langgraph、 langchain_core、 langchain_openai)。
开发
对于开发环境,请使用 Databricks Extras 和 LangGraph/LangChain 包安装完整的 MLflow 包:
pip install --upgrade "mlflow[databricks]>=3.1" langgraph langchain_core langchain_openai
# Add other langchain packages if needed by your graph
完整 mlflow[databricks] 包包括用于 Databricks 的本地开发和试验的所有功能。
生产
对于生产部署,请安装 mlflow-tracing 和 LangGraph/LangChain 包。
pip install --upgrade mlflow-tracing langgraph langchain_core langchain_openai
# Add other langchain packages if needed by your graph
包 mlflow-tracing 已针对生产用途进行优化。
注释
若要获得最佳的 LangGraph 跟踪体验,强烈推荐使用依赖于 LangChain 自动记录集成的 MLflow 3。
在运行示例之前,需要配置环境:
对于不使用 Databricks 笔记本的用户:设置 Databricks 环境变量:
export DATABRICKS_HOST="https://your-workspace.cloud.databricks.com"
export DATABRICKS_TOKEN="your-personal-access-token"
对于 Databricks 笔记本中的用户:这些凭据会自动为您设置。
API 密钥:确保配置 LLM 提供程序 API 密钥。 对于生产环境,请使用 马赛克 AI 网关或 Databricks 机密,而不要使用硬编码的值,以便更安全地管理 API 密钥。
export OPENAI_API_KEY="your-openai-api-key"
# Add other provider keys as needed
Usage
运行以下代码将为图形生成轨迹,如上方视频剪辑所示。
from typing import Literal
import os
import mlflow

from langchain_core.messages import AIMessage, ToolCall
from langchain_core.outputs import ChatGeneration, ChatResult
from langchain_core.tools import tool
from langchain_openai import ChatOpenAI
from langgraph.prebuilt import create_react_agent

# Ensure your OPENAI_API_KEY (or other LLM provider keys) is set in your environment
# os.environ["OPENAI_API_KEY"] = "your-openai-api-key" # Uncomment and set if not globally configured

# Enabling tracing for LangGraph (LangChain)
mlflow.langchain.autolog()

# Set up MLflow tracking to Databricks
mlflow.set_tracking_uri("databricks")
mlflow.set_experiment("/Shared/langgraph-tracing-demo")

@tool
def get_weather(city: Literal["nyc", "sf"]):
    """Use this to get weather information."""
    if city == "nyc":
        return "It might be cloudy in nyc"
    elif city == "sf":
        return "It's always sunny in sf"

llm = ChatOpenAI(model="gpt-4o-mini")
tools = [get_weather]
graph = create_react_agent(llm, tools)

# Invoke the graph
result = graph.invoke(
    {"messages": [{"role": "user", "content": "what is the weather in sf?"}]}
)
在节点或工具中添加区段
通过将自动跟踪与 手动跟踪 API 相结合,可以在节点或工具中添加子范围,以获取有关该步骤的更详细的见解。
例如,让我们学习 LangGraph 的代码 助手 教程。 节点 check_code 实际上由生成的代码的两个不同的验证组成。 可能需要为每个验证添加范围,以查看执行了哪些验证。 为此,只需在节点函数内创建手动跨度。
def code_check(state: GraphState):
    # State
    messages = state["messages"]
    code_solution = state["generation"]
    iterations = state["iterations"]

    # Get solution components
    imports = code_solution.imports
    code = code_solution.code

    # Check imports
    try:
        # Create a child span manually with mlflow.start_span() API
        with mlflow.start_span(name="import_check", span_type=SpanType.TOOL) as span:
            span.set_inputs(imports)
            exec(imports)
            span.set_outputs("ok")
    except Exception as e:
        error_message = [("user", f"Your solution failed the import test: {e}")]
        messages += error_message
        return {
            "generation": code_solution,
            "messages": messages,
            "iterations": iterations,
            "error": "yes",
        }

    # Check execution
    try:
        code = imports + "\n" + code
        with mlflow.start_span(name="execution_check", span_type=SpanType.TOOL) as span:
            span.set_inputs(code)
            exec(code)
            span.set_outputs("ok")
    except Exception as e:
        error_message = [("user", f"Your solution failed the code execution test: {e}")]
        messages += error_message
        return {
            "generation": code_solution,
            "messages": messages,
            "iterations": iterations,
            "error": "yes",
        }

    # No errors
    return {
        "generation": code_solution,
        "messages": messages,
        "iterations": iterations,
        "error": "no",
    }
这样,check_code节点的跨度将具有子跨度,这记录每个验证是否失败,其中包含具体的异常信息。

警告
对于生产环境,请使用 马赛克 AI 网关或 Databricks 机密,而不要使用硬编码的值,以便更安全地管理 API 密钥。
禁用自动跟踪
可以通过调用 mlflow.langchain.autolog(disable=True) 或 mlflow.autolog(disable=True)调用来全局禁用 LangGraph 的自动跟踪。