适用于:![]() IoT Edge 1.5
IoT Edge 1.5
重要
IoT Edge 1.5 LTS 是受支持的版本。 IoT Edge 1.4 LTS 的生命周期结束日期为 2024 年 11 月 12 日。 如果你使用的是早期版本,请参阅更新 IoT Edge。
本教程介绍如何使用 Azure IoT Edge for Linux on Windows 和 Visual Studio 2022 开发、调试自己的代码并将其部署到 IoT Edge 设备。 你将通过将 C# 模块部署到 Linux 设备来了解 IoT Edge 解决方案的最常见开发人员场景。 你将部署和调试在 Windows 上的 Linux 容器中运行的自定义 IoT Edge 模块。 即使你计划使用其他语言或部署 Azure 服务,本教程仍然有助于了解开发工具和概念。
本教程包含适用于两种 IoT Edge 开发工具的步骤:
- Azure IoT Edge 开发工具 CLI 命令行接口 (CLI),这是开发的首选工具
- 适用于 Visual Studio 的 Azure IoT Edge 工具扩展处于维护模式
使用本教程开头的工具选择器按钮选择工具版本。
在本教程中,你将了解如何执行以下操作:
- 设置开发计算机。
- 使用 IoT Edge 开发工具创建新项目。
- 将您的项目打包成一个容器,并将其存储在 Azure 容器注册表中。
- 将代码部署到 IoT Edge 设备。
先决条件
本教程假设你使用运行 Windows 的计算机作为开发计算机。 在 Windows 计算机上,可以开发 Windows 或 Linux 模块。 本教程会指导你使用 IoT Edge for Linux on Windows 生成和部署模块,进而开发 Linux 容器。
开始之前:
下载 .NET Core SDK。
在开发计算机上安装或修改 Visual Studio 2022。 选择“Azure 开发”和“使用 C++ 的桌面开发”工作负载选项。
Visual Studio 2022 安装准备就绪后,请从 Visual Studio Marketplace 下载并安装 Azure IoT Edge Tools。
可以使用 Azure IoT Edge Tools 扩展来创建和生成 IoT Edge 解决方案。 首选开发工具为 Azure IoT Edge Dev Tool CLI。 该扩展包括用于创建 Visual Studio 项目的 Azure IoT Edge 项目模板。 目前,无论使用哪种开发工具,都需要安装该扩展。
提示
如果使用的是 Visual Studio 2019,请从 Visual Studio Marketplace 下载并安装适用于 Visual Studio 2019 的 Azure IoT Edge Tools。
- 安装 Azure CLI。
- 在 Azure 中创建免费层或标准层 IoT 中心作为云资源。
如果没有 Azure 试用版订阅,请在开始前创建 Azure 试用版订阅。
关键概念
本教程详细介绍如何开发 IoT Edge 模块。 IoT Edge 模块是包含可执行代码的容器。 可以将一个或多个模块部署到 IoT Edge 设备。 模块执行特定的任务,例如,从传感器引入数据、清理和分析数据,或者将消息发送到 IoT 中心。 有关详细信息,请参阅了解 Azure IoT Edge 模块。
开发 IoT Edge 模块时,了解开发计算机和最终将部署模块的目标 IoT Edge 设备之间的差异非常重要。 为保存模块代码而生成的容器必须与目标设备的操作系统 (OS) 匹配。
例如,最常见的方案是在 Windows 计算机上开发面向运行 IoT Edge 的 Linux 设备的模块。 在这种情况下,容器 OS 为 Linux。
在学习本教程的过程中,请记住开发计算机 OS 和容器 OS 之间的差异。 在本教程中,你将使用 Windows 主机进行开发,并使用 IoT Edge for Linux on Windows 虚拟机 (VM) 来生成和部署模块。
本教程针对使用 Linux 容器运行 IoT Edge 的设备。 只要开发计算机可以运行 Linux 容器,就可以使用首选操作系统。 建议通过 Linux 容器使用 Visual Studio 进行开发,因此这就是本教程使用的工具。 还可以使用 Visual Studio Code,但两个工具提供的支持存在差异。 有关详细信息,请参阅使用 Visual Studio Code 开发 Azure IoT Edge 模块。
为远程连接设置 Docker CLI 和 Docker 引擎
IoT Edge 模块被打包为容器,因此,需要在开发计算机上安装容器引擎来生成和管理容器。
IoT Edge for Linux on Windows VM 已包含 Docker 引擎的实例。 本教程介绍如何从 Windows 开发人员计算机远程连接到 IoT Edge for Linux on Windows VM Docker 实例。 由于使用此远程连接,可以不再依赖于适用于 Windows 的 Docker Desktop。
配置 Docker CLI
第一步是在 Windows 开发计算机上配置 Docker CLI,以便能够连接到远程 Docker 引擎:
从
docker.exe下载 Docker CLI 的预编译 版本。 还可以从 GitHub 下载官方 cli 项目,然后按照存储库说明对其进行编译。将
docker.exe提取到开发计算机中的某个目录,如C:\Docker\bin。打开“关于你的电脑”-“系统信息”->“高级系统设置”。>
选择“高级”>“环境变量”。 在“用户变量”下,选择“路径”。
编辑“路径”变量并添加 的位置
docker.exe。打开提升的 PowerShell 会话。
使用以下命令检查是否可以访问 Docker CLI:
docker --version如果成功配置了所有内容,则命令的输出应显示 Docker 版本。 它应如
Docker version 20.10.12, build e91ed57所示。
配置 Docker 引擎
第二步是配置 IoT Edge for Linux on Windows VM Docker 引擎以接受外部连接,并添加相应的防火墙规则。
警告
将 Docker 引擎公开给外部连接可能会增加安全风险。 应仅将此配置用于开发目的。 在开发完成后,确保将该配置还原为默认设置。
打开权限提升的 PowerShell 会话并运行以下命令:
# Configure the IoT Edge for Linux on Windows VM Docker engine to accept external connections, and add the appropriate firewall rules.
Invoke-EflowVmCommand "sudo iptables -A INPUT -p tcp --dport 2375 -j ACCEPT"

# Create a copy of the IoT Edge for Linux on Windows VM _docker.service_ in the system folder.
Invoke-EflowVmCommand "sudo cp /lib/systemd/system/docker.service /etc/systemd/system/docker.service"

# Replace the service execution line to listen for external connections.
Invoke-EflowVmCommand "sudo sed -i 's/-H fd:\/\// -H fd:\/\/ -H tcp:\/\/0.0.0.0:2375/g'  /etc/systemd/system/docker.service"

# Reload the IoT Edge for Linux on Windows VM services configurations.
Invoke-EflowVmCommand "sudo systemctl daemon-reload"

# Reload the Docker engine service.
Invoke-EflowVmCommand "sudo systemctl restart docker.service"

# Check that the Docker engine is listening to external connections.
Invoke-EflowVmCommand "sudo netstat -lntp | grep dockerd"
下面是示例输出:
PS C:\> # Configure the IoT Edge for Linux on Windows virtual machine Docker engine to accept external connections, and add the appropriate firewall rules.
PS C:\> Invoke-EflowVmCommand "sudo iptables -A INPUT -p tcp --dport 2375 -j ACCEPT"
PS C:\>
PS C:\> # Create a copy of the IoT Edge for Linux on Windows VM docker.service in the system folder.
PS C:\> Invoke-EflowVmCommand "sudo cp /lib/systemd/system/docker.service /etc/systemd/system/docker.service"
PS C:\>
PS C:\> # Replace the service execution line to listen for external connections.
PS C:\> Invoke-EflowVmCommand "sudo sed -i 's/-H fd:\/\// -H fd:\/\/ -H tcp:\/\/0.0.0.0:2375/g' /etc/systemd/system/docker.service"
PS C:\>
PS C:\> # Reload the IoT Edge for Linux on Windows VM services configurations.
PS C:\> Invoke-EflowVmCommand "sudo systemctl daemon-reload"
PS C:\>
PS C:\> # Reload the Docker engine service.
PS C:\> Invoke-EflowVmCommand "sudo systemctl restart docker.service"
PS C:\>
PS C:\> # Check that the Docker engine is listening to external connections.
PS C:\> Invoke-EflowVmCommand "sudo netstat -lntp | grep dockerd"
tcp6       0      0 :::2375                 :::* LISTEN      2790/dockerd
测试连接
最后一步是测试与 IoT Edge for Linux on Windows VM Docker 引擎连接:
获取 IoT Edge for Linux on Windows VM 的 IP 地址:
Get-EflowVmAddr提示
如果在没有静态 IP 的情况下部署了 IoT Edge for Linux on Windows VM,则 IP 地址可能会在 Windows 主机 OS 重启或网络更改时发生更改。 请确保每次要建立与 Docker 引擎的远程连接时,使用 IoT Edge for Linux on Windows VM 的正确 IP 地址。
下面是示例输出:
PS C:\> Get-EflowVmAddr
[03/15/2022 15:22:30] Querying IP and MAC addresses from virtual machine (DESKTOP-J1842A1-EFLOW)
 - Virtual machine MAC: 00:15:5d:6f:da:78
 - Virtual machine IP : 172.31.24.105 retrieved directly from virtual machine
00:15:5d:6f:da:78
172.31.24.105
连接到 IoT Edge for Linux on Window 虚拟机 Docker 引擎,并运行
hello-world示例容器。 将<EFLOW-VM-IP>替换为在上一步中获取的 IoT Edge for Linux on Windows VM IP 地址。docker -H tcp://<EFLOW-VM-IP>:2375 run --rm hello-world下载容器完成后,容器将运行并生成以下输出:
PS C:\> docker -H tcp://172.31.24.105:2375 run --rm hello-world
Unable to find image 'hello-world:latest' locally
latest: Pulling from library/hello-world
2db29710123e: Pull complete
Digest: sha256:4c5f3db4f8a54eb1e017c385f683a2de6e06f75be442dc32698c9bbe6c861edd
Status: Downloaded newer image for hello-world:latest

Hello from Docker!
This message shows that your installation appears to be working correctly.

To generate this message, Docker took the following steps:
 1. The Docker client contacted the Docker daemon.
 2. The Docker daemon pulled the "hello-world" image from the Docker Hub.
    (amd64)
 3. The Docker daemon created a new container from that image which runs the
    executable that produces the output you're currently reading.
 4. The Docker daemon streamed that output to the Docker client, which sent it
    to your terminal.

To try something more ambitious, you can run an Ubuntu container with:
 $ docker run -it ubuntu bash

Share images, automate workflows, and more with a free Docker ID:
 https://hub.docker.com/

For more examples and ideas, visit:
 https://docs.docker.com/get-started/
创建 Azure IoT Edge 项目
可在 Visual Studio 的 IoT Edge 项目模板中创建可以部署到 IoT Edge 设备的解决方案。 使用以下步骤创建一个 Azure IoT Edge 解决方案,并在该解决方案中生成第一个模块。 每一个 IoT Edge 解决方案都可包含多个模块。
重要
Visual Studio 创建的 IoT Edge 项目结构与 Visual Studio Code 中的不同。
目前,Azure IoT Edge 开发工具 CLI 不支持创建 Visual Studio 项目类型。 需要使用 Azure IoT Edge Tools 扩展来创建 Visual Studio 项目。
在 Visual Studio 中,通过选择在起始页上“创建新项目”或通过选择工具栏上的“新建项目”按钮来创建新项目。
在“创建新项目”页面中,搜索“Azure IoT Edge”。 选择与 IoT Edge 设备的平台(Linux IoT Edge 模块)和体系结构匹配的项目,然后选择“下一步”。
在“配置新项目”中,输入项目名称并指定位置,然后选择“创建”。
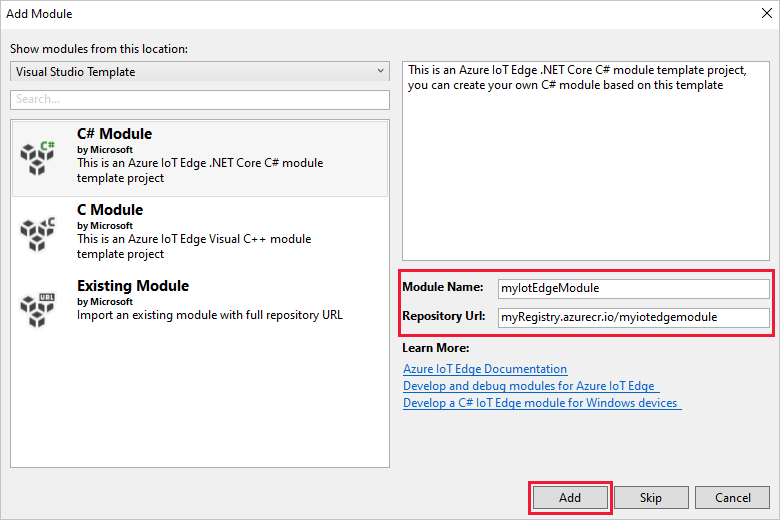
在“添加模块”对话中,选择要开发的模块类型。 还可以选择“现有模块”,可实现将现有 IoT Edge 模块加入部署。
在“模块名称”中,指定模块名称。
在“存储库 URL”中提供模块的映像存储库的名称。 Visual Studio 使用“localhost:5000/”<你的模块名称来自动填充模块名称>。 将其替换为你自己的注册表信息。
如果使用本地 Docker 注册表进行测试,请使用 localhost。 如果使用 Azure 容器注册表,那么请从注册表的设置中使用登录服务器。 登录服务器类似于 <注册表名称>.azurecr.cn。 仅替换字符串的 localhost:5000 部分,使最终结果类似于<注册表名称>.azurecr.io/<你的模块名称>。
选择“添加”,将模块添加到项目中。

注意
如果有现有的 IoT Edge 项目,可以通过打开
module.json文件来更改存储库 URL。 存储库 URL 位于 JSON 文件的repository属性中。
现在,已在 Visual Studio 解决方案中创建了一个 IoT Edge 项目和 IoT Edge 模块。
项目结构
在解决方案中有两个项目级别的文件夹:主项目文件夹和模块文件夹。 例如,你可能有一个名为 AzureIotEdgeApp1 的主项目文件夹和一个名为 IotEdgeModule1 的模块文件夹。
主项目文件夹包含部署清单。 部署清单是一个 JSON 文档,用于描述要在目标 IoT Edge 设备上配置的模块。
模块文件夹包含模块代码的文件。 它命名为 Program.cs 或 main.c,具体取决于所选语言。 该文件夹还含有名为 module.json 的文件,用于描述模块的元数据。 各种 Docker 文件可提供将模块生成为 Windows 或 Linux 容器所需的信息。
项目的部署清单
要编辑的部署清单名为 deployment.debug.template.json。 该文件是 IoT Edge 部署清单模板,用于定义设备上运行的所有模块。 该文件还定义了模块如何相互通信。 有关部署清单的详细信息,请参阅了解如何部署模块和建立路由。
部署模板包括:
- 两个运行时模块,
edgeAgent和edgeHub。 - 在此 Visual Studio 项目中创建的自定义模块。
- 名为
SimulatedTemperatureSensor的模块。 此默认模块会生成用于测试模块的模拟数据。如果不需要此模块,亦可将其删除。 若要了解模拟温度传感器的工作原理,请查看 SimulatedTemperatureSensor.csproj 源代码。
设置 IoT Edge 运行时版本
目前,最新的稳定运行时版本是 1.5。 将 IoT Edge 运行时版本更新为最新的稳定版本或面向设备的相应版本:
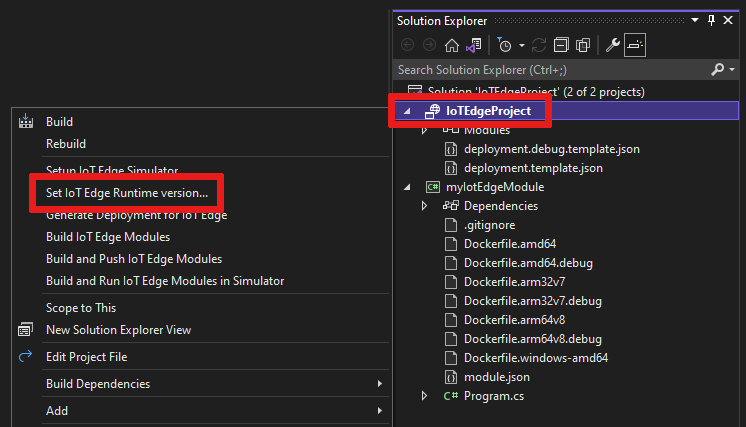
在解决方案资源管理器中,右键单击主项目名称,然后选择“设置 IoT Edge 运行时版本”。

使用下拉菜单选择 IoT Edge 设备正在运行的运行时版本。 然后选择“确定”保存更改。 如果未进行任何更改,请选择“取消”。
目前该扩展不包括针对最新运行时版本的选择。 如果要设置高于 1.2 的运行时版本,请打开
deployment.debug.template.json部署清单文件。 更改系统运行时模块映像edgeAgent和edgeHub的运行时版本。 例如,如果要使用 IoT Edge 运行时版本 1.5,请更改部署清单文件中的以下行:"systemModules": { "edgeAgent": { //... "image": "mcr.microsoft.com/azureiotedge-agent:1.5" //... "edgeHub": { //... "image": "mcr.microsoft.com/azureiotedge-hub:1.5", //...如果更改了版本,请右键单击项目名称并选择“为 IoT Edge 生成部署”以重新生成部署清单。 此步骤基于部署模板生成部署清单。 清单显示在 Visual Studio 项目的
config文件夹中。
打开
deployment.debug.template.json部署清单文件。更改系统运行时模块映像
edgeAgent和edgeHub的运行时版本。 例如,如果要使用 IoT Edge 运行时版本 1.5,请更改部署清单文件中的以下行:"systemModules": { "edgeAgent": { //... "image": "mcr.microsoft.com/azureiotedge-agent:1.5", //... "edgeHub": { //... "image": "mcr.microsoft.com/azureiotedge-hub:1.5", //...
设置 Visual Studio 2022 远程 Docker 引擎实例
将 Azure IoT Edge 工具扩展配置为使用在 IoT Edge for Linux on Windows VM 中运行的远程 Docker 引擎:
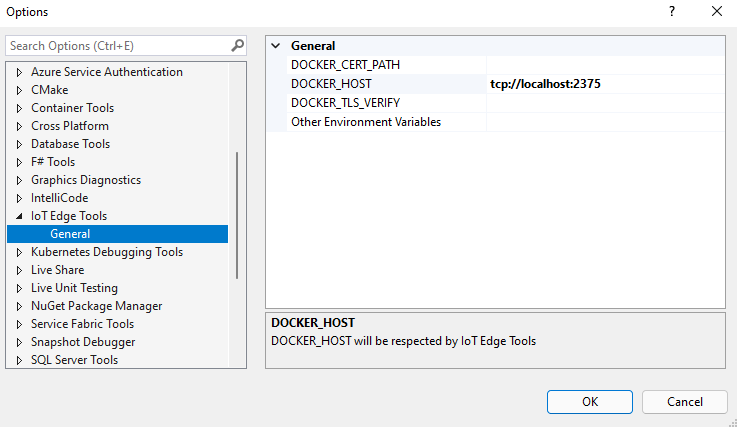
选择“工具”“Azure IoT Edge 工具”>“IoT Edge 工具设置”>。
将 DOCKER_HOST localhost 值替换为 IoT Edge for Linux on Windows VM 的 IP 地址。 如果你忘记了 IP 地址,请使用 IoT Edge for Linux on Windows PowerShell cmdlet
Get-EflowVmAddr获取该地址。 例如,如果 IoT Edge for Linux on Windows VM 地址为 172.20.1.100,则新值应为 tcp://172.20.1.100:2375。
选择“确定”。
开发模块
添加新模块后,其已附带随时可用于生成并部署到设备的默认代码,以便无需操作任何代码即可开始测试。 模块代码在模块文件夹中的文件名为 Program.cs(适用于 C#)或 main.c(适用于 C)。
在默认解决方案中,来自 SimulatedTemperatureSensor 模块的模拟数据将路由到模块。 该模块接受输入,然后将其发送到 Azure IoT 中心。
准备好使用自己的代码自定义模块模板时,请使用 Azure IoT 中心 SDK 生成其他模块,以解决 IoT 解决方案的关键需求。 这些需求可能包括安全性、设备管理和可靠性。
生成并推送单个模块
通常,需要先测试和调试每个模块,然后再在具有多个模块的整个解决方案中运行此模块。 由于解决方案将使用在 IoT Edge for Linux on Windows VM 中运行的 Docker 引擎进行生成或调试,因此第一步是生成和发布模块以启用远程调试:
在解决方案资源管理器中选择模块项目文件夹(例如 )
myIotEdgeModule。将自定义模块设置为启动项目。 在菜单中选择“项目”“设为启动项目”>。
若要调试 C# Linux 模块,需要更新
Dockerfile.amd64.debug文件来启用 SSH 服务。 更新Dockerfile.amd64.debug文件以使用以下模板:支持远程调试的 Azure IoT Edge AMD64 C# 模块的 Dockerfile。注意
如果选择“调试”,Visual Studio 使用 生成 Docker 映像
Dockerfile.(amd64|windows-amd64).debug。 生成容器映像时,文件将在该映像中包含 .NET Core 命令行调试器 VSDBG。 对于生产就绪的 IoT Edge 模块,建议使用“发布”配置,此模块可在没有 VSDBG 的情况下使用 。确保模板的最后一行
ENTRYPOINT ["dotnet", "IotEdgeModule1.dll"]中的 DLL 名称与 IoT Edge 模块项目的名称匹配。若要与 Linux 模块建立 SSH 连接,需要创建一个 RSA 密钥。 打开权限提升的 PowerShell 会话并运行以下命令,以创建新的 RSA 密钥。 确保将 RSA 密钥保存在同一 IoT Edge 模块文件夹下,并且密钥的名称为
id_rsa。ssh-keygen -t RSA -b 4096 -m PEM
如果使用的是专用注册表(如 Azure 容器注册表),请使用以下 Docker 命令登录。 可以从 Azure 门户的注册表的“访问密钥”页中获取用户名和密码。 如果使用的是本地注册表,可运行本地注册表。
docker -H tcp://<EFLOW-VM-IP>:2375 login -u <Container Registry username> -p <Container Registry password> <Container Registry login server>
在“解决方案资源管理器”中右键单击项目文件夹,然后选择“生成并推送 IoT Edge 模块”。 此命令生成并推送每个模块的 Docker 映像。
如果使用的是专用注册表(如 Azure 容器注册表),则需要将注册表登录信息添加到文件
deployment.template.json中的运行时设置。 将占位符替换为实际容器注册表管理员用户名、密码和注册表名。"settings": { "minDockerVersion": "v1.25", "loggingOptions": "", "registryCredentials": { "registry1": { "username": "<username>", "password": "<password>", "address": "<registry name>.azurecr.cn" } } }注意
本文使用 Azure 容器注册表的管理员登录凭据,其十分适用于开发和测试方案。 为生产方案做好准备后,建议使用最低权限身份验证选项(如服务主体)。 有关详细信息,请参阅管理容器注册表的访问权限。
需要公开端口 22 以访问模块 SSH 服务。 本教程使用 10022 作为主机端口,但可以指定其他端口。 指定的端口将用作连接到 Linux C# 模块的 SSH 端口。 需要将 SSH 端口信息添加到文件
createOptions中此 Linux 模块设置的deployment.debug.template.json:"createOptions": { "HostConfig": { "Privileged": true, "PortBindings": { "22/tcp": [ { "HostPort": "10022" } ] } } }在“解决方案资源管理器”中,右键单击项目文件夹,并选择“为 IoT Edge 生成部署”以生成新的 IoT Edge 部署 JSON。
选择“查看”“Cloud Explorer” 。 确保已登录到 Visual Studio 2019。
在 Cloud Explorer 中,展开订阅并找到要部署的 Azure IoT 中心和 Azure IoT Edge 设备。
右键单击 IoT Edge 设备并选择“创建部署”。 转到为平台配置的调试部署清单。 它位于 Visual Studio 解决方案
config文件夹中,例如deployment.amd64.json。
生成模块 Docker 映像
开发模块后,可以生成模块映像以存储在容器注册表中,以便部署到 IoT Edge 设备。
使用模块的 Dockerfile 生成模块 Docker 映像:
docker build --rm -f "<DockerFilePath>" -t <ImageNameAndTag> "<ContextPath>"
例如,假设命令 shell 位于项目目录中,且模块名称为 IotEdgeModule1。 若要生成本地注册表或 Azure 容器注册表的映像,请使用以下命令:
# Build the image for the local registry

docker build --rm -f "./IotEdgeModule1/Dockerfile.amd64.debug" -t localhost:5000/iotedgemodule1:0.0.1-amd64 "./IotEdgeModule1"

# Or build the image for an Azure Container Registry

docker build --rm -f "./IotEdgeModule1/Dockerfile.amd64.debug" -t myacr.azurecr.cn/iotedgemodule1:0.0.1-amd64 "./IotEdgeModule1"
推送模块 Docker 映像
将模块映像推送到本地注册表或容器注册表:
docker push <ImageName>
例如:
# Push the Docker image to the local registry

docker push localhost:5000/iotedgemodule1:0.0.1-amd64

# Or push the Docker image to an Azure Container Registry
az acr login --name myacr
docker push myacr.azurecr.cn/iotedgemodule1:0.0.1-amd64
将模块部署到 IoT Edge 设备
在 Visual Studio 中,打开主项目中的 deployment.debug.template.json 部署清单文件。
在部署之前,需要更新 Azure 容器注册表凭据、模块映像以及适当的 createOptions 值。 若要了解 createOption 值的详细信息,请参阅如何配置 IoT Edge 模块的容器创建选项。
如果您使用 Azure 容器注册表来存储模块映像,请将您的凭据添加到设置中的
deployment.debug.template.jsonedgeAgent。 例如:"modulesContent": { "$edgeAgent": { "properties.desired": { "schemaVersion": "1.1", "runtime": { "type": "docker", "settings": { "minDockerVersion": "v1.25", "loggingOptions": "", "registryCredentials": { "myacr": { "username": "myacr", "password": "<your_acr_password>", "address": "myacr.azurecr.cn" } } } }, //...将
image属性值替换为推送到注册表的模块映像名称。 例如,如果为自定义模块myacr.azurecr.cn/iotedgemodule1:0.0.1-amd64推送了标记为IotEdgeModule1的映像,请使用该标记值替换映像属性值。在部署模板中为每个系统和自定义模块添加或替换
createOptions值(采用字符串化内容)。例如,
image的createOptions和IotEdgeModule1设置类似于以下示例:"IotEdgeModule1": { "version": "1.0.0", "type": "docker", "status": "running", "restartPolicy": "always", "settings": { "image": "myacr.azurecr.cn/iotedgemodule1:0.0.1-amd64", "createOptions": "{\"HostConfig\":{\"PortBindings\":{\"5671/tcp\":[{\"HostPort\":\"5671\"}],\"8883/tcp\":[{\"HostPort\":\"8883\"}],\"443/tcp\":[{\"HostPort\":\"443\"}]}}}" }使用 IoT Edge Azure CLI set-modules 命令将模块部署到 Azure IoT 中心。 例如,若要将
deployment.debug.amd64.json文件中定义的模块部署到 IoT Edge 设备my-iot-hub的 IoT 中心my-device,请使用以下命令:az iot edge set-modules --hub-name my-iot-hub --device-id my-device --content ./deployment.debug.template.json --login "HostName=my-iot-hub.azure-devices.cn;SharedAccessKeyName=iothubowner;SharedAccessKey=<SharedAccessKey>"提示
可以在 Azure 门户中的“Azure IoT 中心”“安全设置”>“共享访问策略”下找到 IoT 中心连接字符串>。
在“Cloud Explorer”中,右键单击你的边缘设备并刷新,以查看与 和
$edgeAgent模块一起运行的新模块$edgeHub。
调试解决方案
在提升的 PowerShell 会话中运行以下命令:
根据用于 Linux C# 模块的名称获取
moduleId值。 将占位符<iot-edge-module-name>替换为你的模块名称。$moduleId = Invoke-EflowVmCommand "sudo docker ps -aqf name=<iot-edge-module-name>"检查
$moduleId是否正确。 如果该变量为空,请确保使用正确的模块名称。在 Linux 容器中启动 SSH 服务:
Invoke-EflowVmCommand "sudo docker exec -it -d $moduleId service ssh start"在 IoT Edge for Linux on Windows VM 上打开模块的 SSH 端口。 (本教程使用端口 10022。)
Invoke-EflowVmCommand "sudo iptables -A INPUT -p tcp --dport 10022 -j ACCEPT"
警告
出于安全原因,每次 IoT Edge for Linux on Windows VM 重启时,都会删除 IP 表规则,并返回到原始设置。 此外,必须手动启动模块的 SSH 服务。
成功启动 SSH 服务后,选择“调试”“附加到进程”,将“连接类型”设置为“SSH”,将“连接目标”设置为你的 IoT Edge for Linux on Windows VM 的 IP 地址>。 如果不知道 IoT Edge for Linux on Windows VM 的 IP 地址,可以使用
Get-EflowVmAddrPowerShell cmdlet。键入 IP,然后选择 Enter 键。 在弹出窗口中输入以下配置:
字段 值 主机名 IoT Edge for Linux on Windows VM 的 IP 地址 端口 10022(或在部署配置中使用的端口) 用户名 root 身份验证类型 私钥 私钥文件 上一步中创建的 id_rsa值的完整路径密码 用于上一步中创建的密钥的密码 使用 SSH 成功连接到模块后,可以选择进程并选择“附加”。 对于 C# 模块,需要选择进程“dotnet”,然后依次选择“附加”、“托管 (CoreCLR)”。 首次运行可能需要 10 到 20 秒的时间。
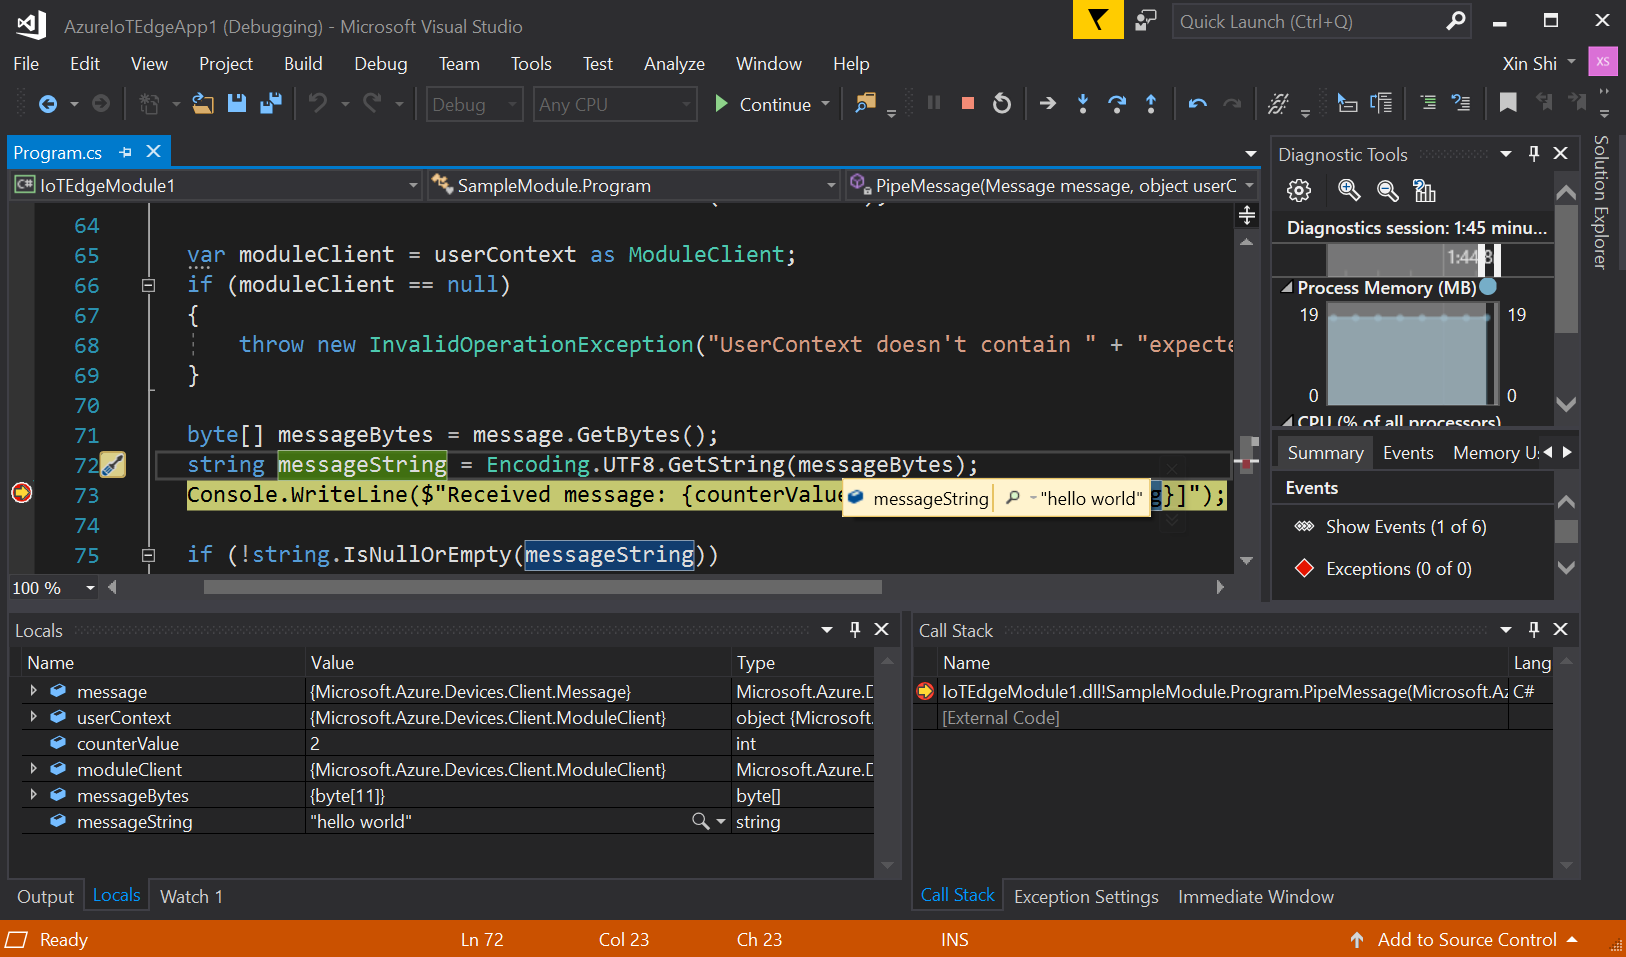
设置用于检查模块的断点:
- 如果在 C# 环境中开发,请在
PipeMessage()的ModuleBackgroundService.cs函数中设置断点。 - 如果在 C 环境中开发,请在
InputQueue1Callback()的main.c函数中设置断点。
- 如果在 C# 环境中开发,请在
应将
SimulatedTemperatureSensor的输出重定向到自定义 Linux C# 模块的input1。 应触发断点。 可在 Visual Studio“局部变量”窗口中监视变量 。
若要停止调试,按 Ctrl+F5 或选择“停止”按钮。
清理资源
如果打算继续学习下一篇建议的文章,可以保留已创建的资源和配置,以便重复使用。 还可以继续使用相同的 IoT Edge 设备作为测试设备。
否则,可以删除本文中使用的本地配置和 Azure 资源,以免产生费用。
删除 Azure 资源
删除 Azure 资源和资源组的操作不可逆。 请确保不要意外删除错误的资源组或资源。 如果在具有要保留的资源的现有资源组中创建 IoT 中心,请仅删除 IoT 中心资源本身,而不是资源组。
若要删除资源,请执行以下操作:
- 登录到 Azure 门户,然后选择“资源组”。
- 选择包含 IoT Edge 测试资源的资源组的名称。
- 查看资源组包含的资源列表。 若要删除这一切,可以选择“删除资源组”。 如果只需删除部分,可以选择每个资源以单独删除。
下一步
在本教程中,你在开发计算机上设置了 Visual Studio,并从中部署和调试了你的第一个 IoT Edge 模块。 你已经了解基本概念,请尝试向模块添加功能,以便它可以分析通过它传递的数据: