重要
Azure 磁盘加密计划于 2028 年 9 月 15 日停用。 在该日期之前,可以继续使用 Azure 磁盘加密,而不会中断。 2028 年 9 月 15 日,已启用 ADE 的工作负荷将继续运行,但 VM 重启后加密磁盘将无法解锁,从而导致服务中断。
使用 主机端加密 用于新 VM。 所有已启用 ADE 的 VM(包括备份)必须在停用日期之前迁移到主机上的加密,以避免服务中断。 有关详细信息,请参阅 从 Azure 磁盘加密迁移到主机加密 。
适用于:✔️ Windows VM
新版本的 Azure 磁盘加密无需提供 Microsoft Entra 应用程序参数即可启用 VM 磁盘加密。 在新版本中,不再需要在启用加密步骤中提供Microsoft Entra凭据。 使用新版本加密所有新 VM,而无需Microsoft Entra应用程序参数。 有关使用新版本启用 VM 磁盘加密的说明,请参阅Azure 磁盘加密。 仍支持已使用Microsoft Entra应用程序参数加密的 VM。 继续使用Microsoft Entra语法维护这些 VM。
Azure 磁盘加密使用 Azure 密钥保管库来控制和管理磁盘加密密钥和机密。 有关 Key Vault 的详细信息,请参阅 Azure 密钥保管库 入门和保护 Key Vault。
创建和配置密钥保管库以与 Microsoft Entra ID(以前的版本)配合使用Azure 磁盘加密涉及四个步骤:
- 创建密钥保管库。
- 设置 Microsoft Entra 应用程序和服务主体。
- 为 Microsoft Entra 应用设置密钥保管库访问策略。
- 设置 Key Vault 高级访问策略。
还可以生成或导入密钥加密密钥(KEK)。
有关如何安装工具并连接到 Azure的步骤,请参阅为 Azure 磁盘加密创建并配置密钥保管库一文。
注意
本文中的步骤在 Azure 磁盘加密先决条件 CLI 脚本和 Azure 磁盘加密先决条件 PowerShell 脚本中自动执行。
创建密钥保管库
Azure 磁盘加密与 Azure 密钥保管库 集成,帮助你控制和管理 Key Vault 订阅中的磁盘加密密钥与机密。 可为 Azure 磁盘加密创建 Key Vault,或使用现有的 Key Vault。 有关 Key Vault 的详细信息,请参阅 Azure 密钥保管库 入门和保护 Key Vault。 可以使用资源管理器模板、Azure PowerShell 或 Azure CLI 创建 Key Vault。
警告
为了确保加密机密不会跨越区域边界,Azure 磁盘加密要求密钥保管库和 VM 位于同一区域。 在要加密的 VM 所在的同一区域中创建和使用密钥保管库。
使用 PowerShell 创建密钥保管库
可以使用 Azure PowerShell 和 New-AzKeyVault cmdlet 创建密钥保管库。 有关其他密钥保管库 cmdlet,请参阅 Az.KeyVault。
根据需要,使用 New-AzResourceGroup 创建新资源组。 若要列出数据中心位置,请使用 Get-AzLocation。
# Get-AzLocation
New-AzResourceGroup -Name 'MyKeyVaultResourceGroup' -Location 'China East 2'
使用 New-AzKeyVault 创建新的密钥保管库
New-AzKeyVault -VaultName 'MySecureVault' -ResourceGroupName 'MyKeyVaultResourceGroup' -Location 'China East 2'请注意,加密磁盘时返回的 保管库名称、 资源组名称、 资源 ID、 保管库 URI 和 对象 ID 供以后使用。
使用 Azure CLI 创建密钥保管库
可以使用 Azure CLI 和 az keyvault 命令来管理密钥保管库。 若要创建 Key Vault,请使用 az keyvault create。
根据需要,使用 az group create 创建新资源组。 若要列出各个位置,请使用 az account list-locations
# To list locations: az account list-locations --output table
az group create -n "MyKeyVaultResourceGroup" -l "China East 2"
使用 az keyvault create 创建新的密钥保管库。
az keyvault create --name "MySecureVault" --resource-group "MyKeyVaultResourceGroup" --location "China East 2"请注意系统会返回以下信息供稍后使用:保管库名称(名称)、资源组名称、资源 ID(ID)、保管库 URI 以及 对象 ID。
使用 资源管理器 模板创建密钥保管库
可以使用资源管理器模板创建 Key Vault。
- 在 Azure 快速入门模板中,选择“部署到 Azure”。
- 选择订阅、资源组、资源组位置、密钥保管库名称、对象 ID、法律条款和协议,然后选择“ 购买”。
设置 Microsoft Entra 应用和服务主体
需要在 Azure 中正在运行的 VM 上启用加密时,Azure 磁盘加密将生成加密密钥并将其写入 Key Vault。 在密钥保管库中管理加密密钥需要 Microsoft Entra 身份验证。 为此创建 Microsoft Entra 应用程序。 在身份验证时,可以使用基于客户端密码的身份验证。
使用 Azure PowerShell 设置Microsoft Entra应用和服务主体
若要运行以下命令,请获取并使用Azure PowerShell模块。
使用 New-AzADApplication PowerShell cmdlet 创建 Microsoft Entra 应用程序。 MyApplicationHomePage 和 MyApplicationUri 可以是你选择的任何值。
$aadClientSecret = "My AAD client secret" $aadClientSecretSec = ConvertTo-SecureString -String $aadClientSecret -AsPlainText -Force $azureAdApplication = New-AzADApplication -DisplayName "My Application Display Name" -HomePage "https://MyApplicationHomePage" -IdentifierUris "https://MyApplicationUri" -Password $aadClientSecretSec $servicePrincipal = New-AzADServicePrincipal –ApplicationId $azureAdApplication.ApplicationId -Role Contributor$azureAdApplication.ApplicationId是Microsoft Entra客户端 ID,$aadClientSecret是稍后将用于启用Azure 磁盘加密的客户端密码。 请妥善保存 Microsoft Entra 客户端密码。 运行$azureAdApplication.ApplicationId会显示应用程序 ID。
使用 Azure CLI 设置Microsoft Entra应用和服务主体
可以使用 Azure CLI 和 az ad sp 命令来管理服务主体。 有关详细信息,请参阅创建 Azure 服务主体。
创建新服务主体。
az ad sp create-for-rbac --name "ServicePrincipalName" --password "My-AAD-client-secret" --role Contributor --scopes /subscriptions/<subscription_id>返回的 appId 是其他命令中使用的Microsoft Entra客户端 ID。 这也是你在 az keyvault set-policy 中将使用的 SPN。 密码是稍后用于启用Azure 磁盘加密的客户端密码。 请妥善保存 Microsoft Entra 客户端密码。
在 Azure 门户中创建并配置 Microsoft Entra 应用和服务主体
按照使用门户创建可访问资源的 Microsoft Entra 应用程序和服务主体一文中的步骤创建 Microsoft Entra 应用程序。 这些步骤中的每一步都会将你直接带到文章中的相应部分,以完成操作。
- 验证所需的权限
-
创建 Microsoft Entra 应用程序
- 创建应用程序时,可以使用任意所需的名称和登录 URL。
-
获取应用程序 ID 和身份验证密钥。
- 身份验证密钥是客户端密码,用作 Set-AzVMDiskEncryptionExtension 的 AadClientSecret。
- 应用程序使用身份验证密钥作为凭据登录到 Microsoft Entra ID。 在 Azure 门户中,此机密称为密钥,但与 Key Vault 没有任何关系。 请适当地保护此机密。
- 应用程序 ID 稍后将被用作 Set-AzVMDiskEncryptionExtension 的 AadClientId,并作为 Set-AzKeyVaultAccessPolicy 的 ServicePrincipalName。
为 Microsoft Entra 应用设置密钥保管库访问策略
若要将加密机密写入指定的密钥保管库,Azure 磁盘加密需要有权将机密写入密钥保管库的 Microsoft Entra 应用程序的客户端 ID 和客户端密码。
注意
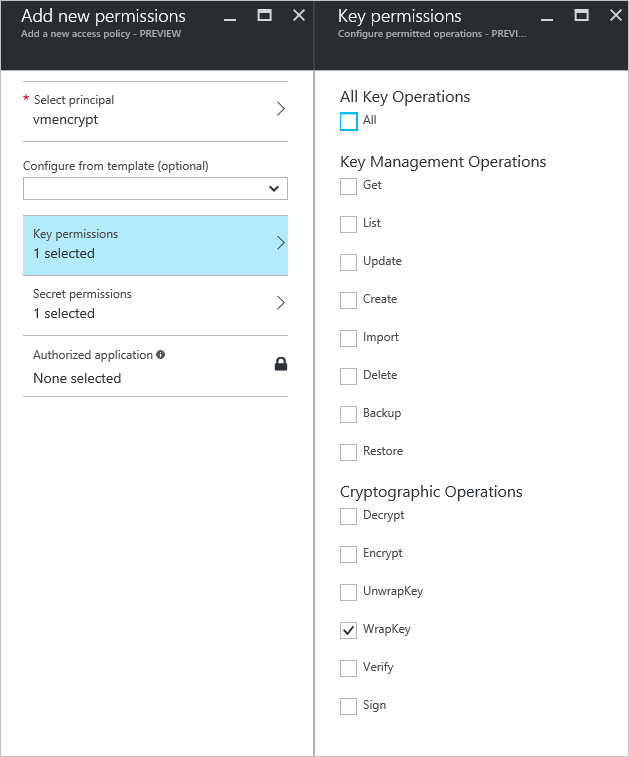
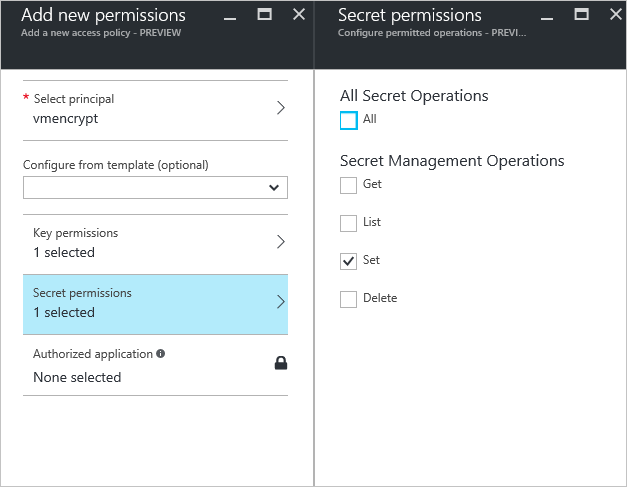
Azure 磁盘加密要求为 Microsoft Entra 客户端应用程序配置以下访问策略:WrapKey 和 Set 权限。
使用 Azure PowerShell 为Microsoft Entra应用设置密钥保管库访问策略
Microsoft Entra 应用程序需具有访问保管库中密钥或机密的权限。 使用 Set-AzKeyVaultAccessPolicy cmdlet,并将客户端 ID(注册应用程序时所生成)用作 –ServicePrincipalName 参数值,以向应用程序授予权限。 若要了解详细信息,请参阅博客文章 Azure 密钥保管库 - Step by Step(Azure 密钥保管库 - 分步指南)。
使用 PowerShell 为 AD 应用程序设置密钥保管库访问策略。
$keyVaultName = 'MySecureVault'
$aadclient ID = 'MyAadAppclient ID'
$KVRGname = 'MyKeyVaultResourceGroup'
Set-AzKeyVaultAccessPolicy -VaultName $keyVaultName -ServicePrincipalName $aadclient ID -PermissionsToKeys 'WrapKey' -PermissionsToSecrets 'Set' -ResourceGroupName $KVRGname
使用 Azure CLI 为 Microsoft Entra 应用设置密钥保管库访问策略
使用 az keyvault set-policy 设置访问策略。 有关详细信息,请参阅使用 CLI 2.0 管理 密钥保管库。
使用以下命令,为你使用 Azure CLI 创建的服务主体授予获取机密和包装密钥的权限:
az keyvault set-policy --name "MySecureVault" --spn "<spn created with CLI/the Microsoft Entra client ID>" --key-permissions wrapKey --secret-permissions set
使用门户为Microsoft Entra应用设置密钥保管库访问策略
- 打开包含你的密钥保管库的资源组。
- 选择密钥保管库,转到 “访问策略”,然后选择“ 添加新”。
- 在“选择主体”下,搜索创建的 Microsoft Entra 应用程序并选择它。
- 对于密钥权限,请在“加密操作”下检查“包装密钥”。
- 对于机密权限,请检查“机密管理操作”下的“设置”。
- 选择“确定”以保存访问策略。
设置 Key Vault 高级访问策略
Azure 平台需要访问密钥保管库中的加密密钥或机密,才能让 VM 在启动和解密卷时使用这些密钥或机密。 在密钥保管库上启用磁盘加密,否则部署将失败。
使用 Azure PowerShell 设置密钥保管库高级访问策略
使用 Key Vault PowerShell cmdlet Set-AzKeyVaultAccessPolicy 为 Key Vault 启用磁盘加密。
为磁盘加密启用密钥保管库:Azure 磁盘加密需要启用 EnabledForDiskEncryption。
Set-AzKeyVaultAccessPolicy -VaultName 'MySecureVault' -ResourceGroupName 'MyKeyVaultResourceGroup' -EnabledForDiskEncryption根据需要为部署启用 密钥保管库: 在资源创建操作中引用此 密钥保管库(例如,创建虚拟机)时,使 Microsoft.Compute 资源提供程序能够从此 密钥保管库 中检索机密。
Set-AzKeyVaultAccessPolicy -VaultName 'MySecureVault' -ResourceGroupName 'MyKeyVaultResourceGroup' -EnabledForDeployment根据需要为模板部署启用 密钥保管库: 在模板部署中引用此 密钥保管库 时,使 Azure 资源管理器能够从此 密钥保管库 中获取机密。
Set-AzKeyVaultAccessPolicy -VaultName 'MySecureVault' -ResourceGroupName 'MyKeyVaultResourceGroup' -EnabledForTemplateDeployment
使用 Azure CLI 设置密钥保管库高级访问策略
使用 az keyvault update 为 Key Vault 启用磁盘加密。
为磁盘加密启用 密钥保管库: 需要使用 Enabled-for-disk-encryption。
az keyvault update --name "MySecureVault" --resource-group "MyKeyVaultResourceGroup" --enabled-for-disk-encryption "true"根据需要为部署启用 密钥保管库: 允许虚拟机从保管库中检索作为机密存储的证书。
az keyvault update --name "MySecureVault" --resource-group "MyKeyVaultResourceGroup" --enabled-for-deployment "true"根据需要为模板部署启用 密钥保管库: 允许资源管理器从保管库中检索机密。
az keyvault update --name "MySecureVault" --resource-group "MyKeyVaultResourceGroup" --enabled-for-template-deployment "true"
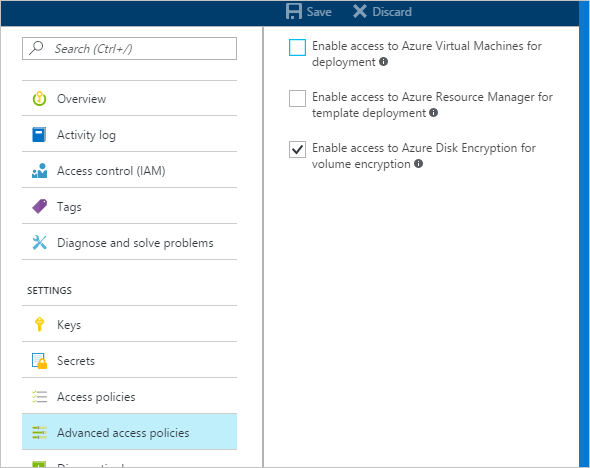
通过 Azure 门户设置密钥保管库高级访问策略
- 选择密钥保管库,转到“访问策略”,然后单击以显示高级访问策略。
- 选中标有“启用对 Azure 磁盘加密的访问以进行卷加密”的框。
- 根据需要,选择“启用对部署Azure 虚拟机的访问权限”或“启用对模板部署Azure 资源管理器的访问权限”。
- 选择“保存”。
配置密钥加密密钥(可选)
如果要将密钥加密密钥(KEK)用于加密密钥的额外安全层,请将 KEK 添加到密钥保管库。 使用 Add-AzKeyVaultKey cmdlet 命令在密钥保管库中创建密钥加密密钥。 还可从本地密钥管理 HSM 导入 KEK。 有关详细信息,请参阅密钥保管库文档。 指定密钥加密密钥后,Azure 磁盘加密会使用该密钥包装加密机密,然后将机密写入 密钥保管库。
生成密钥时,请使用 RSA 密钥类型。 Azure 磁盘加密尚不支持使用椭圆曲线键。
Key Vault 机密 URL 和 KEK URL 必须包含版本信息。 Azure 会强制实施这项版本控制限制。 有关有效的机密和 KEK URL,请参阅以下示例:
有效机密 URL 的示例:
https://contosovault.vault.azure.cn/secrets/EncryptionSecretWithKek/xxxxxxxxxxxxxxxxxxxxxxxxxxxxxxxx有效 KEK URL 的示例:
https://contosovault.vault.azure.cn/keys/diskencryptionkek/xxxxxxxxxxxxxxxxxxxxxxxxxxxxxxxxAzure 磁盘加密不支持将端口号指定为 Key Vault 机密和 KEK URL 的一部分。 有关受支持和不受支持的 Key Vault URL 的示例,请参阅以下示例:
无法接受的密钥保管库 URL
https://contosovault.vault.azure.cn:443/secrets/contososecret/xxxxxxxxxxxxxxxxxxxxxxxxxxxxxxxx可接受的 Key Vault URL:
https://contosovault.vault.azure.cn/secrets/contososecret/xxxxxxxxxxxxxxxxxxxxxxxxxxxxxxxx
通过 Azure PowerShell 设置密钥加密密钥
在使用 PowerShell 脚本之前,请查看Azure 磁盘加密先决条件以了解脚本中的步骤。 可能需要根据环境更改示例脚本。 此脚本会创建 Azure 磁盘加密所需的所有先决条件,并加密现有的 IaaS 虚拟机,同时使用密钥加密密钥对磁盘加密密钥进行包装。
# Step 1: Create a new resource group and key vault in the same location.
	 # Fill in 'MyLocation', 'MyKeyVaultResourceGroup', and 'MySecureVault' with your values.
	 # Use Get-AzLocation to get available locations and use the DisplayName.
	 # To use an existing resource group, comment out the line for New-AzResourceGroup

    $Loc = 'MyLocation';
    $KVRGname = 'MyKeyVaultResourceGroup';
    $KeyVaultName = 'MySecureVault';
    New-AzResourceGroup –Name  $KVRGname –Location $Loc;
    New-AzKeyVault -VaultName $KeyVaultName -ResourceGroupName $KVRGname -Location $Loc;
    $KeyVault = Get-AzKeyVault -VaultName $KeyVaultName -ResourceGroupName  $KVRGname;
    $KeyVaultResourceId = (Get-AzKeyVault -VaultName $KeyVaultName -ResourceGroupName  $KVRGname).ResourceId;
    $diskEncryptionKeyVaultUrl = (Get-AzKeyVault -VaultName $KeyVaultName -ResourceGroupName  $KVRGname).VaultUri;

# Step 2: Create the AD application and service principal.
	 # Fill in 'MyAADClientSecret', "<My Application Display Name>", "<https://MyApplicationHomePage>", and "<https://MyApplicationUri>" with your values.
	 # MyApplicationHomePage and the MyApplicationUri can be any values that you choose.

	 $aadClientSecret =  'MyAADClientSecret';
    $aadClientSecretSec = ConvertTo-SecureString -String $aadClientSecret -AsPlainText -Force;
    $azureAdApplication = New-AzADApplication -DisplayName "<My Application Display Name>" -HomePage "<https://MyApplicationHomePage>" -IdentifierUris "<https://MyApplicationUri>" -Password $aadClientSecretSec
    $servicePrincipal = New-AzADServicePrincipal –ApplicationId $azureAdApplication.ApplicationId -Role Contributor;
    $aadclient ID = $azureAdApplication.ApplicationId;

#Step 3: Enable the vault for disk encryption and set the access policy for the Microsoft Entra application.

	 Set-AzKeyVaultAccessPolicy -VaultName $KeyVaultName -ResourceGroupName $KVRGname -EnabledForDiskEncryption;
    Set-AzKeyVaultAccessPolicy -VaultName $keyVaultName -ServicePrincipalName $aadclient ID -PermissionsToKeys 'WrapKey' -PermissionsToSecrets 'Set' -ResourceGroupName  $KVRGname;

#Step 4: Create a new key in the key vault with the Add-AzKeyVaultKey cmdlet.
	 # Fill in 'MyKeyEncryptionKey' with your value.

	 $keyEncryptionKeyName = 'MyKeyEncryptionKey';
    Add-AzKeyVaultKey -VaultName $KeyVaultName -Name $keyEncryptionKeyName -Destination 'Software';
    $keyEncryptionKeyUrl = (Get-AzKeyVaultKey -VaultName $KeyVaultName -Name $keyEncryptionKeyName).Key.kid;

#Step 5: Encrypt the disks of an existing IaaS VM
	 # Fill in 'MySecureVM' and 'MyVirtualMachineResourceGroup' with your values.

	 $VMName = 'MySecureVM';
     $VMRGName = 'MyVirtualMachineResourceGroup';
    Set-AzVMDiskEncryptionExtension -ResourceGroupName $VMRGName -VMName $vmName -Aadclient ID $aadclient ID -AadClientSecret $aadClientSecret -DiskEncryptionKeyVaultUrl $diskEncryptionKeyVaultUrl -DiskEncryptionKeyVaultId $KeyVaultResourceId -KeyEncryptionKeyUrl $keyEncryptionKeyUrl -KeyEncryptionKeyVaultId $KeyVaultResourceId;
基于证书的身份验证(可选)
如果要使用证书身份验证,可以将一个证书上传到密钥保管库并将其部署到客户端。 在使用 PowerShell 脚本之前,请查看Azure 磁盘加密先决条件以了解脚本中的步骤。 可能需要根据环境更改示例脚本。
# Fill in "MyKeyVaultResourceGroup", "MySecureVault", and 'MyLocation' ('My location' only if needed)

  $KVRGname = 'MyKeyVaultResourceGroup'
  $KeyVaultName= 'MySecureVault'

  # Create a key vault and set enabledForDiskEncryption property on it.
  # Comment out the next three lines if you already have an existing key vault enabled for encryption. No need to set 'My location' in this case.

  $Loc = 'MyLocation'
  New-AzKeyVault -VaultName $KeyVaultName -ResourceGroupName $KVRGname -Location $Loc
  Set-AzKeyVaultAccessPolicy -VaultName $KeyVaultName -ResourceGroupName $KVRGname -EnabledForDiskEncryption

  #Setting some variables with the key vault information
  $KeyVault = Get-AzKeyVault -VaultName $KeyVaultName -ResourceGroupName $KVRGname
  $DiskEncryptionKeyVaultUrl = $KeyVault.VaultUri
  $KeyVaultResourceId = $KeyVault.ResourceId

  # Create the Microsoft Entra application and associate the certificate with it.
  # Fill in "C:\certificates\mycert.pfx", "Password", "<My Application Display Name>", "<https://MyApplicationHomePage>", and "<https://MyApplicationUri>" with your values.
  # MyApplicationHomePage and the MyApplicationUri can be any values you wish

  $CertPath = "C:\certificates\mycert.pfx"
  $CertPassword = "Password"
  $Cert = New-Object System.Security.Cryptography.X509Certificates.X509Certificate2($CertPath, $CertPassword)
  $CertValue = [System.Convert]::ToBase64String($cert.GetRawCertData())

  $AzureAdApplication = New-AzADApplication -DisplayName "<My Application Display Name>" -HomePage "<https://MyApplicationHomePage>" -IdentifierUris "<https://MyApplicationUri>" -CertValue $CertValue
  $ServicePrincipal = New-AzADServicePrincipal -ApplicationId $AzureAdApplication.ApplicationId -Role Contributor

  $AADclient ID = $AzureAdApplication.ApplicationId
  $aadClientCertThumbprint= $cert.Thumbprint

  Set-AzKeyVaultAccessPolicy -VaultName $keyVaultName -ServicePrincipalName $aadclient ID -PermissionsToKeys 'WrapKey' -PermissionsToSecrets 'Set' -ResourceGroupName $KVRGname

  # Upload the pfx file to the key vault.
  # Fill in "MyAADCert".

  $KeyVaultSecretName = "MyAADCert"
  $FileContentBytes = get-content $CertPath -Encoding Byte
  $FileContentEncoded = [System.Convert]::ToBase64String($fileContentBytes)
          $JSONObject = @"
          {
              "data" : "$filecontentencoded",
              "dataType" : "pfx",
              "password" : "$CertPassword"
          }
"@

  $JSONObjectBytes = [System.Text.Encoding]::UTF8.GetBytes($jsonObject)
  $JSONEncoded = [System.Convert]::ToBase64String($jsonObjectBytes)

  #Set the secret and set the key vault policy for -EnabledForDeployment

  $Secret = ConvertTo-SecureString -String $JSONEncoded -AsPlainText -Force
  Set-AzKeyVaultSecret -VaultName $KeyVaultName -Name $KeyVaultSecretName -SecretValue $Secret
  Set-AzKeyVaultAccessPolicy -VaultName $KeyVaultName -ResourceGroupName $KVRGname -EnabledForDeployment

  # Deploy the certificate to the VM
  # Fill in 'MySecureVM' and 'MyVirtualMachineResourceGroup' with your values.

  $VMName = 'MySecureVM'
  $VMRGName = 'MyVirtualMachineResourceGroup'
  $CertUrl = (Get-AzKeyVaultSecret -VaultName $KeyVaultName -Name $KeyVaultSecretName).Id
  $SourceVaultId = (Get-AzKeyVault -VaultName $KeyVaultName -ResourceGroupName $KVRGName).ResourceId
  $VM = Get-AzVM -ResourceGroupName $VMRGName -Name $VMName
  $VM = Add-AzVMSecret -VM $VM -SourceVaultId $SourceVaultId -CertificateStore "My" -CertificateUrl $CertUrl
  Update-AzVM -VM $VM -ResourceGroupName $VMRGName

  #Enable encryption on the VM by using Microsoft Entra client ID and the client certificate thumbprint

  Set-AzVMDiskEncryptionExtension -ResourceGroupName $VMRGName -VMName $VMName -Aadclient ID $AADclient ID -AadClientCertThumbprint $AADClientCertThumbprint -DiskEncryptionKeyVaultUrl $DiskEncryptionKeyVaultUrl -DiskEncryptionKeyVaultId $KeyVaultResourceId
基于证书的身份验证和 KEK(可选)
如果要使用证书身份验证并使用 KEK 包装加密密钥,可以使用以下脚本作为示例。 在使用 PowerShell 脚本之前,请查看前面所有Azure 磁盘加密先决条件,以了解脚本中的步骤。 可能需要根据环境更改示例脚本。
# Fill in 'MyKeyVaultResourceGroup', 'MySecureVault', and 'MyLocation' (if needed)

   $KVRGname = 'MyKeyVaultResourceGroup'
   $KeyVaultName= 'MySecureVault'

   # Create a key vault and set enabledForDiskEncryption property on it.
   # Comment out the next three lines if you already have an existing key vault enabled for encryption.

   $Loc = 'MyLocation'
   New-AzKeyVault -VaultName $KeyVaultName -ResourceGroupName $KVRGname -Location $Loc
   Set-AzKeyVaultAccessPolicy -VaultName $KeyVaultName -ResourceGroupName $KVRGname -EnabledForDiskEncryption

   # Create the Microsoft Entra application and associate the certificate with it.
   # Fill in "C:\certificates\mycert.pfx", "Password", "<My Application Display Name>", "<https://MyApplicationHomePage>", and "<https://MyApplicationUri>" with your values.
   # MyApplicationHomePage and the MyApplicationUri can be any values you wish

   $CertPath = "C:\certificates\mycert.pfx"
   $CertPassword = "Password"
   $Cert = New-Object System.Security.Cryptography.X509Certificates.X509Certificate2($CertPath, $CertPassword)
   $CertValue = [System.Convert]::ToBase64String($cert.GetRawCertData())

   $AzureAdApplication = New-AzADApplication -DisplayName "<My Application Display Name>" -HomePage "<https://MyApplicationHomePage>" -IdentifierUris "<https://MyApplicationUri>" -CertValue $CertValue
   $ServicePrincipal = New-AzADServicePrincipal -ApplicationId $AzureAdApplication.ApplicationId -Role Contributor

   $AADclient ID = $AzureAdApplication.ApplicationId
   $aadClientCertThumbprint= $cert.Thumbprint

   ## Give access for setting secrets and wrapping keys
   Set-AzKeyVaultAccessPolicy -VaultName $keyVaultName -ServicePrincipalName $aadclient ID -PermissionsToKeys 'WrapKey' -PermissionsToSecrets 'Set' -ResourceGroupName $KVRGname

   # Upload the pfx file to the key vault.
   # Fill in "MyAADCert".

   $KeyVaultSecretName = "MyAADCert"
   $FileContentBytes = get-content $CertPath -Encoding Byte
   $FileContentEncoded = [System.Convert]::ToBase64String($fileContentBytes)
           $JSONObject = @"
           {
               "data" : "$filecontentencoded",
               "dataType" : "pfx",
               "password" : "$CertPassword"
           }
"@

   $JSONObjectBytes = [System.Text.Encoding]::UTF8.GetBytes($jsonObject)
   $JSONEncoded = [System.Convert]::ToBase64String($jsonObjectBytes)

   #Set the secret and set the key vault policy for deployment

   $Secret = ConvertTo-SecureString -String $JSONEncoded -AsPlainText -Force
   Set-AzKeyVaultSecret -VaultName $KeyVaultName -Name $KeyVaultSecretName -SecretValue $Secret
   Set-AzKeyVaultAccessPolicy -VaultName $KeyVaultName -ResourceGroupName $KVRGname -EnabledForDeployment

   #Setting some variables with the key vault information and generating a KEK
   # Fill in 'KEKName'

   $KEKName ='KEKName'
   $KeyVault = Get-AzKeyVault -VaultName $KeyVaultName -ResourceGroupName $KVRGname
   $DiskEncryptionKeyVaultUrl = $KeyVault.VaultUri
   $KeyVaultResourceId = $KeyVault.ResourceId
   $KEK = Add-AzKeyVaultKey -VaultName $KeyVaultName -Name $KEKName -Destination "Software"
   $KeyEncryptionKeyUrl = $KEK.Key.kid


   # Deploy the certificate to the VM
   # Fill in 'MySecureVM' and 'MyVirtualMachineResourceGroup' with your values.

   $VMName = 'MySecureVM';
   $VMRGName = 'MyVirtualMachineResourceGroup';
   $CertUrl = (Get-AzKeyVaultSecret -VaultName $KeyVaultName -Name $KeyVaultSecretName).Id
   $SourceVaultId = (Get-AzKeyVault -VaultName $KeyVaultName -ResourceGroupName $KVRGName).ResourceId
   $VM = Get-AzVM -ResourceGroupName $VMRGName -Name $VMName
   $VM = Add-AzVMSecret -VM $VM -SourceVaultId $SourceVaultId -CertificateStore "My" -CertificateUrl $CertUrl
   Update-AzVM -VM $VM -ResourceGroupName $VMRGName

   #Enable encryption on the VM by using Microsoft Entra client ID and the client certificate thumbprint

   Set-AzVMDiskEncryptionExtension -ResourceGroupName $VMRGName -VMName $VMName -Aadclient ID $AADclient ID -AadClientCertThumbprint $AADClientCertThumbprint -DiskEncryptionKeyVaultUrl $DiskEncryptionKeyVaultUrl -DiskEncryptionKeyVaultId $KeyVaultResourceId -KeyEncryptionKeyUrl $keyEncryptionKeyUrl -KeyEncryptionKeyVaultId $KeyVaultResourceId