重要
Azure 磁盘加密计划于 2028 年 9 月 15 日停用。 在该日期之前,可以继续使用 Azure 磁盘加密,而不会中断。 2028 年 9 月 15 日,已启用 ADE 的工作负荷将继续运行,但 VM 重启后加密磁盘将无法解锁,从而导致服务中断。
使用 主机端加密 用于新 VM。 所有已启用 ADE 的 VM(包括备份)必须在停用日期之前迁移到主机上的加密,以避免服务中断。 有关详细信息,请参阅 从 Azure 磁盘加密迁移到主机加密 。
适用于:✔️ Windows VM
本文提供了用于准备预加密 VHD 和其他任务的示例脚本。
注释
除非另有说明,否则所有脚本均引用最新的非 AAD 版本的 ADE。
Azure 磁盘加密的示例 PowerShell 脚本
- 列出订阅中所有已加密的 VM
可以使用 Find_1passAdeVersion_VM.ps1 PowerShell 脚本查找订阅中存在的所有资源组中的所有 ADE 加密 VM 和扩展版本。
或者,这些 cmdlet 会显示所有经 ADE 加密的 VM(但不显示扩展版本):
$osVolEncrypted = {(Get-AzVMDiskEncryptionStatus -ResourceGroupName $_.ResourceGroupName -VMName $_.Name).OsVolumeEncrypted}
$dataVolEncrypted= {(Get-AzVMDiskEncryptionStatus -ResourceGroupName $_.ResourceGroupName -VMName $_.Name).DataVolumesEncrypted}
Get-AzVm | Format-Table @{Label="MachineName"; Expression={$_.Name}}, @{Label="OsVolumeEncrypted"; Expression=$osVolEncrypted}, @{Label="DataVolumesEncrypted"; Expression=$dataVolEncrypted}
列出订阅中所有已加密的 VMSS 实例
可以使用 Find_1passAdeVersion_VMSS.ps1 PowerShell 脚本,在订阅中的所有资源组中找到所有 ADE 加密的虚拟机规模集实例和扩展版本。
列出 Key Vault 中用于加密 VM 的所有磁盘加密机密
Get-AzKeyVaultSecret -VaultName $KeyVaultName | where {$_.Tags.ContainsKey('DiskEncryptionKeyFileName')} | format-table @{Label="MachineName"; Expression={$_.Tags['MachineName']}}, @{Label="VolumeLetter"; Expression={$_.Tags['VolumeLetter']}}, @{Label="EncryptionKeyURL"; Expression={$_.Id}}
使用 Azure 磁盘加密先决条件 PowerShell 脚本
如果你已熟悉进行 Azure 磁盘加密的先决条件,则可以使用 Azure 磁盘加密先决条件 PowerShell 脚本。 有关此 PowerShell 脚本的用法示例,请参阅有关加密 VM 的快速入门。 可以删除脚本的某个部分中的注释(从第 211 行开始),以加密现有资源组中现有 VM 的所有磁盘。
下表显示了可在 PowerShell 脚本中使用的参数:
| 参数 | Description | 强制? |
|---|---|---|
| $resourceGroupName | 密钥保管库所属的资源组的名称。 如果该资源组不存在,该脚本将创建具有此名称的新资源组。 | True |
| $keyVaultName | 要在其中放置加密密钥的密钥保管库的名称。 如果该保管库不存在,该脚本将创建具有此名称的新保管库。 | True |
| $location | 密钥保管库的位置。 确保要加密的密钥保管库和 VM 位于同一位置。 使用 Get-AzLocation 获取位置列表。 |
True |
| $subscriptionId | 要使用的 Azure 订阅标识符。 使用 Get-AzSubscription 获取你的订阅 ID。 |
True |
| $aadAppName | 将机密写入 密钥保管库 的 Microsoft Entra 应用程序名称。 如果该应用程序不存在,该脚本将创建具有此名称的新应用程序。 如果此应用已存在,请将 aadClientSecret 参数传递给脚本。 | 假 |
| $aadClientSecret | 先前创建的 Microsoft Entra 应用程序的客户端密码。 | 假 |
| $keyEncryptionKeyName | 密钥保管库中可选密钥加密密钥的名称。 如果该密钥不存在,该脚本将创建具有此名称的新密钥。 | 假 |
资源管理器模板
在不使用 Microsoft Entra 应用的情况下加密或解密 VM
使用 Microsoft Entra 应用加密或解密 VM
- 在现有或正在运行的 Windows VM 上启用磁盘加密
- 禁用正在运行的 Windows VM 上的加密
- 从预加密的 VHD/存储 Blob 创建新的加密托管磁盘 - 从预加密的 VHD 及其相应的加密设置创建新的加密托管磁盘。
准备预加密的 Windows VHD
以下部分介绍如何准备预加密的 Windows VHD 作为 Azure IaaS 中的加密 VHD 进行部署。 使用此信息在Azure Site Recovery或Azure上准备和启动新的Windows VM(VHD)。 有关如何准备和上传 VHD 的详细信息,请参阅上传通用 VHD 并将其用于在Azure中创建新 VM。
更新组策略以允许使用非 TPM 保护 OS
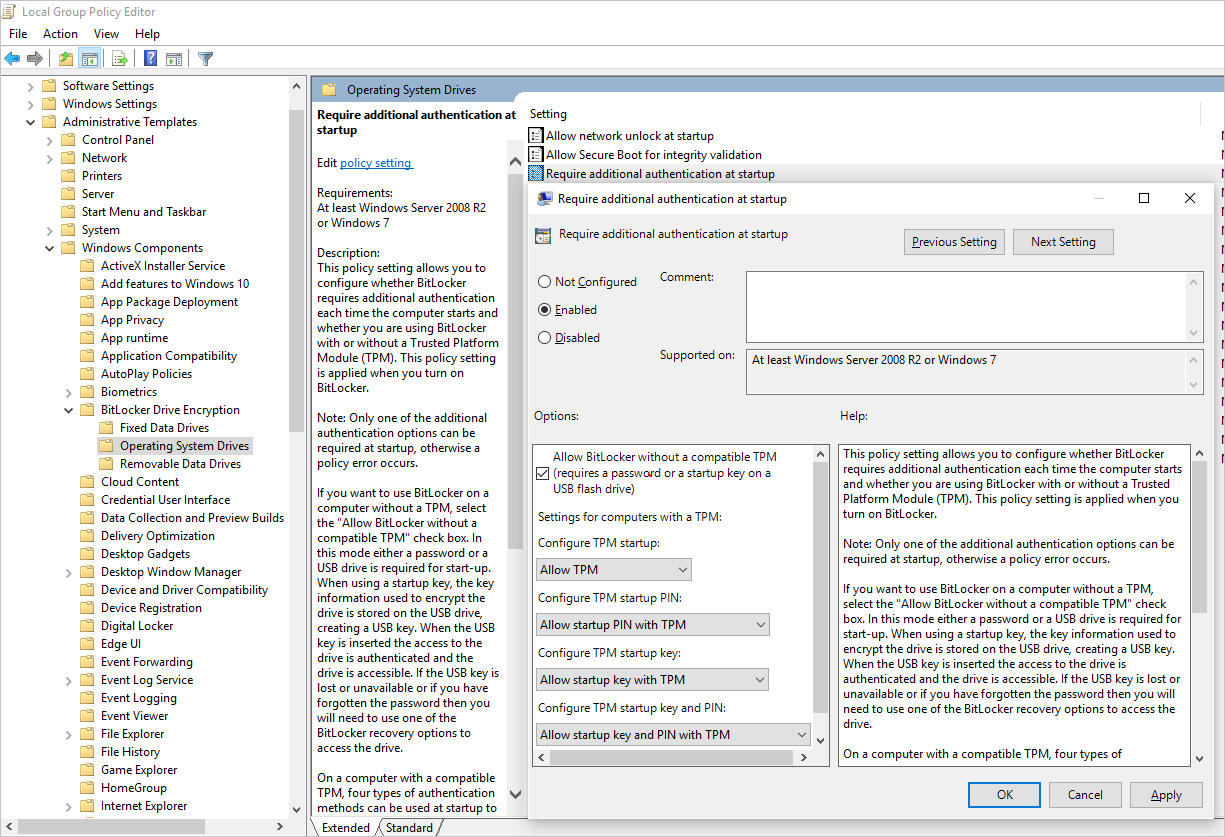
在“本地计算机策略”“计算机设置”>“管理模板”>“Windows 组件”>下配置名为“BitLocker 驱动器加密”的 BitLocker 组策略设置。 如下图所示,将此设置更改为“操作系统驱动器”>“启动时需要附加身份验证”>“没有兼容的 TPM 时允许 BitLocker”:
安装 BitLocker 功能组件
对于 Windows Server 2012 或更高版本,请使用以下命令:
dism /online /Enable-Feature /all /FeatureName:BitLocker /quiet /norestart
对于 Windows Server 2008 R2,请使用以下命令:
ServerManagerCmd -install BitLockers
使用 bdehdcfg 为 BitLocker 准备 OS 卷
若要压缩 OS 分区并为 BitLocker 准备计算机,请根据需要执行 bdehdcfg:
bdehdcfg -target c: shrink -quiet
使用 BitLocker 保护 OS 卷
使用 manage-bde 命令通过外部密钥保护器在启动卷上启用加密。 此外将外部密钥(.bek 文件)放在外部驱动器或卷上。 下次重启后,会在系统/引导卷上启用加密。
manage-bde -on %systemdrive% -sk [ExternalDriveOrVolume]
reboot
注释
使用独立的数据/资源 VHD 准备 VM,以使用 BitLocker 获取外部密钥。
将加密的 VHD 上传到 Azure 存储帐户
启用 BitLocker 加密后,需要将本地加密的 VHD 上传到存储帐户。
Add-AzVhd [-Destination] <Uri> [-LocalFilePath] <FileInfo> [[-NumberOfUploaderThreads] <Int32> ] [[-BaseImageUriToPatch] <Uri> ] [[-OverWrite]] [ <CommonParameters>]
将预加密 VM 的机密上传到密钥保管库
将之前获取的磁盘加密机密作为机密上传到密钥保管库中。 为此,请向上传机密的帐户授予设置的机密权限和包装密钥权限。
# Typically, account Id is the user principal name (in user@domain.com format)
$upn = (Get-AzureRmContext).Account.Id
Set-AzKeyVaultAccessPolicy -VaultName $kvname -UserPrincipalName $acctid -PermissionsToKeys wrapKey -PermissionsToSecrets set

# In local Shell, the account ID is a managed service identity, so specify the username directly
# $upn = "user@domain.com"
# Set-AzKeyVaultAccessPolicy -VaultName $kvname -UserPrincipalName $acctid -PermissionsToKeys wrapKey -PermissionsToSecrets set

# When running as a service principal, retrieve the service principal ID from the account ID, and set access policy to that
# $acctid = (Get-AzureRmContext).Account.Id
# $spoid = (Get-AzureRmADServicePrincipal -ServicePrincipalName $acctid).Id
# Set-AzKeyVaultAccessPolicy -VaultName $kvname -ObjectId $spoid -BypassObjectIdValidation -PermissionsToKeys wrapKey -PermissionsToSecrets set
未用 KEK 加密的磁盘加密密钥
若要在密钥保管库中设置机密,请使用 Set-AzKeyVaultSecret。 将密码编码为 base64 字符串,然后将其上传到密钥保管库。 此外,请确保在 Key Vault 中创建机密时设置以下标记。
 # This is the passphrase that was provided for encryption during the distribution installation
 $passphrase = "contoso-password"

 $tags = @{"DiskEncryptionKeyEncryptionAlgorithm" = "RSA-OAEP"; "DiskEncryptionKeyFileName" = "LinuxPassPhraseFileName"}
 $secretName = [guid]::NewGuid().ToString()
 $secretValue = [Convert]::ToBase64String([System.Text.Encoding]::ASCII.GetBytes($passphrase))
 $secureSecretValue = ConvertTo-SecureString $secretValue -AsPlainText -Force

 $secret = Set-AzKeyVaultSecret -VaultName $KeyVaultName -Name $secretName -SecretValue $secureSecretValue -tags $tags
 $secretUrl = $secret.Id
$secretUrl在下一步中,无需使用 KEK 即可附加 OS 磁盘。
使用 KEK 加密的磁盘加密机密
将机密上传到 Key Vault 之前,可根据需要使用密钥加密密钥对其进行加密。 使用封装 API,先使用密钥加密密钥对该密钥进行加密。 此包装操作的输出是 base64 URL 编码的字符串,可以使用 Set-AzKeyVaultSecret cmdlet 将其作为机密上传。
    # This is the passphrase that was provided for encryption during the distribution installation
    $passphrase = "contoso-password"

    Add-AzKeyVaultKey -VaultName $KeyVaultName -Name "keyencryptionkey" -Destination Software
    $KeyEncryptionKey = Get-AzKeyVaultKey -VaultName $KeyVault.OriginalVault.Name -Name "keyencryptionkey"

    $apiversion = "2015-06-01"

    ##############################
    # Get Auth URI
    ##############################

    $uri = $KeyVault.VaultUri + "/keys"
    $headers = @{}

    $response = try { Invoke-RestMethod -Method GET -Uri $uri -Headers $headers } catch { $_.Exception.Response }

    $authHeader = $response.Headers["www-authenticate"]
    $authUri = [regex]::match($authHeader, 'authorization="(.*?)"').Groups[1].Value

    Write-Host "Got Auth URI successfully"

    ##############################
    # Get Auth Token
    ##############################

    $uri = $authUri + "/oauth2/token"
    $body = "grant_type=client_credentials"
    $body += "&client_id=" + $AadClientId
    $body += "&client_secret=" + [Uri]::EscapeDataString($AadClientSecret)
    $body += "&resource=" + [Uri]::EscapeDataString("https://vault.azure.cn")
    $headers = @{}

    $response = Invoke-RestMethod -Method POST -Uri $uri -Headers $headers -Body $body

    $access_token = $response.access_token

    Write-Host "Got Auth Token successfully"

    ##############################
    # Get KEK info
    ##############################

    $uri = $KeyEncryptionKey.Id + "?api-version=" + $apiversion
    $headers = @{"Authorization" = "Bearer " + $access_token}

    $response = Invoke-RestMethod -Method GET -Uri $uri -Headers $headers

    $keyid = $response.key.kid

    Write-Host "Got KEK info successfully"

    ##############################
    # Encrypt passphrase by using a KEK
    ##############################

    $passphraseB64 = [Convert]::ToBase64String([System.Text.Encoding]::ASCII.GetBytes($Passphrase))
    $uri = $keyid + "/encrypt?api-version=" + $apiversion
    $headers = @{"Authorization" = "Bearer " + $access_token; "Content-Type" = "application/json"}
    $bodyObj = @{"alg" = "RSA-OAEP"; "value" = $passphraseB64}
    $body = $bodyObj | ConvertTo-Json

    $response = Invoke-RestMethod -Method POST -Uri $uri -Headers $headers -Body $body

    $wrappedSecret = $response.value

    Write-Host "Encrypted passphrase successfully"

    ##############################
    # Store secret
    ##############################

    $secretName = [guid]::NewGuid().ToString()
    $uri = $KeyVault.VaultUri + "/secrets/" + $secretName + "?api-version=" + $apiversion
    $secretAttributes = @{"enabled" = $true}
    $secretTags = @{"DiskEncryptionKeyEncryptionAlgorithm" = "RSA-OAEP"; "DiskEncryptionKeyFileName" = "LinuxPassPhraseFileName"}
    $headers = @{"Authorization" = "Bearer " + $access_token; "Content-Type" = "application/json"}
    $bodyObj = @{"value" = $wrappedSecret; "attributes" = $secretAttributes; "tags" = $secretTags}
    $body = $bodyObj | ConvertTo-Json

    $response = Invoke-RestMethod -Method PUT -Uri $uri -Headers $headers -Body $body

    Write-Host "Stored secret successfully"

    $secretUrl = $response.id
在下一步中,使用 $KeyEncryptionKey 和 $secretUrl通过 KEK 附加 OS 磁盘。
附加 OS 磁盘时指定机密 URL
不使用 KEK
附加 OS 磁盘时,传递 $secretUrl。 该 URL 是在“未使用 KEK 加密的磁盘加密机密”部分生成的。
    Set-AzVMOSDisk `
            -VM $VirtualMachine `
            -Name $OSDiskName `
            -SourceImageUri $VhdUri `
            -VhdUri $OSDiskUri `
            -Windows `
            -CreateOption FromImage `
            -DiskEncryptionKeyVaultId $KeyVault.ResourceId `
            -DiskEncryptionKeyUrl $SecretUrl
使用 KEK
附加 OS 磁盘时,传递 $KeyEncryptionKey 和 $secretUrl。 URL 在“使用 KEK 加密的磁盘加密机密”部分中生成。
    Set-AzVMOSDisk `
            -VM $VirtualMachine `
            -Name $OSDiskName `
            -SourceImageUri $CopiedTemplateBlobUri `
            -VhdUri $OSDiskUri `
            -Windows `
            -CreateOption FromImage `
            -DiskEncryptionKeyVaultId $KeyVault.ResourceId `
            -DiskEncryptionKeyUrl $SecretUrl `
            -KeyEncryptionKeyVaultId $KeyVault.ResourceId `
            -KeyEncryptionKeyURL $KeyEncryptionKey.Id