Observação
O acesso a essa página exige autorização. Você pode tentar entrar ou alterar diretórios.
O acesso a essa página exige autorização. Você pode tentar alterar os diretórios.
除了快速任务之外,ACR 任务还支持在将源代码提交到 Git 存储库时自动在云中生成 Docker 容器映像。 ACR 任务支持的 Git 上下文包括公共或专用GitHub或Azure Repos。
注意
目前,ACR 任务不支持GitHub Enterprise 存储库中的提交或拉取请求触发器。
在本教程中,在你将源代码提交到 Git 存储库时,ACR 任务会生成并推送在 Dockerfile 中指定的单一容器映像。 要创建多步骤任务并让其使用 YAML 文件来定义相关步骤,以便在提交代码时生成、推送和测试(可选)多个容器,请参阅教程:提交源代码时在云中运行多步骤容器工作流。 有关 ACR 任务的概述,请参阅使用 ACR 任务自动执行 OS 和框架修补
本教程的内容:
- 创建任务
- 测试任务
- 查看任务状态
- 使用代码提交触发任务
本教程假设你已完成前面教程中的任务。 如果尚未完成,请先完成前面教程先决条件部分中的步骤,再继续操作。
必备条件
获取示例代码
本教程假设你已完成前面教程中的步骤,并且已经创建分支和克隆示例存储库。 如果尚未完成,请先完成前面教程先决条件部分中的步骤,再继续操作。
容器注册表
必须在Azure订阅中具有Azure容器注册表才能完成本教程。 如果需要注册表,请参阅
创建GitHub个人访问令牌
若要在向 Git 存储库提交内容时触发任务,ACR 任务需要用于访问存储库的个人访问令牌 (PAT)。 如果还没有 PAT,请按照以下步骤在GitHub生成一个:
转到 GitHub 上的
个人访问令牌创建页 。 输入令牌的简短说明,例如“ACR 任务演示”
选择 ACR 的作用域以访问存储库。 要像本教程一样访问公共存储库,请在“存储库”下方,启用“存储库:状态”和“public_repo”
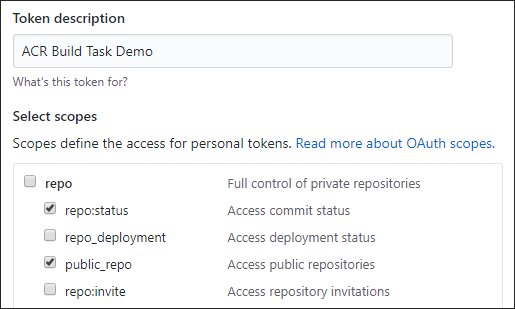
注意
若要生成 PAT 以访问专用存储库,请选择完全存储库控制的作用域。
选择“生成令牌”按钮(可能会要求你确认密码)
将生成的令牌复制并保存到安全位置(在后续部分定义任务时会使用此令牌)

为Azure CLI准备环境
如果希望在本地运行 CLI 引用命令,install Azure CLI。 如果在 Windows 或 macOS 上运行,请考虑在 Docker 容器中运行Azure CLI。 有关详细信息,请参阅 如何在 Docker 容器中运行Azure CLI。
如果使用本地安装,请使用 az login 命令登录到Azure CLI。 若要完成身份验证过程,请遵循终端中显示的步骤。 有关其他登录选项,请参阅Azure CLI登录。
出现提示时,请在首次使用时安装 Azure CLI 扩展。 有关扩展的详细信息,请参阅 使用 Azure CLI 的扩展。
运行az version命令,以查看已安装的版本和依赖库。 若要升级到最新版本,请运行az upgrade。
注意
在世纪互联运营的Microsoft Azure中使用Azure CLI之前,请先运行 az cloud set -n AzureChinaCloud 以更改云环境。 如果要切换回Azure公有云,请再次运行 az cloud set -n AzureCloud。
创建生成任务
现已完成启用 ACR 任务以读取提交状态和在存储库中创建 Webhook 所需的步骤,接下来可以创建任务,以便在向存储库提交内容时触发容器映像生成。
首先,使用适用于环境的值填充这些 shell 环境变量。 此步骤并非严格要求,但使在本教程中执行多行Azure CLI命令变得更加容易。 如果未填充这些环境变量,则每当示例命令中出现每个值,都必须手动替换该值。
ACR_NAME=<registry-name>        # The name of your Azure container registry
GIT_USER=<github-username>      # Your GitHub user account name
GIT_PAT=<personal-access-token> # The PAT you generated in the previous section
现在,请执行以下 az acr task create 命令以创建该任务。
注意
以下示例中使用的 Dockerfile 依赖于来自 Docker Hub 的公共基础镜像。 若要提高使用公共内容时的可靠性,请在专用Azure容器注册表中导入和管理映像,并更新 Dockerfile 以使用专用管理的基础映像。 详细了解如何使用公共映像。
az acr task create \
    --registry $ACR_NAME \
    --name taskhelloworld \
    --image helloworld:{{.Run.ID}} \
    --context https://github.com/$GIT_USER/acr-build-helloworld-node.git#master \
    --file Dockerfile \
    --git-access-token $GIT_PAT
此任务指定向 指定的存储库中的--context分支提交代码时,ACR 任务将根据该分支中的代码生成容器映像。 将使用存储库根目录中由 --file 指定的 Dockerfile 来生成映像。
--image 参数为映像标记的版本部分指定参数化的 {{.Run.ID}} 值,确保生成映像与特定生成关联且被唯一标记。
成功的 az acr task create 命令的输出应如下所示:
{
  "agentConfiguration": {
    "cpu": 2
  },
  "creationDate": "2010-11-19T22:42:32.972298+00:00",
  "id": "/subscriptions/<Subscription ID>/resourceGroups/myregistry/providers/Microsoft.ContainerRegistry/registries/myregistry/tasks/taskhelloworld",
  "location": "chinaeast2",
  "name": "taskhelloworld",
  "platform": {
    "architecture": "amd64",
    "os": "Linux",
    "variant": null
  },
  "provisioningState": "Succeeded",
  "resourceGroup": "myregistry",
  "status": "Enabled",
  "step": {
    "arguments": [],
    "baseImageDependencies": null,
    "contextPath": "https://github.com/gituser/acr-build-helloworld-node#main",
    "dockerFilePath": "Dockerfile",
    "imageNames": [
      "helloworld:{{.Run.ID}}"
    ],
    "isPushEnabled": true,
    "noCache": false,
    "type": "Docker"
  },
  "tags": null,
  "timeout": 3600,
  "trigger": {
    "baseImageTrigger": {
      "baseImageTriggerType": "Runtime",
      "name": "defaultBaseimageTriggerName",
      "status": "Enabled"
    },
    "sourceTriggers": [
      {
        "name": "defaultSourceTriggerName",
        "sourceRepository": {
          "branch": "main",
          "repositoryUrl": "https://github.com/gituser/acr-build-helloworld-node#main",
          "sourceControlAuthProperties": null,
          "sourceControlType": "GitHub"
        },
        "sourceTriggerEvents": [
          "commit"
        ],
        "status": "Enabled"
      }
    ]
  },
  "type": "Microsoft.ContainerRegistry/registries/tasks"
}
测试构建任务
现在你有一个任务来定义你的构建。 若要测试生成管道,请执行 az acr task run 命令手动触发生成:
az acr task run --registry $ACR_NAME --name taskhelloworld
默认情况下,执行此命令时,az acr task run 命令会将日志流式传输到控制台。 该输出已经过简化,只显示关键步骤。
2023/11/19 22:51:00 Using acb_vol_9ee1f28c-4fd4-43c8-a651-f0ed027bbf0e as the home volume
2023/11/19 22:51:00 Setting up Docker configuration...
2023/11/19 22:51:02 Successfully set up Docker configuration
2023/11/19 22:51:02 Logging in to registry: myregistry.azurecr.cn
2023/11/19 22:51:03 Successfully logged in
2023/11/19 22:51:03 Executing step: build
2023/11/19 22:51:03 Obtaining source code and scanning for dependencies...
2023/11/19 22:51:05 Successfully obtained source code and scanned for dependencies
Sending build context to Docker daemon  23.04kB
Step 1/5 : FROM node:15-alpine
[...]
Step 5/5 : CMD ["node", "/src/server.js"]
 ---> Running in 7382eea2a56a
Removing intermediate container 7382eea2a56a
 ---> e33cd684027b
Successfully built e33cd684027b
Successfully tagged myregistry.azurecr.cn/helloworld:da2
2023/11/19 22:51:11 Executing step: push
2023/11/19 22:51:11 Pushing image: myregistry.azurecr.cn/helloworld:da2, attempt 1
The push refers to repository [myregistry.azurecr.cn/helloworld]
4a853682c993: Preparing
[...]
4a853682c993: Pushed
[...]
da2: digest: sha256:c24e62fd848544a5a87f06ea60109dbef9624d03b1124bfe03e1d2c11fd62419 size: 1366
2023/11/19 22:51:21 Successfully pushed image: myregistry.azurecr.cn/helloworld:da2
2023/11/19 22:51:21 Step id: build marked as successful (elapsed time in seconds: 7.198937)
2023/11/19 22:51:21 Populating digests for step id: build...
2023/11/19 22:51:22 Successfully populated digests for step id: build
2023/11/19 22:51:22 Step id: push marked as successful (elapsed time in seconds: 10.180456)
The following dependencies were found:
- image:
    registry: myregistry.azurecr.cn
    repository: helloworld
    tag: da2
    digest: sha256:c24e62fd848544a5a87f06ea60109dbef9624d03b1124bfe03e1d2c11fd62419
  runtime-dependency:
    registry: registry.hub.docker.com
    repository: library/node
    tag: 9-alpine
    digest: sha256:8dafc0968fb4d62834d9b826d85a8feecc69bd72cd51723c62c7db67c6dec6fa
  git:
    git-head-revision: 68cdf2a37cdae0873b8e2f1c4d80ca60541029bf

Run ID: ca6 was successful after 27s
通过提交触发构建
通过手动运行任务对其进行测试后,可通过更改源代码手动触发该任务。
首先,请确保位于包含本地克隆存储库的目录中:
cd acr-build-helloworld-node
接下来,执行以下命令,在GitHub上创建、提交和推送存储库分支的新文件:
echo "Hello World!" > hello.txt
git add hello.txt
git commit -m "Testing ACR Tasks"
git push origin main
执行 git push 命令时,系统可能会要求你提供GitHub凭据。 提供GitHub用户名,并输入之前为密码创建的个人访问令牌(PAT)。
Username for 'https://github.com': <github-username>
Password for 'https://githubuser@github.com': <personal-access-token>
将提交推送到您的存储库后,由 ACR 任务创建的 Webhook 会在 Azure Container Registry 中触发,并启动构建。 显示当前正在运行的任务的日志,以验证和监视生成进度:
az acr task logs --registry $ACR_NAME
输出结果类似于以下内容,显示当前执行(或最近执行)的任务:
Showing logs of the last created run.
Run ID: ca7

[...]

Run ID: ca7 was successful after 38s
生成列表
若要查看 ACR 任务对注册表完成的任务运行列表,请运行 az acr task list-runs 命令:
az acr task list-runs --registry $ACR_NAME --output table
该命令产生的输出应如下所示。 将显示 ACR 任务已执行的运行,并在最近执行的任务的 TRIGGER 列中显示“Git Commit”:
RUN ID    TASK            PLATFORM    STATUS     TRIGGER    STARTED               DURATION
-------- --------------  ---------- ---------  --------- --------------------  ----------
ca7       taskhelloworld  linux       Succeeded  Commit     2023-11-19T22:54:34Z  00:00:29
ca6       taskhelloworld  linux       Succeeded  Manual     2023-11-19T22:51:47Z  00:00:24
ca5                       linux       Succeeded  Manual     2023-11-19T22:23:42Z  00:00:23
后续步骤
本教程介绍了在将源代码提交到 Git 存储库时,如何使用任务在 Azure 中自动触发容器映像生成。 请转到下一教程来了解如何创建任务,用于在更新容器映像的基础映像时触发构建。