Observação
O acesso a essa página exige autorização. Você pode tentar entrar ou alterar diretórios.
O acesso a essa página exige autorização. Você pode tentar alterar os diretórios.
Azure Network Watcher的数据包捕获功能创建捕获会话来跟踪虚拟机(VM)进出的流量。 你可在捕获文件中定义一个筛选器,使其只跟踪要监视的流量。 此数据将存储在存储 Blob 中或来宾计算机本地。
可以从其他自动化方案(例如从Azure Functions)远程启动此功能。 你可以根据定义的网络异常情况运行主动捕获。 其他用途包括收集网络统计信息、获取有关网络入侵的信息以及调试客户端/服务器通信。
Azure中部署的资源会持续运行。 很难时时主动监视所有资源的状态。 例如,如果在凌晨 2:00 发生问题,会出现什么情况?
通过使用来自Azure生态系统内的Network Watcher警报和函数,可以主动响应数据和工具来解决网络中的问题。
先决条件
- 最新版本的 Azure PowerShell。
- Network Watcher的现有实例。 如果还没有实例,创建 Network Watcher 实例。
- 与 Network Watcher 位于同一区域中、具有 Windows 扩展 或 Linux 虚拟机扩展 的现有虚拟机。
情景
在本示例中,虚拟机的传出流量比平常多,并且你希望收到相关警报。 你可以使用类似的过程为任何条件创建警报。
当事件触发警报时,数据包级数据可帮助你分析传出流量增加的原因。 可以采取措施让虚拟机恢复到初始状态。
此方案假定你有一个现有Network Watcher实例和具有有效虚拟机的资源组。
下面是数据包捕获的工作流:
事件在虚拟机(VM)上触发警报。
警报会调用您的Azure函数。
Azure函数处理警报并启动Network Watcher数据包捕获会话。
数据包捕获在 VM 上运行并收集数据。
将数据包捕获文件上传到存储帐户进行审查和诊断。
为了自动执行此过程,你将在 VM 上创建并连接一个警报,以便在事件发生时触发。 还可以创建一个函数来调用Network Watcher。
此场景:
- 创建启动数据包捕获的Azure函数。
- 在虚拟机上创建警报规则,并配置警报规则以调用Azure函数。
创建Azure函数
若要创建Azure函数来处理警报并创建数据包捕获,首先需要创建函数应用:
登录到 Azure 门户。
在门户顶部的搜索框中,输入“函数应用”。 从搜索结果中选择函数应用 。
选择+ 新建。
在“创建函数应用”的“基本信息”选项卡中,为以下设置输入或选择值:
- 在“项目详细信息”下,选择需要创建功能应用程序的订阅以及用于包含该应用程序的资源组。
- 在“实例详细信息”下:
- 对于“函数应用名称”,请输入函数应用的名称。 此名称追加了 .chinacloudsites.cn。
- 对于“是要部署代码还是容器映像?”,请选择发布模式:“代码”或“容器映像”。
- 对于“运行时堆栈”,请选择一个运行时堆栈。
- 对于“版本”,请选择运行时堆栈的版本。
- 对于“区域”,请选择要在其中创建函数应用的区域。
- 在“操作系统”下,选择当前使用的操作系统的类型。 基于您的运行时堆栈选择,Azure推荐操作系统的类型。
- 在“托管”下,选择要用于函数应用的计划类型。 从以下选项中选择:
- 消耗(无服务器):事件驱动的缩放,成本最低。
- 高级函数 - 企业级无服务器应用程序,支持基于事件的扩展和网络隔离。
- App 服务计划:用于从现有Azure App Service计划重用计算。
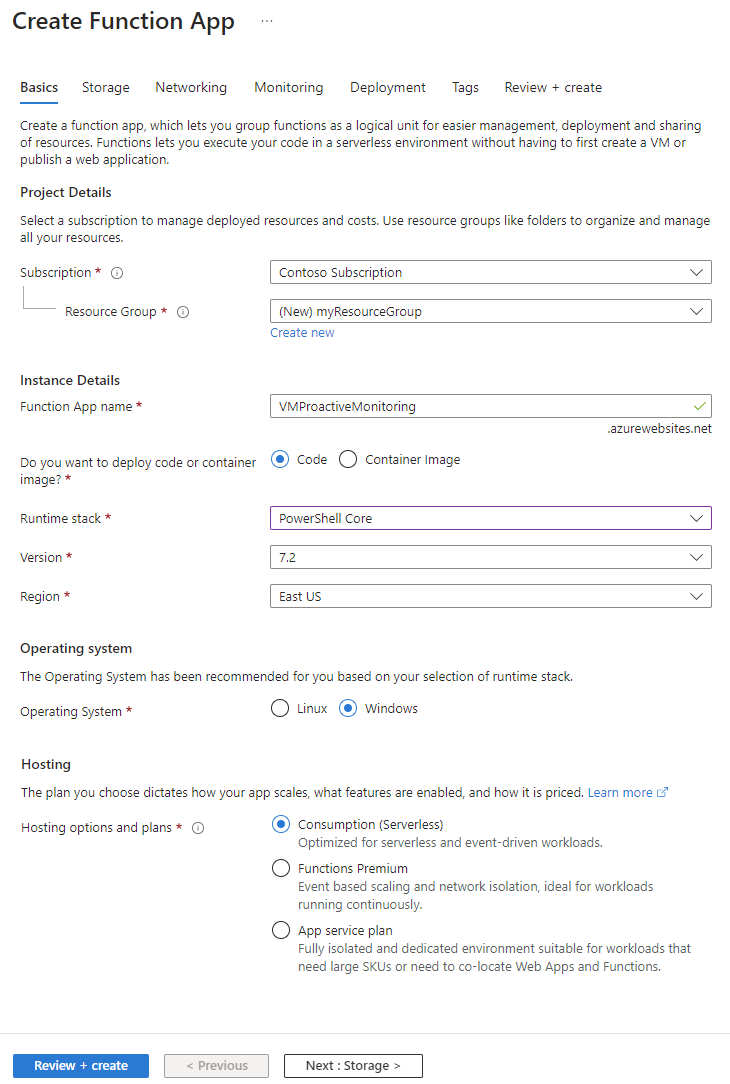
选择“查看 + 创建”以创建应用。

现在可以创建函数:
在创建的函数应用中,选择“函数”,然后选择“创建”来打开“创建函数”窗格。
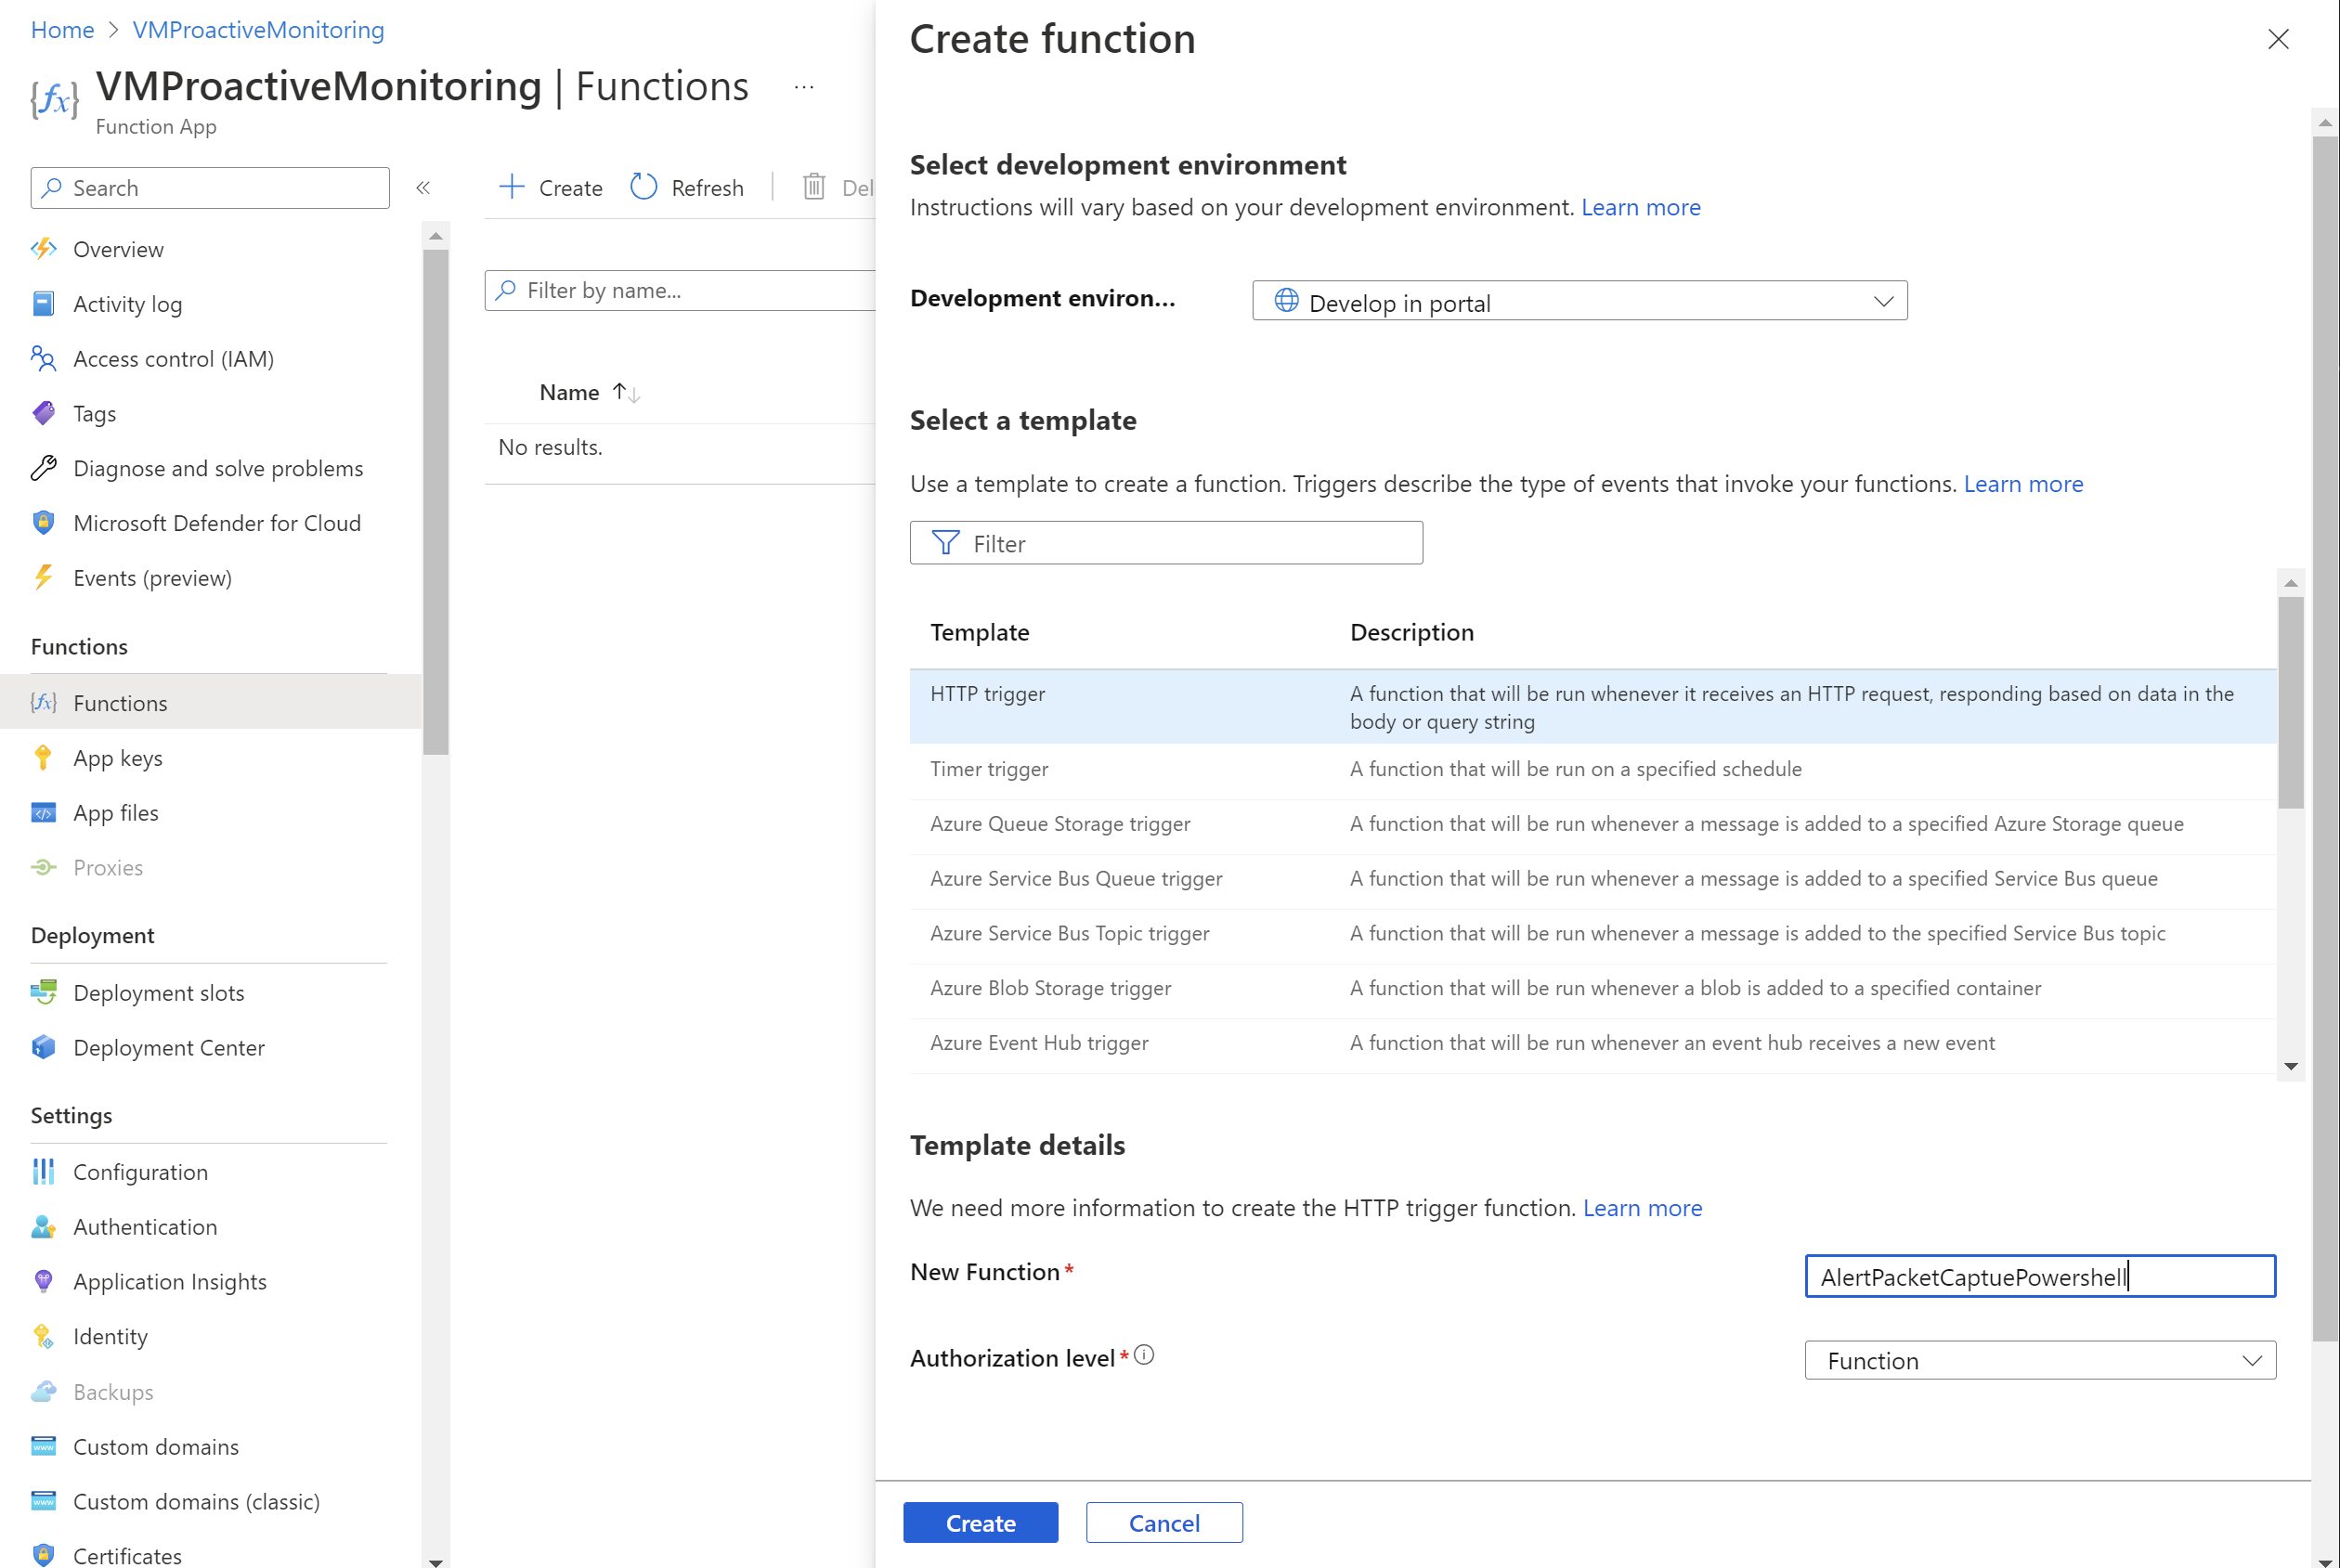
对于“开发环境”,请选择“在门户中开发”。
在“选择模板”下,选择“HTTP 触发器”。
在“模板详细信息”部分中,执行以下操作:
- 对于“新建函数”,请输入函数的名称。
- 对于“授权级别”,请选择“函数”。
选择 创建。
转到创建的函数并选择“代码 + 测试”。
更新脚本并选择“保存”。
配置身份验证
若要使用 PowerShell cmdlet,必须在函数应用中配置身份验证。 若要配置身份验证,必须配置环境变量,并将加密密钥文件上传到函数应用。
注释
此方案仅提供一个示例,说明如何使用Azure Functions实现身份验证。 还有其他方法可以执行相同的操作。
以下 PowerShell 脚本创建名为 PassEncryptKey.key 的密钥文件。 它还提供所提供密码的加密版本。 此密码是针对用于身份验证的Microsoft Entra应用程序定义的相同密码。
#Variables
$keypath = "C:\temp\PassEncryptKey.key"
$AESKey = New-Object Byte[] 32
$Password = "<insert a password here>"

#Keys
[Security.Cryptography.RNGCryptoServiceProvider]::Create().GetBytes($AESKey)
Set-Content $keypath $AESKey

#Get encrypted password
$secPw = ConvertTo-SecureString -AsPlainText $Password -Force
$AESKey = Get-content $KeyPath
$Encryptedpassword = $secPw | ConvertFrom-SecureString -Key $AESKey
$Encryptedpassword
检索环境变量的值
设置以下环境变量,这是访问身份验证值所必需的:
AzureClientIDAzureTenantAzureCredPassword
如果已获得应用程序 ID,请使用该应用程序的 AzureClientID、AzureTenant 和 AzureCredPassword 值。 如果您没有一个,请转到存储环境变量部分。
Azure客户端ID
客户端 ID 是Microsoft Entra ID中应用程序的 ID。 若要获取客户端 ID,请执行以下操作:
如果还没有可使用的应用程序,请运行以下 cmdlet 来创建应用程序:
$app = New-AzADApplication -DisplayName "ExampleAutomationAccount_MF" -HomePage "https://exampleapp.com" -IdentifierUris "https://exampleapp1.com/ExampleFunctionsAccount" -Password "<same password as defined earlier>"
New-AzADServicePrincipal -ApplicationId $app.ApplicationId
Start-Sleep 15
New-AzRoleAssignment -RoleDefinitionName Contributor -ServicePrincipalName $app.ApplicationId
注释
创建该应用程序时使用的密码应与之前保存密钥文件时创建的密码相同。
在 Azure 门户中,选择 Subscriptions。 选择要使用的订阅,然后选择“访问控制(IAM)”。
选择要使用的帐户,然后选择“属性”。 复制应用程序 ID。
AzureTenant
请通过运行以下 PowerShell cmdlet 来获取租户 ID:
(Get-AzSubscription -SubscriptionName "<subscriptionName>").TenantId
AzureCredPassword
AzureCredPassword 环境变量的值是通过运行以下 PowerShell 示例获得的值。 此示例与之前配置身份验证部分所示的示例相同。 所需的值是 $Encryptedpassword 变量的输出。 此输出是使用 PowerShell 脚本加密的服务主体密码。
#Variables
$keypath = "C:\temp\PassEncryptKey.key"
$AESKey = New-Object Byte[] 32
$Password = "<insert a password here>"

#Keys
[Security.Cryptography.RNGCryptoServiceProvider]::Create().GetBytes($AESKey)
Set-Content $keypath $AESKey

#Get encrypted password
$secPw = ConvertTo-SecureString -AsPlainText $Password -Force
$AESKey = Get-content $KeyPath
$Encryptedpassword = $secPw | ConvertFrom-SecureString -Key $AESKey
$Encryptedpassword
存储环境变量
若要存储环境变量,请执行以下操作:
转到函数应用。 选择“配置”“应用程序设置”。
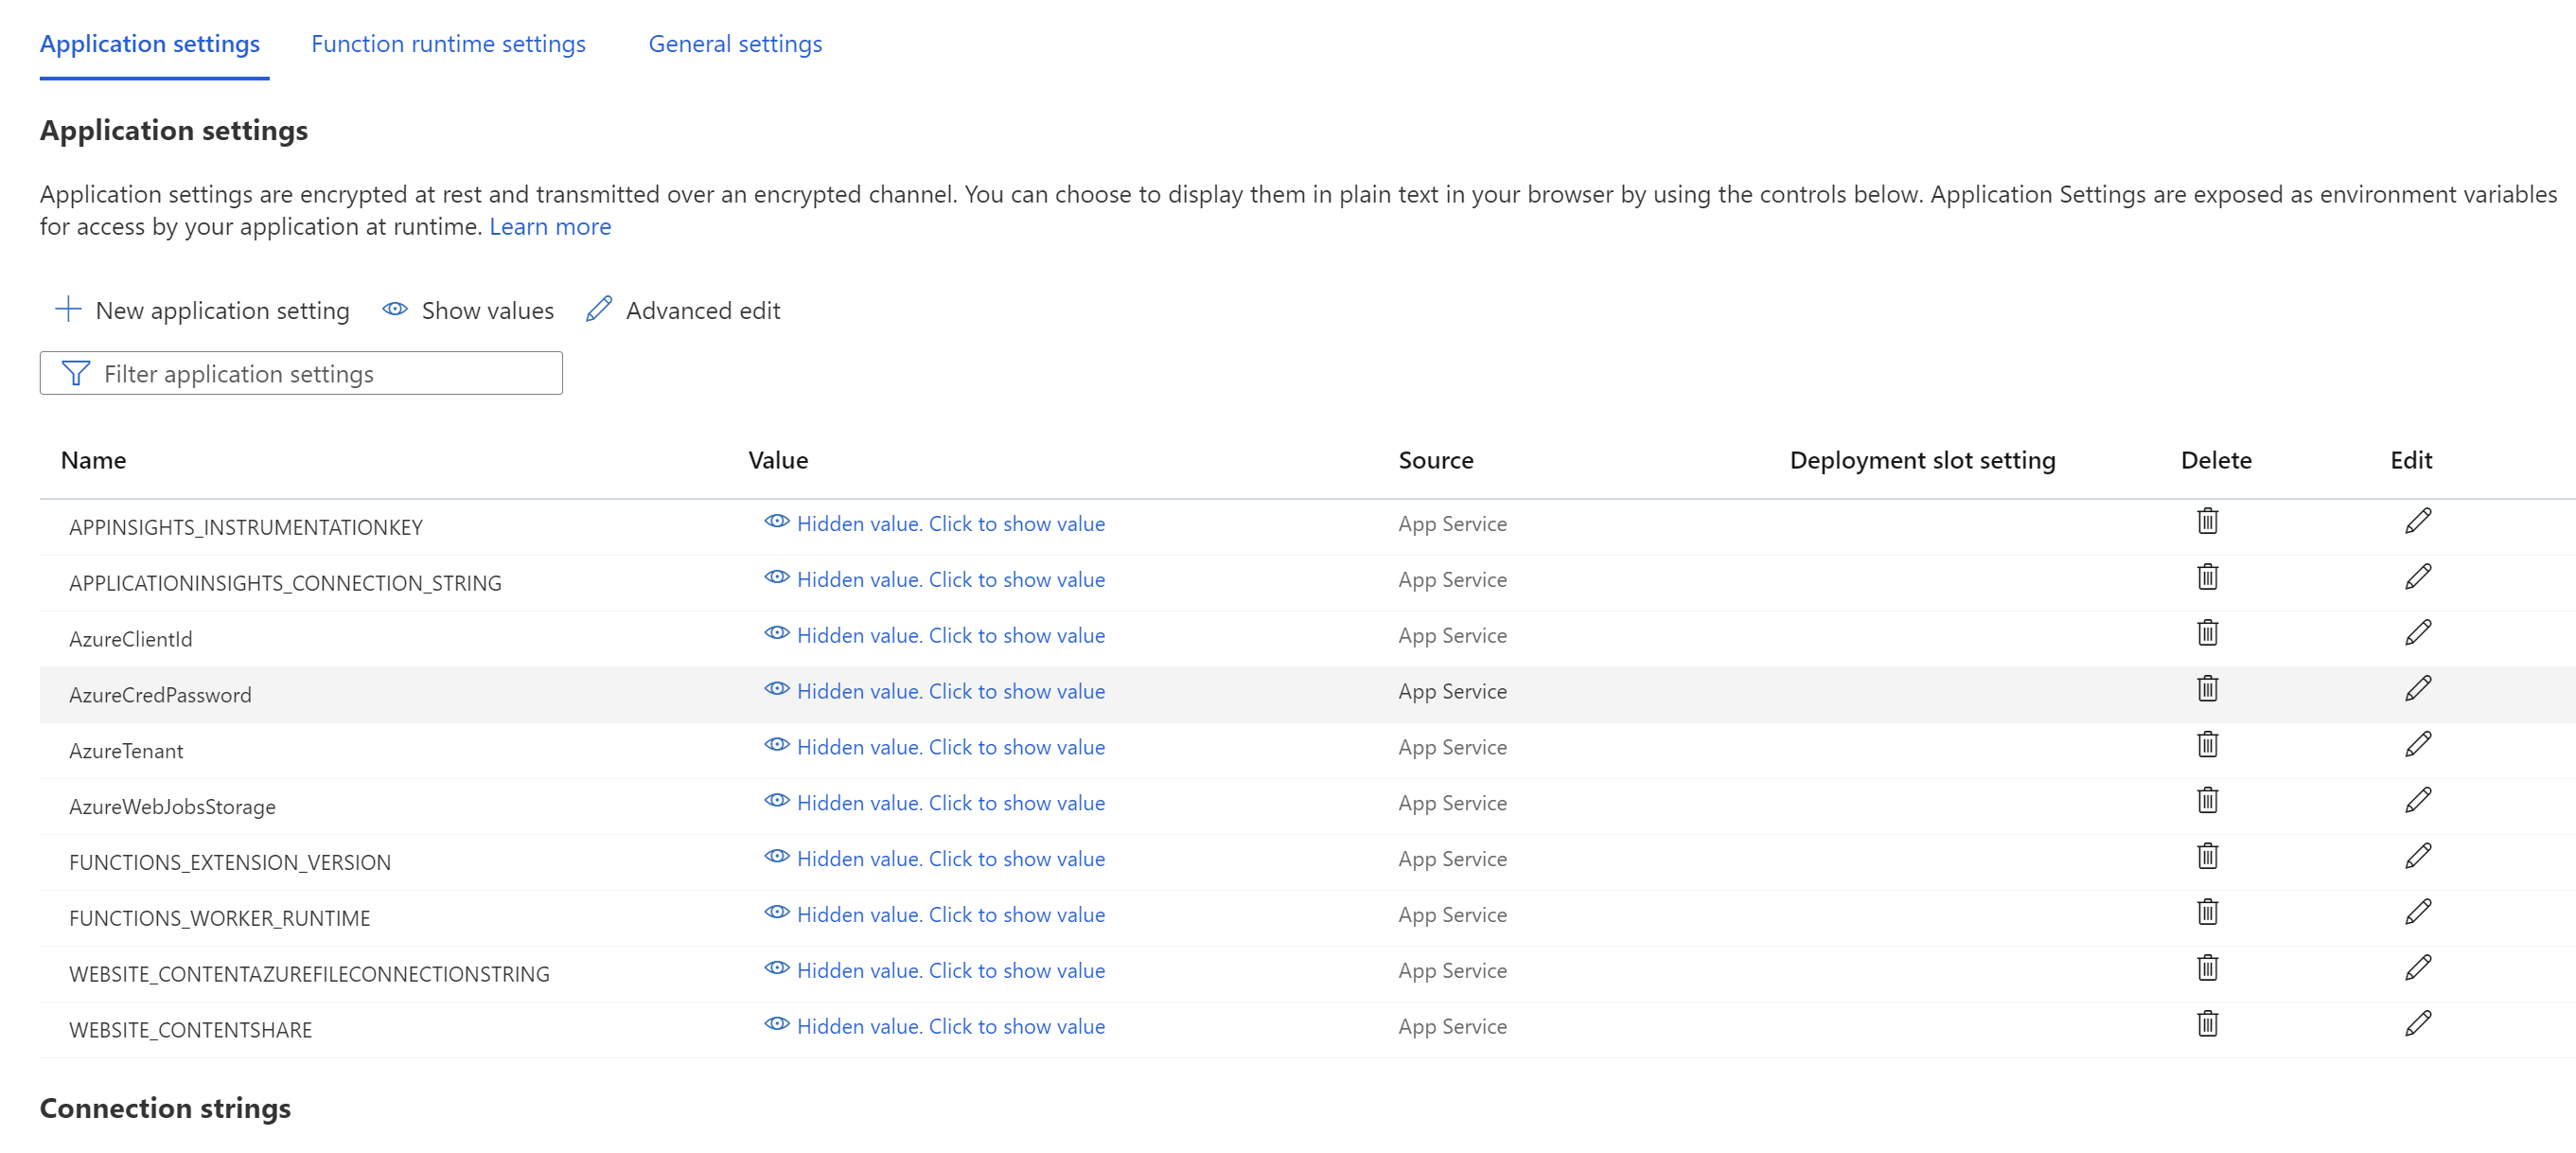
将环境变量及其值添加到应用设置,然后选择“保存”。
将 PowerShell 添加到函数
现在,从Azure函数内部调用Network Watcher。 根据要求,此函数的实现有所不同。 但是,代码的常规流程如下所示:
处理输入参数。
查询现有的数据包捕获,验证限制并解决名称冲突。
使用适当的参数创建数据包捕获。
定期轮询数据包捕获,直到完成。
通知用户数据包捕获会话已完成。
以下示例是可在函数中使用的 PowerShell 代码。 你需要替换 subscriptionId、resourceGroupName 和 storageAccountName 的值。
# Input bindings are passed in via parameter block
param($Request, $TriggerMetadata)

$essentials = $Request.body.data.essentials
$alertContext = $Request.body.data.alertContext

# Storage account ID to save captures in
$storageaccountid = "/subscriptions/{subscriptionId}/resourceGroups/{resourceGroupName}/providers/Microsoft.Storage/storageAccounts/{storageAccountName}"

# Packet capture variables
$packetCaptureName = "PSAzureFunction"
$packetCaptureLimit = 100
$packetCaptureDuration = 30

# Credentials
# Set the credentials in the configurations
$tenant = $env:AzureTenant
$pw = $env:AzureCredPassword
$clientid = $env:AzureClientId
$password = ConvertTo-SecureString $pw -AsPlainText -Force
$credential = New-Object System.Management.Automation.PSCredential ($clientid, $password)

Connect-AzAccount -Environment AzureChinaCloud -ServicePrincipal -Tenant $tenant -Credential $credential #-WarningAction SilentlyContinue | out-null

if ($alertContext.condition.allOf.metricNamespace -eq "Microsoft.Compute/virtualMachines") {

    # Get the VM firing this alert
    $vm = Get-AzVM -ResourceId $essentials.alertTargetIDs[0]

    # Get the Network Watcher instance in the VM's region
    $networkWatcher = Get-AzNetworkWatcher -Location $vm.Location

    # Get existing packet captures
    $packetCaptures = Get-AzNetworkWatcherPacketCapture -NetworkWatcher $networkWatcher

    # Remove an existing packet capture created by the function (if it exists)
    $packetCaptures | ForEach-Object { if ($_.Name -eq $packetCaptureName)
        {
            Remove-AzNetworkWatcherPacketCapture -NetworkWatcher $networkWatcher -PacketCaptureName $packetCaptureName
        }
    }

    # Initiate packet capture on the VM that fired the alert
    if ($packetCaptures.Count -lt $packetCaptureLimit) {
        Write-Output "Initiating Packet Capture"
        New-AzNetworkWatcherPacketCapture -NetworkWatcher $networkWatcher -TargetVirtualMachineId $vm.Id -PacketCaptureName $packetCaptureName -StorageAccountId $storageaccountid -TimeLimitInSeconds $packetCaptureDuration
    }
}
如果使用的是旧架构,请使用以下 PowerShell 代码:
# Input bindings are passed in via parameter block
param($Request, $TriggerMetadata)
$details = $Request.RawBody | ConvertFrom-Json

# Process alert request body
$requestBody = $Request.Body.data

# Storage account ID to save captures in
$storageaccountid = "/subscriptions/{subscriptionId}/resourceGroups/{resourceGroupName}/providers/Microsoft.Storage/storageAccounts/{storageAccountName}"

# Packet capture variables
$packetCaptureName = "PSAzureFunction"
$packetCaptureLimit = 100
$packetCaptureDuration = 30

# Credentials
# Set the credentials in the configurations
$tenant = $env:AzureTenant
$pw = $env:AzureCredPassword
$clientid = $env:AzureClientId

$password = ConvertTo-SecureString $pw -AsPlainText -Force
$credential = New-Object System.Management.Automation.PSCredential ($clientid, $password)

Connect-AzAccount -Environment AzureChinaCloud -ServicePrincipal -Tenant $tenant -Credential $credential #-WarningAction SilentlyContinue | out-null

if ($requestBody.context.resourceType -eq "Microsoft.Compute/virtualMachines") {

    # Get the VM firing this alert
    $vm = Get-AzVM -ResourceGroupName $requestBody.context.resourceGroupName -Name $requestBody.context.resourceName

    # Get the Network Watcher instance in the VM's region
    $networkWatcher = Get-AzNetworkWatcher -Location $vm.Location

    # Get existing packet captures
    packetCaptures = Get-AzNetworkWatcherPacketCapture -NetworkWatcher $networkWatcher

    # Remove an existing packet capture created by the function (if it exists)
    $packetCaptures | ForEach-Object { if ($_.Name -eq $packetCaptureName)
        {
            Remove-AzNetworkWatcherPacketCapture -NetworkWatcher $networkWatcher -PacketCaptureName $packetCaptureName
        }
    }

    # Initiate packet capture on the VM that fired the alert
    if ($packetCaptures.Count -lt $packetCaptureLimit) {
        Write-Output "Initiating Packet Capture"
        New-AzNetworkWatcherPacketCapture -NetworkWatcher $networkWatcher -TargetVirtualMachineId $requestBody.context.resourceId -PacketCaptureName $packetCaptureName -StorageAccountId $storageaccountid -TimeLimitInSeconds $packetCaptureDuration
    }
}
在虚拟机上配置警报
你可以配置警报,以便在特定的指标超过分配的阈值时通知相关人员。 在此示例中,警报位于已发送的“网络流出量总计”指标上,但你也可以针对许多其他指标触发该警报。
创建警报规则
转到现有虚拟机并添加警报规则。 在“创建警报规则”页面上,执行以下步骤:
在“选择信号”窗格中,搜索信号的名称并将其选中。 在此示例中,“网络流出量总计”是所选信号。 它表示虚拟机在所有网络接口上传出的字节数。
在“条件”选项卡中,设置以下值,然后选择“下一步: 操作”。
设置 价值 阈值 静态的 聚合类型 平均值 运算符 大于 阈值 3 每隔一段时间检查 1 分钟 回溯期间 5 分钟 在“操作”选项卡中,选择“创建操作组”。
在“创建操作组”页面上,选择“订阅”、“资源组”和“区域”的值。 另请输入操作组名称和显示名称,然后选择“下一步: 通知”。
在 Notifications 选项卡上,对于 Action type,选择 Azure Function。
在 Azure Function 窗格中, 选择 Subscription、resource group、Function app 和 Azure Function 值。
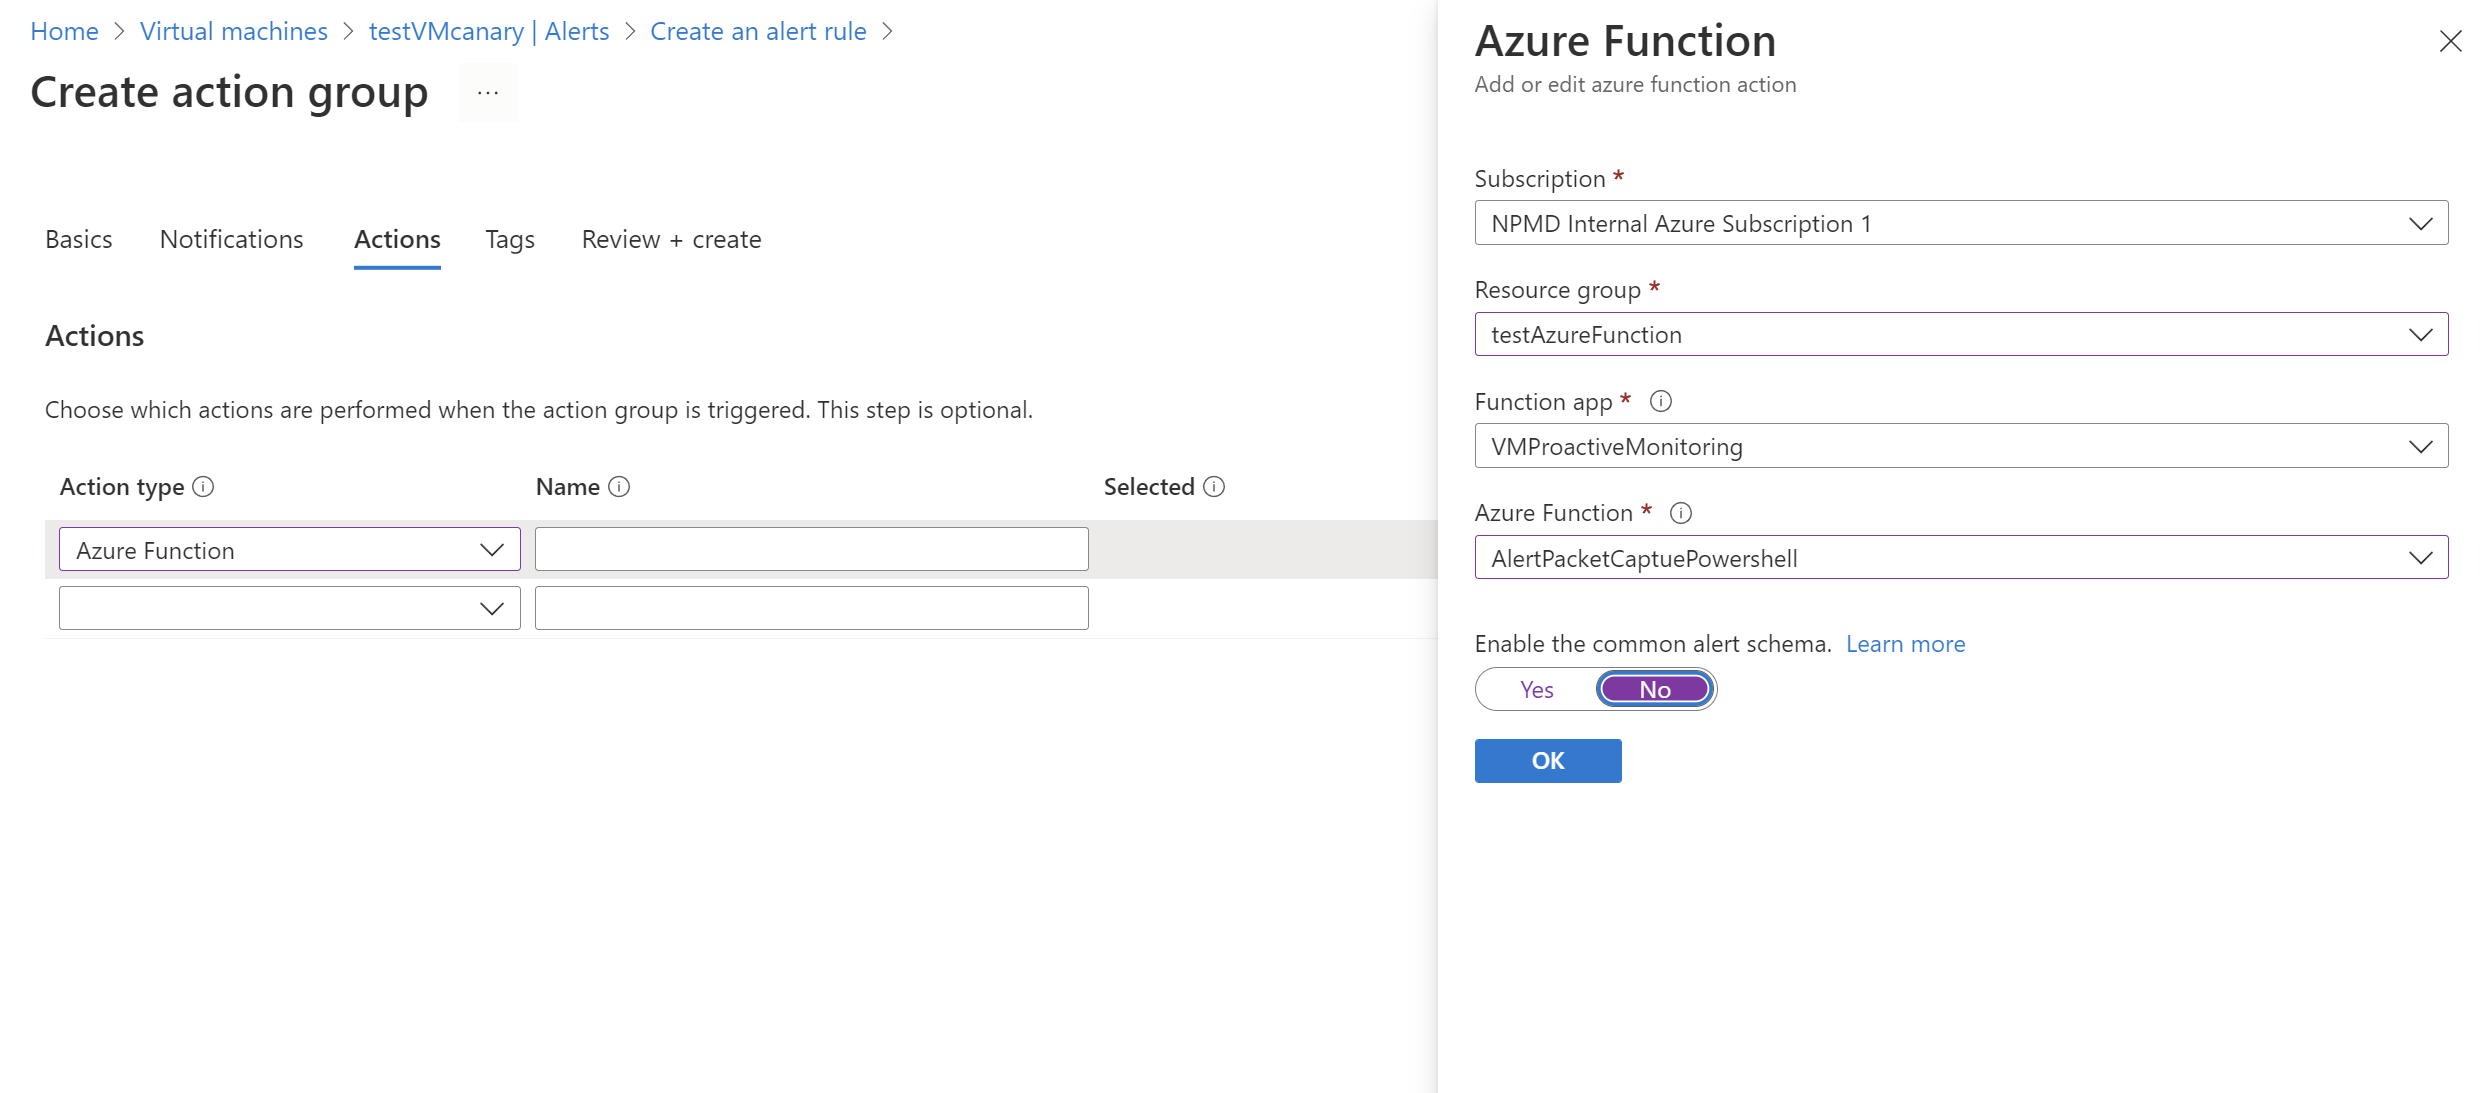
在“启用常见警报架构”滑块中,选择“否”。 然后选择“ 确定”。
查看结果
条件触发警报后,Network Watcher 会创建数据包捕获。 转到 Network Watcher,然后选择数据包捕获。 在此页面上,您可以选择文件链接下载抓包数据。
如果捕获文件存储在本地,可以通过登录到虚拟机来获取该文件。
有关从 Azure 存储帐户下载文件的说明,请参阅适用于 .NET 的 Azure Blob Storage 客户端库快速入门。 也可以使用 Azure Storage Explorer 工具。
下载捕获后,可以使用 Wireshark 等工具查看它,这些工具可以读取 .cap 文件。