Observação
O acesso a essa página exige autorização. Você pode tentar entrar ou alterar diretórios.
O acesso a essa página exige autorização. Você pode tentar alterar os diretórios.
服务总线 分区允许将队列、主题或消息实体跨多个消息代理进行分区。 分区意味着分区实体的总吞吐量不再受单个消息中转站的性能所限制。 此外,消息代理的临时服务中断(例如升级时)不会导致分区队列或主题不可用。 分区队列和主题可以包含所有高级服务总线功能,例如对事务和会话的支持。 有关详细信息,请参阅 分区队列和主题。 本文介绍了为服务总线队列或主题启用分区的不同方法。
重要
- 对于 基本 或 标准 SKU 中的所有队列和主题,可在创建实体时使用分区。
- 不能更改任何现有队列或主题中的分区选项。 只能在创建队列或主题时设置选项。
- 在 Standard 层命名空间中,可以在 1、2、3、4 或 5 GB 大小(默认值为 1 GB)中创建服务总线队列和主题。 启用分区后,服务总线创建实体的 16 个副本(16 个分区),每个副本的大小都相同。 因此,如果你创建了一个大小为 5 GB 的队列,共有 16 个分区,最大队列大小为 (5 * 16) = 80 GB。
使用 Azure 门户
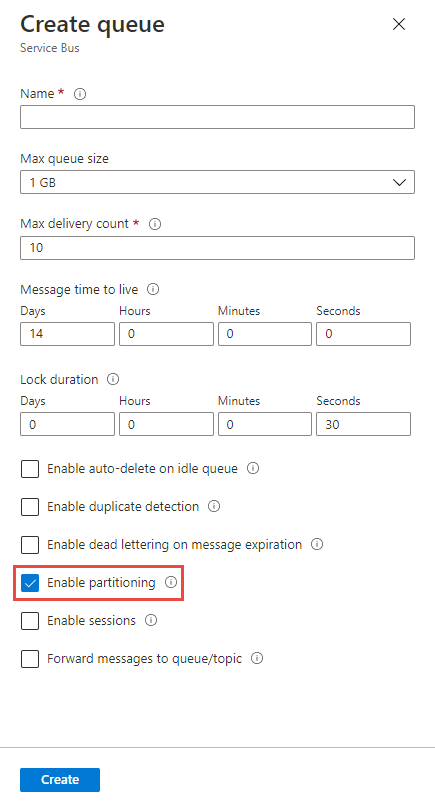
在 Azure 门户中创建 queue 时,请选择 启用分区如下图所示。
在 Azure 门户中创建主题时,请选择启用分区如下图所示。

使用Azure CLI
若要创建启用了分区的队列,请使用az servicebus queue create命令,并将--enable-partitioning设置为true。
az servicebus queue create \
    --resource-group myresourcegroup \
    --namespace-name mynamespace \
    --name myqueue \
    --enable-partitioning true
若要创建启用了分区的主题,请使用设置az servicebus topic create为--enable-partitioning的true命令。
az servicebus topic create \
    --resource-group myresourcegroup \
    --namespace-name mynamespace \
    --name mytopic \
    --enable-partitioning true
使用Azure PowerShell
若要创建启用了分区的队列,请使用New-AzServiceBusQueue命令,并将-EnablePartitioning设置为$True。
New-AzServiceBusQueue -ResourceGroup myresourcegroup `
    -NamespaceName mynamespace `
    -QueueName myqueue `
    -EnablePartitioning $True
若要创建启用了分区的主题,请使用设置New-AzServiceBusTopic为-EnablePartitioning的true命令。
New-AzServiceBusTopic -ResourceGroup myresourcegroup `
    -NamespaceName mynamespace `
    -Name mytopic `
    -EnablePartitioning $True
使用模板
若要创建启用了分区的队列,请在“队列属性”部分将enablePartitioning设置为true。 有关详细信息,请参阅 Microsoft.ServiceBus 命名空间/队列模板参考。
@description('Name of the Service Bus namespace')
param serviceBusNamespaceName string

@description('Name of the Queue')
param serviceBusQueueName string

@description('Location for all resources.')
param location string = resourceGroup().location

resource serviceBusNamespace 'Microsoft.ServiceBus/namespaces@2024-01-01' = {
  name: serviceBusNamespaceName
  location: location
  sku: {
    name: 'Standard'
  }

  resource queue 'queues' = {
    name: serviceBusQueueName
    properties: {
      enablePartitioning: true
    }
  }
}
若要创建启用了分区的主题,请在“主题属性”部分设置为enablePartitioningtrue。 有关详细信息,请参阅 Microsoft.ServiceBus 命名空间/主题模板参考。
@description('Name of the Service Bus namespace')
param serviceBusNamespaceName string

@description('Name of the Topic')
param serviceBusTopicName string

@description('Location for all resources.')
param location string = resourceGroup().location

resource serviceBusNamespace 'Microsoft.ServiceBus/namespaces@2024-01-01' = {
  name: serviceBusNamespaceName
  location: location
  sku: {
    name: 'Standard'
  }

  resource topic 'topics' = {
    name: serviceBusTopicName
    properties: {
      enablePartitioning: true
    }
  }
}
后续步骤
尝试使用所选语言的示例来探索Azure 服务总线功能。
- Azure 服务总线 客户端库示例(.NET 最新版)
- Azure 服务总线 用于 Java 的客户端库示例(最新版)
- Azure 服务总线 客户端库 Python 示例
- 适用于 JavaScript 的 Azure 服务总线 客户端库示例
- typeScript 的 Azure 服务总线 客户端库示例
在下面查找较旧的.NET和Java客户端库的示例:
注意
2026 年 9 月 30 日,我们将停用 Azure 服务总线 SDK 库 WindowsAzure.ServiceBus Microsoft.Azure。ServiceBus 和 com.microsoft。azure.servicebus 不符合Azure SDK准则。 我们还将结束对 SBMP 协议的支持,因此在 2026 年 9 月 30 日之后,你将无法再使用此协议。 在该日期之前迁移到最新的 Azure SDK 库,这些库提供关键的安全更新和改进的功能。
尽管旧库仍可在 2026 年 9 月 30 日以后使用,但它们将不再从Azure获得官方支持和更新。 有关详细信息,请参阅支持停用公告。