Azure 基于角色的访问控制 (Azure RBAC) 是用于管理 Azure 资源访问权限的授权系统。 若要授予访问权限,请将角色分配给特定范围内的用户、组、服务主体或托管标识。 除了使用 Azure PowerShell 或 Azure CLI 之外,还可以使用 Azure 资源管理器模板分配角色。 如果需要一致且重复地部署资源,模板会很有用。 本文介绍如何使用模板分配角色。
注释
Bicep 是一种用于定义 Azure 资源的新语言。 它提供比 JSON 更简单的创作体验,以及其他有助于提高基础结构即代码质量的功能。 建议不熟悉 Azure 基础结构即代码的所有人都使用 Bicep,而不是 JSON。
若要了解如何使用 Bicep 定义角色分配,请参阅使用 Bicep 创建 Azure RBAC 资源。 有关快速入门示例,请参阅 快速入门:使用 Bicep 分配 Azure 角色。
先决条件
若要分配 Azure 角色,必须具有:
-
Microsoft.Authorization/roleAssignments/write权限,例如基于角色的访问控制管理员或用户访问管理员
必须使用以下版本:
-
2018-09-01-preview或更高版本,用于将 Azure 角色分配给新的服务主体 -
2020-04-01-preview或更高版本,用于在资源范围内分配 Azure 角色 -
2022-04-01是第一个稳定版本
有关详细信息,请参阅 Azure RBAC REST API 的 API 版本。
获取对象 ID
若要分配角色,需要指定要为其分配角色的用户、组或应用程序的 ID。 ID 的格式为:11111111-1111-1111-1111-111111111111。 可以使用 Azure 门户、Azure PowerShell 或 Azure CLI 来获取 ID。
用户
若要获取用户的 ID,可以使用 Get-AzADUser 或 az ad user show 命令。
$objectid = (Get-AzADUser -DisplayName "{name}").id
objectid=$(az ad user show --id "{email}" --query id --output tsv)
组
若要获取组的 ID,可以使用 Get-AzADGroup 或 az ad group show 命令。
$objectid = (Get-AzADGroup -DisplayName "{name}").id
objectid=$(az ad group show --group "{name}" --query id --output tsv)
托管标识
若要获取托管标识的 ID,可以使用 Get-AzAdServiceprincipal 或 az ad sp 命令。
$objectid = (Get-AzADServicePrincipal -DisplayName <Azure resource name>).id
objectid=$(az ad sp list --display-name <Azure resource name> --query [].id --output tsv)
应用程序
若要获取服务主体(应用程序使用的标识)的 ID,可以使用 Get-AzADServicePrincipal 或 az ad sp list 命令。 对于服务主体,使用对象 ID,而不是应用程序 ID。
$objectid = (Get-AzADServicePrincipal -DisplayName "{name}").id
objectid=$(az ad sp list --display-name "{name}" --query [].id --output tsv)
分配 Azure 角色
在 Azure RBAC 中,若要授予访问权限,需分配一个角色。
资源组范围(不包含参数)
以下模板演示了用于分配角色的基本方法。 某些值在模板中指定。 以下模板演示:
- 如何将读者角色分配给资源组范围内的用户、组或应用程序
若要使用模板,必须执行以下操作:
- 创建新的 JSON 文件并复制模板
- 将
<your-principal-id>替换为要为其分配角色的用户、组、托管标识或应用程序的 ID
{
    "$schema": "https://schema.management.azure.com/schemas/2015-01-01/deploymentTemplate.json#",
    "contentVersion": "1.0.0.0",
    "resources": [
        {
            "type": "Microsoft.Authorization/roleAssignments",
            "apiVersion": "2022-04-01",
            "name": "[guid(resourceGroup().id)]",
            "properties": {
                "roleDefinitionId": "[concat('/subscriptions/', subscription().subscriptionId, '/providers/Microsoft.Authorization/roleDefinitions/', 'acdd72a7-3385-48ef-bd42-f606fba81ae7')]",
                "principalId": "<your-principal-id>"
            }
        }
    ]
}
下面是 New-AzResourceGroupDeployment 和 az deployment group create 命令示例,演示如何在名为 ExampleGroup 的资源组中启动部署。
New-AzResourceGroupDeployment -ResourceGroupName ExampleGroup -TemplateFile rbac-test.json
az deployment group create --resource-group ExampleGroup --template-file rbac-test.json
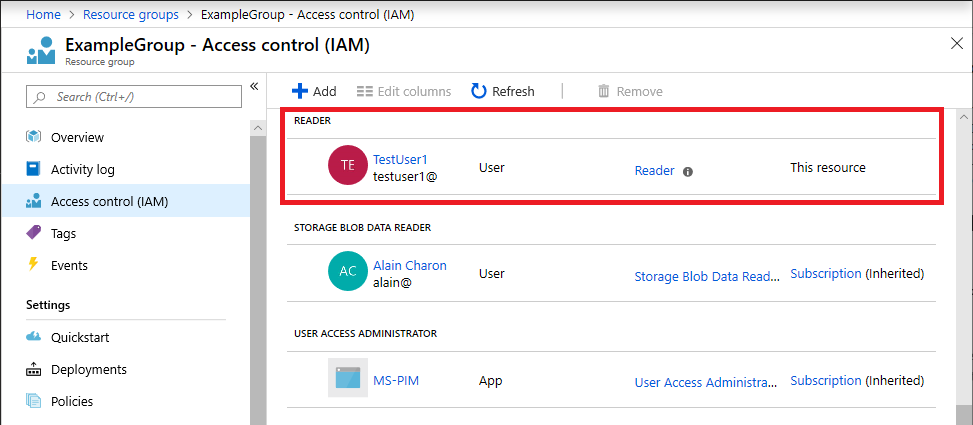
下面显示了在部署模板后向资源组的用户分配“读者”角色的示例。
资源组或订阅范围
上一个模板不太灵活。 以下模板使用参数,并且可以在不同的范围内使用。 以下模板演示:
- 如何将角色分配给资源组范围或订阅范围内的用户、组或应用程序
- 如何将“所有者”、“参与者”和“读者”角色指定为参数
若要使用模板,必须指定以下输入:
- 要为其分配角色的用户、组、托管标识或应用程序的 ID
- 将用于角色分配的唯一 ID,或者可以使用默认 ID
{
    "$schema": "https://schema.management.azure.com/schemas/2015-01-01/deploymentTemplate.json#",
    "contentVersion": "1.0.0.0",
    "parameters": {
        "principalId": {
            "type": "string",
            "metadata": {
                "description": "The principal to assign the role to"
            }
        },
        "builtInRoleType": {
            "type": "string",
            "allowedValues": [
                "Owner",
                "Contributor",
                "Reader"
            ],
            "metadata": {
                "description": "Built-in role to assign"
            }
        },
        "roleNameGuid": {
            "type": "string",
            "defaultValue": "[newGuid()]",
            "metadata": {
                "description": "A new GUID used to identify the role assignment"
            }
        }
    },
    "variables": {
        "Owner": "[concat('/subscriptions/', subscription().subscriptionId, '/providers/Microsoft.Authorization/roleDefinitions/', '8e3af657-a8ff-443c-a75c-2fe8c4bcb635')]",
        "Contributor": "[concat('/subscriptions/', subscription().subscriptionId, '/providers/Microsoft.Authorization/roleDefinitions/', 'b24988ac-6180-42a0-ab88-20f7382dd24c')]",
        "Reader": "[concat('/subscriptions/', subscription().subscriptionId, '/providers/Microsoft.Authorization/roleDefinitions/', 'acdd72a7-3385-48ef-bd42-f606fba81ae7')]"
    },
    "resources": [
        {
            "type": "Microsoft.Authorization/roleAssignments",
            "apiVersion": "2022-04-01",
            "name": "[parameters('roleNameGuid')]",
            "properties": {
                "roleDefinitionId": "[variables(parameters('builtInRoleType'))]",
                "principalId": "[parameters('principalId')]"
            }
        }
    ]
}
注释
此模板不是幂等的,除非将同一 roleNameGuid 值作为模板的每个部署的参数提供。 如果未提供 roleNameGuid,则默认情况下将在每个部署上生成新的 GUID,并且后续部署将失败并出现 Conflict: RoleAssignmentExists 错误。
角色分配的范围是根据部署级别确定的。 下面是 New-AzResourceGroupDeployment 和 az deployment group create 命令示例,演示如何在资源组范围启动部署。
New-AzResourceGroupDeployment -ResourceGroupName ExampleGroup -TemplateFile rbac-test.json -principalId $objectid -builtInRoleType Reader
az deployment group create --resource-group ExampleGroup --template-file rbac-test.json --parameters principalId=$objectid builtInRoleType=Reader
下面是 New-AzDeployment 和 az deployment sub create 命令示例,演示如何在订阅范围启动部署并指定位置。
New-AzDeployment -Location chinanorth -TemplateFile rbac-test.json -principalId $objectid -builtInRoleType Reader
az deployment sub create --location chinanorth --template-file rbac-test.json --parameters principalId=$objectid builtInRoleType=Reader
资源范围
如果需要在资源级别分配角色,请将角色分配的 scope 属性设置为资源的名称。
以下模板演示:
- 如何新建存储帐户
- 如何将角色分配给存储帐户范围内的用户、组或应用程序
- 如何将“所有者”、“参与者”和“读者”角色指定为参数
若要使用模板,必须指定以下输入:
- 要为其分配角色的用户、组、托管标识或应用程序的 ID
{
    "$schema": "https://schema.management.azure.com/schemas/2019-04-01/deploymentTemplate.json#",
    "contentVersion": "1.0.0.0",
    "parameters": {
        "principalId": {
            "type": "string",
            "metadata": {
                "description": "The principal to assign the role to"
            }
        },
        "builtInRoleType": {
            "type": "string",
            "allowedValues": [
                "Owner",
                "Contributor",
                "Reader"
            ],
            "metadata": {
                "description": "Built-in role to assign"
            }
        },
        "roleNameGuid": {
            "type": "string",
            "defaultValue": "[newGuid()]",
            "metadata": {
                "description": "A new GUID used to identify the role assignment"
            }
        },
        "location": {
            "type": "string",
            "defaultValue": "[resourceGroup().location]"
        }
    },
    "variables": {
        "Owner": "[concat('/subscriptions/', subscription().subscriptionId, '/providers/Microsoft.Authorization/roleDefinitions/', '8e3af657-a8ff-443c-a75c-2fe8c4bcb635')]",
        "Contributor": "[concat('/subscriptions/', subscription().subscriptionId, '/providers/Microsoft.Authorization/roleDefinitions/', 'b24988ac-6180-42a0-ab88-20f7382dd24c')]",
        "Reader": "[concat('/subscriptions/', subscription().subscriptionId, '/providers/Microsoft.Authorization/roleDefinitions/', 'acdd72a7-3385-48ef-bd42-f606fba81ae7')]",
        "storageName": "[concat('storage', uniqueString(resourceGroup().id))]"
    },
    "resources": [
        {
            "apiVersion": "2019-04-01",
            "type": "Microsoft.Storage/storageAccounts",
            "name": "[variables('storageName')]",
            "location": "[parameters('location')]",
            "sku": {
                "name": "Standard_LRS"
            },
            "kind": "Storage",
            "properties": {}
        },
        {
            "type": "Microsoft.Authorization/roleAssignments",
            "apiVersion": "2022-04-01",
            "name": "[parameters('roleNameGuid')]",
            "scope": "[concat('Microsoft.Storage/storageAccounts', '/', variables('storageName'))]",
            "dependsOn": [
                "[variables('storageName')]"
            ],
            "properties": {
                "roleDefinitionId": "[variables(parameters('builtInRoleType'))]",
                "principalId": "[parameters('principalId')]"
            }
        }
    ]
}
若要部署上一个模板,请使用资源组命令。 下面是 New-AzResourceGroupDeployment 和 az deployment group create 命令示例,演示如何在资源范围启动部署。
New-AzResourceGroupDeployment -ResourceGroupName ExampleGroup -TemplateFile rbac-test.json -principalId $objectid -builtInRoleType Contributor
az deployment group create --resource-group ExampleGroup --template-file rbac-test.json --parameters principalId=$objectid builtInRoleType=Contributor
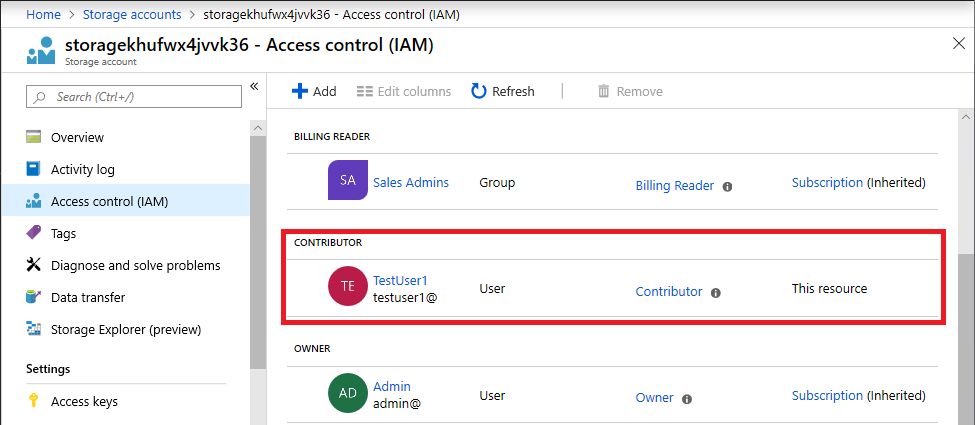
下面显示了在部署模板后向存储帐户的用户分配“参与者”角色的示例。
新服务主体
如果创建新服务主体并立即尝试将角色分配给该服务主体,则在某些情况下该角色分配可能会失败。 例如,如果创建新托管标识,然后尝试将角色分配给同一 Azure 资源管理器模板中的服务主体,则角色分配可能会失败。 失败原因可能是复制延迟。 服务主体是在一个区域中创建的;但是,角色分配可能发生在尚未复制服务主体的其他区域中。
若要解决这种情况,应在创建角色分配时将 principalType 属性设置为 ServicePrincipal。 还必须将角色分配的 apiVersion 设置为 2018-09-01-preview 或更高版本。
2022-04-01 是第一个稳定版本。
以下模板演示:
- 如何创建新的托管标识服务主体
- 如何指定
principalType - 如何将“参与者”角色分配给资源组范围内的服务主体
若要使用模板,必须指定以下输入:
- 托管标识的基名称,或者可以使用默认字符串
{
    "$schema": "http://schema.management.azure.com/schemas/2015-01-01/deploymentTemplate.json#",
    "contentVersion": "1.0.0.0",
    "parameters": {
        "baseName": {
            "type": "string",
            "defaultValue": "msi-test"
        }
    },
    "variables": {
        "identityName": "[concat(parameters('baseName'), '-bootstrap')]",
        "bootstrapRoleAssignmentId": "[guid(concat(resourceGroup().id, 'contributor'))]",
        "contributorRoleDefinitionId": "[concat('/subscriptions/', subscription().subscriptionId, '/providers/Microsoft.Authorization/roleDefinitions/', 'b24988ac-6180-42a0-ab88-20f7382dd24c')]"
    },
    "resources": [
        {
            "type": "Microsoft.ManagedIdentity/userAssignedIdentities",
            "name": "[variables('identityName')]",
            "apiVersion": "2018-11-30",
            "location": "[resourceGroup().location]"
        },
        {
            "type": "Microsoft.Authorization/roleAssignments",
            "apiVersion": "2022-04-01",
            "name": "[variables('bootstrapRoleAssignmentId')]",
            "dependsOn": [
                "[resourceId('Microsoft.ManagedIdentity/userAssignedIdentities', variables('identityName'))]"
            ],
            "properties": {
                "roleDefinitionId": "[variables('contributorRoleDefinitionId')]",
                "principalId": "[reference(resourceId('Microsoft.ManagedIdentity/userAssignedIdentities', variables('identityName')), '2018-11-30').properties.principalId]",
                "principalType": "ServicePrincipal"
            }
        }
    ]
}
下面是 New-AzResourceGroupDeployment 和 az deployment group create 命令示例,演示如何在资源组范围启动部署。
New-AzResourceGroupDeployment -ResourceGroupName ExampleGroup2 -TemplateFile rbac-test.json
az deployment group create --resource-group ExampleGroup2 --template-file rbac-test.json
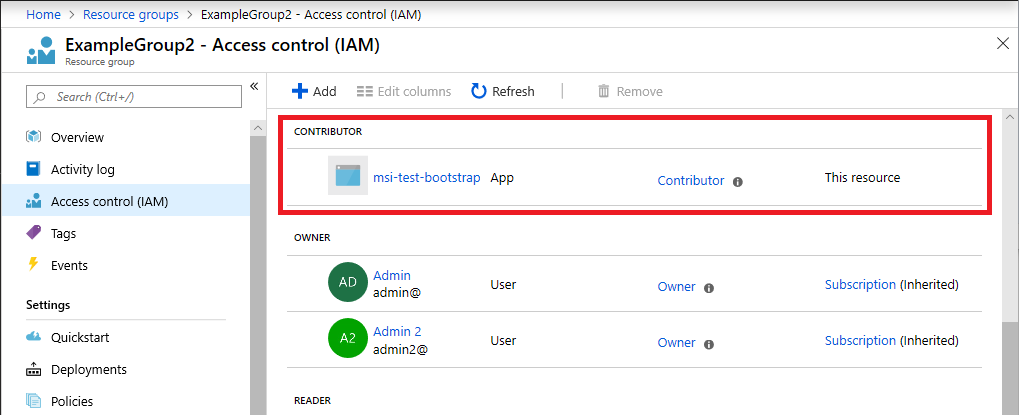
下面显示了在部署模板后向新的托管标识服务主体分配“参与者”角色的示例。


