教程:Azure AI 服务的文档智能
Azure AI 文档智能是一种 Azure AI 服务,使你能够使用机器学习技术构建自动化数据处理应用程序。 本教程介绍如何在 Azure Synapse Analytics 中轻松扩充数据。 你将使用文档智能来分析表单和文档,提取文本和数据,并返回结构化 JSON 输出。 可以快速获取根据特定内容定制的准确结果,无需进行繁琐的手动干预,也不需要具备丰富的数据科学专业知识。
本教程演示如何将文档智能和 SynapseML 结合使用来实现以下目的:
- 从给定文档中提取文本和布局
- 从收据中检测和提取数据
- 从名片中检测和提取数据
- 从发票中检测和提取数据
- 从标识文档中检测和提取数据
如果没有 Azure 订阅,请在开始前创建一个试用帐户。
先决条件
- Azure Synapse Analytics 工作区,其中 Azure Data Lake Storage Gen2 存储帐户配置为默认存储。 你需要成为所使用的 Data Lake Storage Gen2 文件系统的存储 Blob 数据参与者。
- Azure Synapse Analytics 工作区中的 Spark 池。 有关详细信息,请参阅在 Azure Synapse 中创建 Spark 池。
- 在 Azure Synapse 中配置 Azure AI 服务教程中所述的预配置步骤。
入门
打开 Synapse Studio 并创建新笔记本。 若要开始,请导入 SynapseML。
import synapse.ml
from synapse.ml.cognitive import *
配置文档智能
使用你在配置前的步骤中配置的链接文档智能。
ai_service_name = "<Your linked service for Document Intelligence>"
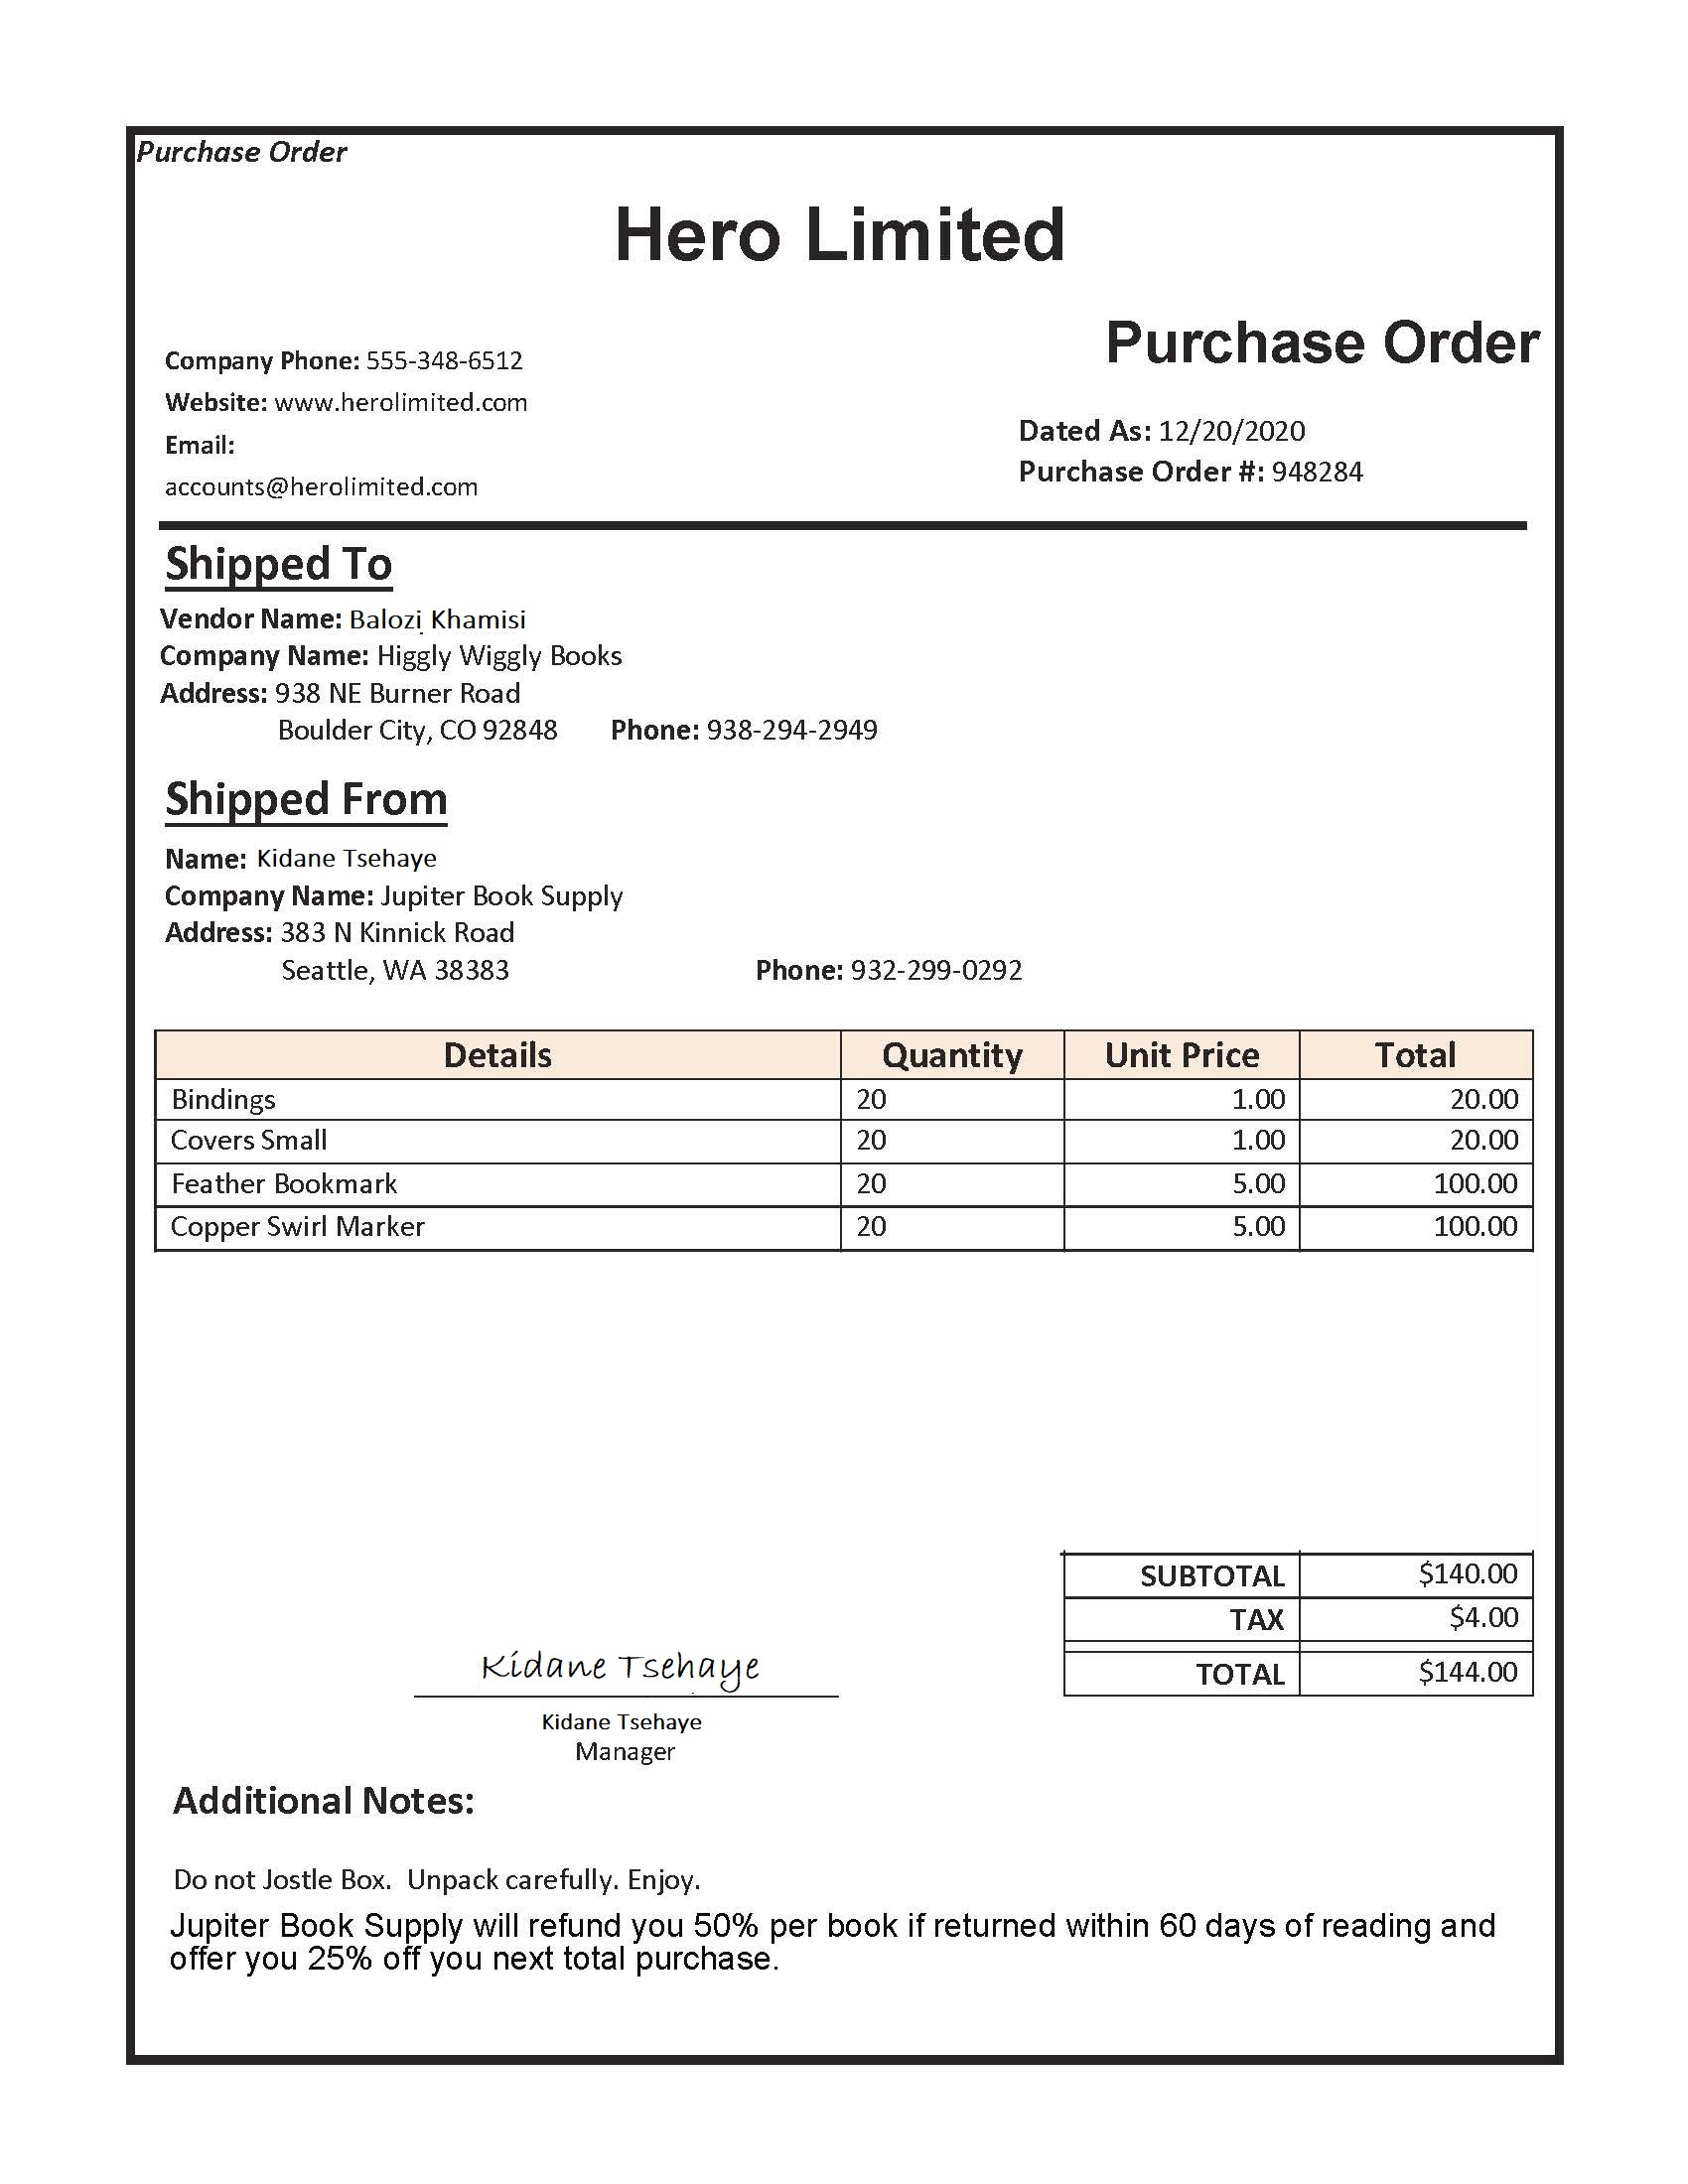
分析布局
从给定文档中提取文本和布局信息。 输入文档必须是支持的内容类型之一:“application/pdf”、“image/jpeg”、“image/png”或“image/tiff”。
示例输入
from pyspark.sql.functions import col, flatten, regexp_replace, explode, create_map, lit

imageDf = spark.createDataFrame([
  ("<replace with your file path>/layout.jpg",)
], ["source",])

analyzeLayout = (AnalyzeLayout()
                 .setLinkedService(ai_service_name)
                 .setImageUrlCol("source")
                 .setOutputCol("layout")
                 .setConcurrency(5))


display(analyzeLayout
        .transform(imageDf)
        .withColumn("lines", flatten(col("layout.analyzeResult.readResults.lines")))
        .withColumn("readLayout", col("lines.text"))
        .withColumn("tables", flatten(col("layout.analyzeResult.pageResults.tables")))
        .withColumn("cells", flatten(col("tables.cells")))
        .withColumn("pageLayout", col("cells.text"))
        .select("source", "readLayout", "pageLayout"))
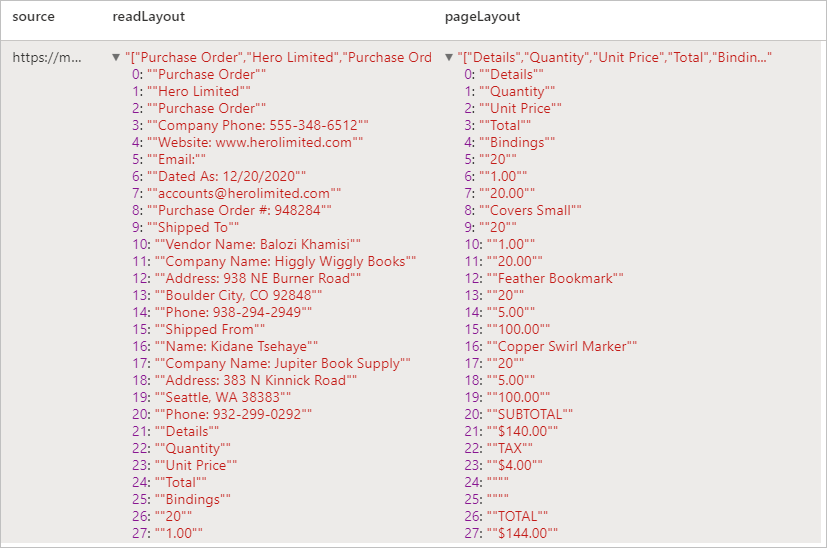
预期结果
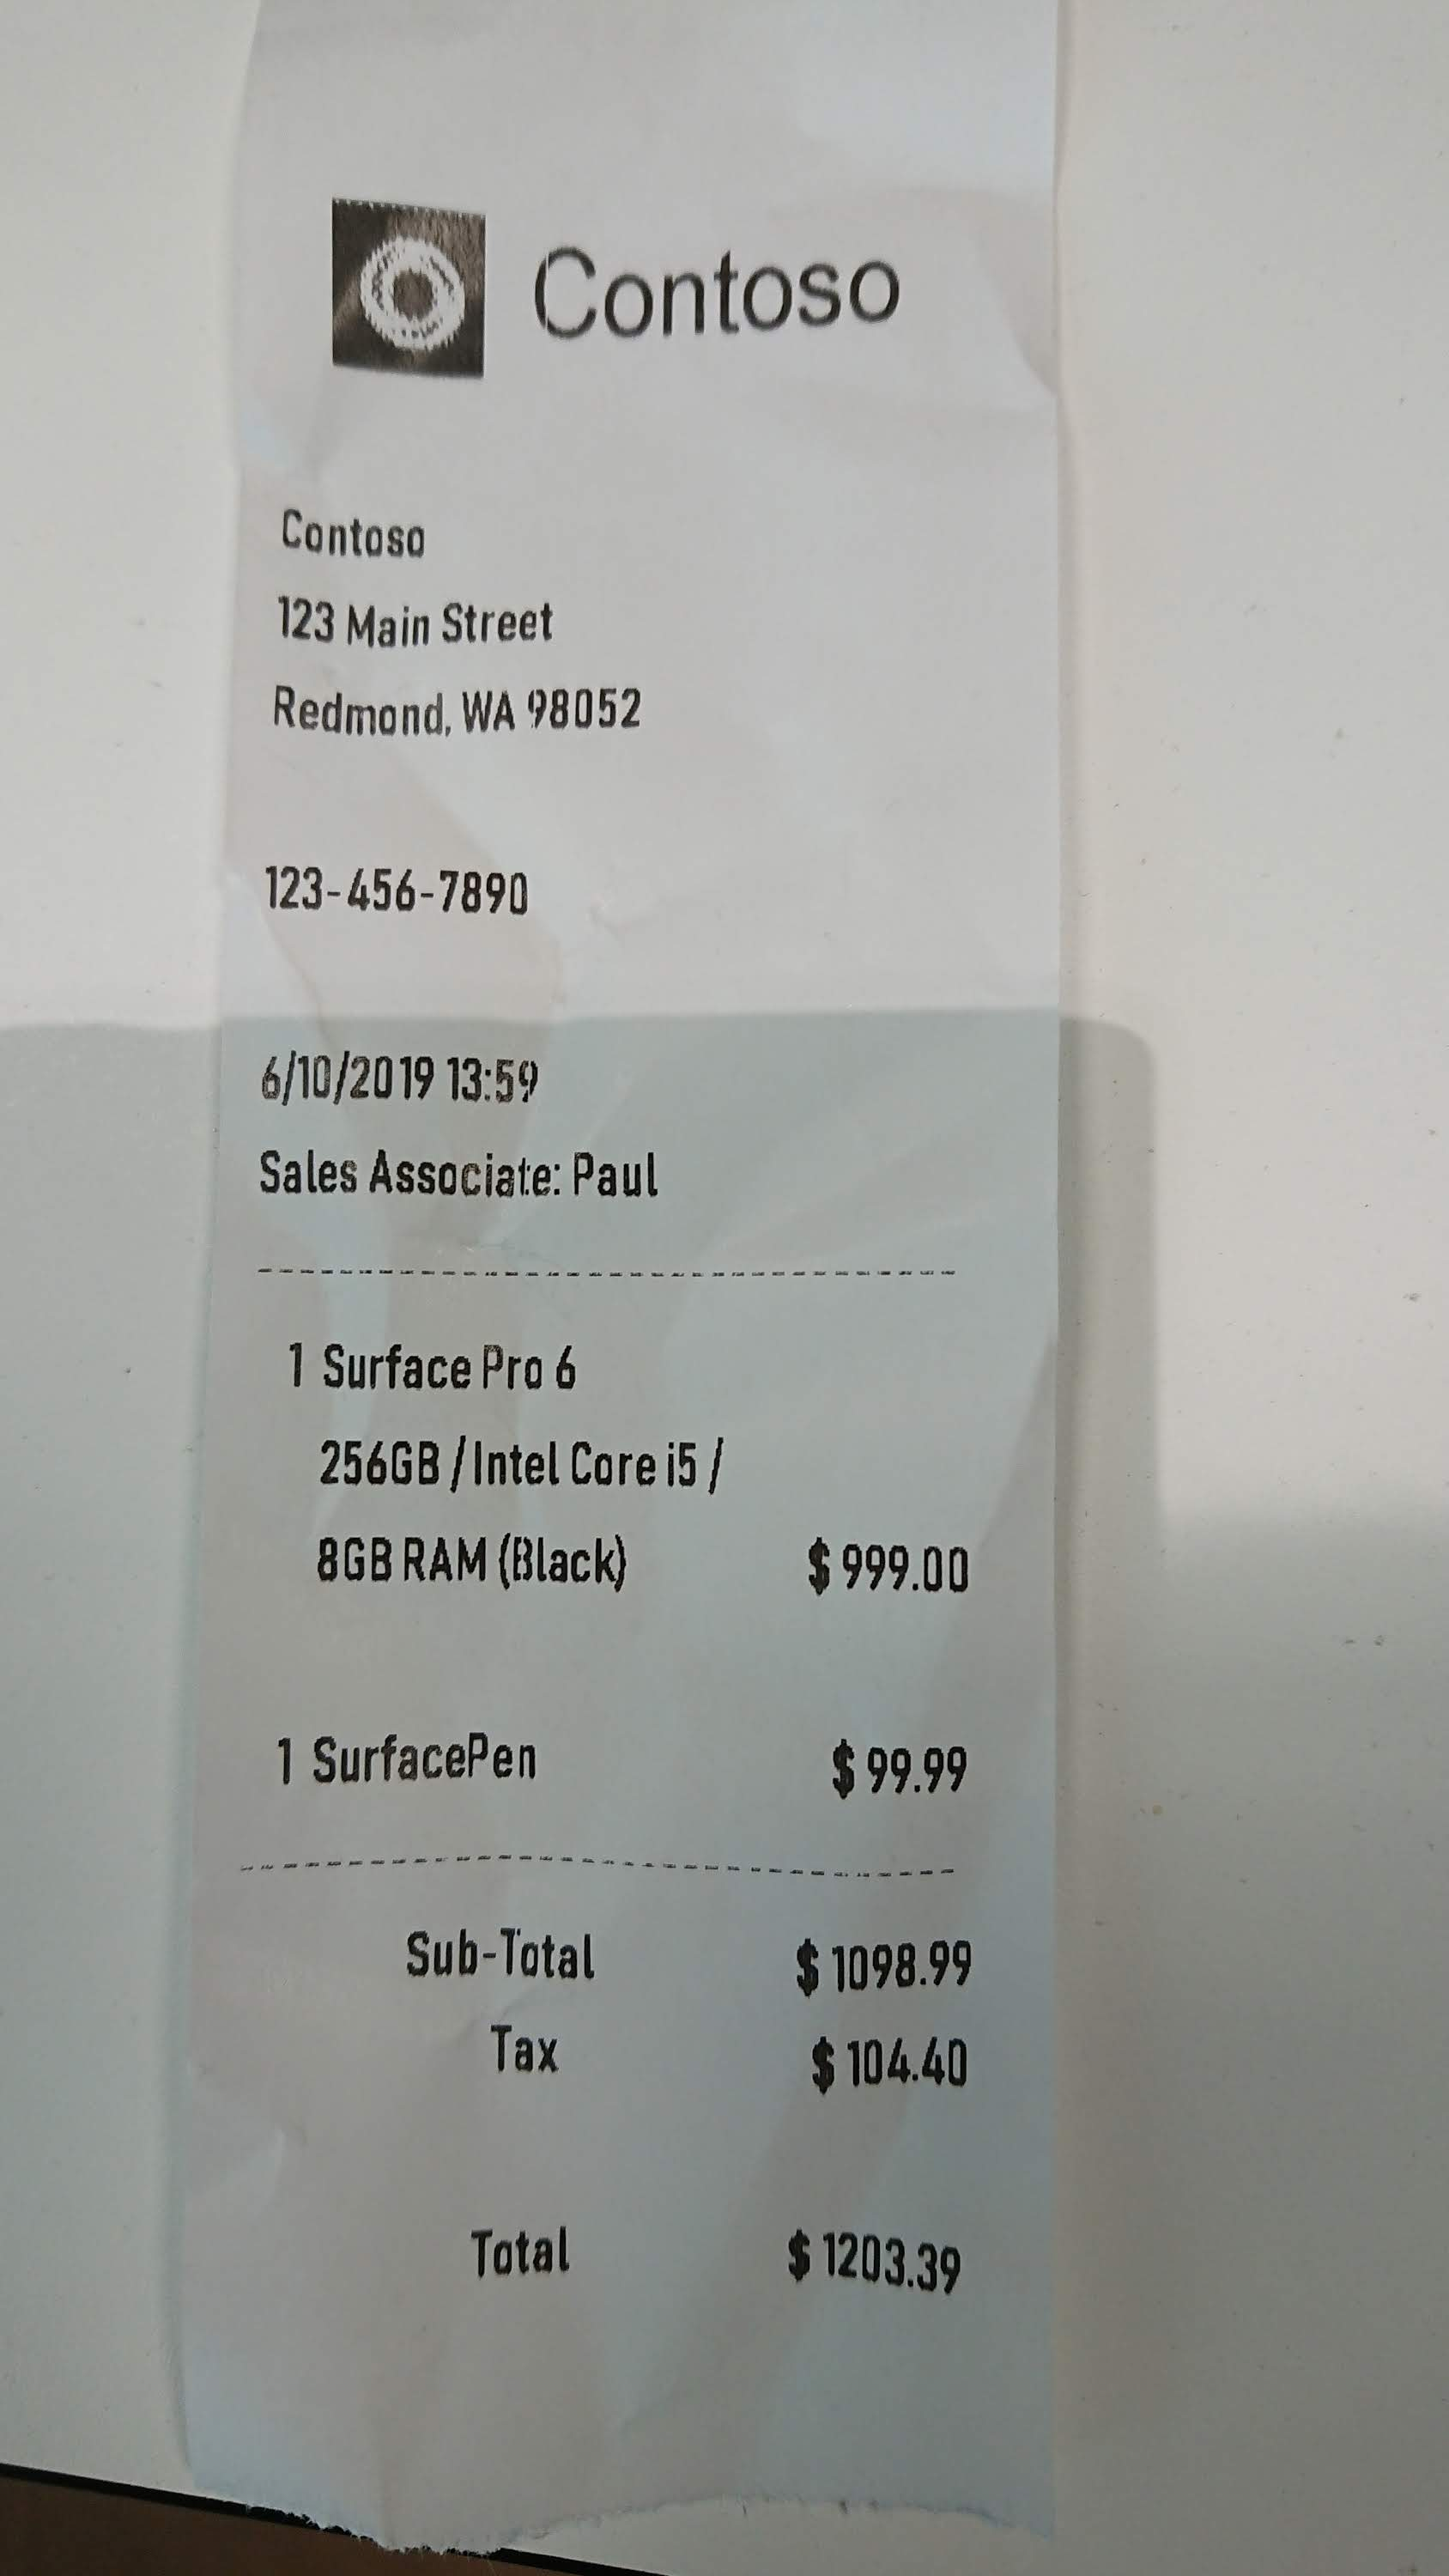
分析回执
使用光学字符识别 (OCR) 和我们的收据模型从收据中检测和提取数据,这让你可以轻松地从收据中提取结构化数据,例如商店名称、商家电话号码、交易日期、交易总额等。
示例输入
imageDf2 = spark.createDataFrame([
  ("<replace with your file path>/receipt1.png",)
], ["image",])

analyzeReceipts = (AnalyzeReceipts()
                 .setLinkedService(ai_service_name)
                 .setImageUrlCol("image")
                 .setOutputCol("parsed_document")
                 .setConcurrency(5))


results = analyzeReceipts.transform(imageDf2).cache()
display(results.select("image", "parsed_document"))
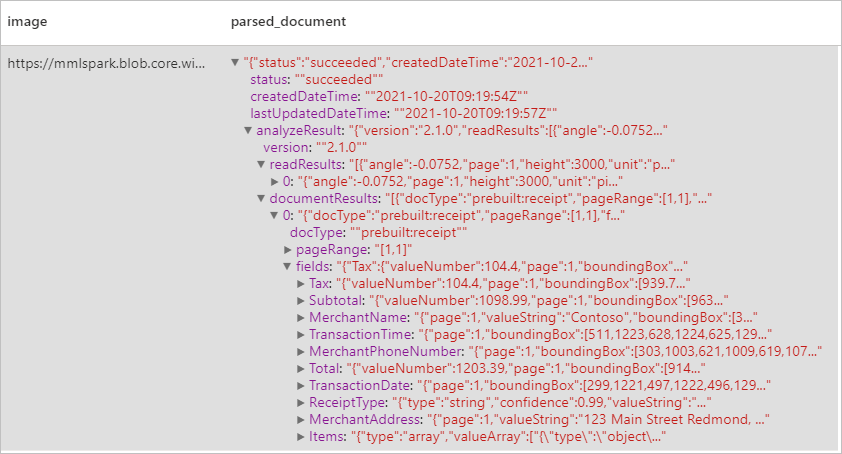
预期结果
分析名片
使用光学字符识别 (OCR) 和名片模型从名片中检测和提取数据,这让你可以轻松地从名片中提取结构化数据,例如联系人姓名、公司名称、电话号码、电子邮件等。
示例输入
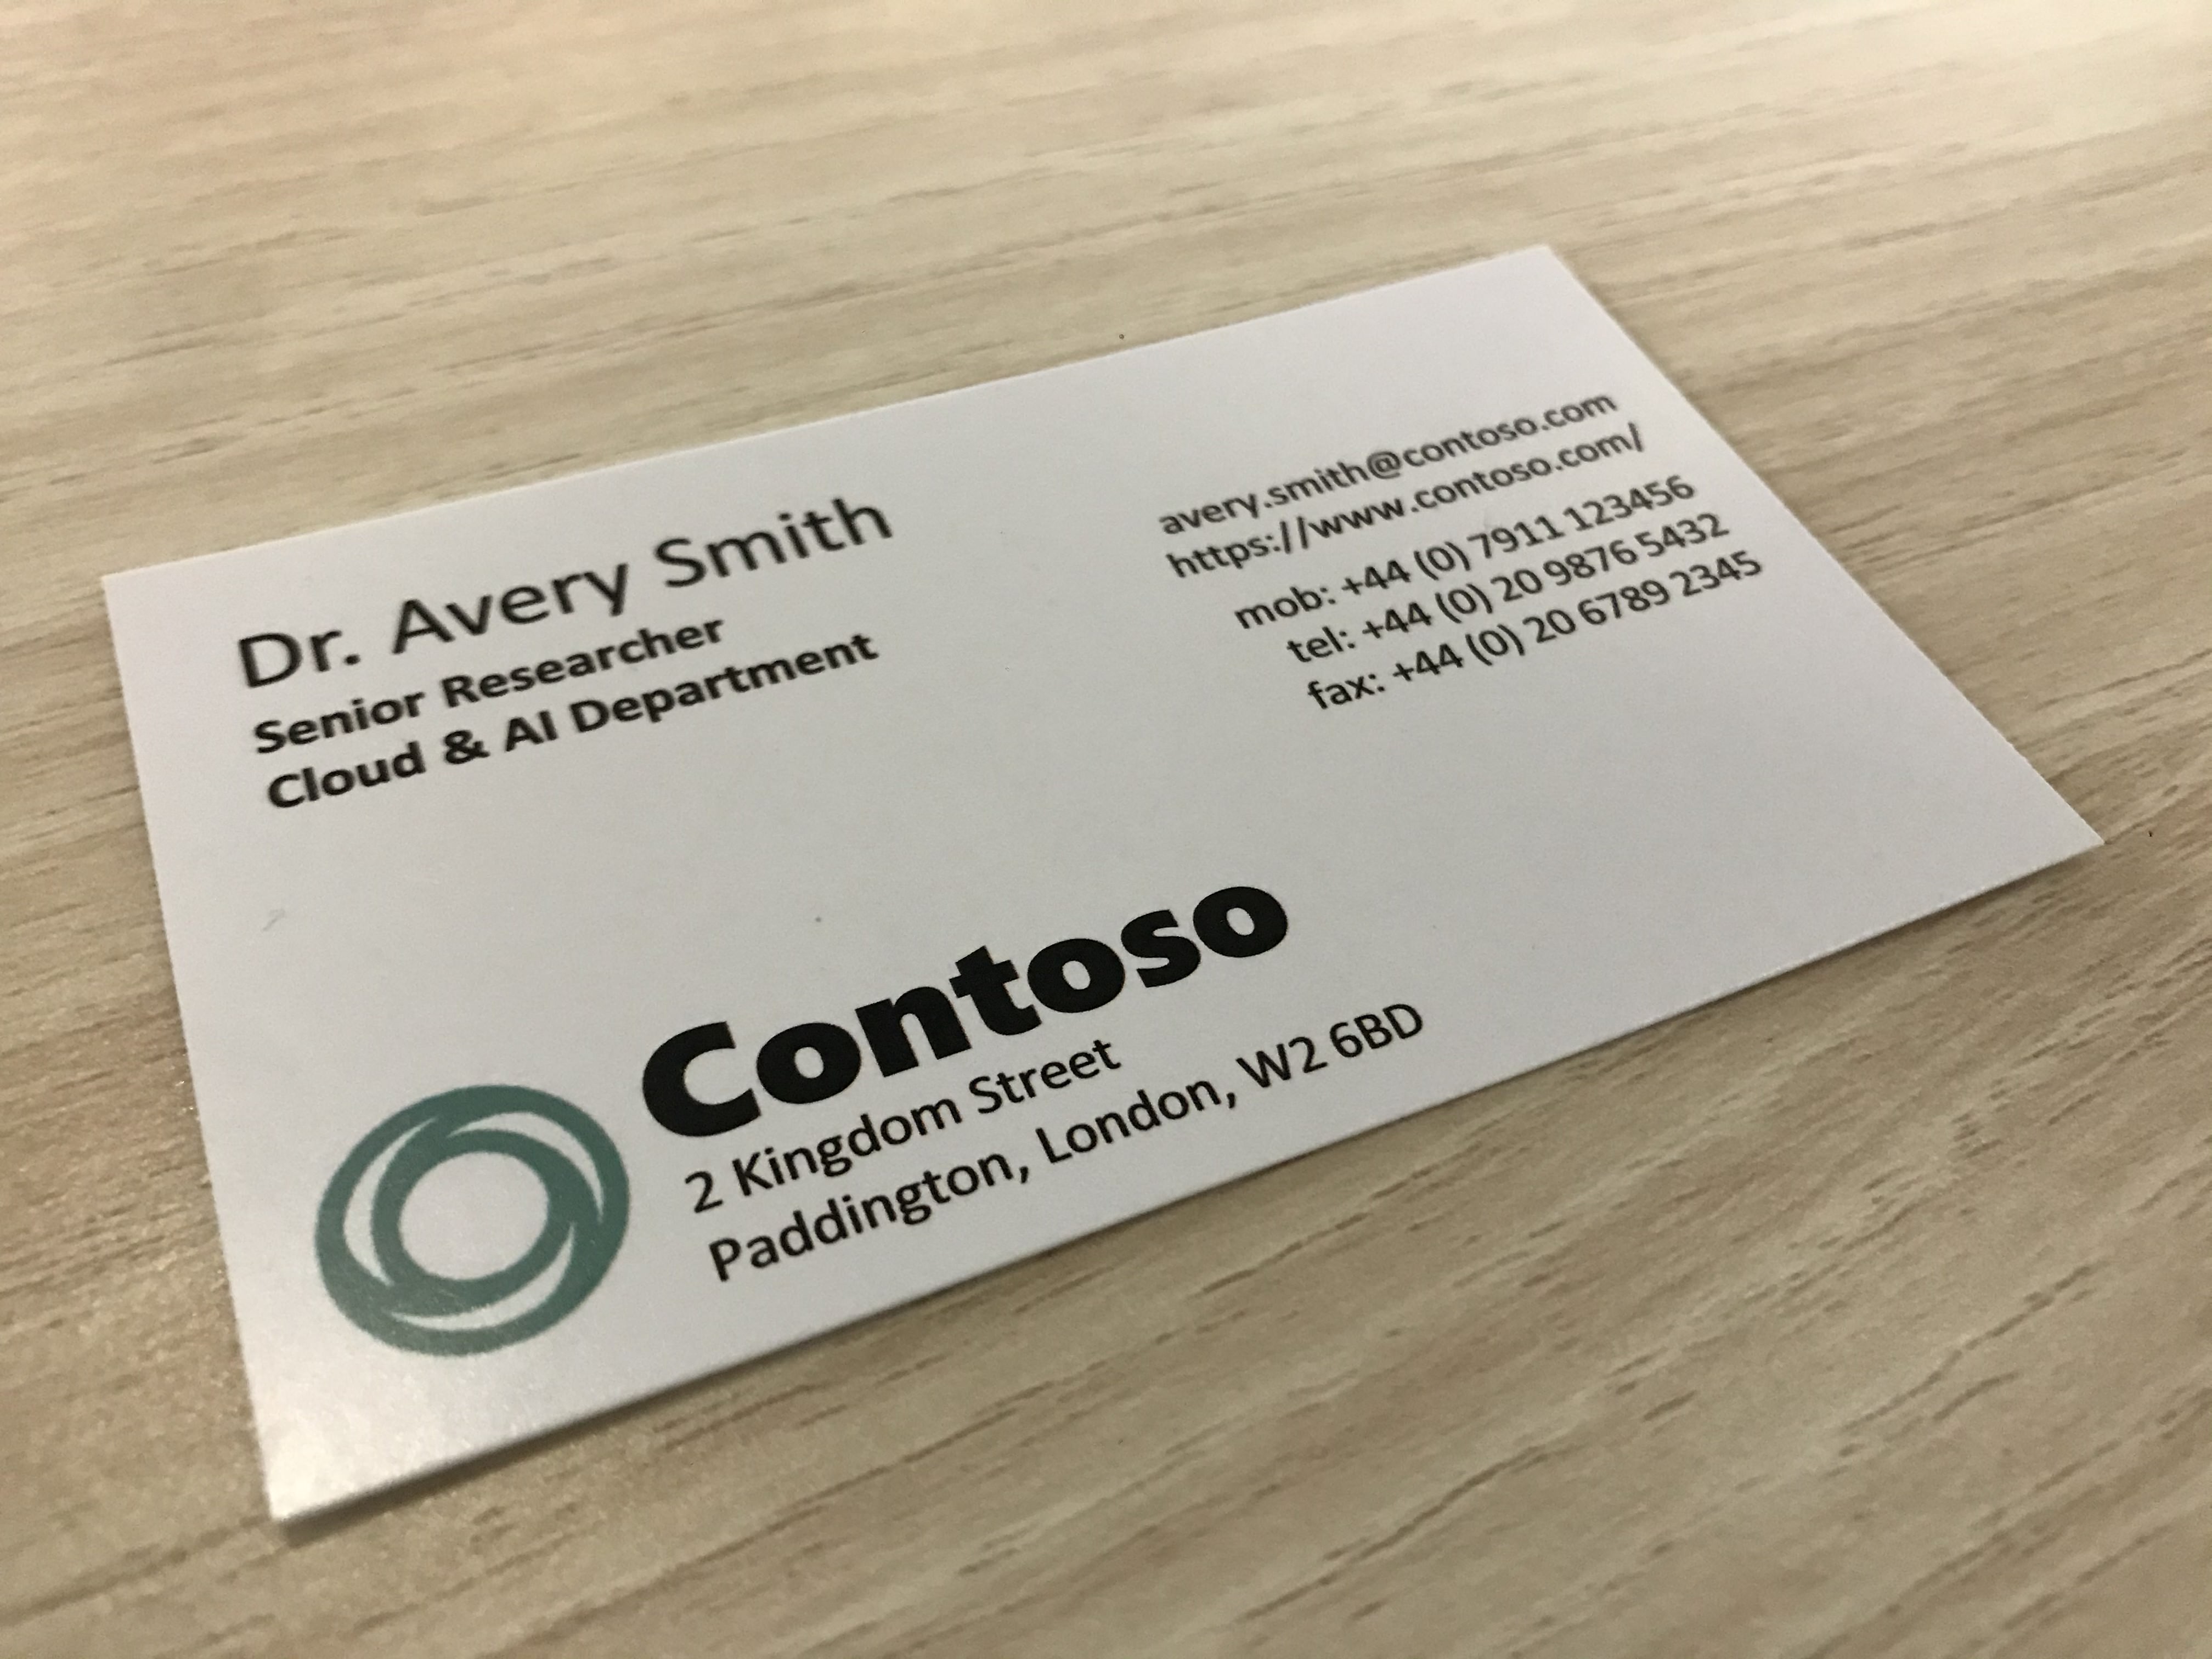
imageDf3 = spark.createDataFrame([
  ("<replace with your file path>/business_card.jpg",)
], ["source",])

analyzeBusinessCards = (AnalyzeBusinessCards()
                 .setLinkedService(ai_service_name)
                 .setImageUrlCol("source")
                 .setOutputCol("businessCards")
                 .setConcurrency(5))

display(analyzeBusinessCards
        .transform(imageDf3)
        .withColumn("documents", explode(col("businessCards.analyzeResult.documentResults.fields")))
        .select("source", "documents"))
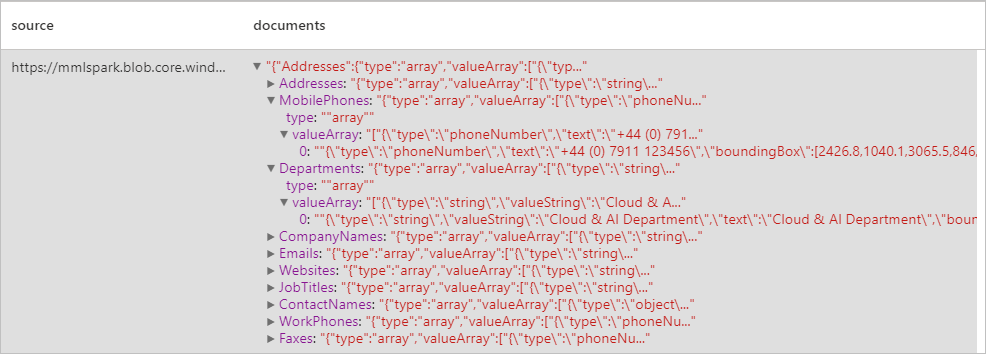
预期结果
分析发票
使用光学字符识别 (OCR) 以及我们的发票理解深度学习模型从发票中检测和提取数据,这让你可以轻松地从发票中提取结构化数据,例如客户、供应商、发票 ID、发票截止日期、总金额、发票应付金额、税额、发货人、帐单付款、行项等。
示例输入
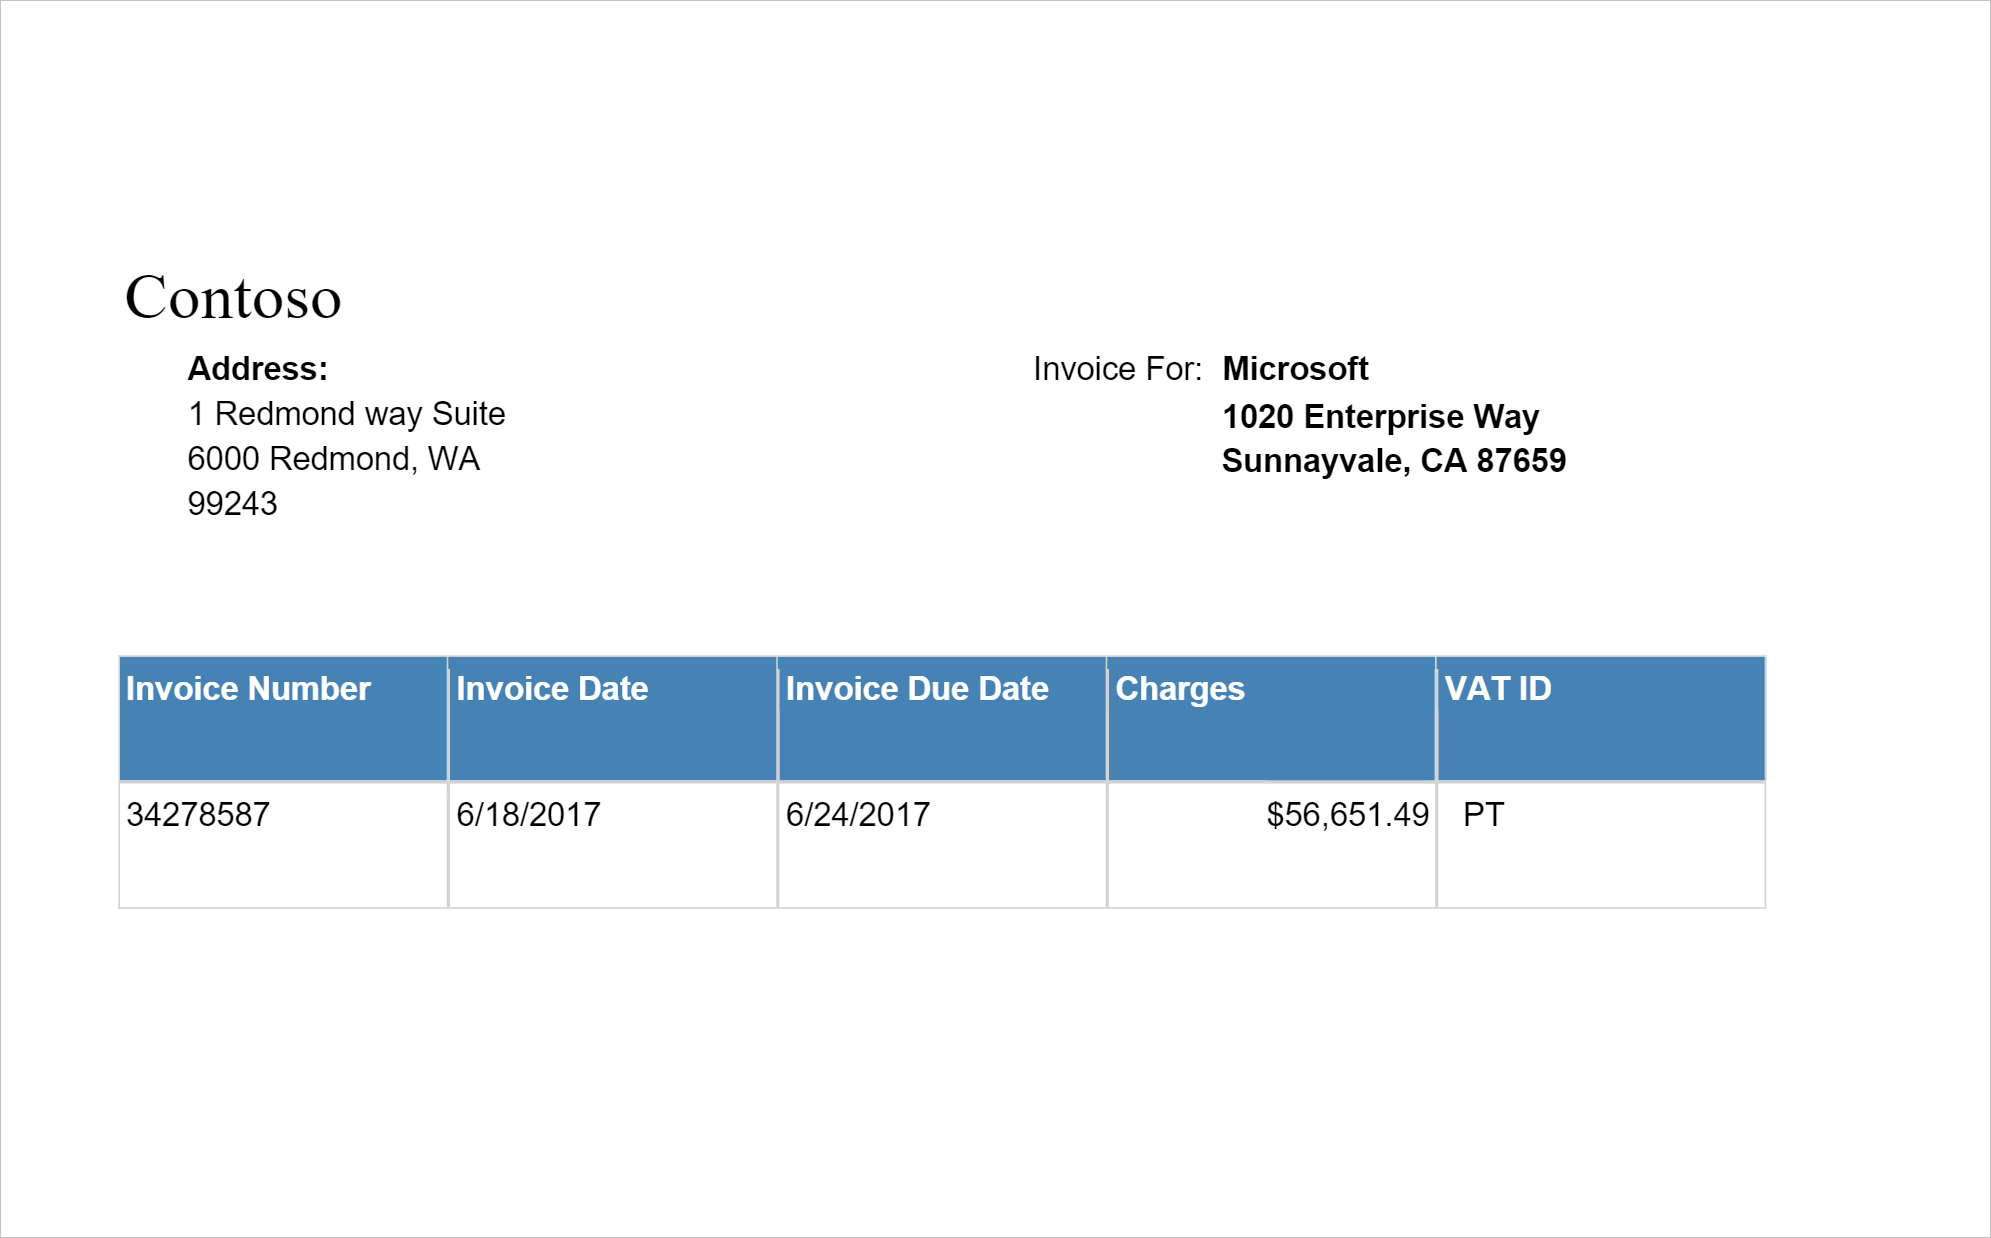
imageDf4 = spark.createDataFrame([
  ("<replace with your file path>/invoice.png",)
], ["source",])

analyzeInvoices = (AnalyzeInvoices()
                 .setLinkedService(ai_service_name)
                 .setImageUrlCol("source")
                 .setOutputCol("invoices")
                 .setConcurrency(5))

display(analyzeInvoices
        .transform(imageDf4)
        .withColumn("documents", explode(col("invoices.analyzeResult.documentResults.fields")))
        .select("source", "documents"))
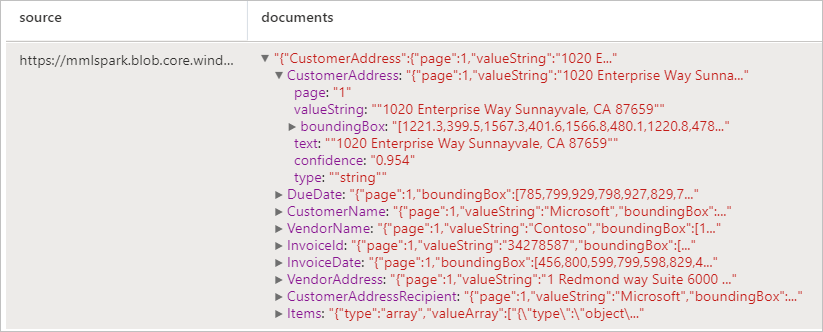
预期结果
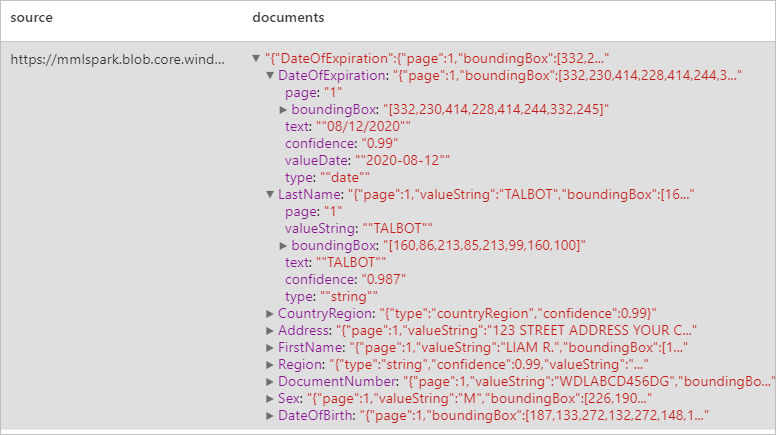
分析 ID 文档
使用光学字符识别 (OCR) 和我们的 ID 文档模型从标识文档中检测和提取数据,从而轻松从 ID 文档中提取结构化数据,例如名字、姓氏、出生日期、文档编号等。
示例输入

imageDf5 = spark.createDataFrame([
  ("<replace with your file path>/id.jpg",)
], ["source",])

analyzeIDDocuments = (AnalyzeIDDocuments()
                 .setLinkedService(ai_service_name)
                 .setImageUrlCol("source")
                 .setOutputCol("ids")
                 .setConcurrency(5))

display(analyzeIDDocuments
        .transform(imageDf5)
        .withColumn("documents", explode(col("ids.analyzeResult.documentResults.fields")))
        .select("source", "documents"))
预期结果
清理资源
为了确保关闭 Spark 实例,请结束任何已连接的会话(笔记本)。 达到 Apache Spark 池中指定的空闲时间时,池将会关闭。 也可以从笔记本右上角的状态栏中选择“停止会话”。
