Azure Kubernetes 服务 (AKS) 是可用于快速部署和管理群集的托管式 Kubernetes 服务。 在本快速入门中,请执行以下操作:
- 使用 Azure 资源管理器模板部署 AKS 群集。
- 在该群集中运行一个包含 Web 前端和 Redis 实例的多容器应用程序。
Azure 资源管理器模板是定义项目基础结构和配置的 JavaScript 对象表示法 (JSON) 文件。 模板使用声明性语法。 你可以在不编写用于创建部署的编程命令序列的情况下,描述预期部署。
本快速入门假设读者基本了解 Kubernetes 的概念。 有关详细信息,请参阅 Azure Kubernetes 服务 (AKS) 的 Kubernetes 核心概念。
如果你的环境满足先决条件,并且你熟悉如何使用 ARM 模板,请选择“部署到 Azure”按钮。 Azure 门户中会打开模板。

如果没有 Azure 订阅,可在开始前创建一个试用帐户。
先决条件
可以使用本地 Azure CLI。
如果需要,请安装 Azure CLI 来运行 CLI 参考命令。
本地 Azure CLI,请了解如何安装 Azure CLI。 如果在 Windows 或 macOS 上运行,请考虑在 Docker 容器中运行 Azure CLI。 有关详细信息,请参阅如何在 Docker 容器中运行 Azure CLI。
通过使用 az login 命令登录到 Azure CLI。 若要完成身份验证过程,请遵循终端中显示的步骤。 有关其他登录选项,请参阅使用 Azure CLI 登录。
出现提示时,请在首次使用时安装 Azure CLI 扩展。 有关扩展详细信息,请参阅使用 Azure CLI 的扩展。
运行 az version 以查找安装的版本和依赖库。 若要升级到最新版本,请运行 az upgrade。
本文需要 Azure CLI 版本 2.0.61 或更高版本。
若要使用资源管理器模板创建 AKS 群集,请提供 SSH 公钥。 如果需要此资源,请参阅以下部分;否则请跳到查看模板部分。
创建 SSH 密钥对
若要访问 AKS 节点,请使用通过 ssh-keygen 命令生成的 SSH 密钥对(公钥和私钥)进行连接。 默认情况下,这些文件在 ~/.ssh 目录中创建。 运行 ssh-keygen 命令会覆盖给定位置中同名的任何 SSH 密钥对。
运行
ssh-keygen命令。 以下示例使用 RSA 加密和 4096 位长度创建 SSH 密钥对:ssh-keygen -t rsa -b 4096
有关创建 SSH 密钥的详细信息,请参阅在 Azure 中创建和管理用于身份验证的 SSH 密钥。
查看模板
本快速入门中使用的模板来自 Azure 快速入门模板。
{
  "$schema": "https://schema.management.azure.com/schemas/2019-04-01/deploymentTemplate.json#",
  "contentVersion": "1.0.0.1",
  "parameters": {
    "clusterName": {
      "type": "string",
      "defaultValue": "aks101cluster",
      "metadata": {
        "description": "The name of the Managed Cluster resource."
      }
    },
    "location": {
      "type": "string",
      "defaultValue": "[resourceGroup().location]",
      "metadata": {
        "description": "The location of the Managed Cluster resource."
      }
    },
    "dnsPrefix": {
      "type": "string",
      "metadata": {
        "description": "Optional DNS prefix to use with hosted Kubernetes API server FQDN."
      }
    },
    "osDiskSizeGB": {
      "type": "int",
      "defaultValue": 0,
      "minValue": 0,
      "maxValue": 1023,
      "metadata": {
        "description": "Disk size (in GB) to provision for each of the agent pool nodes. This value ranges from 0 to 1023. Specifying 0 will apply the default disk size for that agentVMSize."
      }
    },
    "agentCount": {
      "type": "int",
      "defaultValue": 3,
      "minValue": 1,
      "maxValue": 50,
      "metadata": {
        "description": "The number of nodes for the cluster."
      }
    },
    "agentVMSize": {
      "type": "string",
      "defaultValue": "Standard_DS2_v2",
      "metadata": {
        "description": "The size of the Virtual Machine."
      }
    },
    "linuxAdminUsername": {
      "type": "string",
      "metadata": {
        "description": "User name for the Linux Virtual Machines."
      }
    },
    "sshRSAPublicKey": {
      "type": "string",
      "metadata": {
        "description": "Configure all linux machines with the SSH RSA public key string. Your key should include three parts, for example 'ssh-rsa AAAAB...snip...UcyupgH azureuser@linuxvm'"
      }
    },
    "osType": {
      "type": "string",
      "defaultValue": "Linux",
      "allowedValues": [
        "Linux"
      ],
      "metadata": {
        "description": "The type of operating system."
      }
    }
  },
  "resources": [
    {
      "type": "Microsoft.ContainerService/managedClusters",
      "apiVersion": "2020-03-01",
      "name": "[parameters('clusterName')]",
      "location": "[parameters('location')]",
      "properties": {
        "dnsPrefix": "[parameters('dnsPrefix')]",
        "agentPoolProfiles": [
          {
            "name": "agentpool",
            "osDiskSizeGB": "[parameters('osDiskSizeGB')]",
            "count": "[parameters('agentCount')]",
            "vmSize": "[parameters('agentVMSize')]",
            "osType": "[parameters('osType')]",
            "storageProfile": "ManagedDisks"
          }
        ],
        "linuxProfile": {
          "adminUsername": "[parameters('linuxAdminUsername')]",
          "ssh": {
            "publicKeys": [
              {
                "keyData": "[parameters('sshRSAPublicKey')]"
              }
            ]
          }
        }
      },
      "identity": {
          "type": "SystemAssigned"
      }
    }
  ],
  "outputs": {
    "controlPlaneFQDN": {
      "type": "string",
      "value": "[reference(parameters('clusterName')).fqdn]"
    }
  }
}
有关更多 AKS 示例,请参阅 AKS 快速入门模板站点。
部署模板
选择以下按钮登录到 Azure 并打开一个模板。
选择或输入以下值。
对于本快速入门,请保留“OS 磁盘大小(GB)”、“代理计数”、“代理 VM 大小”、“OS 类型”和“Kubernetes 版本”的默认值。 为以下模板参数提供自己的值:
订阅:选择 Azure 订阅。
资源组:选择“新建”。 输入资源组的唯一名称(例如 myResourceGroup),然后选择“确定”。
位置:选择一个位置,例如“中国东部 2”。
群集名称:输入 AKS 群集的唯一名称,例如 myAKSCluster。
DNS 前缀:输入群集的唯一 DNS 前缀,例如 myakscluster。
Linux 管理员用户名:输入一个用户名用于通过 SSH 进行连接,例如 azureuser。
SSH RSA 公钥:复制并粘贴 SSH 密钥对的 public 部分(默认为 ~/.ssh/id_rsa.pub 的内容)。
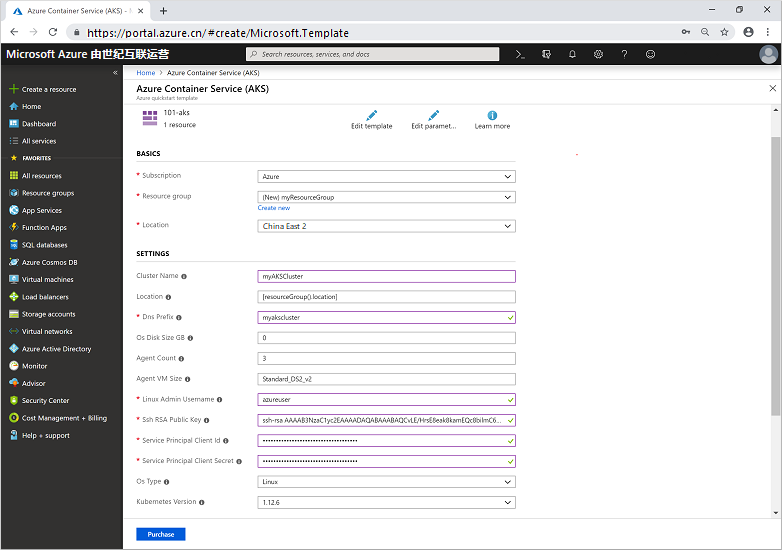
选择“查看 + 创建” 。
创建 AKS 群集需要几分钟时间。 等待群集成功部署,然后转到下一步骤。
验证部署
连接到群集
若要管理 Kubernetes 群集,请使用 Kubernetes 命令行客户端 kubectl。
在本地使用 az aks install-cli 命令安装
kubectl:az aks install-cli使用 az aks get-credentials 命令将
kubectl配置为连接到你的 Kubernetes 群集。 此命令将下载凭据,并将 Kubernetes CLI 配置为使用这些凭据。注意
在可以在由世纪互联运营的 Microsoft Azure 中使用 Azure CLI 之前,请先运行
az cloud set -n AzureChinaCloud来更改云环境。 若要切换回 Azure 公有云,请再次运行az cloud set -n AzureCloud。az login az aks get-credentials --resource-group myResourceGroup --name myAKSCluster使用 kubectl get 命令验证与群集之间的连接。 此命令将返回群集节点的列表。
kubectl get nodes输出将显示前面步骤中创建的节点。 确保所有节点的状态为“就绪”:
NAME                       STATUS   ROLES   AGE     VERSION
aks-agentpool-41324942-0   Ready    agent   6m44s   v1.12.6
aks-agentpool-41324942-1   Ready    agent   6m46s   v1.12.6
aks-agentpool-41324942-2   Ready    agent   6m45s   v1.12.6
运行应用程序
Kubernetes 清单文件定义群集的所需状态,例如,要运行哪些容器映像。
在本快速入门中,你将使用清单来创建运行 Azure Vote 应用程序所需的所有对象。 此清单包含两个 Kubernetes 部署:
- 示例 Azure Vote Python 应用程序。
- 一个 Redis 实例。
此外,还会创建两个 Kubernetes 服务:
- Redis 实例的内部服务。
- 用于通过 Internet 访问 Azure Vote 应用程序的外部服务。
创建名为
azure-vote.yaml的文件。- 可以在虚拟或物理系统上使用
code、vi或nano创建此文件。
- 可以在虚拟或物理系统上使用
复制以下 YAML 定义:
apiVersion: apps/v1
kind: Deployment
metadata:
  name: azure-vote-back
spec:
  replicas: 1
  selector:
    matchLabels:
      app: azure-vote-back
  template:
    metadata:
      labels:
        app: azure-vote-back
    spec:
      nodeSelector:
        "kubernetes.io/os": linux
      containers:
      - name: azure-vote-back
        image: mcr.azk8s.cn/oss/bitnami/redis:6.0.8
        env:
        - name: ALLOW_EMPTY_PASSWORD
          value: "yes"
        resources:
          requests:
            cpu: 100m
            memory: 128Mi
          limits:
            cpu: 250m
            memory: 256Mi
        ports:
        - containerPort: 6379
          name: redis
---
apiVersion: v1
kind: Service
metadata:
  name: azure-vote-back
spec:
  ports:
  - port: 6379
  selector:
    app: azure-vote-back
---
apiVersion: apps/v1
kind: Deployment
metadata:
  name: azure-vote-front
spec:
  replicas: 1
  selector:
    matchLabels:
      app: azure-vote-front
  template:
    metadata:
      labels:
        app: azure-vote-front
    spec:
      nodeSelector:
        "kubernetes.io/os": linux
      containers:
      - name: azure-vote-front
        image: mcr.azk8s.cn/azuredocs/azure-vote-front:v1
        resources:
          requests:
            cpu: 100m
            memory: 128Mi
          limits:
            cpu: 250m
            memory: 256Mi
        ports:
        - containerPort: 80
        env:
        - name: REDIS
          value: "azure-vote-back"
---
apiVersion: v1
kind: Service
metadata:
  name: azure-vote-front
spec:
  type: LoadBalancer
  ports:
  - port: 80
  selector:
    app: azure-vote-front
使用 kubectl apply 命令部署应用程序,并指定 YAML 清单的名称:
kubectl apply -f azure-vote.yaml输出显示已成功创建的部署和服务:
deployment "azure-vote-back" created
service "azure-vote-back" created
deployment "azure-vote-front" created
service "azure-vote-front" created
测试应用程序
应用程序运行时,Kubernetes 服务将向 Internet 公开应用程序前端。 此过程可能需要几分钟才能完成。
使用带有 --watch 参数的 kubectl get service 命令来监视进度。
kubectl get service azure-vote-front --watch
azure-vote-front 服务的 EXTERNAL-IP 输出最初显示为 pending。
NAME               TYPE           CLUSTER-IP   EXTERNAL-IP   PORT(S)        AGE
azure-vote-front   LoadBalancer   10.0.37.27   <pending>     80:30572/TCP   6s
在 EXTERNAL-IP 地址从 pending 更改为实际公共 IP 地址后,请使用 CTRL-C 来停止 kubectl 监视进程。 以下示例输出显示向服务分配了有效的公共 IP 地址:
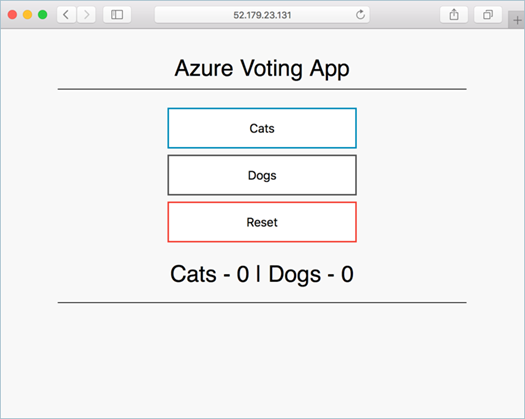
azure-vote-front LoadBalancer 10.0.37.27 52.179.23.131 80:30572/TCP 2m
若要查看 Azure Vote 应用的实际效果,请打开 Web 浏览器并转到服务的外部 IP 地址。
清理资源
为了避免产生 Azure 费用,请清理不需要的资源。 可以使用 az group delete 命令删除资源组、容器服务及所有相关资源。
az group delete --name myResourceGroup --yes --no-wait
注意
删除群集时,AKS 群集使用的 Azure Active Directory 服务主体不会被删除。 有关如何删除服务主体的步骤,请参阅 AKS 服务主体的注意事项和删除。
如果你使用了托管标识,则该标识由平台托管,不需要删除。
获取代码
本快速入门使用现有的容器映像创建了 Kubernetes 部署。 GitHub 上提供了相关的应用程序代码、Dockerfile 和 Kubernetes 清单文件。
后续步骤
在本快速入门中,你部署了一个 Kubernetes 群集,然后在其中部署了多容器应用程序。
若要详细了解 AKS 并演练部署示例的完整代码,请继续阅读“Kubernetes 群集”教程。