Istio 是跨 Kubernetes 群集中的微服务提供关键功能集的开源服务网格。 这些功能包括流量管理、服务标识和安全性、策略执行以及可观察性。 有关 Istio 的详细信息,请参阅官方文档什么是 Istio?。
本文演示了如何使用 Istio 的流量管理功能。 将使用 AKS 投票应用示例探究智能路由和 Canary 发布。
在本文中,学习如何:
- 部署应用程序
- 更新应用程序
- 推出应用程序的 Canary 发布
- 完成推出
准备阶段
注意
此方案已针对 Istio 版本 1.3.2 进行了测试。
本文中详述的步骤假设你已创建 AKS 群集(已启用 Kubernetes RBAC 的 Kubernetes 1.13 及更高版本)并已与该群集建立 kubectl 连接。 此外,还需在群集内安装 Istio。
如果获取关于这些项目的帮助,请参阅 AKS 快速入门和在 AKS 中安装 Istio 的指导。
关于此应用程序方案
AKS 投票应用示例向用户提供了两个投票选项(“猫”或“狗”) 。 有一个用于保存各个选项的投票数的存储组件。 此外,还有一个用于提供各个选项的投票详细信息的分析组件。
在此应用程序方案中,首先需要部署投票应用的 1.0 版本及分析组件的 1.0 版本。 此分析组件将对投票数进行简单计数。 投票应用和分析组件与由 Redis 支持的存储组件 1.0 版本进行交互。
将分析组件升级到提供计数和当前总数及百分比的 1.1 版本。
一部分用户将通过 Canary 发布测试应用的 2.0 版本。 该新版本使用 MySQL 数据库支持的存储组件。
确信该 2.0 版本按预期方式作用于该部分用户后,向所有用户推出 2.0 版本。
部署应用程序
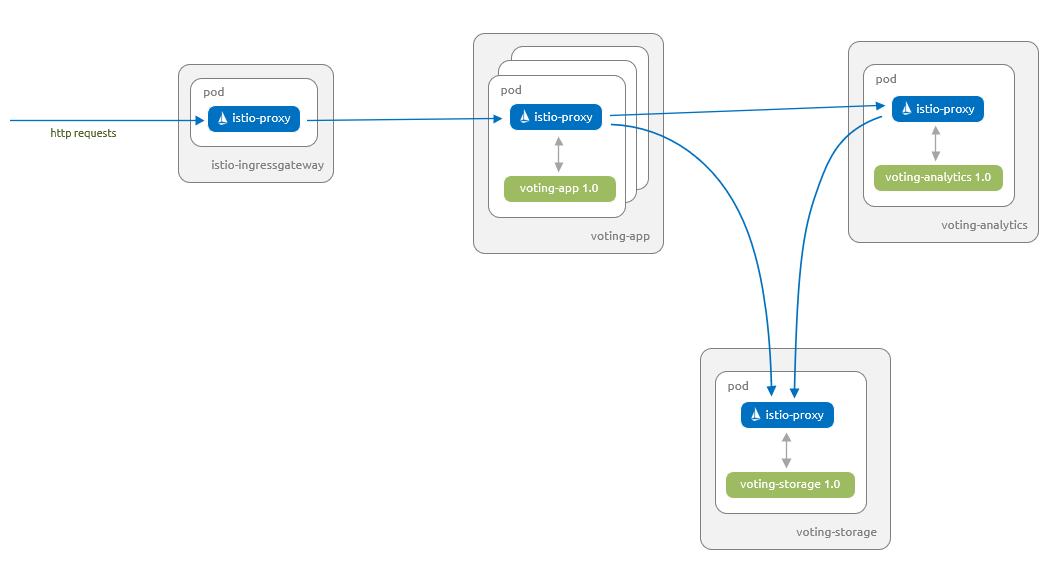
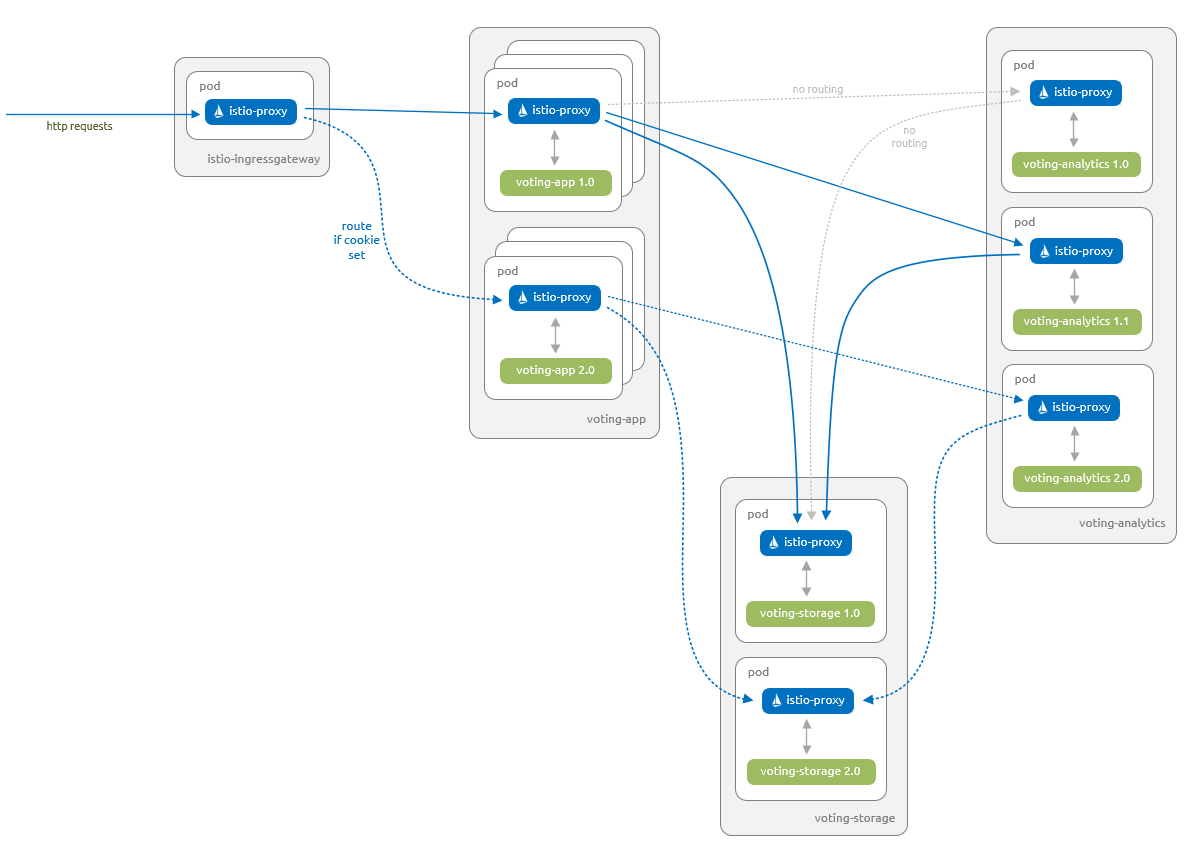
首先将应用程序部署到 Azure Kubernetes 服务 (AKS) 群集。 下图说明了本部分结束时运行的内容 - 所有组件的 1.0 版本及由 Istio Ingress 网关维护的入站请求:
按照本文操作所需的项目可在 Azure-Samples/aks-voting-app GitHub 存储库中获取。 下载这些项目或克隆该存储库,如下所示:
git clone https://github.com/Azure-Samples/aks-voting-app.git
转到下载/克隆的存储库中的以下文件夹中,并从此文件夹中运行所有后续步骤:
cd aks-voting-app/scenarios/intelligent-routing-with-istio
首先,在 AKS 群集中为 AKS 投票应用示例创建命名空间,并命名为“voting”,如下所示:
kubectl create namespace voting
使用 istio-injection=enabled 标记此命名空间。 此标签会指示 Istio 自动将 Istio 代理作为挎斗注入到此命名空间中的所有 Pod 中。
kubectl label namespace voting istio-injection=enabled
现在我们将创建 AKS 投票应用的组件。 在上一个步骤所创建的 voting 命名空间中创建这些组件。
kubectl apply -f kubernetes/step-1-create-voting-app.yaml --namespace voting
下面的示例输出显示了要创建的资源:
deployment.apps/voting-storage-1-0 created
service/voting-storage created
deployment.apps/voting-analytics-1-0 created
service/voting-analytics created
deployment.apps/voting-app-1-0 created
service/voting-app created
注意
Istio 对 Pod 和服务有一些特定要求。 有关详细信息,请参阅针对 Pod 和服务的 Istio 要求文档。
使用 kubectl get pods 命令查看已创建的 Pod,如下所示:
kubectl get pods -n voting --show-labels
下面的示例输出说明有三个 voting-app Pod 实例,并且 voting-analytics 和 voting-storage Pod 实例各有一个。 每个 Pod 有两个容器。 两个容器中的其中一个是组件,另一个是 istio-proxy:
NAME                                    READY     STATUS    RESTARTS   AGE   LABELS
voting-analytics-1-0-57c7fccb44-ng7dl   2/2       Running   0          39s   app=voting-analytics,pod-template-hash=57c7fccb44,version=1.0
voting-app-1-0-956756fd-d5w7z           2/2       Running   0          39s   app=voting-app,pod-template-hash=956756fd,version=1.0
voting-app-1-0-956756fd-f6h69           2/2       Running   0          39s   app=voting-app,pod-template-hash=956756fd,version=1.0
voting-app-1-0-956756fd-wsxvt           2/2       Running   0          39s   app=voting-app,pod-template-hash=956756fd,version=1.0
voting-storage-1-0-5d8fcc89c4-2jhms     2/2       Running   0          39s   app=voting-storage,pod-template-hash=5d8fcc89c4,version=1.0
若要查看有关 Pod 的信息,我们将使用带有标签选择器的 kubectl describe pod 命令来选择 voting-analytics Pod。 我们将筛选输出以显示 Pod 中两个容器的详细信息:
kubectl describe pod -l "app=voting-analytics, version=1.0" -n voting | egrep "istio-proxy:|voting-analytics:" -A2
Istio 已自动注入 istio-proxy 容器,来管理组件的往返网络流量,如以下示例输出所示:
  voting-analytics:
    Container ID:   docker://35efa1f31d95ca737ff2e2229ab8fe7d9f2f8a39ac11366008f31287be4cea4d
    Image:          mcr.microsoft.com/aks/samples/voting/analytics:1.0
--
  istio-proxy:
    Container ID:  docker://1fa4eb43e8d4f375058c23cc062084f91c0863015e58eb377276b20c809d43c6
    Image:         docker.io/istio/proxyv2:1.3.2
kubectl describe pod -l "app=voting-analytics, version=1.0" -n voting | Select-String -Pattern "istio-proxy:|voting-analytics:" -Context 0,2
Istio 已自动注入 istio-proxy 容器,来管理组件的往返网络流量,如以下示例输出所示:
>   voting-analytics:
      Container ID:   docker://35efa1f31d95ca737ff2e2229ab8fe7d9f2f8a39ac11366008f31287be4cea4d
      Image:          mcr.microsoft.com/aks/samples/voting/analytics:1.0
>   istio-proxy:
      Container ID:  docker://1fa4eb43e8d4f375058c23cc062084f91c0863015e58eb377276b20c809d43c6
      Image:         docker.io/istio/proxyv2:1.3.2
创建 Istio 网关和虚拟服务后,才能连接到投票应用。 这些 Istio 资源将来自默认 Istio Ingress 网关的流量路由到应用程序。
注意
网关是位于服务网格边缘的组件,用于接收入站或出站 HTTP 和 TCP 流量。
虚拟服务将定义一组适用于一个或多个目标服务的路由规则。
使用 kubectl apply 命令部署网关和虚拟服务 yaml。 请记得指定这些资源要部署到的命名空间。
kubectl apply -f istio/step-1-create-voting-app-gateway.yaml --namespace voting
以下示例输出显示了正在创建的新网关和虚拟服务:
virtualservice.networking.istio.io/voting-app created
gateway.networking.istio.io/voting-app-gateway created
使用下面的命令获取 Istio Ingress 网关的 IP 地址:
kubectl get service istio-ingressgateway --namespace istio-system -o jsonpath='{.status.loadBalancer.ingress[0].ip}'
以下示例输出显示 Ingress 网关的 IP 地址:
20.188.211.19
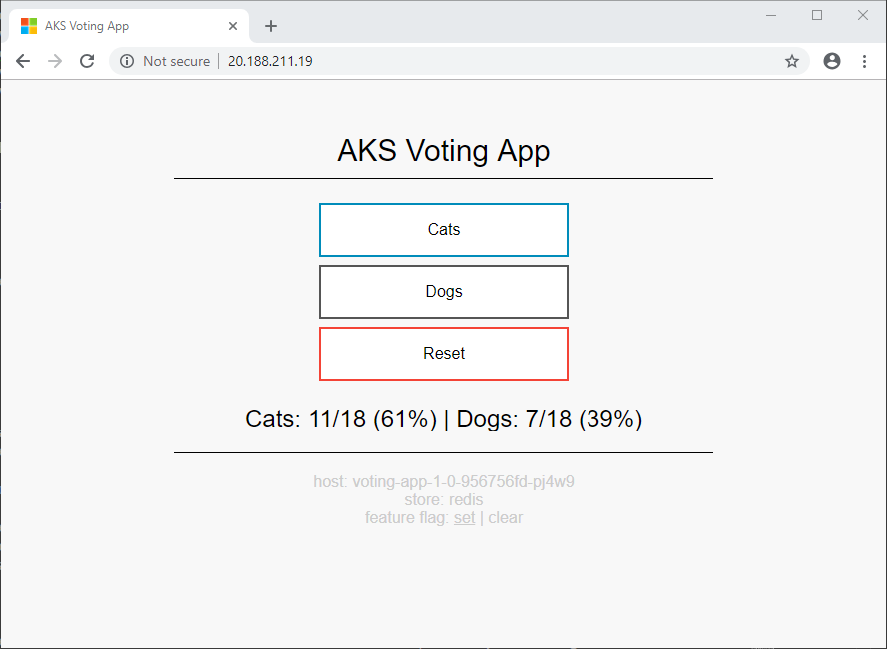
打开浏览器,并粘贴该 IP 地址。 将显示 AKS 投票应用示例。
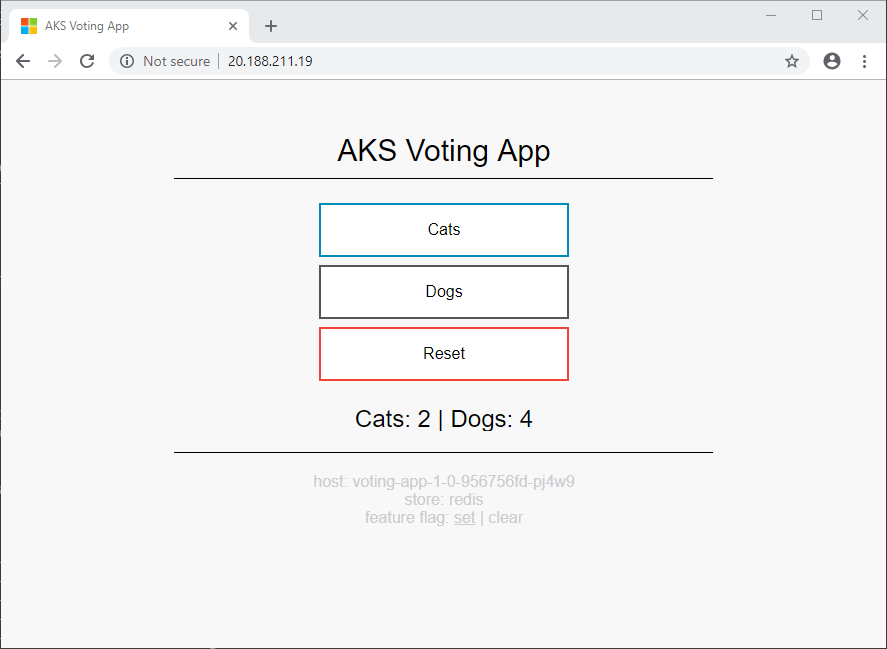
屏幕底部的信息显示应用使用 voting-app 的 1.0 版本,并使用 voting-storage (Redis) 的 1.0 版本作为存储选项。
更新应用程序
让我们来部署分析组件的新版本。 除每个类别的计数外,新版本 1.1 还显示总数和百分比。
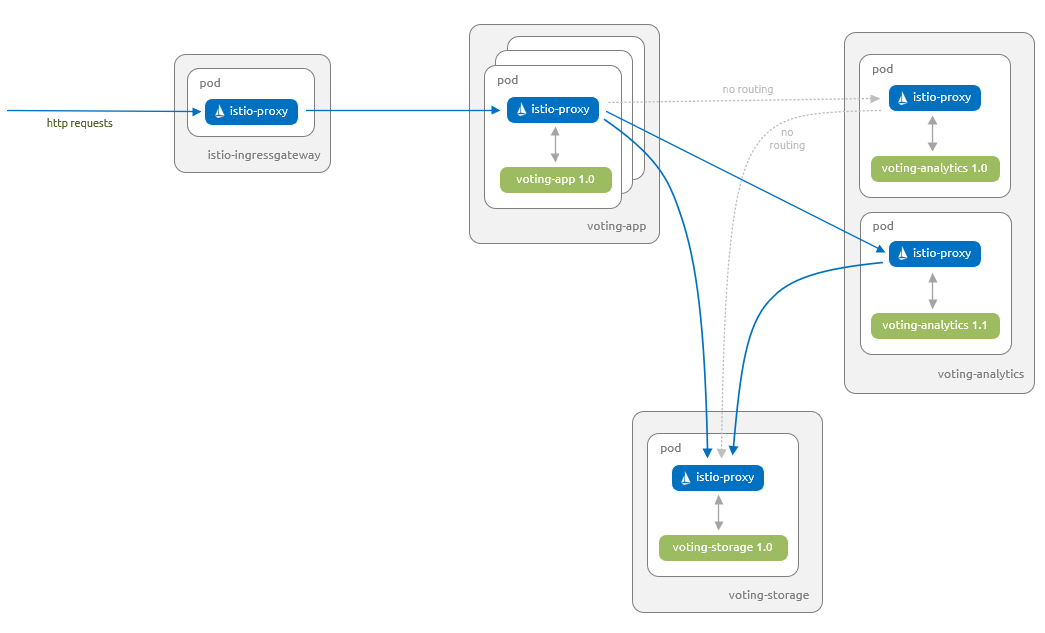
下图显示了将在本部分结束时运行的内容 - 仅 voting-analytics 组件的 1.1 版本具有路由自 voting-app 组件的流量。 即使 voting-analytics 组件的 1.0 版本继续运行,并且 voting-analytics 服务引用了它,Istio 代理也禁用它的往返流量。
让我们部署 voting-analytics 组件的 1.1 版本。 在 voting 命名空间中创建此组件:
kubectl apply -f kubernetes/step-2-update-voting-analytics-to-1.1.yaml --namespace voting
下面的示例输出显示了要创建的资源:
deployment.apps/voting-analytics-1-1 created
使用在前面步骤中获取的 Istio Ingress 网关的 IP 地址,重新在浏览器中打开 AKS 投票应用示例。
浏览器在下面所示的两个视图之间交替。 由于将 Kubernetes 服务用于了 voting-analytics 组件,并且仅有单个标签选择器 (app: voting-analytics),因此 Kubernetes 在匹配该选择器的 Pod 之间使用轮询机制的默认行为。 在这种情况下,它同时是 voting-analytics Pod 的 1.0 和 1.1 版本。
可以将 voting-analytics 组件的两个版本之间的切换可视化,如下所示。 要记得使用自己的 Istio Ingress 网关的 IP 地址。
INGRESS_IP=20.188.211.19
for i in {1..5}; do curl -si $INGRESS_IP | grep results; done
INGRESS_IP=20.188.211.19
for i in {1..5}; do curl -si $INGRESS_IP | grep results; done
$INGRESS_IP="20.188.211.19"
(1..5) |% { (Invoke-WebRequest -Uri $INGRESS_IP).Content.Split("`n") | Select-String -Pattern "results" }
下面的示例输出显示了网站在两个版本之间切换时返回的网站的相关部分:
  <div id="results"> Cats: 2 | Dogs: 4 </div>
  <div id="results"> Cats: 2 | Dogs: 4 </div>
  <div id="results"> Cats: 2/6 (33%) | Dogs: 4/6 (67%) </div>
  <div id="results"> Cats: 2 | Dogs: 4 </div>
  <div id="results"> Cats: 2/6 (33%) | Dogs: 4/6 (67%) </div>
将流量锁定到应用程序 1.1 版本
现在让我们将流量锁定到 voting-analytics 组件的 1.1 版本和 voting-storage 组件的 1.0 版本。 然后定义适用于所有其他组件的路由规则。
- 虚拟服务将定义一组适用于一个或多个目标服务的路由规则。
- “目标规则”定义流量策略和特定于版本的策略。
- “策略”定义工作负载可以接受的身份验证方法。
使用 kubectl apply 命令替换 voting-app 上的虚拟服务定义,并添加适用于其他组件的目标规则和虚拟服务。 将策略添加到 voting 命名空间,以确保使用相互 TLS 和客户端证书保护服务之间的所有通信。
- 策略将
peers.mtls.mode设置为STRICT,以确保在voting命名空间内的服务之间执行相互 TLS。 - 我们还在所有目标规则中将
trafficPolicy.tls.mode设置为ISTIO_MUTUAL。 Istio 为服务提供强标识,并使用相互 TLS 和客户端证书保护 Istio 以透明方式管理的服务之间的通信。
kubectl apply -f istio/step-2-update-and-add-routing-for-all-components.yaml --namespace voting
以下示例输出显示了正在更新/创建的新策略、目标规则和虚拟服务:
virtualservice.networking.istio.io/voting-app configured
policy.authentication.istio.io/default created
destinationrule.networking.istio.io/voting-app created
destinationrule.networking.istio.io/voting-analytics created
virtualservice.networking.istio.io/voting-analytics created
destinationrule.networking.istio.io/voting-storage created
virtualservice.networking.istio.io/voting-storage created
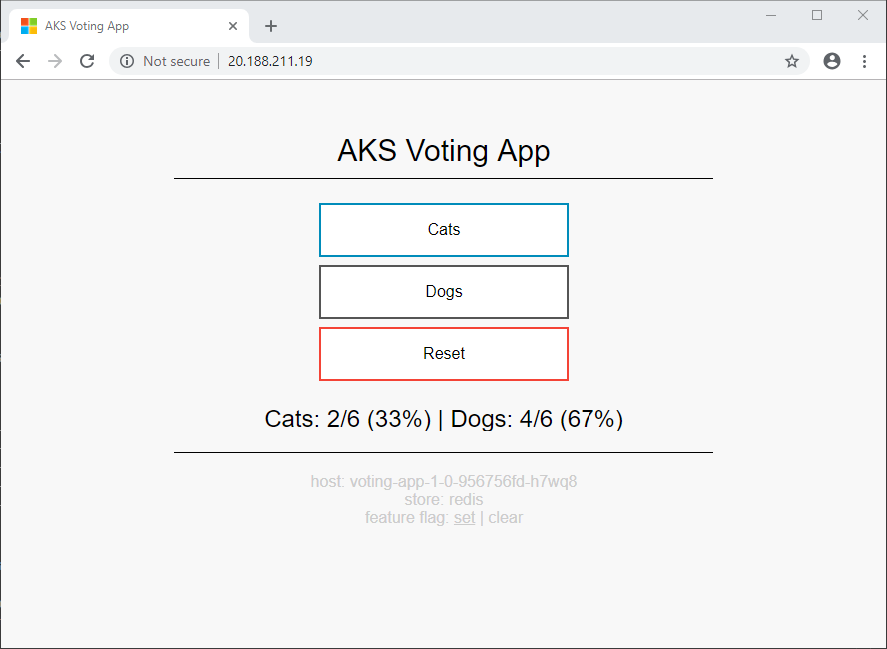
若重新在浏览器中打开 AKS 投票应用,则 voting-app 组件仅使用 voting-analytics 组件的新版本 1.1。
现在路由到 voting-analytics 组件的 1.1 版本,可以更加轻松地将此可视化,如下所示。 要记得使用自己的 Istio Ingress 网关的 IP 地址:
INGRESS_IP=20.188.211.19
for i in {1..5}; do curl -si $INGRESS_IP | grep results; done
INGRESS_IP=20.188.211.19
for i in {1..5}; do curl -si $INGRESS_IP | grep results; done
$INGRESS_IP="20.188.211.19"
(1..5) |% { (Invoke-WebRequest -Uri $INGRESS_IP).Content.Split("`n") | Select-String -Pattern "results" }
下面的示例输出显示了返回的网站的相关部分:
  <div id="results"> Cats: 2/6 (33%) | Dogs: 4/6 (67%) </div>
  <div id="results"> Cats: 2/6 (33%) | Dogs: 4/6 (67%) </div>
  <div id="results"> Cats: 2/6 (33%) | Dogs: 4/6 (67%) </div>
  <div id="results"> Cats: 2/6 (33%) | Dogs: 4/6 (67%) </div>
  <div id="results"> Cats: 2/6 (33%) | Dogs: 4/6 (67%) </div>
现在让我们确认 Istio 要使用相互 TLS 来保护各个服务之间的通信。 为此,我们将对 istioctl 客户端二进制文件使用 authn tls-check 命令,其格式如下。
istioctl authn tls-check <pod-name[.namespace]> [<service>]
这组命令提供有关从命名空间中的所有 Pod 访问指定服务的信息,这些 Pod 与一组标签匹配:
# mTLS configuration between each of the istio ingress pods and the voting-app service
kubectl get pod -n istio-system -l app=istio-ingressgateway | grep Running | cut -d ' ' -f1 | xargs -n1 -I{} istioctl authn tls-check {}.istio-system voting-app.voting.svc.cluster.local

# mTLS configuration between each of the voting-app pods and the voting-analytics service
kubectl get pod -n voting -l app=voting-app | grep Running | cut -d ' ' -f1 | xargs -n1 -I{} istioctl authn tls-check {}.voting voting-analytics.voting.svc.cluster.local

# mTLS configuration between each of the voting-app pods and the voting-storage service
kubectl get pod -n voting -l app=voting-app | grep Running | cut -d ' ' -f1 | xargs -n1 -I{} istioctl authn tls-check {}.voting voting-storage.voting.svc.cluster.local

# mTLS configuration between each of the voting-analytics version 1.1 pods and the voting-storage service
kubectl get pod -n voting -l app=voting-analytics,version=1.1 | grep Running | cut -d ' ' -f1 | xargs -n1 -I{} istioctl authn tls-check {}.voting voting-storage.voting.svc.cluster.local
# mTLS configuration between each of the istio ingress pods and the voting-app service
(kubectl get pod -n istio-system -l app=istio-ingressgateway | Select-String -Pattern "Running").Line |% { $_.Split()[0] |% { istioctl authn tls-check $($_ + ".istio-system") voting-app.voting.svc.cluster.local } }

# mTLS configuration between each of the voting-app pods and the voting-analytics service
(kubectl get pod -n voting -l app=voting-app | Select-String -Pattern "Running").Line |% { $_.Split()[0] |% { istioctl authn tls-check $($_ + ".voting") voting-analytics.voting.svc.cluster.local } }

# mTLS configuration between each of the voting-app pods and the voting-storage service
(kubectl get pod -n voting -l app=voting-app | Select-String -Pattern "Running").Line |% { $_.Split()[0] |% { istioctl authn tls-check $($_ + ".voting") voting-storage.voting.svc.cluster.local } }

# mTLS configuration between each of the voting-analytics version 1.1 pods and the voting-storage service
(kubectl get pod -n voting -l app=voting-analytics,version=1.1 | Select-String -Pattern "Running").Line |% { $_.Split()[0] |% { istioctl authn tls-check $($_ + ".voting") voting-storage.voting.svc.cluster.local } }
下面的示例输出显示,对上面的各个查询都强制执行相互 TLS。 输出还显示了实施相互 TLS 的策略和目标规则:
# mTLS configuration between istio ingress pods and the voting-app service
HOST:PORT                                    STATUS     SERVER     CLIENT     AUTHN POLICY       DESTINATION RULE
voting-app.voting.svc.cluster.local:8080     OK         mTLS       mTLS       default/voting     voting-app/voting

# mTLS configuration between each of the voting-app pods and the voting-analytics service
HOST:PORT                                          STATUS     SERVER     CLIENT     AUTHN POLICY       DESTINATION RULE
voting-analytics.voting.svc.cluster.local:8080     OK         mTLS       mTLS       default/voting     voting-analytics/voting
HOST:PORT                                          STATUS     SERVER     CLIENT     AUTHN POLICY       DESTINATION RULE
voting-analytics.voting.svc.cluster.local:8080     OK         mTLS       mTLS       default/voting     voting-analytics/voting
HOST:PORT                                          STATUS     SERVER     CLIENT     AUTHN POLICY       DESTINATION RULE
voting-analytics.voting.svc.cluster.local:8080     OK         mTLS       mTLS       default/voting     voting-analytics/voting

# mTLS configuration between each of the voting-app pods and the voting-storage service
HOST:PORT                                        STATUS     SERVER     CLIENT     AUTHN POLICY       DESTINATION RULE
voting-storage.voting.svc.cluster.local:6379     OK         mTLS       mTLS       default/voting     voting-storage/voting
HOST:PORT                                        STATUS     SERVER     CLIENT     AUTHN POLICY       DESTINATION RULE
voting-storage.voting.svc.cluster.local:6379     OK         mTLS       mTLS       default/voting     voting-storage/voting
HOST:PORT                                        STATUS     SERVER     CLIENT     AUTHN POLICY       DESTINATION RULE
voting-storage.voting.svc.cluster.local:6379     OK         mTLS       mTLS       default/voting     voting-storage/voting

# mTLS configuration between each of the voting-analytics version 1.1 pods and the voting-storage service
HOST:PORT                                        STATUS     SERVER     CLIENT     AUTHN POLICY       DESTINATION RULE
voting-storage.voting.svc.cluster.local:6379     OK         mTLS       mTLS       default/voting     voting-storage/voting
推出应用程序的 Canary 发布
现在让我们部署 voting-app、voting-analytics 和 voting-storage 组件的版本 2.0。 新的 voting-storage 组件使用 MySQL 而不是 Redis,并且 voting-app 和 voting-analytics 组件被更新以允许它们使用这个新的 voting-storage 组件。
现在 voting-app 组件支持功能标记功能。 可使用此功能标记针对用户子集测试 Istio 的 Canary 发布功能。
下图显示了在本部分结束时将要运行的内容。
voting-app组件的1.0版本、voting-analytics组件的1.1版本和voting-storage组件的1.0版本能够相互通信。voting-app组件的2.0版本、voting-analytics组件的2.0版本和voting-storage组件的2.0版本能够相互通信。- 仅已设置特定功能标记的用户可以访问用户
voting-app组件的2.0版本。 此更改通过 cookie 使用功能标记管理。
首先,更新 Istio 目标规则和虚拟服务,以适用于这些新组件。 这些更新将确保不会以错误的方式将流量路由到新组件,并确保用户不会获得不需要的访问:
kubectl apply -f istio/step-3-add-routing-for-2.0-components.yaml --namespace voting
以下示例输出显示了正在更新的目标规则和虚拟服务:
destinationrule.networking.istio.io/voting-app configured
virtualservice.networking.istio.io/voting-app configured
destinationrule.networking.istio.io/voting-analytics configured
virtualservice.networking.istio.io/voting-analytics configured
destinationrule.networking.istio.io/voting-storage configured
virtualservice.networking.istio.io/voting-storage configured
接下来,为组件的新版本 2.0 添加 Kubernetes 对象。 此外,更新 voting-storage 服务,以将 MySQL 的 3306 端口包括在内:
kubectl apply -f kubernetes/step-3-update-voting-app-with-new-storage.yaml --namespace voting
下面的示例输出说明已成功更新或创建 Kubernetes 对象:
service/voting-storage configured
secret/voting-storage-secret created
deployment.apps/voting-storage-2-0 created
persistentvolumeclaim/mysql-pv-claim created
deployment.apps/voting-analytics-2-0 created
deployment.apps/voting-app-2-0 created
等待至所有 2.0 版本的 Pod 均在运行。 使用带有 -w 监视开关的 kubectl get pods 命令监视 voting 命名空间中所有 Pod 上的更改:
kubectl get pods --namespace voting -w
现在应该能够在投票应用程序的 1.0 版本和 2.0 版本 (Canary) 之间切换。 屏幕底部的功能标记切换将设置 cookie。 voting-app 虚拟服务使用此 cookie 将用户路由到新版本 2.0。
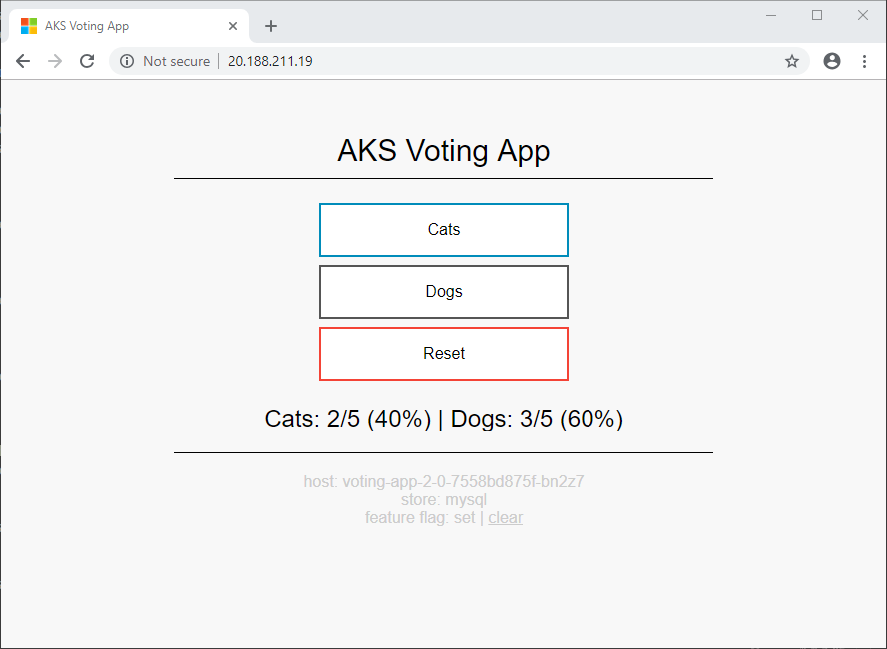
应用的各个版本的投票计数不同。 此差异突出了正在使用两个不同的存储后端。
完成推出
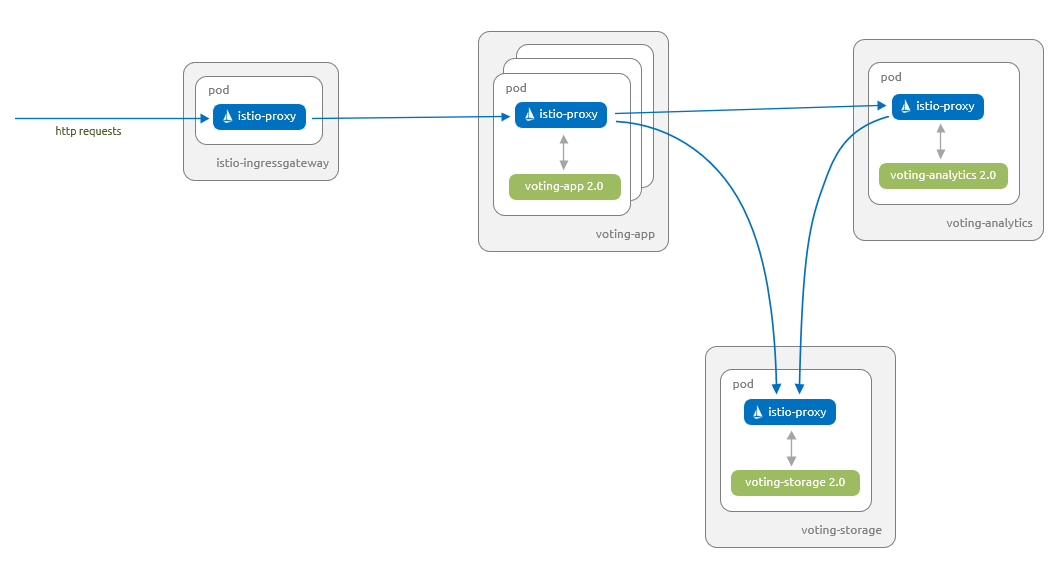
成功测试 Canary 发布后,更新 voting-app 虚拟服务,以将所有流量路由到 voting-app 组件的 2.0 版本。 然后无论是否设置了功能标记,所有用户均会看到应用程序的 2.0 版本:

更新所有的目标规则,以删除不想要激活的组件版本。 然后更新所有虚拟服务,以停止引用这些版本。
由于不再有任何流量到达这些组件的任何旧版本,因此现在可以安全地删除这些组件的所有部署。
现在你已成功推出 AKS 投票应用的新版本。
清理
通过删除 voting 命名空间,可以从 AKS 群集中删除我们在此方案中使用的 AKS 投票应用,如下所示:
kubectl delete namespace voting
以下示例输出显示,AKS 投票应用的所有组件都已从 AKS 群集中删除。
namespace "voting" deleted
后续步骤
可以使用 Istio Bookinfo 应用程序示例探究其他方案。