本指南演示如何使用 Locust 负载测试框架验证部署在 Azure Kubernetes 服务(AKS)上的 Valkey 群集的复原能力。 它逐步讲解如何构建测试客户端、将其部署到 AKS、模拟故障和分析群集行为。
注意
本文包含对术语 master (primary)的引用,该术语是Microsoft不再使用的术语。 从 Valkey 软件中删除术语后,我们将将其从本文中删除。
为 Valkey 生成示例客户端应用程序
以下步骤演示如何为 Valkey 生成示例客户端应用程序。
示例客户端应用程序使用 Locust 负载测试框架 来模拟 配置和部署的 Valkey 群集上的工作负荷。 Python 代码实现 一个 Locust User 类 ,该类连接到 Valkey 群集并执行 设置和获取 操作。 可以扩展此类以实现更复杂的操作。
注意
建议使用可用的最安全的身份验证流。 此过程中所述的身份验证流要求对应用程序具有很高的信任度,并具有在其他流中不存在的风险。 仅当其他更安全的流(如托管标识)不可行时,才应使用此流。
使用以下命令创建 Dockerfile 并将其
requirements.txt放置在新目录中:mkdir valkey-client cd valkey-client cat > Dockerfile <<EOF FROM python:3.10-slim-bullseye COPY requirements.txt . COPY locustfile.py . RUN pip install --upgrade pip && pip install --no-cache-dir -r requirements.txt EOF cat > requirements.txt <<EOF valkey locust EOFlocustfile.py创建包含 Valkey 客户端应用程序代码的文件:cat > locustfile.py <<EOF import time from locust import between, task, User, events,tag, constant_throughput from valkey import ValkeyCluster from random import randint class ValkeyLocust(User): wait_time = constant_throughput(50) host = "valkey-cluster.valkey.svc.cluster.local" def __init__(self, *args, **kwargs): super(ValkeyLocust, self).__init__(*args, **kwargs) self.client = ValkeyClient(host=self.host) def on_stop(self): self.client.close() @task @tag("set") def set_value(self): self.client.set_value("set_value") @task @tag("get") def get_value(self): self.client.get_value("get_value") class ValkeyClient(object): def __init__(self, host, *args, **kwargs): super().__init__(*args, **kwargs) with open("/etc/valkey-password/valkey-password-file.conf", "r") as f: self.password = f.readlines()[0].split(" ")[1].strip() self.host = host self.vc = ValkeyCluster(host=self.host, port=6379, password=self.password, username="default", cluster_error_retry_attempts=0, socket_timeout=2, keepalive=1 ) def set_value(self, key, command='SET'): start_time = time.perf_counter() try: result = self.vc.set(randint(0, 1000), randint(0, 1000)) if not result: result = '' length = len(str(result)) total_time = (time.perf_counter()- start_time) * 1000 events.request.fire( request_type=command, name=key, response_time=total_time, response_length=length, ) except Exception as e: total_time = (time.perf_counter()- start_time) * 1000 events.request.fire( request_type=command, name=key, response_time=total_time, response_length=0, exception=e ) result = '' return result def get_value(self, key, command='GET'): start_time = time.perf_counter() try: result = self.vc.get(randint(0, 1000)) if not result: result = '' length = len(str(result)) total_time = (time.perf_counter()- start_time) * 1000 events.request.fire( request_type=command, name=key, response_time=total_time, response_length=length, ) except Exception as e: total_time = (time.perf_counter()- start_time) * 1000 events.request.fire( request_type=command, name=key, response_time=total_time, response_length=0, exception=e ) result = '' return result EOF
生成 Docker 映像并将其推送到 ACR
使用命令生成 Docker 映像并将其上传到 Azure 容器注册表(ACR)。
az acr buildaz acr build --image valkey-client --registry ${MY_ACR_REGISTRY} .使用
az acr repository list命令验证是否已成功推送映像。az acr repository list --name ${MY_ACR_REGISTRY} --output table输出应显示
valkey-client图像,如以下示例所示:Result ---------------- valkey-client
将示例客户端 Pod 部署到 AKS
使用
Pod命令创建使用上一步骤中生成的 Valkey 客户端映像的kubectl apply。 Pod 规范包含具有客户端用于连接到 Valkey 群集的 Valkey 密码的机密存储库 CSI 卷。kubectl apply -f - <<EOF --- kind: Pod apiVersion: v1 metadata: name: valkey-client namespace: valkey spec: affinity: nodeAffinity: requiredDuringSchedulingIgnoredDuringExecution: nodeSelectorTerms: - matchExpressions: - key: agentpool operator: In values: - nodepool1 containers: - name: valkey-client image: ${MY_ACR_REGISTRY}.azurecr.cn/valkey-client command: ["locust", "--processes", "4"] volumeMounts: - name: valkey-password mountPath: "/etc/valkey-password" volumes: - name: valkey-password csi: driver: secrets-store.csi.k8s.io readOnly: true volumeAttributes: secretProviderClass: "valkey-password" EOF端口转发端口 8089,以使用
kubectl port-forward命令访问本地计算机上的 Locust Web 界面。kubectl port-forward -n valkey valkey-client 8089:8089访问
http://localhost:8089处的 Locust Web 界面并启动测试。 可以调整用户数和生成速率,以模拟 Valkey 群集上的工作负载。 下图使用 100 个用户和 10 生成速率: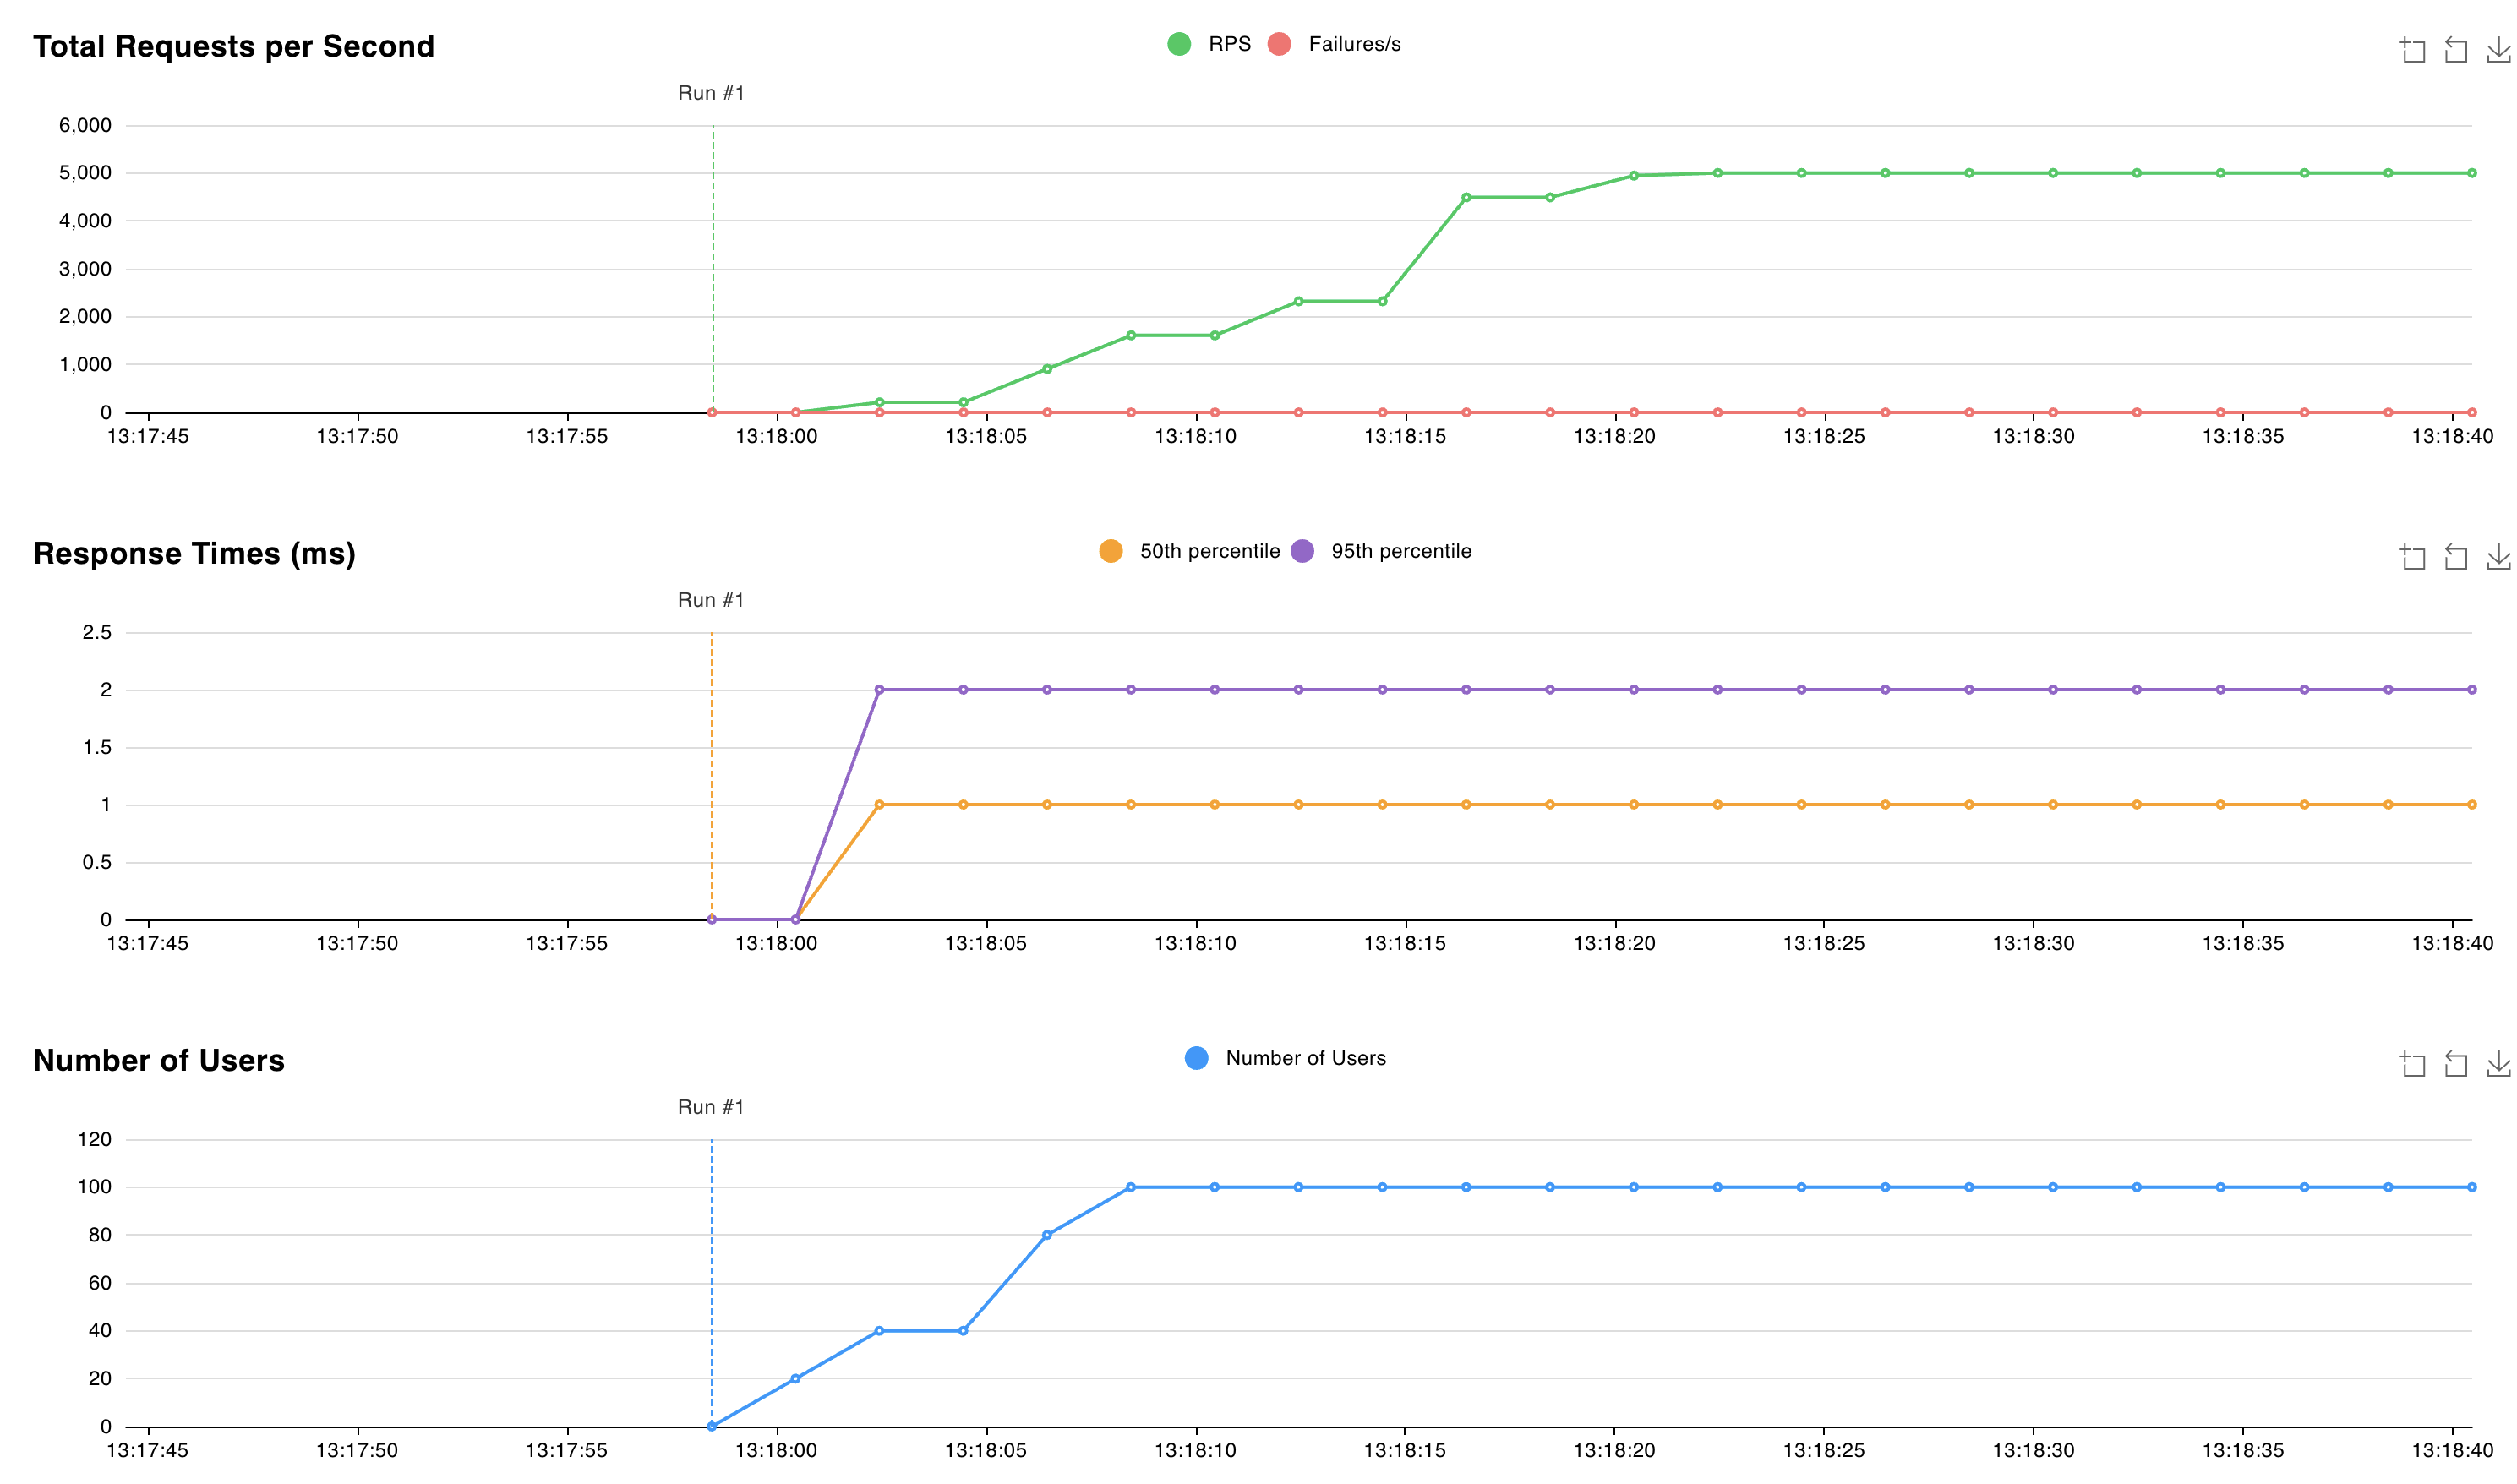
模拟故障并观察 Valkey 群集行为
通过使用带有
StatefulSet标志的kubectl delete命令删除--cascade=orphan来模拟中断。 目标是能够删除单个 Pod,而无需StatefulSet立即重新创建已删除的 Pod。kubectl delete statefulset valkey-masters --cascade=orphan使用
valkey-masters-0命令删除kubectl delete podPod。kubectl delete pod valkey-masters-0使用
kubectl get pods的命令查看 Pod 列表。kubectl get pods输出应指示
valkey-masters-0Pod 已删除。 其他 pod 应处于Running状态,如以下示例所示:NAME READY STATUS RESTARTS AGE valkey-client 1/1 Running 0 6m34s valkey-masters-1 1/1 Running 0 16m valkey-masters-2 1/1 Running 0 16m valkey-replicas-0 1/1 Running 0 16m valkey-replicas-1 1/1 Running 0 16m valkey-replicas-2 1/1 Running 0 16m使用
valkey-replicas-0命令获取kubectl logs valkey-replicas-0pod的日志。kubectl logs valkey-replicas-0在输出中,我们观察到完整事件持续约 18 秒:
1:S 05 Nov 2024 12:18:53.961 * Connection with primary lost.
1:S 05 Nov 2024 12:18:53.961 * Caching the disconnected primary state.
1:S 05 Nov 2024 12:18:53.961 * Reconnecting to PRIMARY 10.224.0.250:6379
1:S 05 Nov 2024 12:18:53.961 * PRIMARY <-> REPLICA sync started
1:S 05 Nov 2024 12:18:53.964 # Error condition on socket for SYNC: Connection refused
1:S 05 Nov 2024 12:18:54.910 * Connecting to PRIMARY 10.224.0.250:6379
1:S 05 Nov 2024 12:18:54.910 * PRIMARY <-> REPLICA sync started
1:S 05 Nov 2024 12:18:54.912 # Error condition on socket for SYNC: Connection refused
1:S 05 Nov 2024 12:18:55.920 * Connecting to PRIMARY 10.224.0.250:6379
[..CUT..]
1:S 05 Nov 2024 12:19:10.056 * Connecting to PRIMARY 10.224.0.250:6379
1:S 05 Nov 2024 12:19:10.057 * PRIMARY <-> REPLICA sync started
1:S 05 Nov 2024 12:19:10.058 # Error condition on socket for SYNC: Connection refused
1:S 05 Nov 2024 12:19:10.709 * Node c44d4b682b6fb9b37033d3e30574873545266d67 () reported node 9e7c43890613cc3ad4006a9cdc0b5e5fc5b6d44e     () as not reachable.
1:S 05 Nov 2024 12:19:10.864 * NODE 9e7c43890613cc3ad4006a9cdc0b5e5fc5b6d44e () possibly failing.
1:S 05 Nov 2024 12:19:11.066 * 10000 changes in 60 seconds. Saving...
1:S 05 Nov 2024 12:19:11.068 * Background saving started by pid 29
1:S 05 Nov 2024 12:19:11.068 * Connecting to PRIMARY 10.224.0.250:6379
1:S 05 Nov 2024 12:19:11.068 * PRIMARY <-> REPLICA sync started
1:S 05 Nov 2024 12:19:11.069 # Error condition on socket for SYNC: Connection refused
29:C 05 Nov 2024 12:19:11.090 * DB saved on disk
29:C 05 Nov 2024 12:19:11.090 * Fork CoW for RDB: current 0 MB, peak 0 MB, average 0 MB
1:S 05 Nov 2024 12:19:11.169 * Background saving terminated with success
1:S 05 Nov 2024 12:19:11.884 * FAIL message received from ba36d5167ee6016c01296a4a0127716f8edf8290 () about     9e7c43890613cc3ad4006a9cdc0b5e5fc5b6d44e ()
1:S 05 Nov 2024 12:19:11.884 # Cluster state changed: fail
1:S 05 Nov 2024 12:19:11.974 * Start of election delayed for 510 milliseconds (rank #0, offset 7225807).
1:S 05 Nov 2024 12:19:11.976 * Node d43f370a417d299b78bd1983792469fe5c39dcdf () reported node 9e7c43890613cc3ad4006a9cdc0b5e5fc5b6d44e     () as not reachable.
1:S 05 Nov 2024 12:19:12.076 * Connecting to PRIMARY 10.224.0.250:6379
1:S 05 Nov 2024 12:19:12.076 * PRIMARY <-> REPLICA sync started
1:S 05 Nov 2024 12:19:12.076 * Currently unable to failover: Waiting the delay before I can start a new failover.
1:S 05 Nov 2024 12:19:12.078 # Error condition on socket for SYNC: Connection refused
1:S 05 Nov 2024 12:19:12.581 * Starting a failover election for epoch 15.
1:S 05 Nov 2024 12:19:12.616 * Currently unable to failover: Waiting for votes, but majority still not reached.
1:S 05 Nov 2024 12:19:12.616 * Needed quorum: 2. Number of votes received so far: 1
1:S 05 Nov 2024 12:19:12.616 * Failover election won: I'm the new primary.
1:S 05 Nov 2024 12:19:12.616 * configEpoch set to 15 after successful failover
1:M 05 Nov 2024 12:19:12.616 * Discarding previously cached primary state.
1:M 05 Nov 2024 12:19:12.616 * Setting secondary replication ID to c0b5b2df8a43b19a4d43d8f8b272a07139e0ca34, valid up to offset:     7225808. New replication ID is 029fcfbae0e3e4a1dccd73066043deba6140c699
1:M 05 Nov 2024 12:19:12.616 * Cluster state changed: ok
在这个 18 秒的时间窗口期间,我们观察到写入已删除 Pod 所属分片的操作失败,同时 Valkey 集群正在选举新的主节点。 在此时间范围内,请求延迟峰值为 60 毫秒 。

选择新主节点后,Valkey 群集将继续为请求提供服务,延迟约为 2 毫秒。
后续步骤
供稿人
Microsoft 会维护本文。 本系列文章为以下参与者的原创作品:
- Nelly Kiboi | 服务工程师
- Saverio Proto | 首席客户体验工程师