Add Push Notifications to your iOS App
Overview
In this tutorial, you add push notifications to the iOS quickstart project so that a push notification is sent to the device every time a record is inserted.
If you do not use the downloaded quickstart server project, you will need the push notification extension package. For more information, see Work with the .NET backend server SDK for Azure Mobile Apps guide.
The iOS simulator does not support push notifications. You need a physical iOS device and an Apple Developer Program membership.
Configure Notification Hub
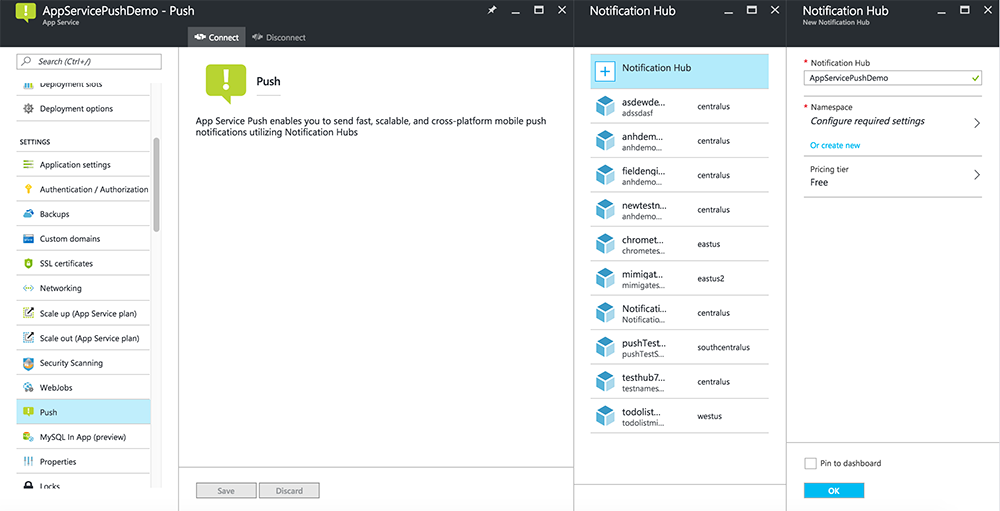
The Mobile Apps feature of Azure App Service uses Azure Notification Hubs to send pushes, so you will be configuring a notification hub for your mobile app.
In the Azure portal, go to App Services, and then select your app back end. Under Settings, select Push.
To add a notification hub resource to the app, select Connect. You can either create a hub or connect to an existing one.
Now you have connected a notification hub to your Mobile Apps back-end project. Later you configure this notification hub to connect to a platform notification system (PNS) to push to devices.
Register app for push notifications
- Register an app ID for your app. Create an explicit app ID (not a wildcard app ID) and, for Bundle ID, use the exact bundle ID that is in your Xcode quickstart project. It is also crucial that you select the Push Notifications option.
- Next, to prepare for configuring push notifications, create either a "Development" or "Distribution" SSL certificate.
Configure Azure to send push notifications
- On your Mac, launch Keychain Access. On the left navigation bar, under Category, open My Certificates. Find the SSL certificate that you downloaded in the previous section, and then disclose its contents. Select only the certificate (do not select the private key). Then export it.
- In the Azure portal, select Browse All > App Services. Then select your Mobile Apps back end.
- Under Settings, select App Service Push. Then select your notification hub name.
- Go to Apple Push Notification Services > Upload Certificate. Upload the .p12 file, selecting the correct Mode (depending on whether your client SSL certificate from earlier is production or sandbox). Save any changes.
Your service is now configured to work with push notifications on iOS.
Update backend to send push notifications
.NET backend (C#):
In Visual Studio, right-click the server project and click Manage NuGet Packages, search for
Microsoft.Azure.NotificationHubs, then click Install. This installs the Notification Hubs library for sending notifications from your backend.In the backend's Visual Studio project, open Controllers > TodoItemController.cs. At the top of the file, add the following
usingstatement:using Microsoft.Azure.Mobile.Server.Config; using Microsoft.Azure.NotificationHubs;Replace the
PostTodoItemmethod with the following code:public async Task<IHttpActionResult> PostTodoItem(TodoItem item) { TodoItem current = await InsertAsync(item); // Get the settings for the server project. HttpConfiguration config = this.Configuration; MobileAppSettingsDictionary settings = this.Configuration.GetMobileAppSettingsProvider().GetMobileAppSettings(); // Get the Notification Hubs credentials for the Mobile App. string notificationHubName = settings.NotificationHubName; string notificationHubConnection = settings .Connections[MobileAppSettingsKeys.NotificationHubConnectionString].ConnectionString; // Create a new Notification Hub client. NotificationHubClient hub = NotificationHubClient .CreateClientFromConnectionString(notificationHubConnection, notificationHubName); // iOS payload var appleNotificationPayload = "{\"aps\":{\"alert\":\"" + item.Text + "\"}}"; try { // Send the push notification and log the results. var result = await hub.SendAppleNativeNotificationAsync(appleNotificationPayload); // Write the success result to the logs. config.Services.GetTraceWriter().Info(result.State.ToString()); } catch (System.Exception ex) { // Write the failure result to the logs. config.Services.GetTraceWriter() .Error(ex.Message, null, "Push.SendAsync Error"); } return CreatedAtRoute("Tables", new { id = current.Id }, current); }Republish the server project.
Node.js backend:
Set up your backend project.
Replace the todoitem.js table script with the following code:
var azureMobileApps = require('azure-mobile-apps'),
    promises = require('azure-mobile-apps/src/utilities/promises'),
    logger = require('azure-mobile-apps/src/logger');

var table = azureMobileApps.table();

// When adding record, send a push notification via APNS
table.insert(function (context) {
    // For details of the Notification Hubs JavaScript SDK,
    // see https://aka.ms/nodejshubs
    logger.info('Running TodoItem.insert');

    // Create a payload that contains the new item Text.
    var payload = "{\"aps\":{\"alert\":\"" + context.item.text + "\"}}";

    // Execute the insert; Push as a post-execute action when results are returned as a Promise.
    return context.execute()
        .then(function (results) {
            // Only do the push if configured
            if (context.push) {
                context.push.apns.send(null, payload, function (error) {
                    if (error) {
                        logger.error('Error while sending push notification: ', error);
                    } else {
                        logger.info('Push notification sent successfully!');
                    }
                });
            }
            return results;
        })
        .catch(function (error) {
            logger.error('Error while running context.execute: ', error);
        });
});

module.exports = table;
When editing the file on your local computer, republish the server project.
Add push notifications to app
Objective-C:
In QSAppDelegate.m, import the iOS SDK and QSTodoService.h:
#import <MicrosoftAzureMobile/MicrosoftAzureMobile.h>
#import "QSTodoService.h"
In
didFinishLaunchingWithOptionsin QSAppDelegate.m, insert the following lines right beforereturn YES;:UIUserNotificationSettings* notificationSettings = [UIUserNotificationSettings settingsForTypes:UIUserNotificationTypeAlert | UIUserNotificationTypeBadge | UIUserNotificationTypeSound categories:nil]; [[UIApplication sharedApplication] registerUserNotificationSettings:notificationSettings]; [[UIApplication sharedApplication] registerForRemoteNotifications];In QSAppDelegate.m, add the following handler methods. Your app is now updated to support push notifications.
// Registration with APNs is successful
- (void)application:(UIApplication *)application
didRegisterForRemoteNotificationsWithDeviceToken:(NSData *)deviceToken {

    QSTodoService *todoService = [QSTodoService defaultService];
    MSClient *client = todoService.client;

    [client.push registerDeviceToken:deviceToken completion:^(NSError *error) {
        if (error != nil) {
            NSLog(@"Error registering for notifications: %@", error);
        }
    }];
}

// Handle any failure to register
- (void)application:(UIApplication *)application didFailToRegisterForRemoteNotificationsWithError:
(NSError *)error {
    NSLog(@"Failed to register for remote notifications: %@", error);
}

// Use userInfo in the payload to display an alert.
- (void)application:(UIApplication *)application
        didReceiveRemoteNotification:(NSDictionary *)userInfo {
    NSLog(@"%@", userInfo);

    NSDictionary *apsPayload = userInfo[@"aps"];
    NSString *alertString = apsPayload[@"alert"];

    // Create alert with notification content.
    UIAlertController *alertController = [UIAlertController
                                    alertControllerWithTitle:@"Notification"
                                    message:alertString
                                    preferredStyle:UIAlertControllerStyleAlert];

    UIAlertAction *cancelAction = [UIAlertAction
                                    actionWithTitle:NSLocalizedString(@"Cancel", @"Cancel")
                                    style:UIAlertActionStyleCancel
                                    handler:^(UIAlertAction *action)
                                    {
                                        NSLog(@"Cancel");
                                    }];

    UIAlertAction *okAction = [UIAlertAction
                                actionWithTitle:NSLocalizedString(@"OK", @"OK")
                                style:UIAlertActionStyleDefault
                                handler:^(UIAlertAction *action)
                                {
                                    NSLog(@"OK");
                                }];

    [alertController addAction:cancelAction];
    [alertController addAction:okAction];

    // Get current view controller.
    UIViewController *currentViewController = [[[[UIApplication sharedApplication] delegate] window] rootViewController];
    while (currentViewController.presentedViewController)
    {
        currentViewController = currentViewController.presentedViewController;
    }

    // Display alert.
    [currentViewController presentViewController:alertController animated:YES completion:nil];

}
Swift:
Add file ClientManager.swift with the following contents. Replace %AppUrl% with the URL of the Azure Mobile App backend.
class ClientManager {
    static let sharedClient = MSClient(applicationURLString: "%AppUrl%")
}
In ToDoTableViewController.swift, replace the
let clientline that initializes anMSClientwith this line:let client = ClientManager.sharedClientIn AppDelegate.swift, replace the body of
func applicationas follows:func application(application: UIApplication, didFinishLaunchingWithOptions launchOptions: [NSObject: AnyObject]?) -> Bool { application.registerUserNotificationSettings( UIUserNotificationSettings(forTypes: [.Alert, .Badge, .Sound], categories: nil)) application.registerForRemoteNotifications() return true }In AppDelegate.swift, add the following handler methods. Your app is now updated to support push notifications.
func application(application: UIApplication,
    didRegisterForRemoteNotificationsWithDeviceToken deviceToken: NSData) {
    ClientManager.sharedClient.push?.registerDeviceToken(deviceToken) { error in
        print("Error registering for notifications: ", error?.description)
    }
}

func application(application: UIApplication,
    didFailToRegisterForRemoteNotificationsWithError error: NSError) {
    print("Failed to register for remote notifications: ", error.description)
}

func application(application: UIApplication,
    didReceiveRemoteNotification userInfo: [NSObject: AnyObject]) {

    print(userInfo)

    let apsNotification = userInfo["aps"] as? NSDictionary
    let apsString       = apsNotification?["alert"] as? String

    let alert = UIAlertController(title: "Alert", message: apsString, preferredStyle: .Alert)
    let okAction = UIAlertAction(title: "OK", style: .Default) { _ in
        print("OK")
    }
    let cancelAction = UIAlertAction(title: "Cancel", style: .Default) { _ in
        print("Cancel")
    }

    alert.addAction(okAction)
    alert.addAction(cancelAction)

    var currentViewController = self.window?.rootViewController
    while currentViewController?.presentedViewController != nil {
        currentViewController = currentViewController?.presentedViewController
    }

    currentViewController?.presentViewController(alert, animated: true) {}

}
Test push notifications
- In Xcode, press Run and start the app on an iOS device (note that push will not work on simulators). Click OK to accept push notifications; this request occurs the first time the app runs.
- In the app, add a new item and click +.
- Verify that a notification is received, then click OK to dismiss the notification. You have now successfully completed this tutorial.
More
- Templates give you flexibility to send cross-platform pushes and localized pushes. How to Use iOS Client Library for Azure Mobile Apps shows you how to register templates.