在本快速入门中,你将使用 Azure 应用配置来外部化 Aspire 项目的应用设置的存储和管理。 你将使用 Azure 应用配置 Aspire 集成库来预配应用配置资源,并在每个分布式应用中使用应用配置。
先决条件
- 拥有有效订阅的 Azure 帐户。
- 为 Aspire 设置开发环境。
- 使用 Aspire Starter 模板创建新的 Aspire 解决方案。
- 符合 OCI 的容器运行时,例如 Docker Desktop。
在本地测试应用
Aspire Starter 模板包含与最小 API 项目通信的前端 Web 应用。 API 项目用于向前端提供虚假天气数据。 前端应用被配置为通过服务发现机制连接到 API 项目。 还有一个项目 AppHost 可以协调 Aspire 解决方案中的所有分布式应用程序。
运行
AppHost项目。 可在浏览器中看到 Aspire 仪表板。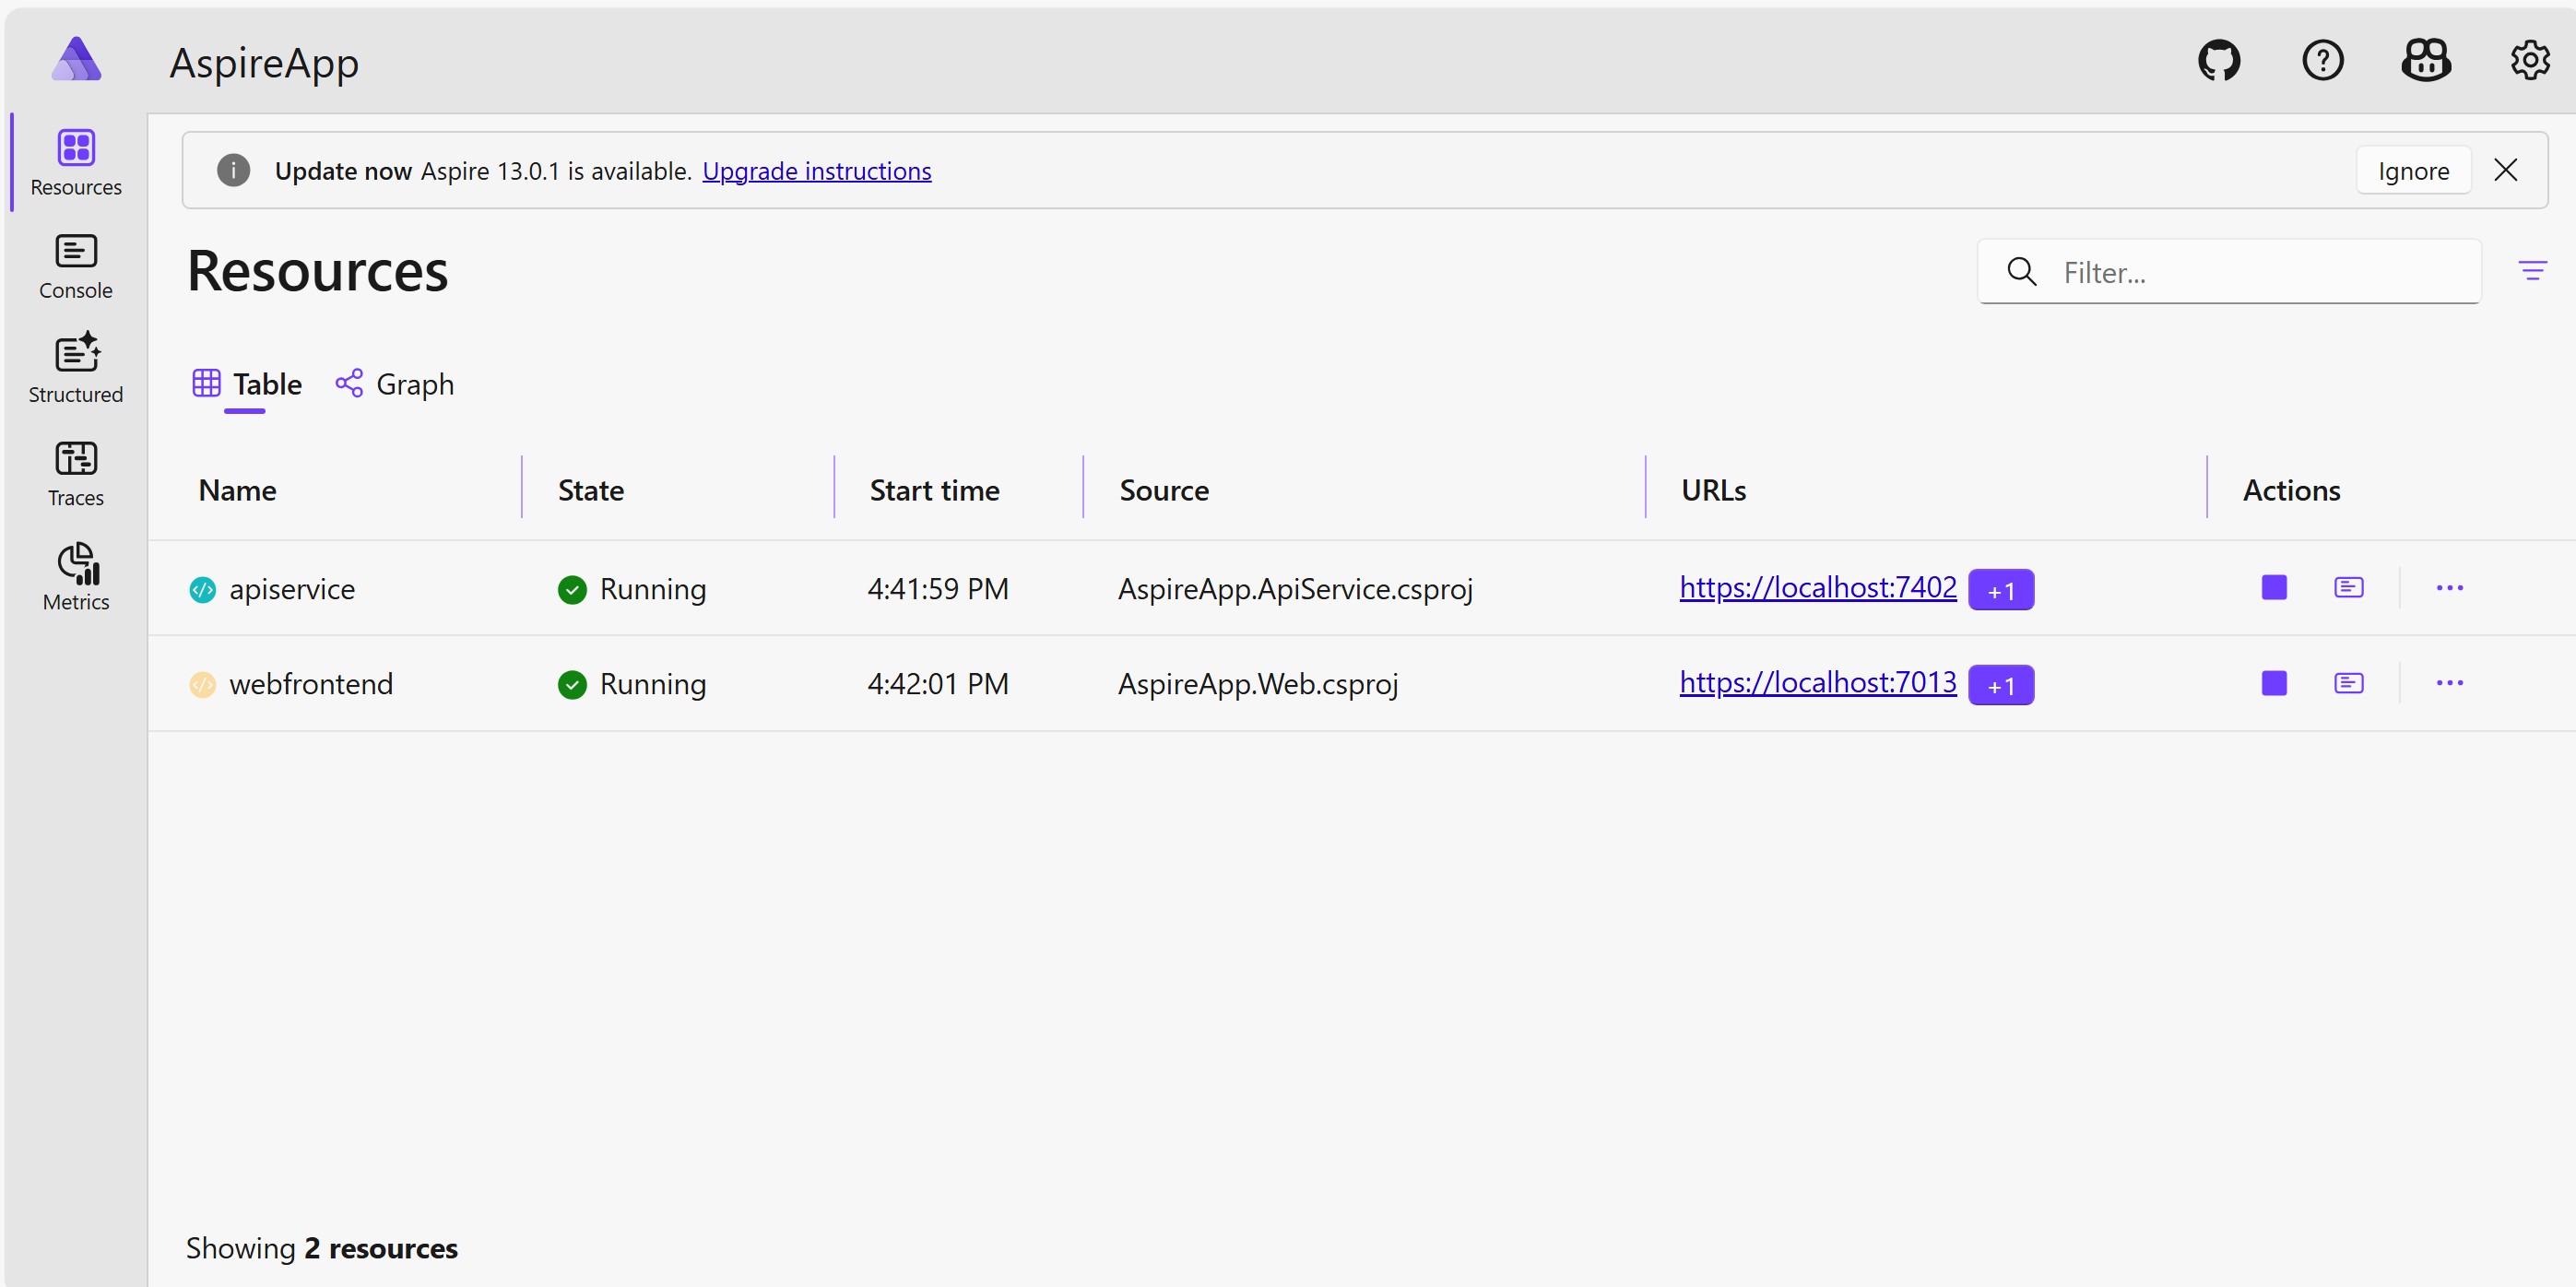
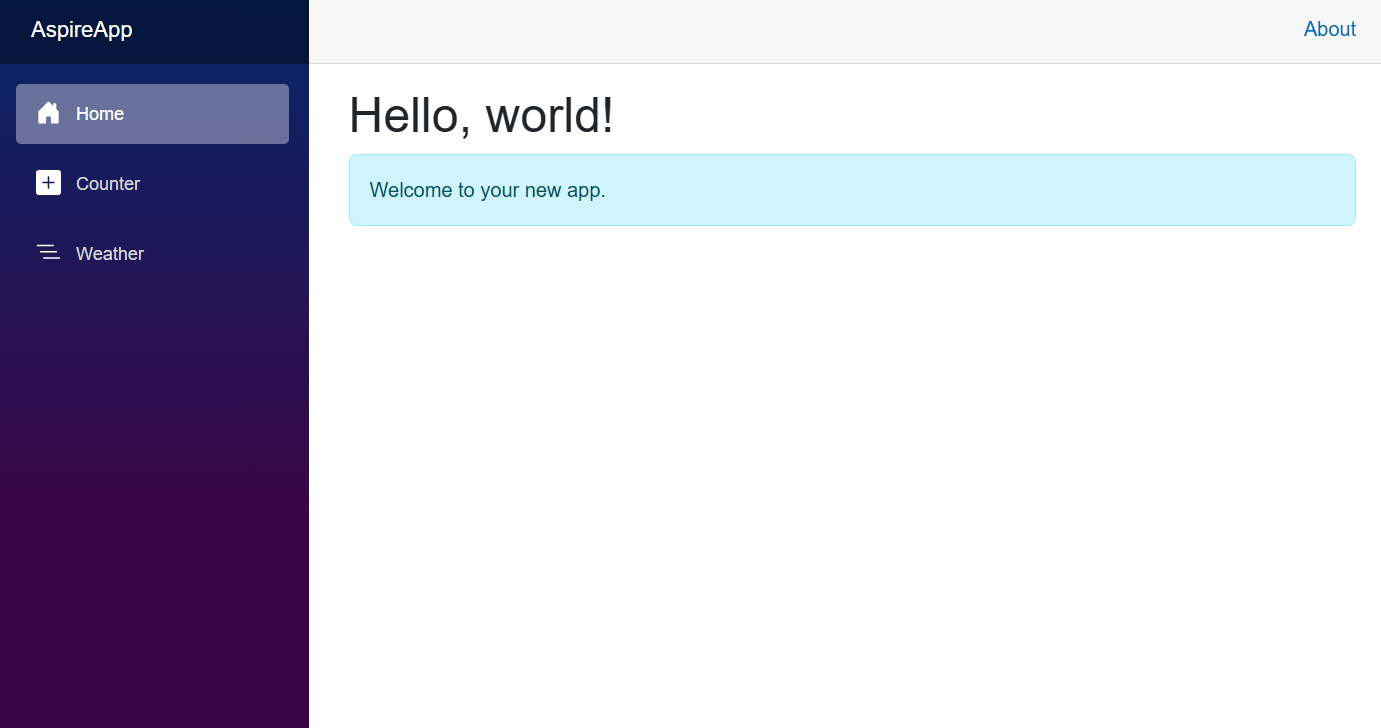
单击网页前端的 URL。 你会看到一个包含欢迎消息的页面。


将 Azure 应用配置添加到 Aspire 解决方案
导航到
AppHost项目的目录。 运行以下命令以添加Aspire.Hosting.Azure.AppConfigurationNuget 包。dotnet add package Aspire.Hosting.Azure.AppConfiguration打开 AppHost.csproj 文件以验证包。 应看到一个被引用的名为
Aspire.Hosting.AppHost的包。 确保Aspire.Hosting.AppHost包版本至少与安装的包版本Aspire.Hosting.Azure.AppConfiguration一样高。打开 AppHost.cs 文件并添加以下代码。
var builder = DistributedApplication.CreateBuilder(args);

// Add an Azure App Configuration resource
var appConfiguration = builder.AddAzureAppConfiguration("appconfiguration");
重要
调用
AddAzureAppConfiguration时,指示应用在应用启动时动态生成 Azure 资源。 应用程序必须配置相应的订阅和位置。 有关详细信息,请参阅 本地 Azure 预配。 如果使用最新的 Aspire SDK,可以通过 Aspire 仪表板配置订阅信息。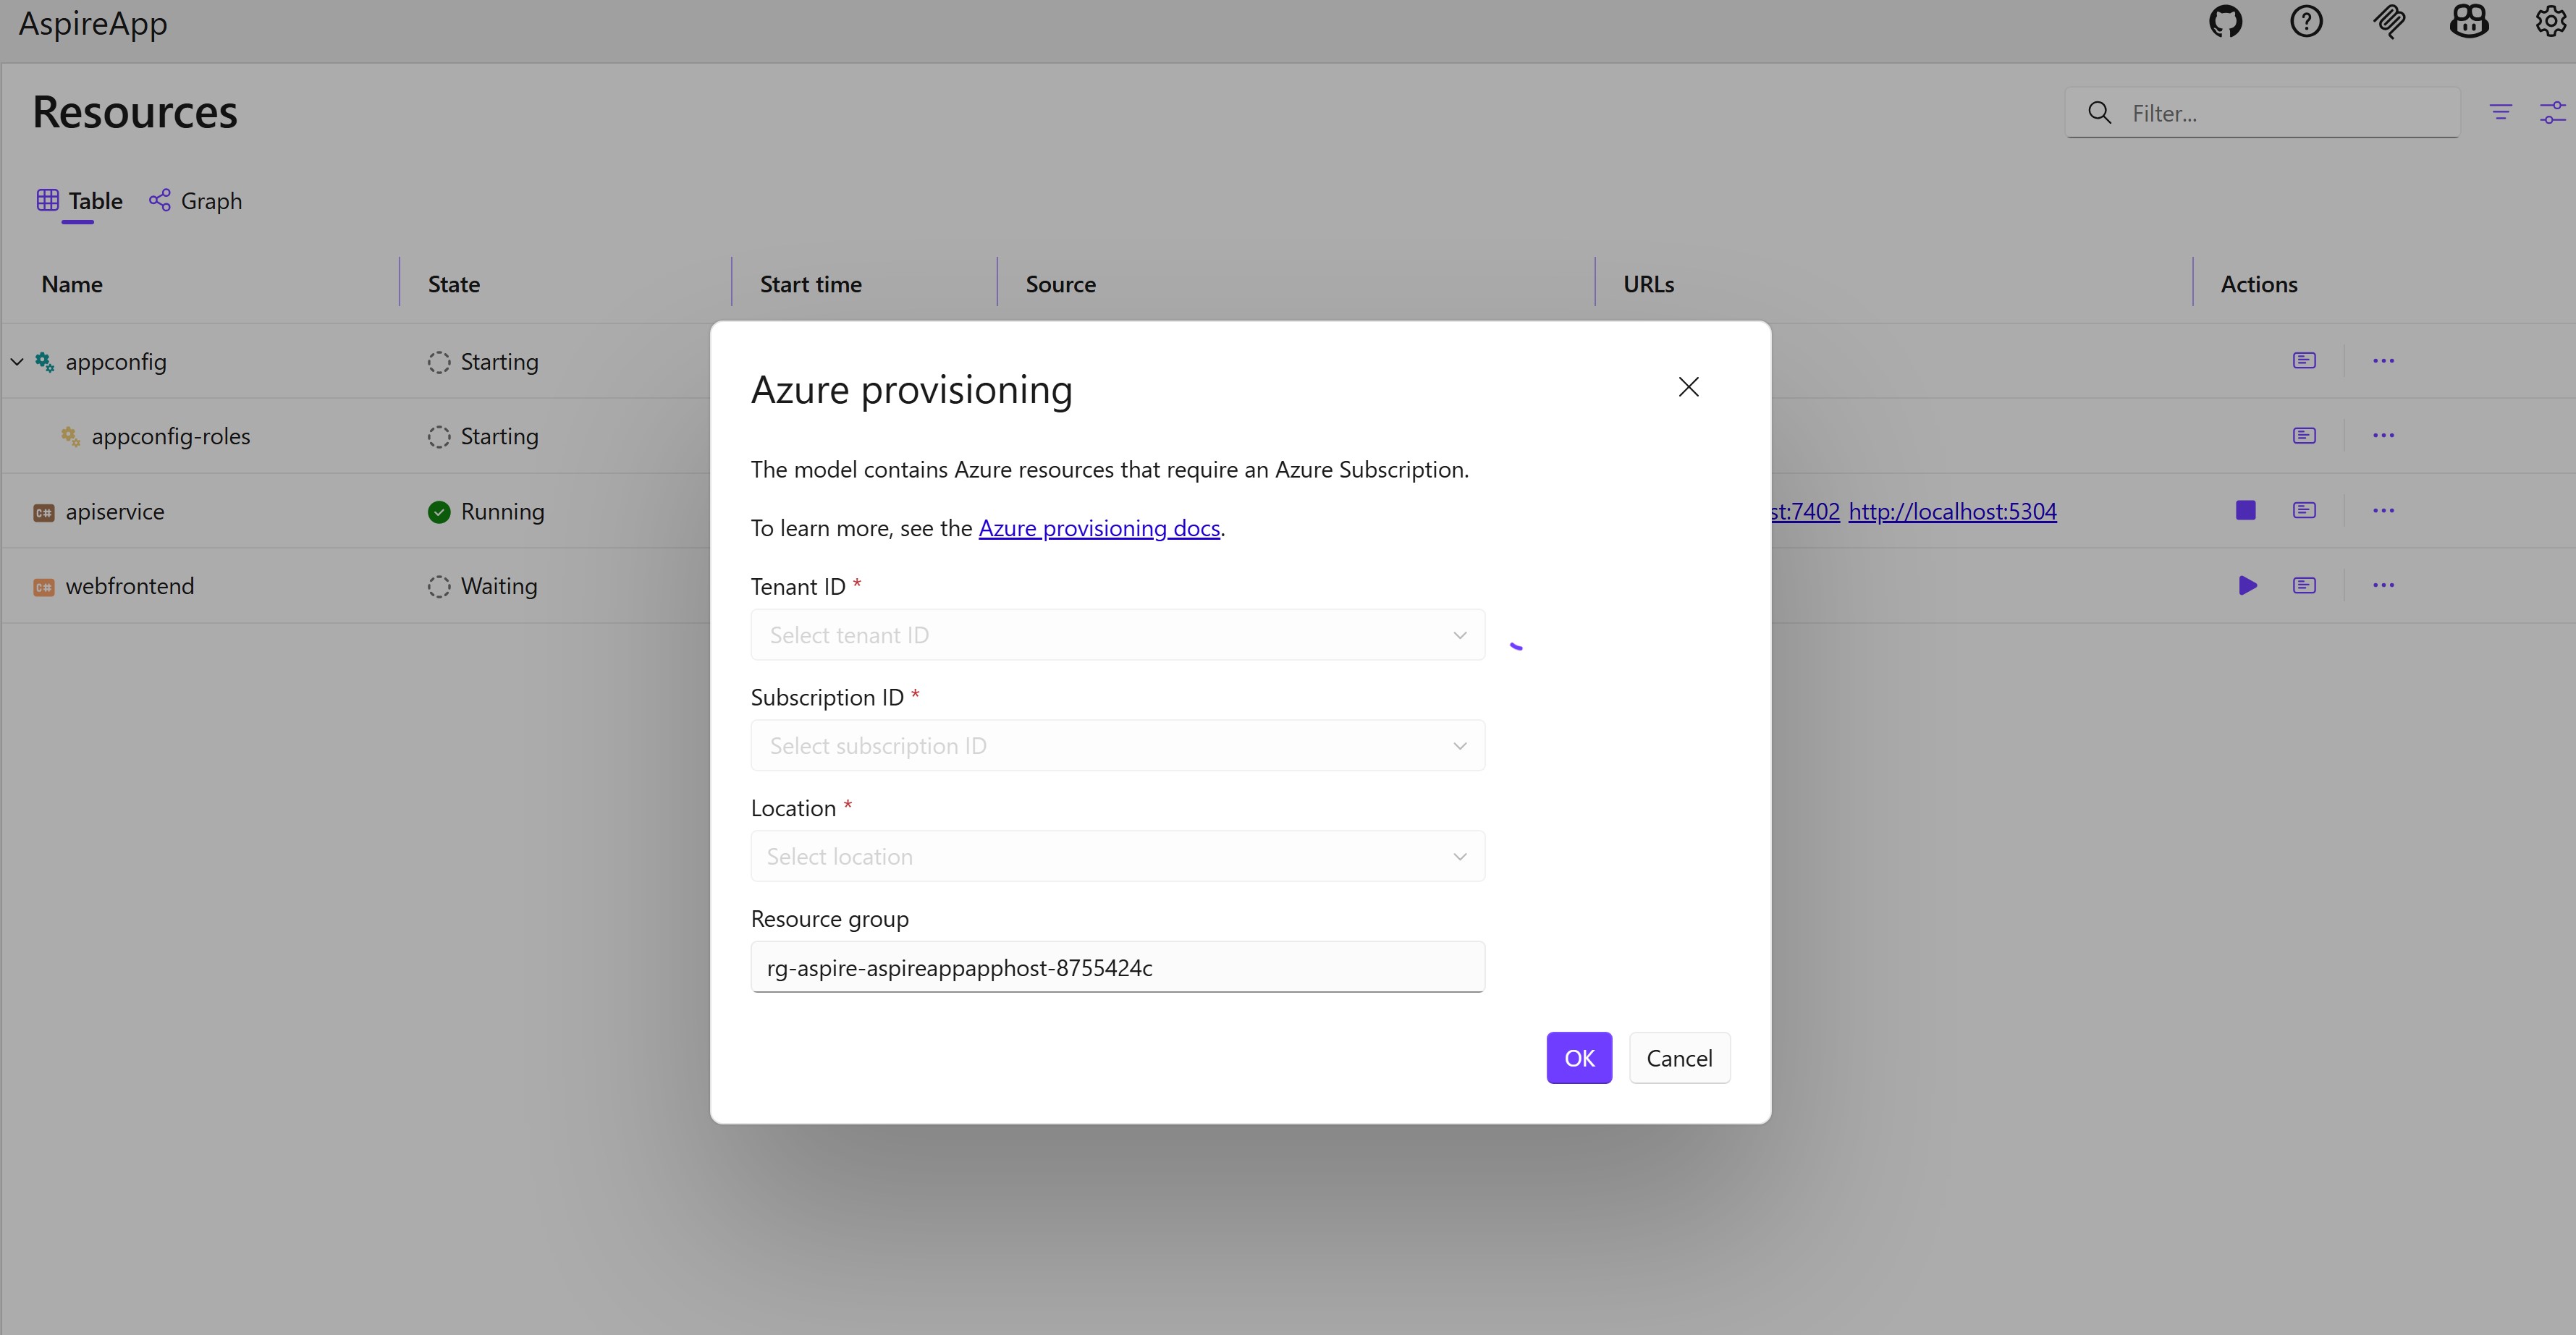
注释
必须在 Azure 订阅上分配 “所有者” 或 “用户访问管理员” 角色。 在预配过程中,需要这些角色才能创建角色分配。
小窍门
可以通过链式调用
RunAsExisting()builder.AddAzureAppConfiguration("appconfig")来引用现有的应用配置资源。 有关详细信息,请转到 “使用现有 Azure 资源”。将应用配置资源的引用添加到
webfrontend项目,并配置项目等待该资源。builder.AddProject<Projects.AspireApp_Web>("webfrontend") .WithExternalHttpEndpoints() .WithHttpHealthCheck("/health") .WithReference(apiService) .WaitFor(apiService) .WithReference(appConfiguration) // reference the App Configuration resource .WaitFor(appConfiguration); // wait for the App Configuration resource to enter the Running state before starting the resource运行
AppHost项目。 您看到 Azure 应用配置资源正在进行配置。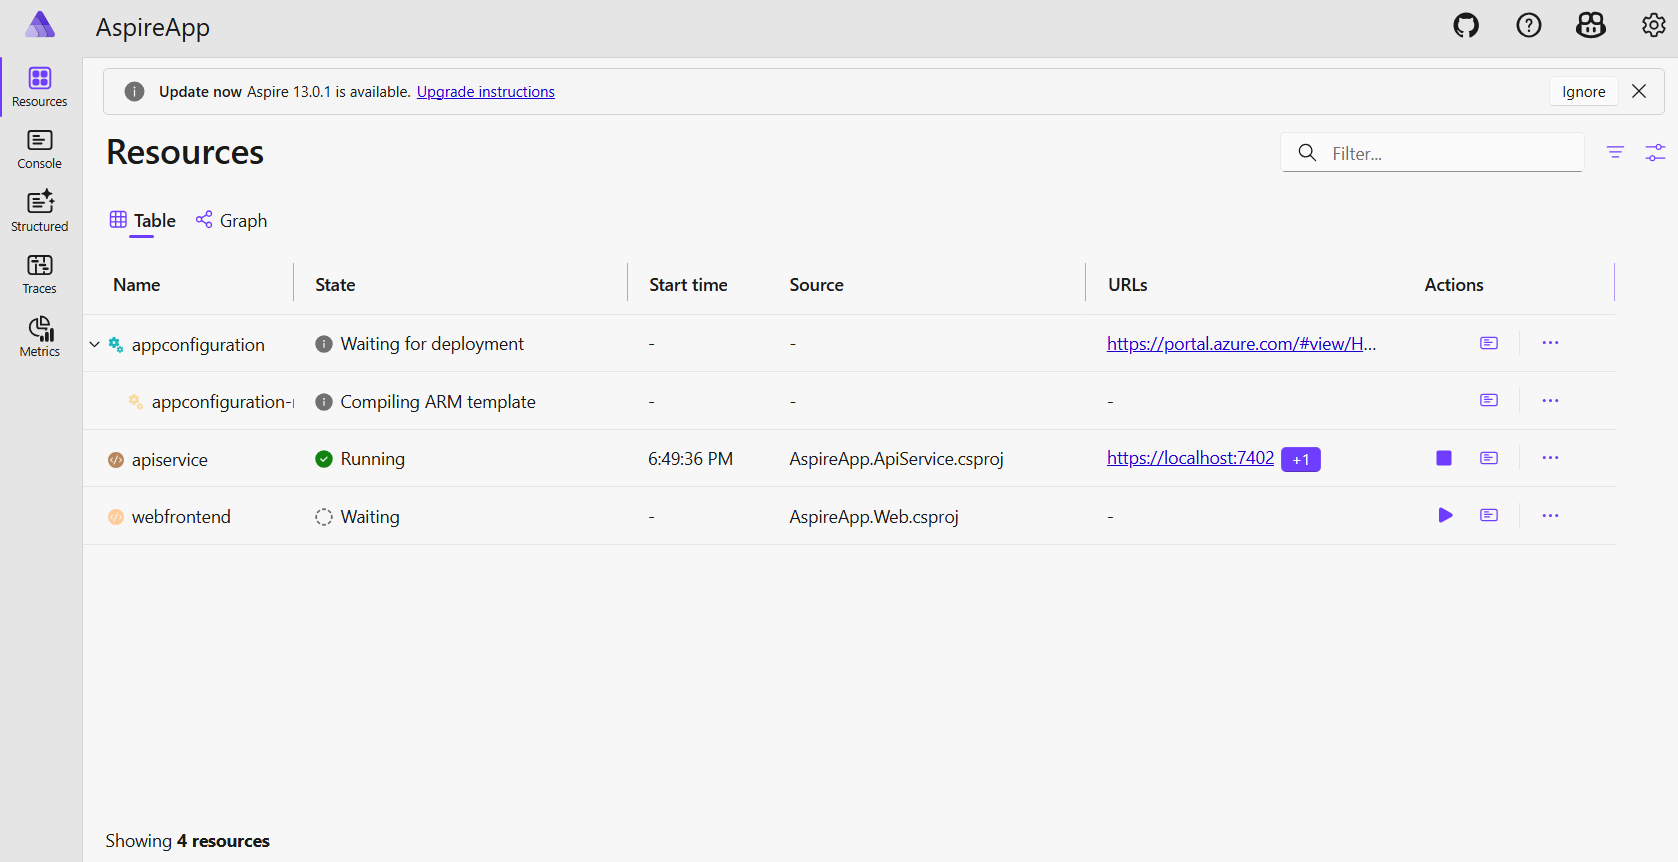
等待几分钟,你会看到 Azure 应用配置资源已预配并正在运行。
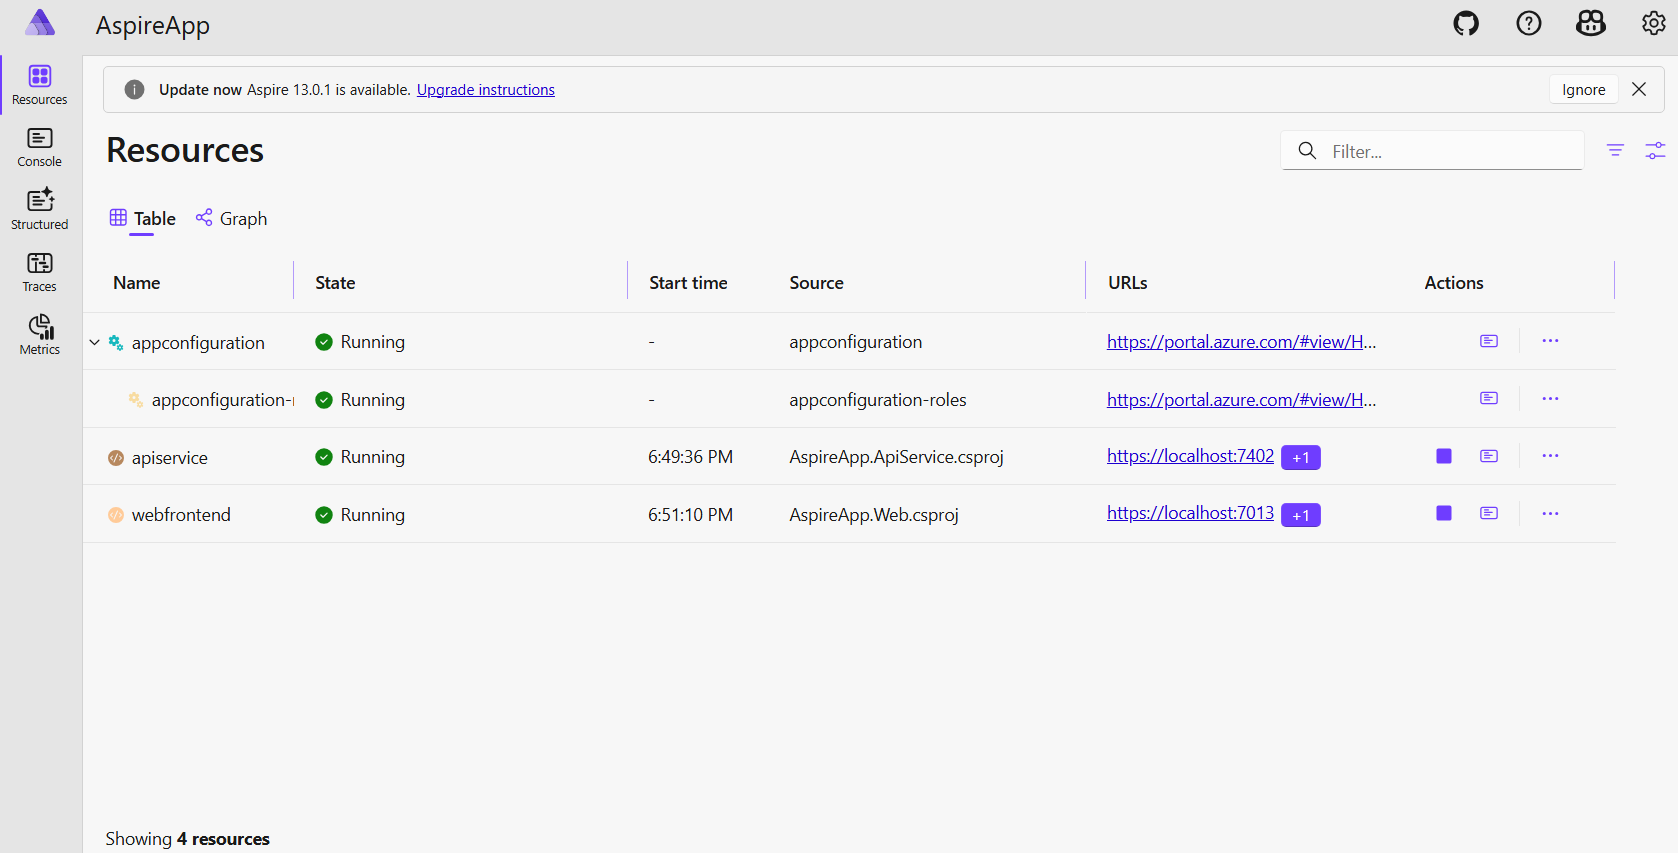
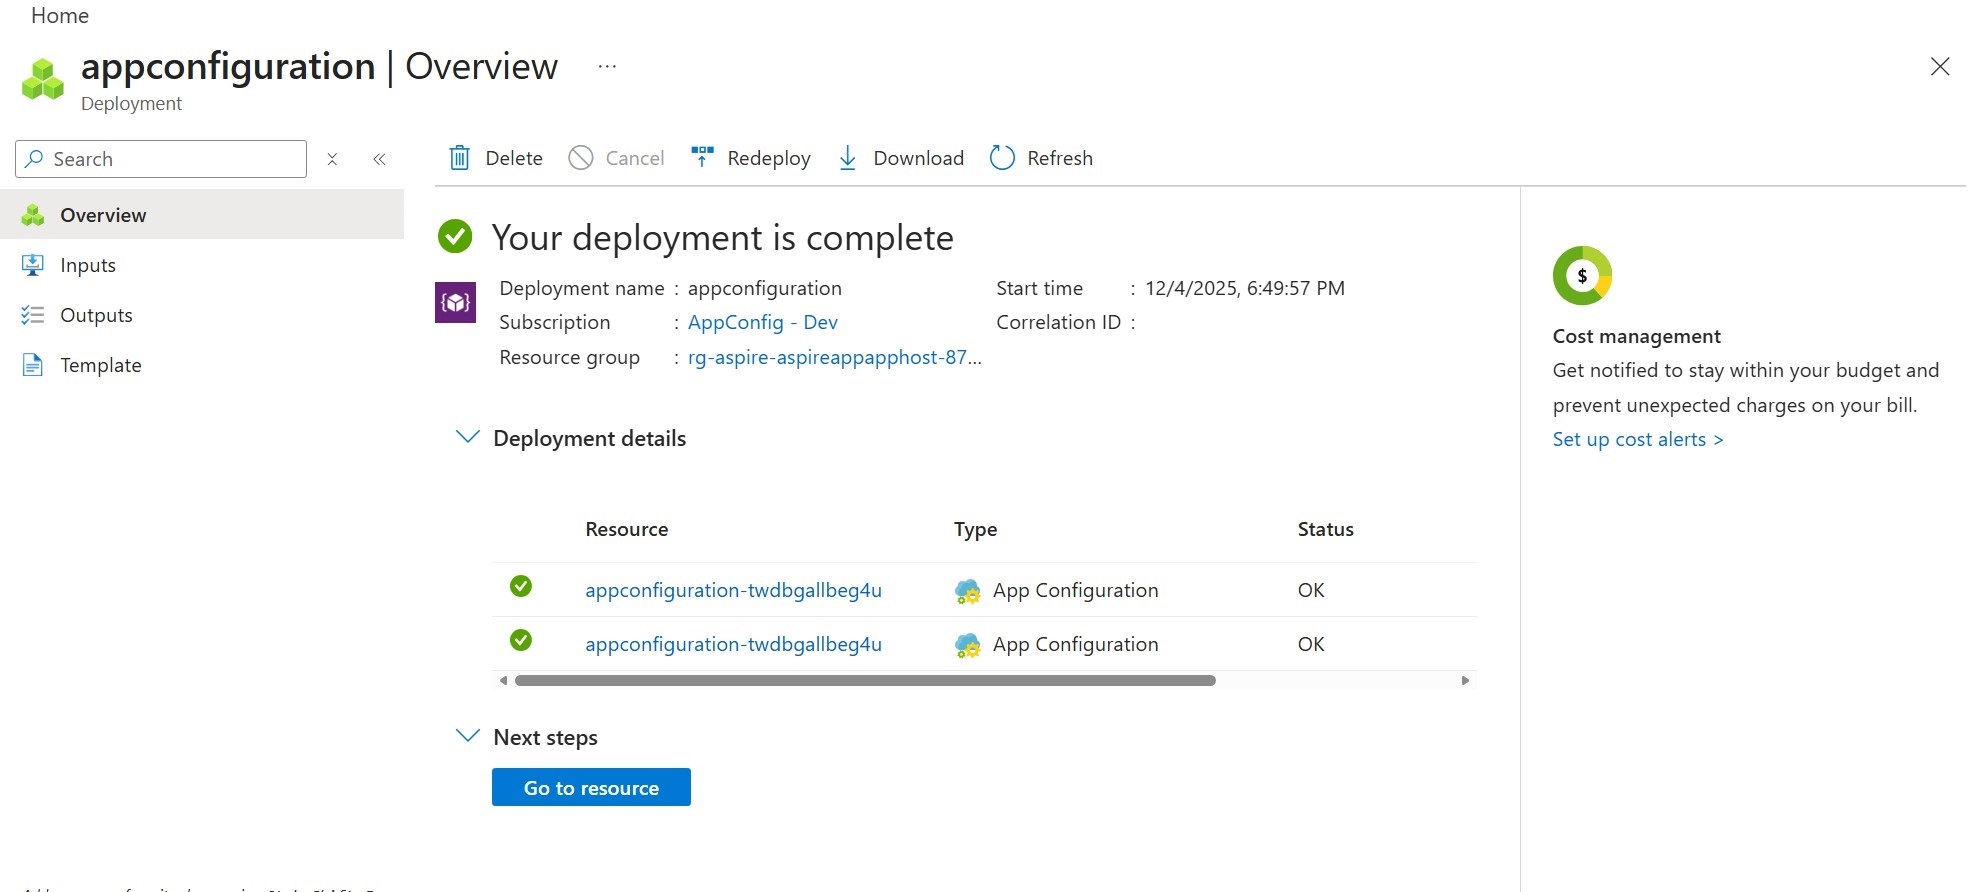
单击 Aspire 仪表板上的部署 URL 转到 Azure 门户。 可以看到部署已完成,可以转到 Azure 应用配置资源。


添加键值
将以下键值添加到应用配置存储区,并保留 标签 和 内容类型 及其默认值。 有关如何使用 Azure 门户或 CLI 将键值添加到存储区的详细信息,请转到创建键值。
| Key | 价值 |
|---|---|
| TestApp:Settings:Message | Azure 应用配置,您好! |
将 Azure 应用配置添加到 Aspire 解决方案
导航到
AppHost项目的目录。 运行以下命令以添加Aspire.Hosting.Azure.AppConfigurationNuget 包。dotnet add package Aspire.Hosting.Azure.AppConfiguration打开 AppHost.csproj。 请确保
Aspire.Hosting.AppHost包版本不早于安装的版本。 否则,需要升级Aspire.Hosting.AppHost包。打开 AppHost.cs 文件并添加以下代码。
var builder = DistributedApplication.CreateBuilder(args);

// Add an Azure App Configuration resource
var appConfiguration = builder.AddAzureAppConfiguration("appconfiguration")
    .RunAsEmulator(emulator => { // use the App Configuration emulator
        emulator.WithDataBindMount();
    });
重要
调用
RunAsEmulator时,它会拉取 应用配置模拟器映像 ,并将容器作为应用配置资源运行。 请确保计算机上具有符合 OCI 的容器运行时。 有关详细信息,请转到 Aspire 容器运行时。小窍门
可以调用
WithDataBindMount或WithDataVolume配置永久性容器存储的模拟器资源,以便无需每次重新创建密钥值。将应用配置资源的引用添加到
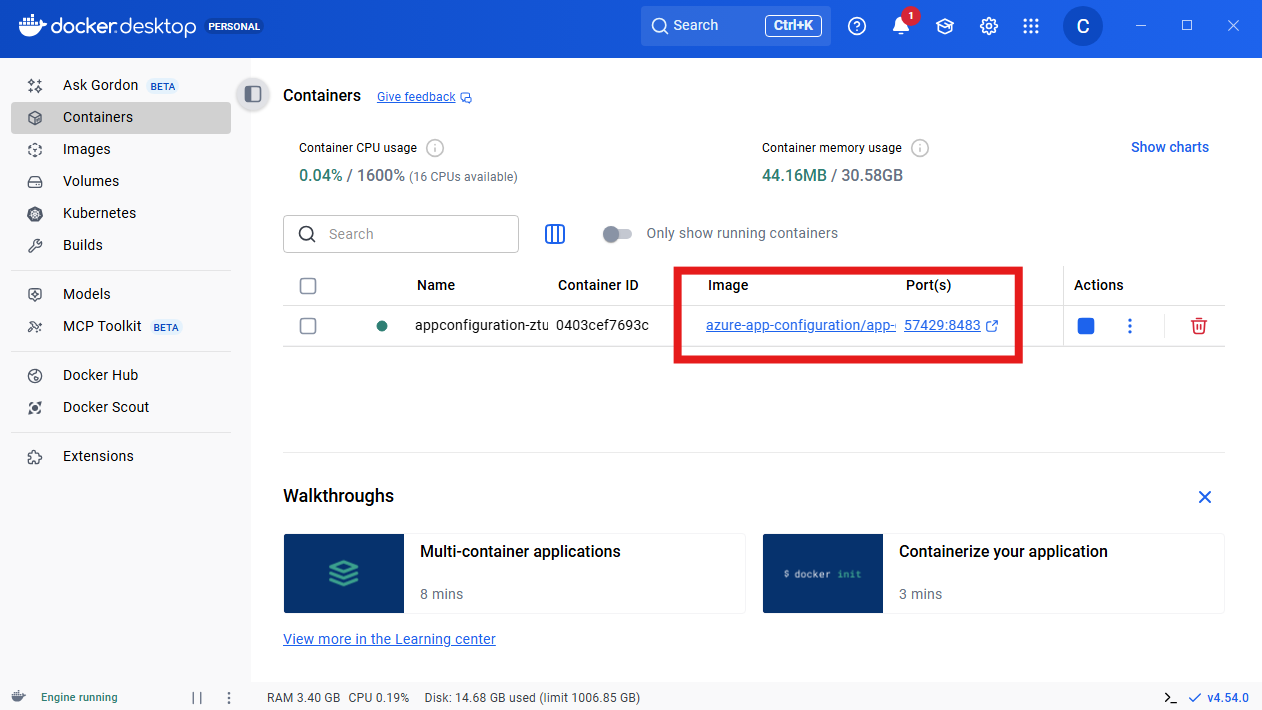
webfrontend项目,并配置项目等待该资源。builder.AddProject<Projects.AspireApp_Web>("webfrontend") .WithExternalHttpEndpoints() .WithHttpHealthCheck("/health") .WithReference(apiService) .WaitFor(apiService) .WithReference(appConfiguration) // reference the App Configuration resource .WaitFor(appConfiguration); // wait for the App Configuration resource to enter the Running state before starting the resource启动容器运行时。 在本教程中,我们使用 Docker Desktop。
运行
AppHost项目。 转到 Aspire 仪表板。 可以看到应用配置模拟器资源正在运行。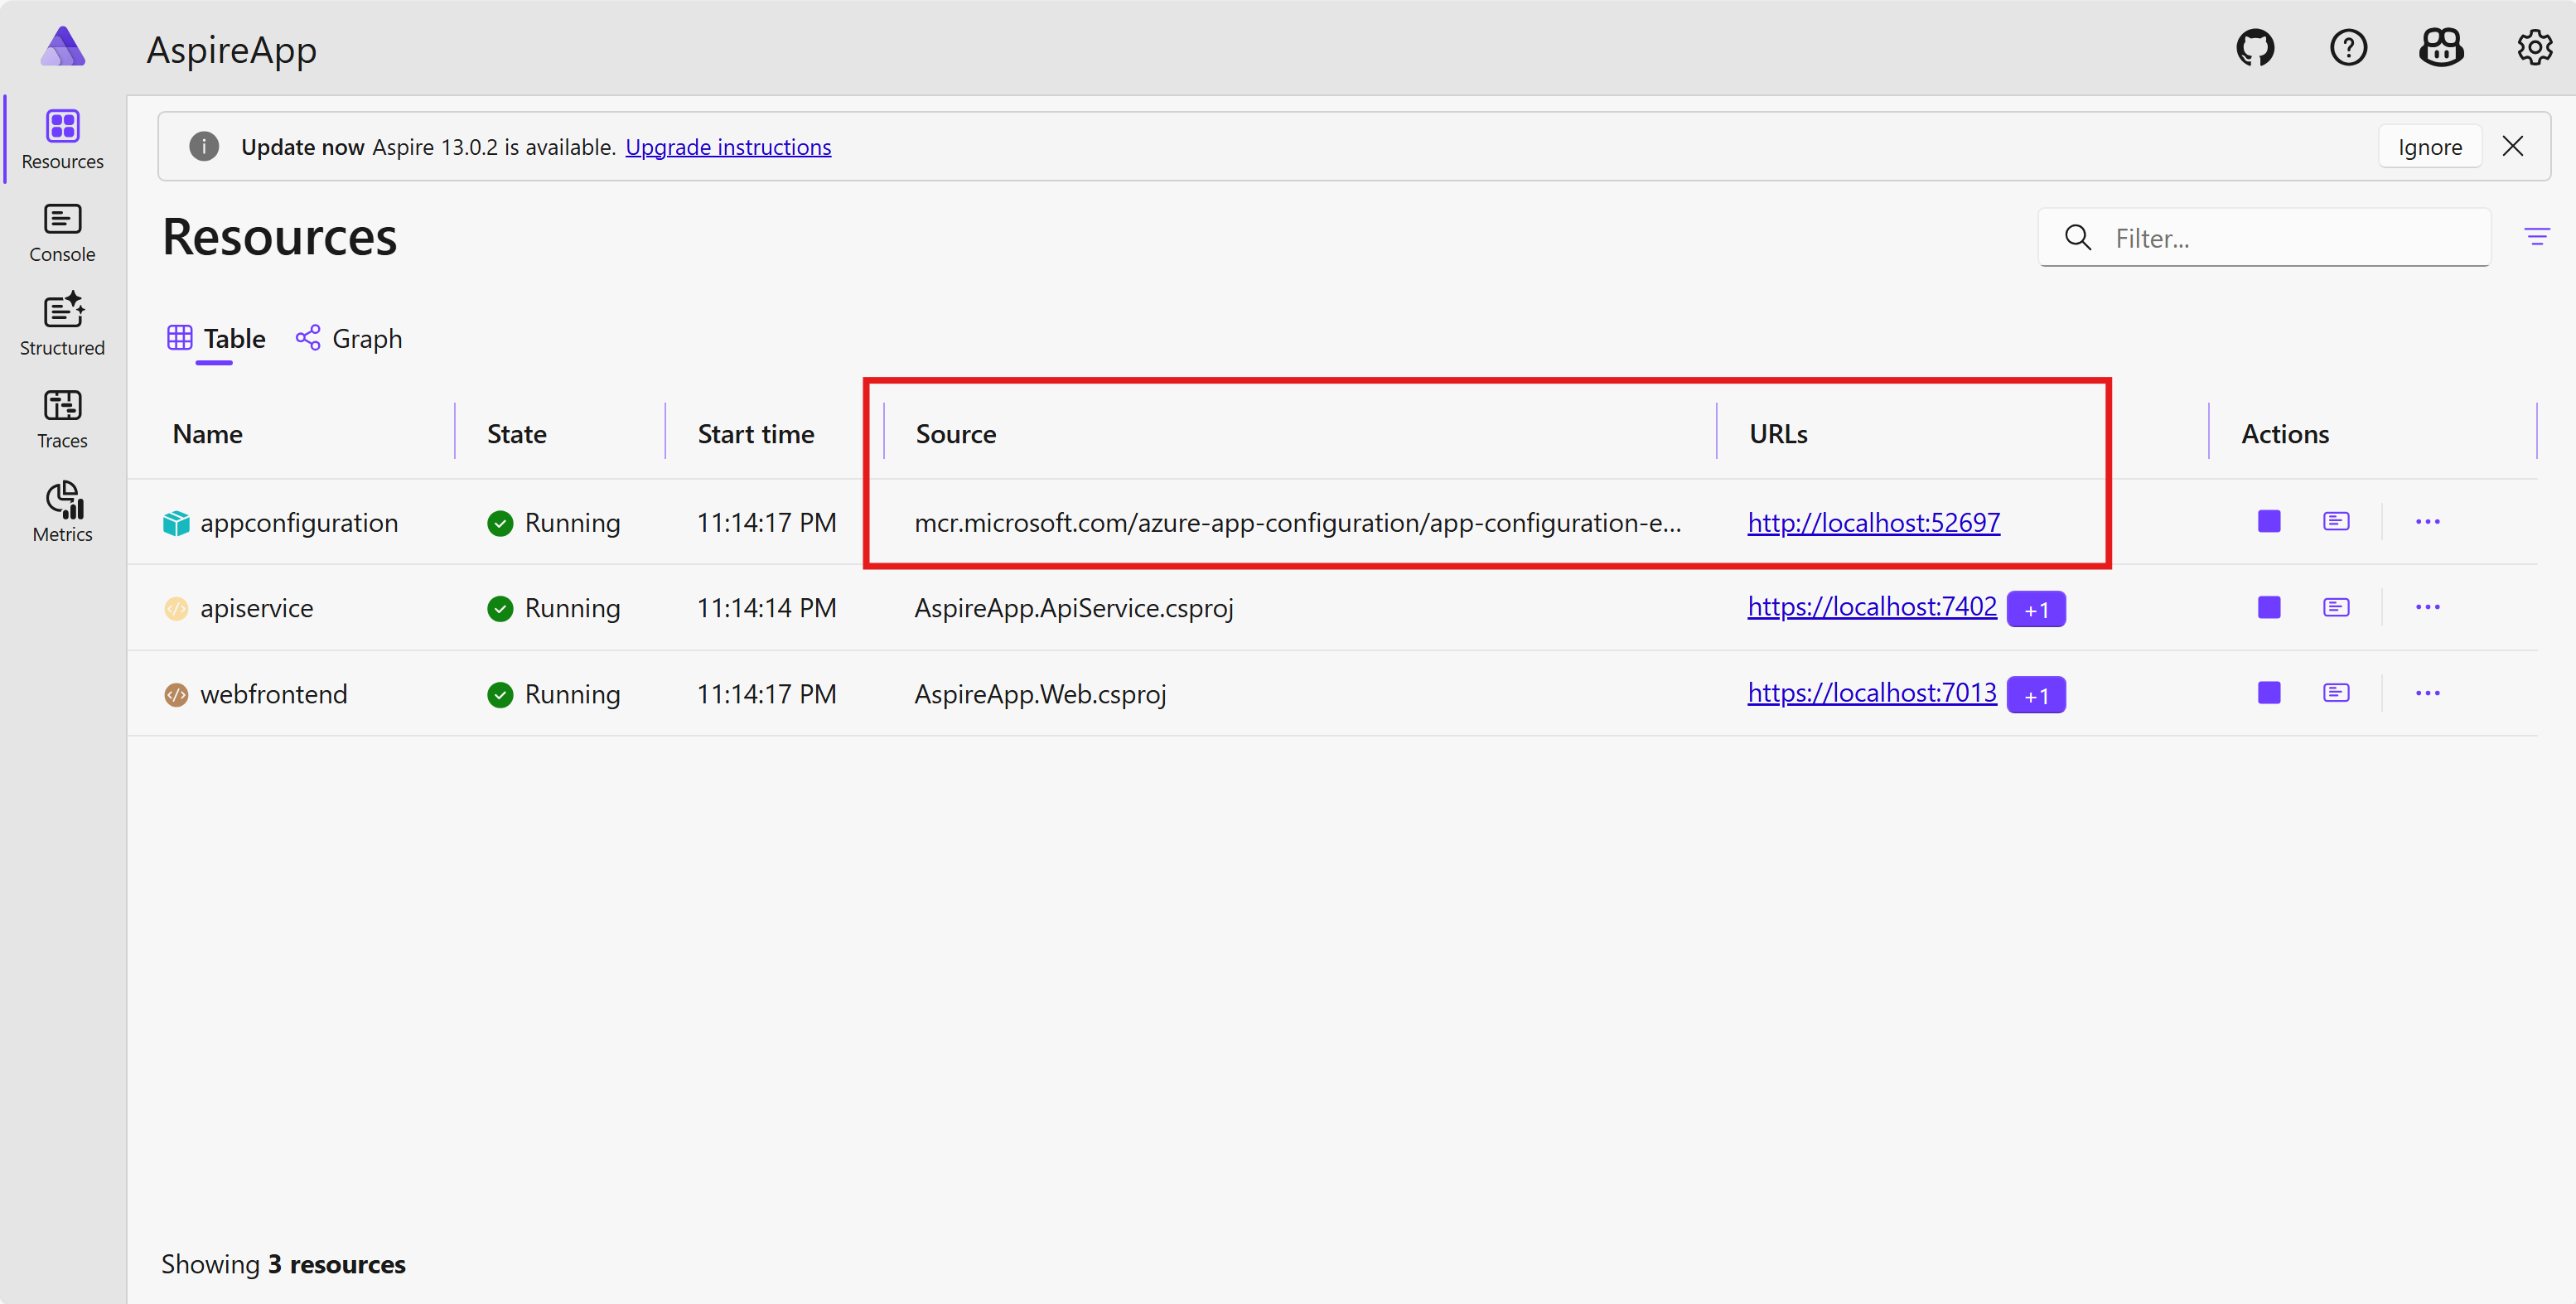
容器开始运行应用配置模拟器。


添加键值
单击资源的 URL
appconfiguration。 你能看到应用配置仿真器的用户界面。Create单击右上角的按钮。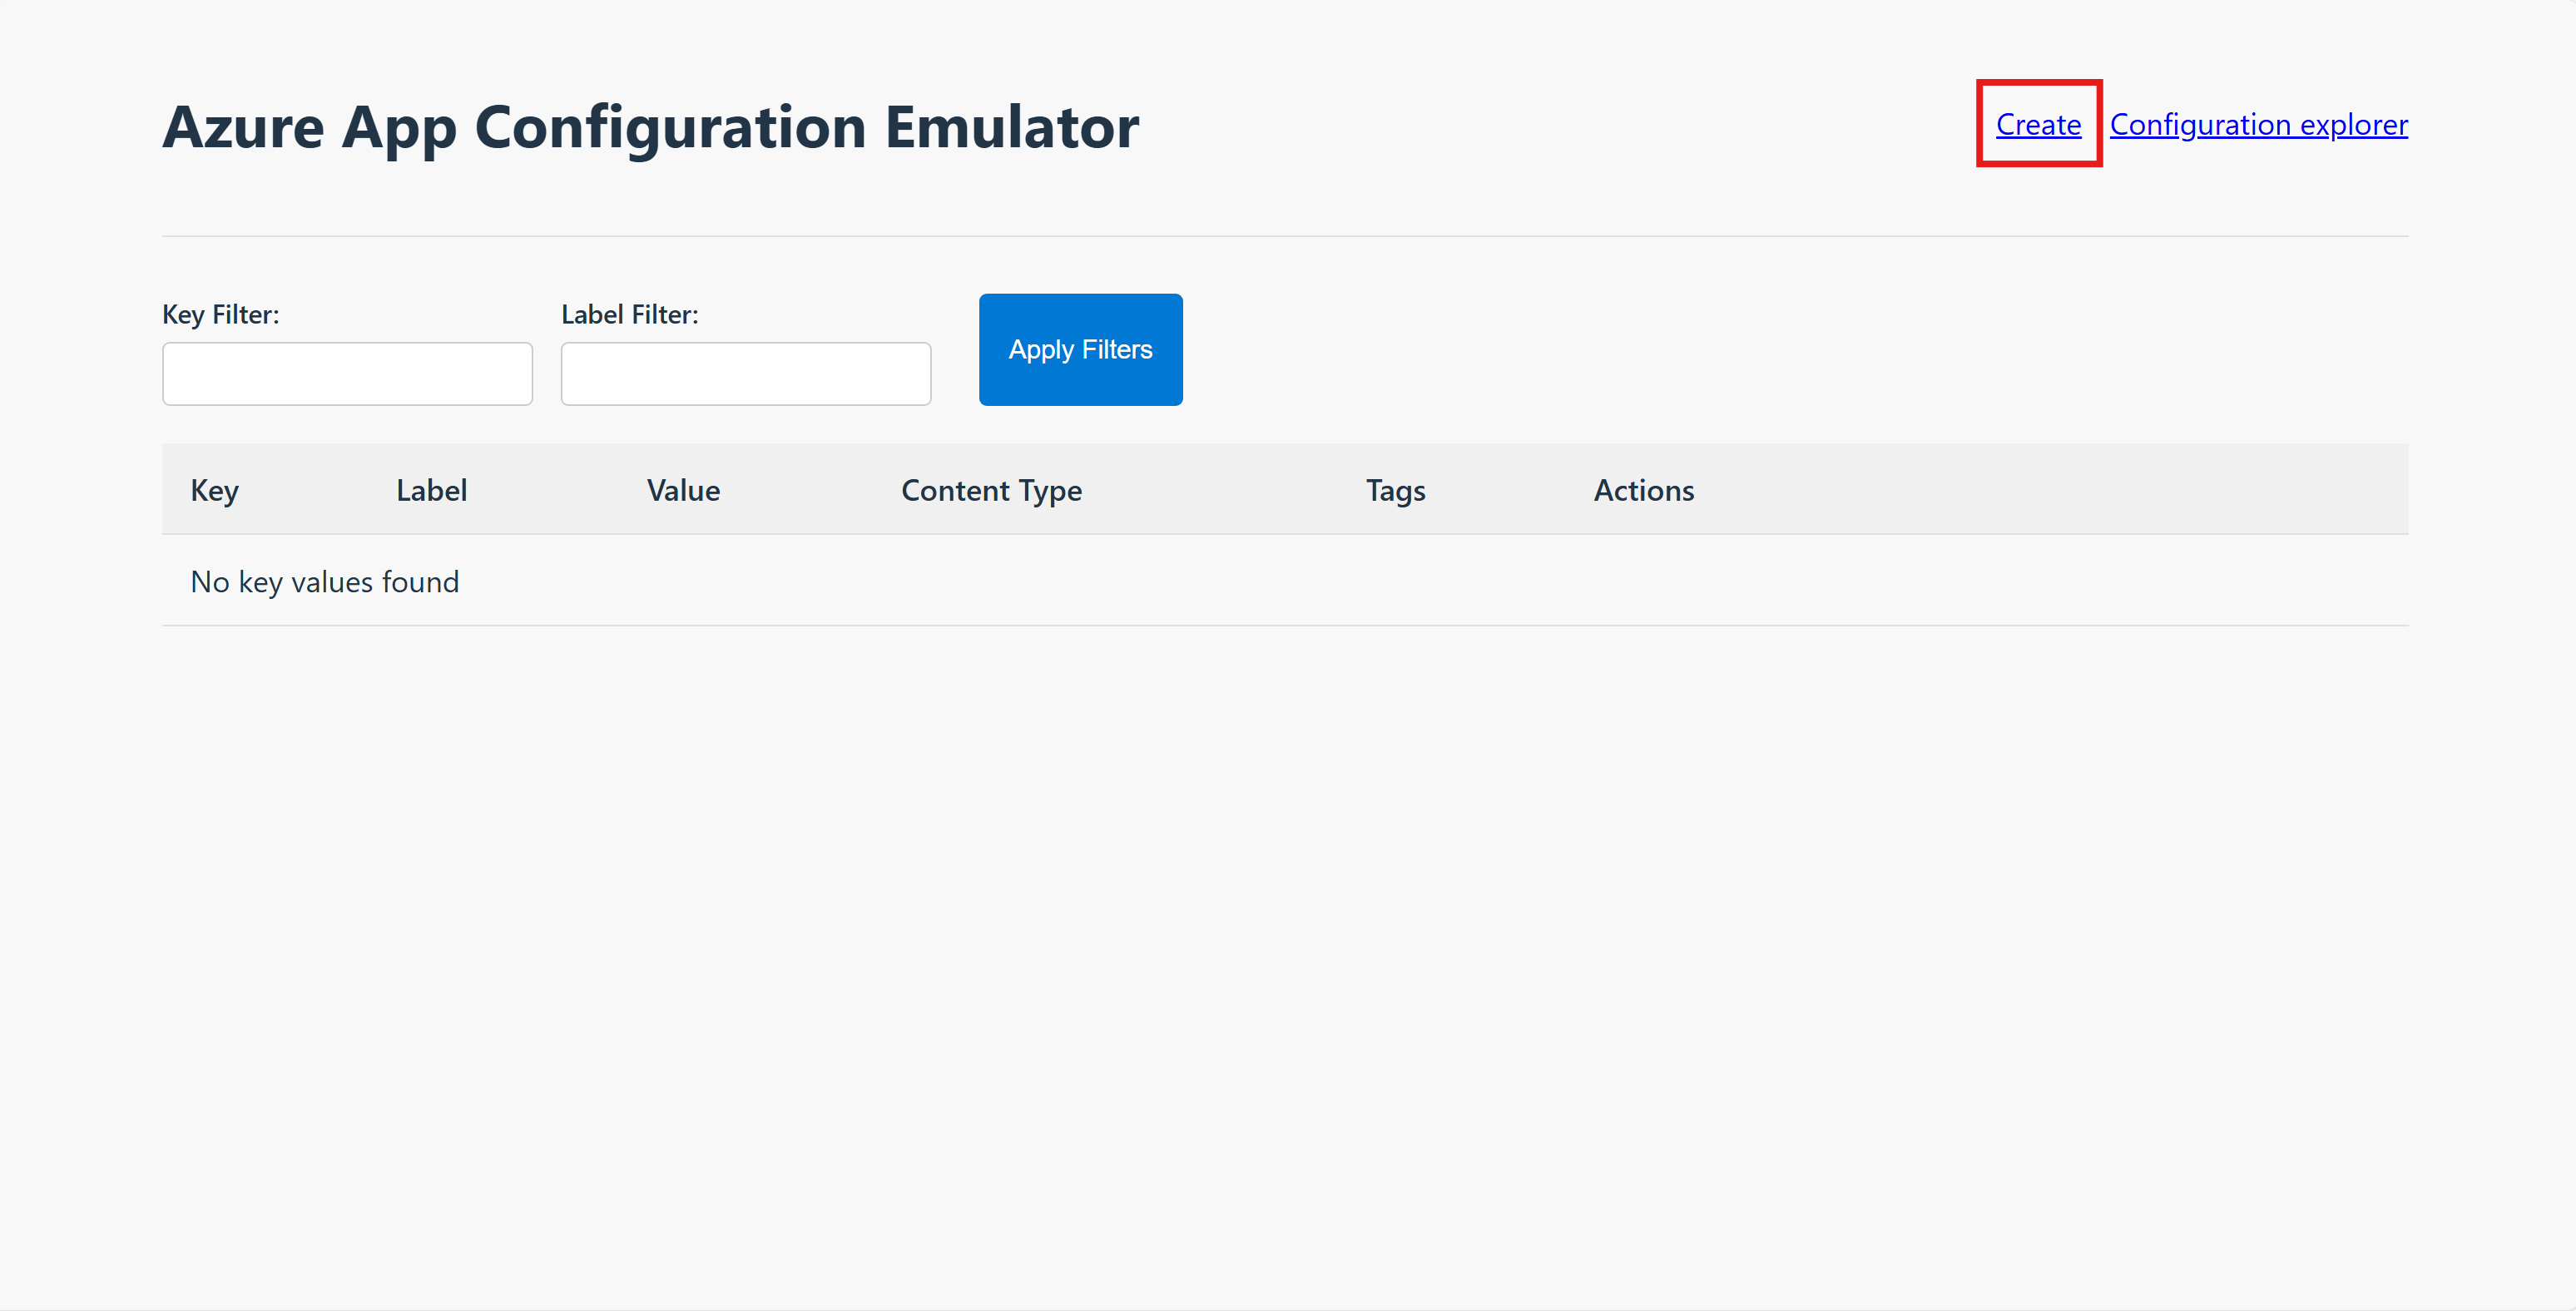
添加以下键值。
Key 价值 TestApp:Settings:Message Azure 应用配置,您好! 单击“
Save”按钮。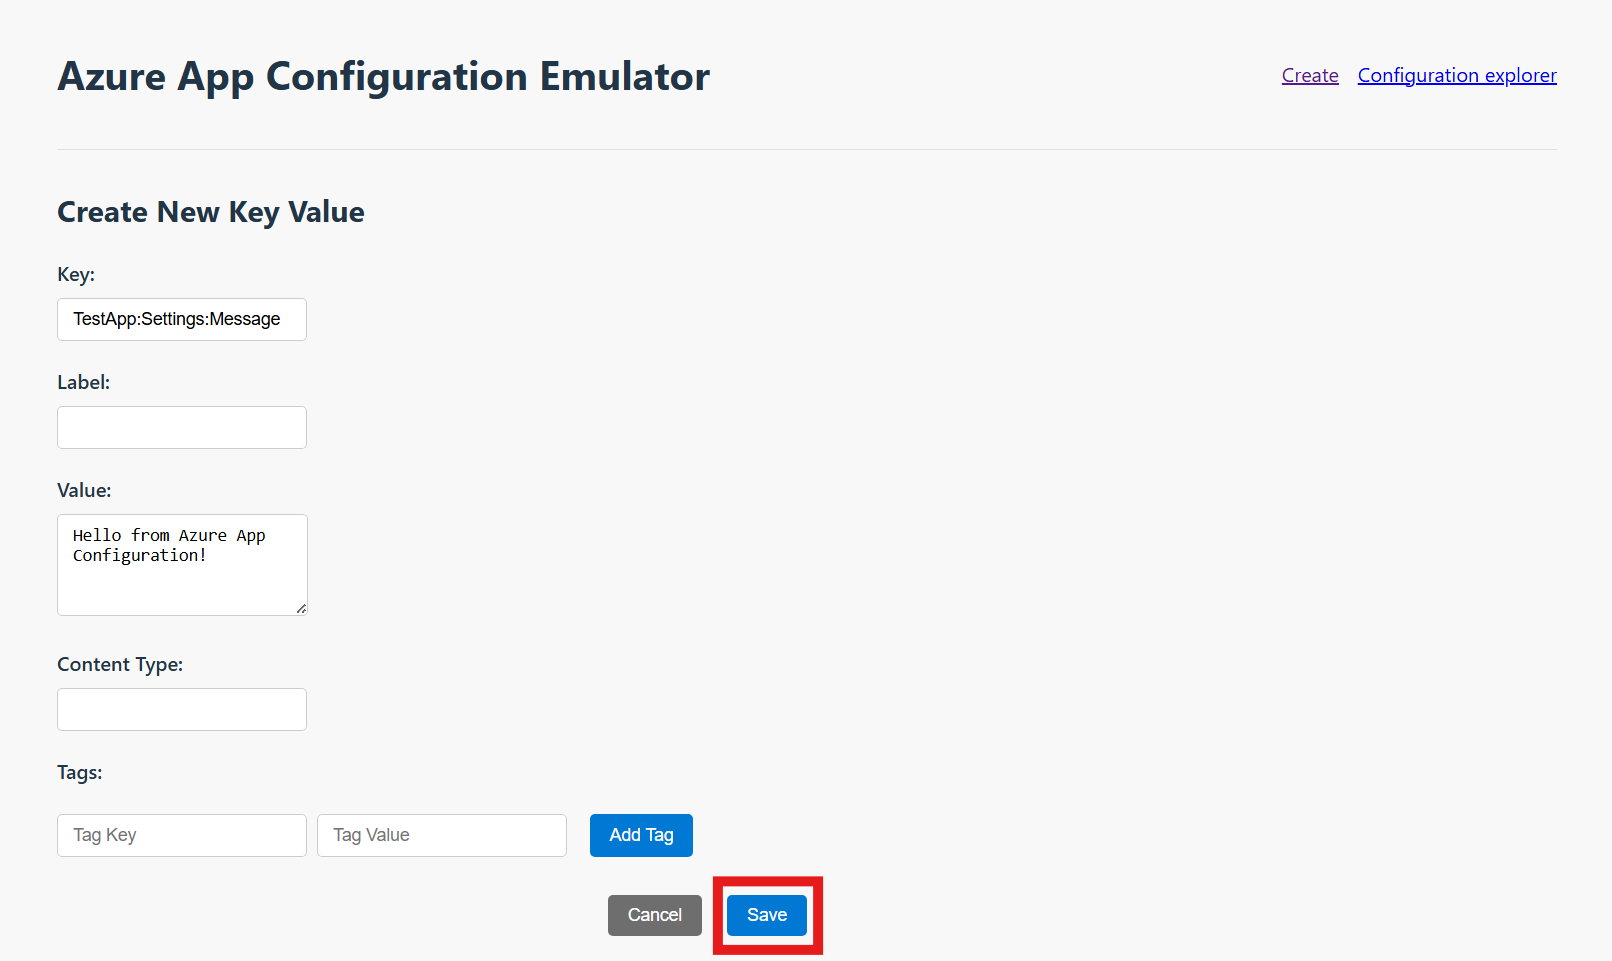

在 Web 应用程序中使用应用配置
导航到
Web项目的目录。 运行以下命令以添加Aspire.Microsoft.Extensions.Configuration.AzureAppConfigurationNuget 包。dotnet add package Aspire.Microsoft.Extensions.Configuration.AzureAppConfiguration打开 Program.cs 文件并添加以下代码。
var builder = WebApplication.CreateBuilder(args);

// Use Azure App Configuration
builder.AddAzureAppConfiguration("appconfiguration"); // use the resource name defined in the AppHost project
打开 Components/Pages/Home.razor 文件,并使用以下代码对其进行更新。
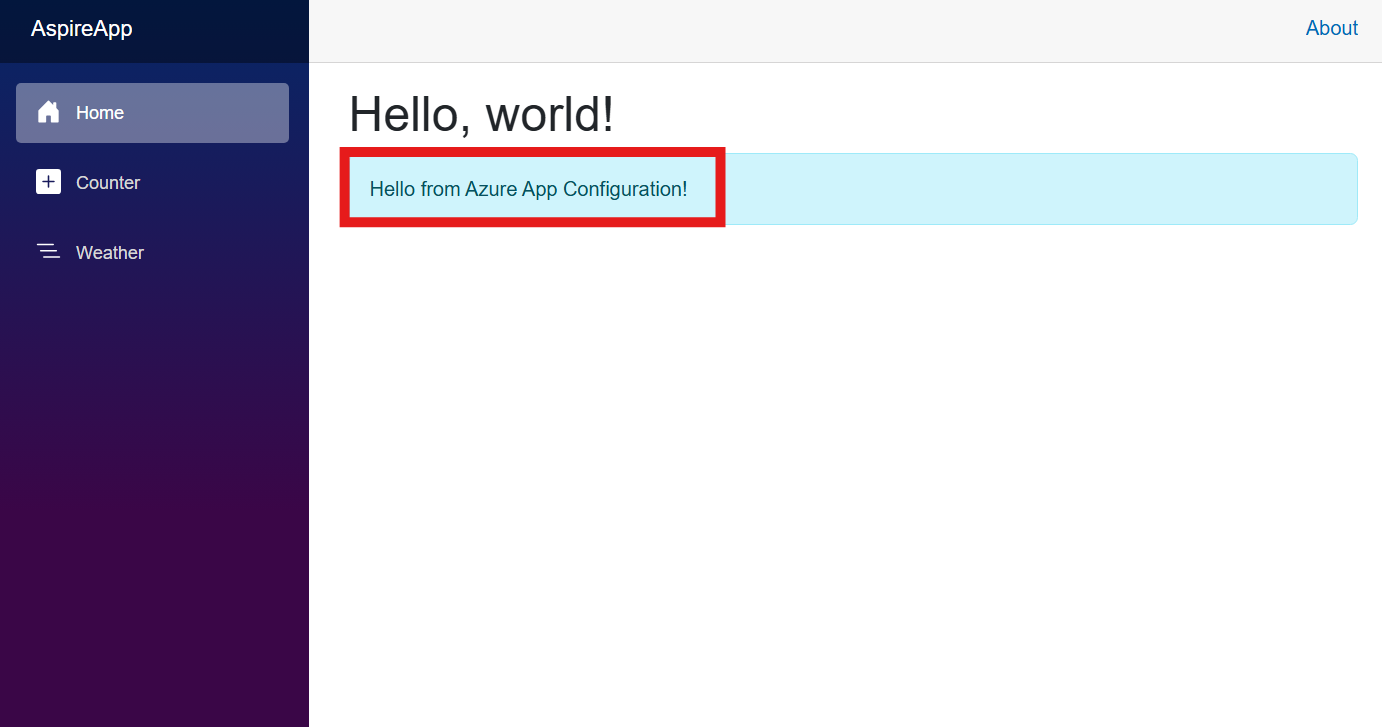
@page "/" @inject IConfiguration Configuration <PageTitle>Home</PageTitle> <h1>Hello, world!</h1> @if (!string.IsNullOrWhiteSpace(message)) { <div class="alert alert-info">@message</div> } else { <div class="alert alert-info">Welcome to your new app.</div> } @code { private string? message; protected override void OnInitialized() { string msg = Configuration["TestApp:Settings:Message"]; message = string.IsNullOrWhiteSpace(msg) ? null : msg; } }AppHost项目。 转到 Aspire 仪表板并单击 Web 前端的 URL。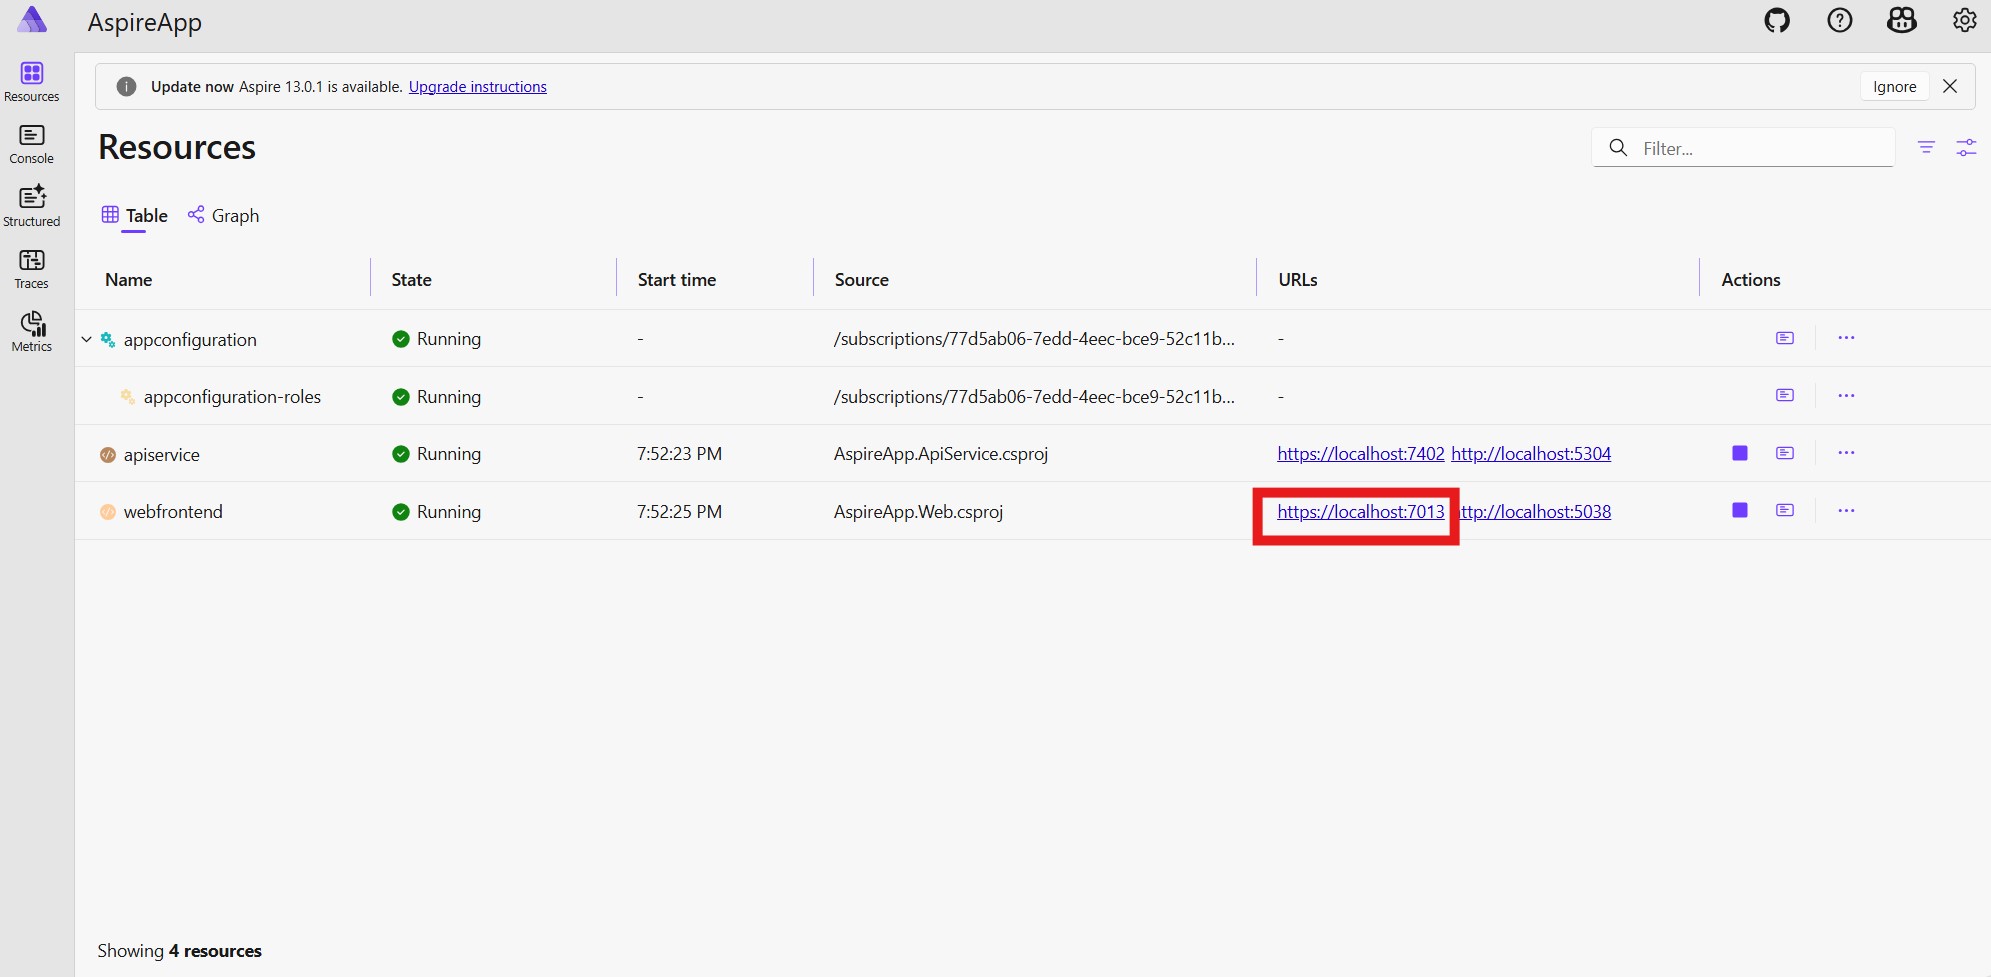
会看到一个页面,其中包含来自 Azure 应用配置的欢迎消息。


后续步骤
在本快速入门中,请执行以下操作:
- 在 Aspire 解决方案中添加了 Azure 应用配置资源。
- 使用 App Configuration Aspire 集成库从 Azure 应用配置读取键值。
- 使用在应用配置中配置的设置显示网页。
若要了解如何将 Aspire 应用配置为动态刷新配置设置,请继续学习下一教程。
若要了解如何在 Aspire 应用中使用功能标志,请继续学习下一教程。
若要详细了解 Azure 应用配置模拟器,请继续阅读以下文档。