在应用程序中运行试验有助于做出明智的决策,以提高应用的性能和用户体验。 本指南介绍如何在应用配置存储中设置和执行试验。 了解如何使用应用配置和 Application Insights 的功能收集和度量数据(预览版)。
为此,可以做出数据驱动的决策来改进应用程序。
注释
一种快速启动试验之旅的方法是运行 名言摘录每日AZD样例。此存储库提供了一个全面的示例,完整地演示了包括Azure资源预配和第一个试验在内的过程,展示如何将Azure应用配置与您的.NET应用程序集成来运行试验。
在本教程中,你将:
- 创建变体功能标志
- 将 Application Insights 资源添加到应用商店
- 将拆分实验工作区添加到您的商店中
- 设置应用以运行试验
- 启用遥测并在变体特性标志中创建实验
- 为试验创建指标
- 获取试验结果
先决条件
- 一份 Azure 订阅。 如果没有,请创建一个试用版订阅。
- Azure 应用程序配置存储。
- 基于工作区的 Application Insights 资源。
创建变体功能标志(预览版)
按照特性标志快速入门中所述,创建一个名为Greeting的变体特性标志,其中包含两个变体,Off 和 On。
将 Application Insights(预览版)资源连接到配置存储
若要运行试验,首先需要将基于工作区的 Application Insights 资源连接到应用配置存储。 将此资源连接到应用配置存储会使用试验的遥测源设置配置存储。
在应用配置存储区中,选择“遥测 > Application Insights”(预览版)。
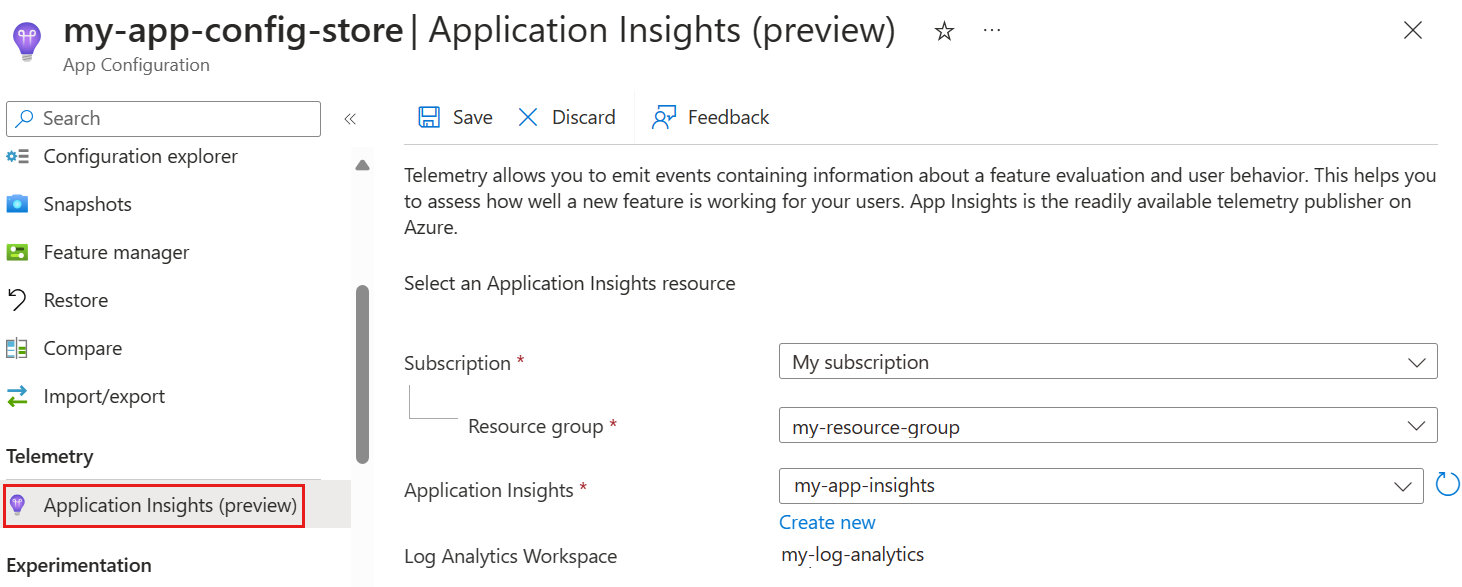
选择要用作变体功能标记和应用的遥测服务提供商的 Application Insights 资源,然后选择保存。 如果没有 Application Insights 资源,请通过选择“ 新建”创建一个。 有关如何继续的详细信息,请转到 创建基于 worskpace 的资源。 然后,返回 Application Insights(预览版),重新加载可用的 Application Insights 资源列表,并选择新的 Application Insights 资源。
通知表明,Application Insights 资源已成功更新,用于应用配置存储。

将拆分实验工作区(预览版)连接到商店
若要在 Azure 应用配置中运行试验,将使用拆分试验工作区。 按照以下步骤将拆分试验工作区连接到应用商店。
在应用配置存储区中,从左侧菜单中选择“试验>拆分试验工作区”(预览)。
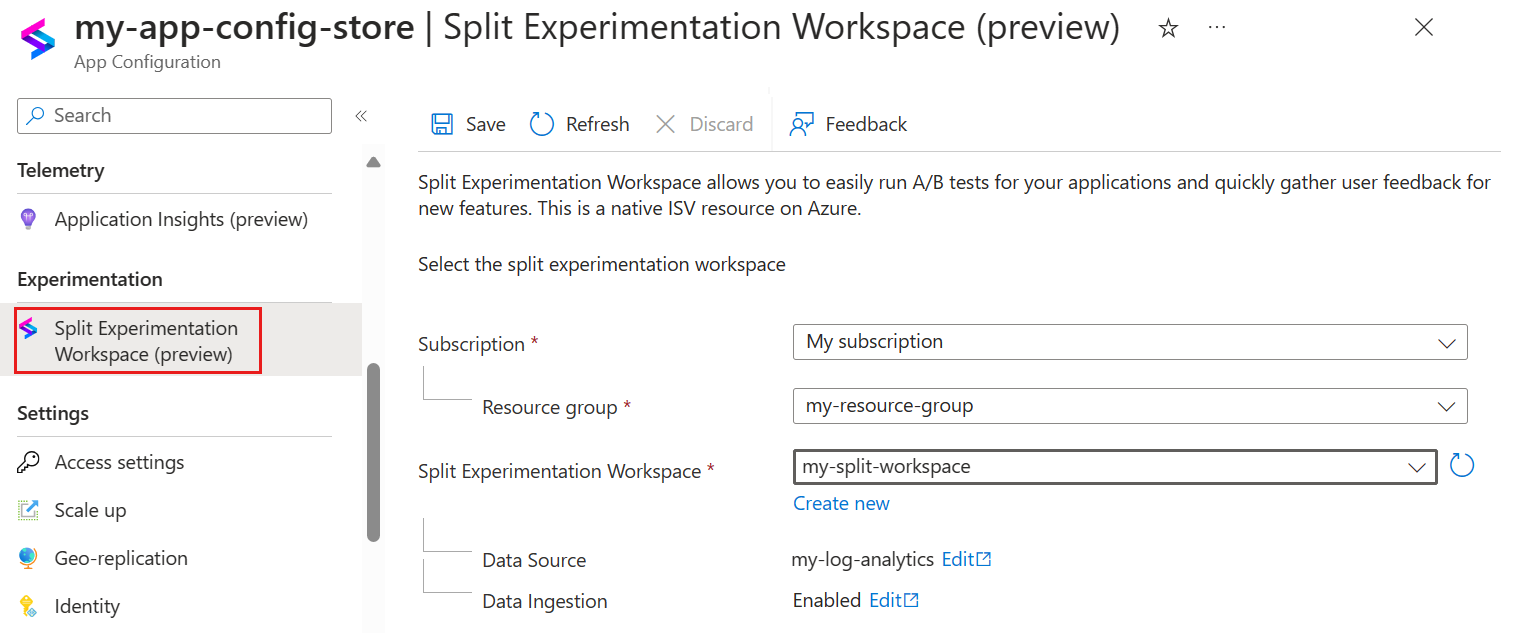
选择 拆分试验工作区,然后 保存。
注释
拆分试验工作区中选择的数据源必须与上一步中选择的 Application Insights 资源相同。
通知表明操作已成功。

设置应用以运行试验
将 Application Insights(预览版)资源连接到应用配置存储后,请设置应用以运行试验(预览版)。
在本例中,你将创建一个名为 每日名言 的 ASP.NET Web 应用。 加载该应用后,它会显示一条名言。 用户可以点击点赞按钮表示喜欢。 为了提高用户参与度,你希望研究个性化问候消息是否会增加点赞引言的用户数量。 在 Azure 应用配置中创建包含两个变体的 Greeting 功能标志: “关闭 ”和 “打开”。 接收 Off 变体的用户将看到标准标题。 接收 On 变体的用户将收到问候消息。 在 Application Insights 中收集和保存用户交互的遥测数据。 使用拆分试验工作区,可以分析试验的有效性。
创建应用并添加用户机密
打开命令提示符并运行以下代码。 这将使用个人帐户身份验证在 ASP.NET Core 中创建新的 Razor Pages 应用程序,并将其置于名为 QuoteOfTheDay 的输出文件夹中。
dotnet new razor --auth Individual -o QuoteOfTheDay在命令提示符中,导航到 QuoteOfTheDay 文件夹并运行以下命令,为应用程序创建 用户密码 。 此机密保存应用配置的连接字符串。
dotnet user-secrets set ConnectionStrings:AppConfiguration "<App Configuration Connection string>"创建另一个保存 Application Insights 连接字符串的用户机密。
dotnet user-secrets set ConnectionStrings:AppInsights "<Application Insights Connection string>"
更新应用程序代码
在 QuoteOfTheDay.csproj 中,将功能管理和应用配置 SDK 的最新预览版本作为必需包添加。
<PackageReference Include="Microsoft.Azure.AppConfiguration.AspNetCore" Version="8.0.0-preview.2" />
<PackageReference Include="Microsoft.FeatureManagement.Telemetry.ApplicationInsights" Version="4.0.0-preview3" />
<PackageReference Include="Microsoft.FeatureManagement.Telemetry.ApplicationInsights.AspNetCore" Version="4.0.0-preview3" />
<PackageReference Include="Microsoft.FeatureManagement.AspNetCore" Version="4.0.0-preview3" />
在 Program.cs行
var builder = WebApplication.CreateBuilder(args);下,添加应用配置提供程序,该提供程序在应用程序启动时从 Azure 拉取配置。 默认情况下,UseFeatureFlags 方法包括所有没有标签的功能标志,并设置缓存过期时间 30 秒。builder.Configuration .AddAzureAppConfiguration(o => { o.Connect(builder.Configuration.GetConnectionString("AppConfiguration")); o.UseFeatureFlags(); });在 Program.cs中,添加以下 using 语句:
using Microsoft.ApplicationInsights.AspNetCore.Extensions;
using Microsoft.ApplicationInsights.Extensibility;
using Microsoft.FeatureManagement.Telemetry.ApplicationInsights.AspNetCore;
在调用
builder.Configuration.AddAzureAppConfiguration的地方,下方添加:// Add Application Insights telemetry. builder.Services.AddApplicationInsightsTelemetry( new ApplicationInsightsServiceOptions { ConnectionString = builder.Configuration.GetConnectionString("AppInsights"), EnableAdaptiveSampling = false }) .AddSingleton<ITelemetryInitializer, TargetingTelemetryInitializer>();此代码片段执行以下作。
- 将 Application Insights 遥测客户端添加到应用程序。
- 添加一个遥测初始化器,将目标信息附加到传出的遥测中。
在根文件夹 QuoteOfTheDay 中,创建名为 ExampleTargetingContextAccessor.cs的新文件。 这会创建一个名为
的新类。 将以下内容粘贴到文件中。 using Microsoft.FeatureManagement.FeatureFilters; namespace QuoteOfTheDay { public class ExampleTargetingContextAccessor : ITargetingContextAccessor { private const string TargetingContextLookup = "ExampleTargetingContextAccessor.TargetingContext"; private readonly IHttpContextAccessor _httpContextAccessor; public ExampleTargetingContextAccessor(IHttpContextAccessor httpContextAccessor) { _httpContextAccessor = httpContextAccessor ?? throw new ArgumentNullException(nameof(httpContextAccessor)); } public ValueTask<TargetingContext> GetContextAsync() { HttpContext httpContext = _httpContextAccessor.HttpContext; if (httpContext.Items.TryGetValue(TargetingContextLookup, out object value)) { return new ValueTask<TargetingContext>((TargetingContext)value); } List<string> groups = new List<string>(); if (httpContext.User.Identity.Name != null) { groups.Add(httpContext.User.Identity.Name.Split("@", StringSplitOptions.None)[1]); } TargetingContext targetingContext = new TargetingContext { UserId = httpContext.User.Identity.Name ?? "guest", Groups = groups }; httpContext.Items[TargetingContextLookup] = targetingContext; return new ValueTask<TargetingContext>(targetingContext); } } }此类声明了 FeatureManagement 的定位功能获取用户上下文的方法。 在这种情况下,它会读取
httpContext.User.Identity.NameUserId,并将电子邮件地址的域视为Group。导航回 Program.cs 并添加以下 using 语句。
using Microsoft.FeatureManagement.Telemetry;
using Microsoft.FeatureManagement;
using QuoteOfTheDay;
在调用的位置
AddApplicationInsightsTelemetry下,添加用于处理应用配置刷新的服务、设置功能管理、配置功能管理目标以及启用功能管理以发布遥测事件。builder.Services.AddHttpContextAccessor(); // Add Azure App Configuration and feature management services to the container. builder.Services.AddAzureAppConfiguration() .AddFeatureManagement() .WithTargeting<ExampleTargetingContextAccessor>() .AddTelemetryPublisher<ApplicationInsightsTelemetryPublisher>();在行
var app = builder.Build();下,添加一个中间件,以便在适当时触发应用配置刷新。// Use Azure App Configuration middleware for dynamic configuration refresh. app.UseAzureAppConfiguration();在这一段下方,添加以下代码,使
TargetingTelemetryInitializer可以通过 HttpContext 存储并访问定向信息。// Add TargetingId to HttpContext for telemetry app.UseMiddleware<TargetingHttpContextMiddleware>();在 QuoteOfTheDay>Pages>Shared>_Layout.cshtml 中添加
QuoteOfTheDay.styles.css以下行以添加 5.15.3 版的font-awesomecss。<link rel="stylesheet" href="https://cdnjs.cloudflare.com/ajax/libs/font-awesome/5.15.3/css/all.min.css">打开 QuoteOfTheDay>Pages>Index.cshtml.cs 并将内容覆盖到报价应用。
using Microsoft.ApplicationInsights;
using Microsoft.AspNetCore.Mvc;
using Microsoft.AspNetCore.Mvc.RazorPages;
using Microsoft.FeatureManagement;

namespace QuoteOfTheDay.Pages;

public class Quote
{
    public string Message { get; set; }

    public string Author { get; set; }
}

public class IndexModel(IVariantFeatureManagerSnapshot featureManager, TelemetryClient telemetryClient) : PageModel
{
    private readonly IVariantFeatureManagerSnapshot _featureManager = featureManager;
    private readonly TelemetryClient _telemetryClient = telemetryClient;

    private Quote[] _quotes = [
        new Quote()
        {
            Message = "You cannot change what you are, only what you do.",
            Author = "Philip Pullman"
        }];

    public Quote? Quote { get; set; }

    public bool ShowGreeting { get; set; }

    public async void OnGet()
    {
        Quote = _quotes[new Random().Next(_quotes.Length)];

        Variant variant = await _featureManager.GetVariantAsync("Greeting", HttpContext.RequestAborted);

        ShowGreeting = variant.Configuration.Get<bool>();
    }

    public IActionResult OnPostHeartQuoteAsync()
    {
        string? userId = User.Identity?.Name;

        if (!string.IsNullOrEmpty(userId))
        {
            // Send telemetry to Application Insights
            _telemetryClient.TrackEvent("Like");

            return new JsonResult(new { success = true });
        }
        else
        {
            return new JsonResult(new { success = false, error = "User not authenticated" });
        }
    }
}
这段代码
PageModel选取一个随机名言,利用GetVariantAsync来获取当前用户的变体,并将名为“ShowGreeting”的变量设置为该变体的值。 它还处理 Post 请求,通过调用_telemetryClient.TrackEvent("Like");将一个名为 Like 的事件发送到 Application Insights。 此事件自动绑定到用户和变体,并可由指标跟踪。打开 index.cshtml 并覆盖 quote 应用的内容。
@page
@model IndexModel
@{
    ViewData["Title"] = "Home page";
    ViewData["Username"] = User.Identity.Name;
}

<style>
    body {
        font-family: Arial, sans-serif;
        background-color: #f4f4f4;
        color: #333;
    }

    .quote-container {
        background-color: #fff;
        margin: 2em auto;
        padding: 2em;
        border-radius: 8px;
        max-width: 750px;
        box-shadow: 0px 4px 8px rgba(0, 0, 0, 0.2);
        display: flex;
        justify-content: space-between;
        align-items: start;
        position: relative;
    }

    .vote-container {
        position: absolute;
        top: 10px;
        right: 10px;
        display: flex;
        gap: 0em;
    }

    .vote-container .btn {
        background-color: #ffffff; /* White background */
        border-color: #ffffff; /* Light blue border */
        color: #333
    }

    .vote-container .btn:focus {
        outline: none;
        box-shadow: none;
    }

    .vote-container .btn:hover {
        background-color: #F0F0F0; /* Light gray background */
    }

    .greeting-content {
        font-family: 'Georgia', serif; /* More artistic font */
    }

    .quote-content p.quote {
        font-size: 2em; /* Bigger font size */
        font-family: 'Georgia', serif; /* More artistic font */
        font-style: italic; /* Italic font */
        color: #4EC2F7; /* Medium-light blue color */
    }
</style>

<div class="quote-container">
    <div class="quote-content">
        @if (Model.ShowGreeting)
        {
            <h3 class="greeting-content">Hi <b>@User.Identity.Name</b>, hope this makes your day!</h3>
        }
        else
        {
            <h3 class="greeting-content">Quote of the day</h3>
        }
        <br />
        <p class="quote">"@Model.Quote.Message"</p>
        <p>- <b>@Model.Quote.Author</b></p>
    </div>

    <div class="vote-container">
        <button class="btn btn-primary" onclick="heartClicked(this)">
            <i class="far fa-heart"></i> <!-- Heart icon -->

        </button>
    </div>

    <form action="/" method="post">
        @Html.AntiForgeryToken()
    </form>
</div>

<script>
    function heartClicked(button) {
        var icon = button.querySelector('i');
        icon.classList.toggle('far');
        icon.classList.toggle('fas');

        // If the quote is hearted
        if (icon.classList.contains('fas')) {
            // Send a request to the server to save the vote
            fetch('/Index?handler=HeartQuote', {
                method: 'POST',
                headers: {
                    'Content-Type': 'application/json',
                    'RequestVerificationToken': document.querySelector('input[name="__RequestVerificationToken"]').value
                }
            });
        }
    }
</script>
此代码对应于用户界面,负责显示“每日名言”并处理使用心形按钮对名言的操作。 它使用前面提到的
Model.ShowGreeting值向不同的用户显示不同的内容,具体取决于其变体。
生成并运行应用
在命令提示符下,在 QuoteOfTheDay 文件夹中,运行:
dotnet build。运行:
dotnet run --launch-profile https。在应用程序的输出中查找格式
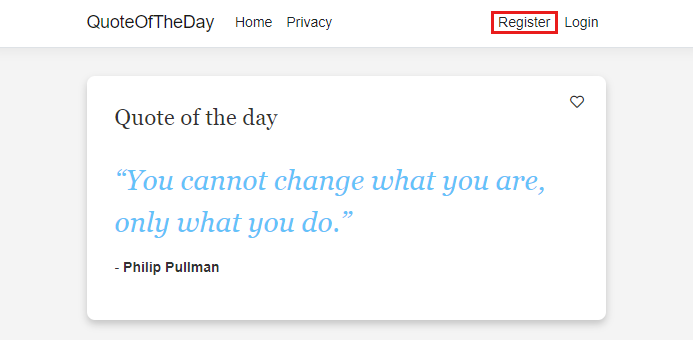
Now listening on: https://localhost:{port}的消息。 在浏览器中打开附带的链接。查看正在运行的应用程序后,选择右上角的“注册”以注册新用户。
注册名为 user@contoso.com 的新用户。 密码必须至少有 6 个字符,并且必须包含数字和特殊字符。
选择链接 点击此处以验证电子邮件,之后输入用户信息。
注册名为 userb@contoso.com第二个用户,输入另一个密码,并验证第二封电子邮件。
注释
对于本教程而言,准确使用这些名称非常重要。 只要该功能已按预期进行配置,两个用户应会看到不同的变体。
选择右上角的“登录”以以用户b 身份登录。。userb@contoso.com
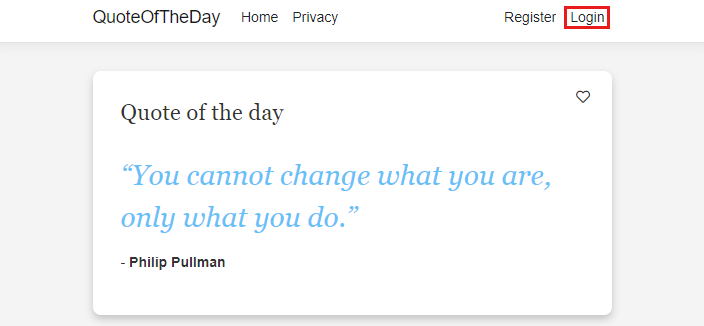
登录后,您应会看到 userb@contoso.com 在查看应用时出现一条特殊消息。
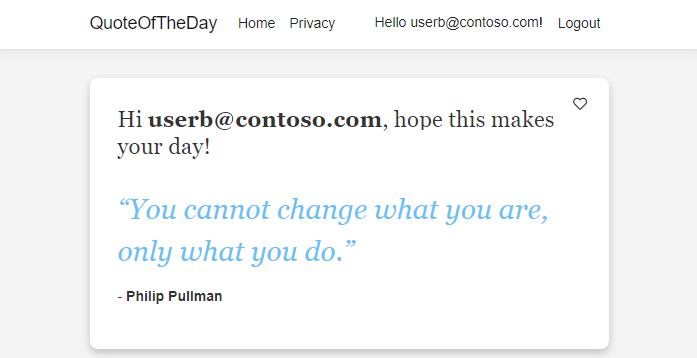
userb@contoso.com 是唯一看到特殊消息的用户。
启用遥测并在变体特性标志中创建实验
按照以下步骤在变体功能标志中启用遥测并创建试验:
在应用配置存储中,转到操作>功能管理器。
选择 ... 上下文菜单,一路转到变体功能标志“Greeting”右侧,然后选择“ 编辑”。
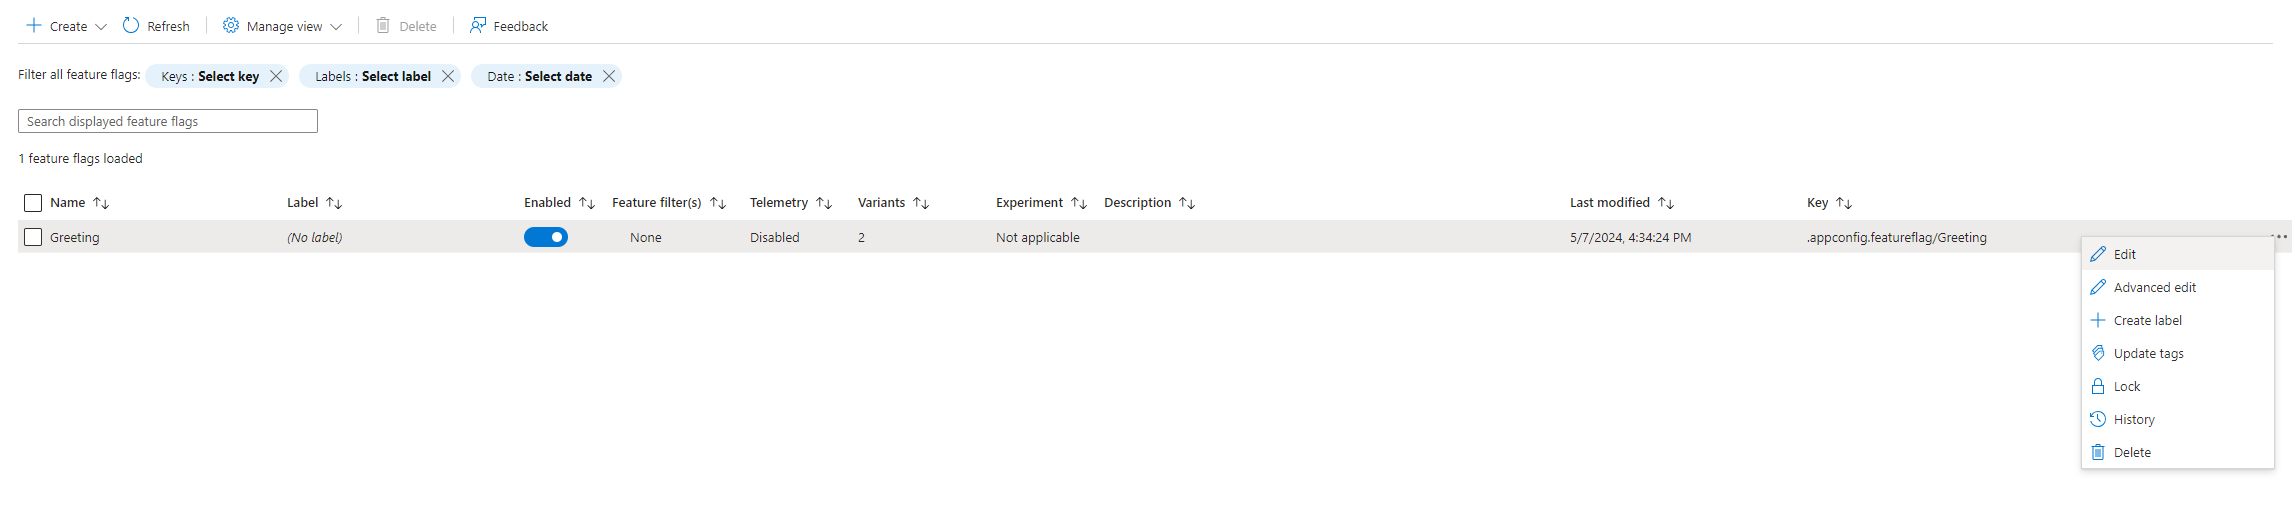
转到“ 遥测 ”选项卡,选中“ 启用遥测”框。
转到“ 试验 ”选项卡,选中“ 创建试验”框,并为实验命名。
选择“查看 + 更新”,然后选择 “更新”。
通知显示操作已成功。 在功能管理器中,变体功能标志应在试验下具有活动一词。

为试验创建指标
拆分试验工作区中的 指标 是发送到 Application Insights 的事件的定量度量值。 此指标有助于评估功能标志对用户行为和结果的影响。
在更新您的应用时,您已将 _telemetryClient.TrackEvent("Like") 添加到应用程序代码中。
Like 是表示用户操作的遥测事件,在本例中为“心形”按钮选择。 此事件将发送到 Application Insights 资源,您将其与即将创建的度量连接。
我们创建的应用只指定一个事件,但可以有多个事件和随后的多个指标。 多个指标也可以基于单个 Application Insight 事件。
导航到拆分试验工作区资源。 在 “配置>试验指标”下,选择“ 创建”。
在 “创建试验指标 ”下选择或输入以下信息,并使用 Create 进行保存。
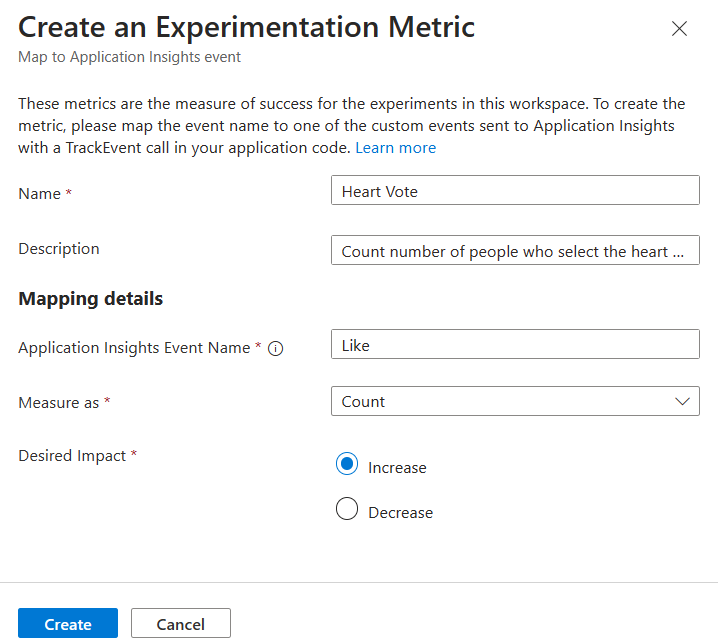
设置 示例值 Description 名称 心投票 试验指标的名称。 说明 统计在看到特殊消息时选择心脏按钮的用户数,与没有看到特殊消息时选择心脏按钮的用户数。 指标的可选说明。 Application Insights 事件名称 喜欢 Application Insights 事件的名称。 此名称区分大小写,它是代码 _telemetryClient.TrackEvent("<Event-Name>")中指定的名称。度量为 计数 可用选项如下: - 计数:计算用户触发事件的次数。
- 平均值:为用户平均事件值。
- 总和:计算用户事件的值。 显示平均求和值。
- 百分比:计算触发事件的用户的百分比。
所需影响 增加 此设置表示衡量已创建的指标的最终目标或目的。 在本教程中,我们的假设是,当用户在“当天报价”旁边有一条特殊消息时,单击心形的类似按钮。 应用程序代码将跟踪此单击作为名为 Like 的事件。 应用程序将 Like 事件作为遥测发送到 Application Insights,并且此试验的期望影响是查看用户在心形投票上的单击次数(以计数度量)的增加,以便能够验证给定假设。 如果尽管向分配的受众显示了特殊消息,但按钮上的单击次数会减少,则该假设会对此实验无效。
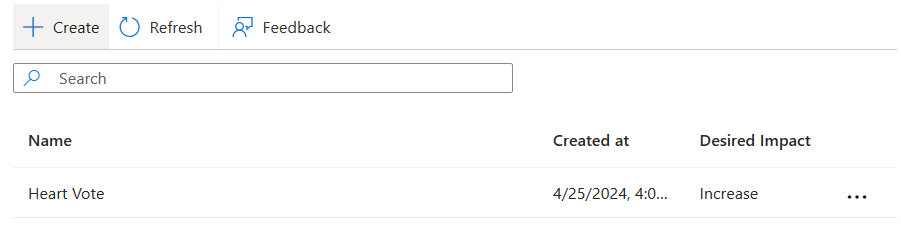
创建后,新指标将显示在门户中。 可以通过选择屏幕右侧的(...)上下文菜单来编辑或删除它。
获取试验结果
若要将新设置试验放入测试并生成结果以供分析,请模拟应用程序的某些流量,并等待 10 到 15 分钟。
若要查看试验的结果,请导航到功能管理器,然后在变体功能标志列表中单击...>试验,或选择“试验”列中的活动链接。 默认情况下不显示此列。 若要显示它,请在功能管理器中,选择“管理视图>编辑列>>试验并应用”。
在结果页上,默认选择了试验 版本 、要比较结果的 基线 和 比较 变体。 如果需要,请根据自己的喜好更改默认值,然后选择 “应用” 以查看试验结果。

上面的屏幕截图显示,实验得到了预期的结果,'心动投票'的 On 变体导致心动投票数比 Off 变体多出 560.62%。
对变体功能标志的任何编辑都生成新版本的试验,可以选择该版本来查看其结果。
注释
若要获取试验结果,每个变体至少需要 30 个事件,但我们建议你拥有更多的最小采样大小,以确保试验产生可靠的结果。
注释
默认情况下已启用 Application Insights 采样,可能会影响试验结果。 在本教程中,建议在 Application Insights 中关闭采样。 详细了解 Application Insights 中的采样。
后续步骤
若要了解有关试验概念的详细信息,请参阅以下文档。
有关 .NET 功能管理库的完整功能概要,请继续阅读以下文档。