你可以使用 GitHub Actions 工作流,借助 Azure/functions-action 自动构建并将你的函数代码部署到 Azure。
要通过 GitHub Actions 部署,请完成以下三个关键步骤:
- 在 Azure 中创建一个用户分配的托管标识,为其配置一个信任你的 GitHub 存储库的联合凭据,并在你的函数应用上为其分配“网站参与者”角色。
- 在 GitHub 中添加身份的客户端 ID、租户 ID 和订阅 ID 作为仓库秘密。
- 在你的仓库中添加一个工作流 YAML 文件,使用
azure/login 并通过 OpenID Connect(OIDC)进行身份验证,然后调用 Azure/functions-action 进行部署。
当你使用 Azure 门户启用 GitHub Actions 时,Functions 会自动执行这些任务,既在 Azure 订阅中,也在 GitHub 仓库中。
为Azure Functions创建工作流配置
你维护一个 YAML 文件(.yml),定义了仓库路径中的 /.github/workflows/ 工作流程配置。 此定义包含构成工作流的操作和参数,它们特定于函数的开发语言。
请使用文章顶部的选择器选择一种创建工作流程文件的方法:
| 方法 |
最适用于 |
OIDC 支持 |
|
工作流程模板 |
完全控制:复制OIDC准备好的模板并进行自定义 |
需要配置 |
| Azure 门户 |
最简单的设置:门户可以帮你创建身份、凭证和工作流程文件 |
已为您配置 |
|
GitHub 市场 |
GitHub-first:从GitHub内置的市场模板开始 |
需要配置和模板修改 |
身份验证概述
GitHub Actions必须通过Azure认证才能部署你的代码。 本文使用OpenID Connect(OIDC),这是推荐的认证方法。 OIDC使用联邦凭证在你的GitHub仓库与Microsoft Entra中用户分配的托管身份之间建立信任关系。 GitHub 中没有存储任何秘密。
OIDC认证示例
以下内联示例展示了所有工作流模板中使用的核心OIDC认证和部署模式:
permissions:
  id-token: write
  contents: read

steps:
  - name: 'Login via OIDC'
    uses: azure/login@v3
    with:
      client-id: ${{ secrets.AZURE_CLIENT_ID }}
      tenant-id: ${{ secrets.AZURE_TENANT_ID }}
      subscription-id: ${{ secrets.AZURE_SUBSCRIPTION_ID }}

  - name: 'Deploy to Azure Functions'
    uses: Azure/functions-action@v1
    with:
      app-name: ${{ env.AZURE_FUNCTIONAPP_NAME }}
      package: ${{ env.AZURE_FUNCTIONAPP_PACKAGE_PATH }}
GitHub Actions OIDC 认证注意事项
- OIDC 使用 工作负载身份联合 ,仅支持用户分配的托管身份。
- 当你在 Azure 门户启用基于 GitHub Actions 的部署时,默认使用 OIDC 认证。
- 在OIDC中,托管身份的客户端ID、租户ID和订阅ID都作为GitHub仓库的秘密存储。
- 使用Azure基于角色的访问控制(Azure RBAC),仅限制访问部署所需的Azure资源。
先决条件
具有活动订阅的 Azure 帐户。
创建帐户。
一个 GitHub 帐户。 如果没有该帐户,请注册免费版。
Project GitHub仓库中的源代码。
对 GitHub Actions 工作流程的基本了解。 如果你是 GitHub Actions 的新手,请参见《理解 GitHub Actions》。
一个托管在Azure上的工作函数应用(仅代码或基于容器)。
(仅限容器部署)一个现有的容器注册表,比如 Azure 容器注册表。
-
Azure CLI(进行本地开发时需要)。 还可以在Azure Cloud Shell中使用Azure CLI。
为 GitHub Actions 部署创建一个托管身份
OpenID Connect(OIDC)是 GitHub Actions 部署到 Azure Functions 的推荐认证方法。 使用 OIDC,你在 Azure 中配置用户分配的托管身份,并与你的 GitHub 仓库建立信任关系。 该工作流程可以直接通过 Azure 认证,而无需将凭证存储为秘密。
使用 az identity create 命令创建用户分配的托管标识:
az identity create --name myGitHubDeployIdentity --resource-group <RESOURCE_GROUP> \
--query "{clientId: clientId, tenantId: tenantId}" -o table
将 <RESOURCE_GROUP> 替换为资源组的名称。
注意输出中的 clientId 和 tenantId 的值。 另外,获取你的订阅ID:
az account show --query "{subId: id}" -o table
你以后在GitHub添加凭证时需要这三个值。
使用 az role assignment create 命令,将 Website Contributor 角色分配给托管标识,并将作用域限定为你的函数应用:
IDENTITY_PRINCIPAL=$(az identity show --name myGitHubDeployIdentity --resource-group <RESOURCE_GROUP> --query 'principalId' -o tsv)
FUNCTION_APP_ID=$(az functionapp show --name <APP_NAME> --resource-group <RESOURCE_GROUP> --query 'id' -o tsv)
az role assignment create --assignee $IDENTITY_PRINCIPAL --role "Website Contributor" --scope $FUNCTION_APP_ID
分别将 <APP_NAME> 和 <RESOURCE_GROUP> 替换为你的应用名称和资源组名称。
使用 az identity federated-credential create 命令创建一个联合凭证,信任来自 GitHub 仓库的令牌:
az identity federated-credential create \
    --identity-name myGitHubDeployIdentity \
    --resource-group <RESOURCE_GROUP> \
    --name github-deploy-credential \
    --issuer https://token.actions.githubusercontent.com \
    --subject repo:<GITHUB_ORG>/<REPO_NAME>:ref:refs/heads/<BRANCH_NAME> \
    --audiences api://AzureADTokenExchange
将 <RESOURCE_GROUP>、<GITHUB_ORG>、<REPO_NAME> 和 <BRANCH_NAME> 替换为自定义值。 主题必须与触发你工作流程的分支相匹配。
(可选)如果要从 Azure 容器注册表 部署容器,还需要将 acrpull 角色分配给托管标识:
IDENTITY_PRINCIPAL=$(az identity show --name myGitHubDeployIdentity --resource-group <RESOURCE_GROUP> --query 'principalId' -o tsv)
az role assignment create --assignee $IDENTITY_PRINCIPAL --role acrpull \
    --scope /subscriptions/<SUBSCRIPTION_ID>/resourceGroups/<RESOURCE_GROUP>/providers/Microsoft.ContainerRegistry/registries/<REGISTRY_NAME>
将 <SUBSCRIPTION_ID>、<RESOURCE_GROUP> 和 <REGISTRY_NAME> 替换为你自己的值。
将凭据添加到GitHub
使用你 创建托管身份时复制的值。
在 GitHub 中,转到存储库。
前往 设置>秘密与变量>操作。
在机密选项卡中,选择新建仓库机密。
创建以下每个秘密:
| Name |
价值 |
AZURE_CLIENT_ID |
托管标识的clientId |
AZURE_TENANT_ID |
托管标识的tenantId |
AZURE_SUBSCRIPTION_ID |
包含你功能应用的订阅ID |
对于从私有注册表部署容器的情况,你还需要注册表专用的机密信息。 更多信息请参见 Docker 登录操作。
通过模板创建工作流
手动创建工作流配置的最佳方式是通过官方支持的模板。
选择“Windows”或“Linux”,确保获取适用于正确操作系统的模板。
部署到 Windows 时使用 runs-on: windows-latest。 容器化部署需要Linux。
部署到 Linux 时使用 runs-on: ubuntu-latest。 用Linux进行容器化部署。
使用Azure Functions动作仓库中针对特定语言的OIDC工作流模板。 将完整文件内容复制到你仓库中一个新命名 .github/workflows/deploy-function-app.yml 的文件中:
name: Build and deploy .NET project to Azure Function App using OIDC

on:
  push:
    branches: [ main ]
  workflow_dispatch:

env:
  AZURE_FUNCTIONAPP_NAME: 'APP_NAME'         # Set this to your function app name on Azure
  AZURE_FUNCTIONAPP_PROJECT_PATH: '.'        # Set this to the path to your function app project, defaults to the repository root. The deploy action will package the contents of this path.
  DOTNET_VERSION: '10.0.x'                   # Set this to the .NET version of your project
  BUILD_ARTIFACT_NAME: 'released-package'    # Set this according to your team's naming convention

jobs:
  build:
    runs-on: windows-latest # Assumes your target function app is Windows-based
    permissions:
      id-token: write  # Required for OIDC
      contents: read   # Required for actions/checkout
    defaults:
      run:
        shell: bash
        working-directory: ${{ env.AZURE_FUNCTIONAPP_PROJECT_PATH }}
    steps:
      - name: 'Checkout repository'
        uses: actions/checkout@v6

      - name: 'Set up .NET version: ${{ env.DOTNET_VERSION }}'
        uses: actions/setup-dotnet@v5
        with:
          dotnet-version: ${{ env.DOTNET_VERSION }}

      # Perform additional steps such as running tests, if needed

      - name: 'Build and prepare .NET project for deployment'
        run: dotnet publish --configuration Release --output ./output

      - name: Upload artifact for the deployment job
        uses: actions/upload-artifact@v7
        with:
          name: ${{ env.BUILD_ARTIFACT_NAME }}
          path: ${{ env.AZURE_FUNCTIONAPP_PROJECT_PATH }}/output
          include-hidden-files: true  # Required for .NET projects

  deploy:
    runs-on: windows-latest # Assumes your target function app is Windows-based
    needs: build
    permissions:
      id-token: write  # Required for OIDC
    steps:
      - name: 'Download artifact from build job'
        uses: actions/download-artifact@v8
        with:
          name: ${{ env.BUILD_ARTIFACT_NAME }}
          path: '${{ env.AZURE_FUNCTIONAPP_PROJECT_PATH }}/downloaded-artifact'

      - name: 'Log in to Azure with AZ CLI'
        uses: azure/login@v3
        with:
          client-id: ${{ vars.AZURE_CLIENT_ID }}
          tenant-id: ${{ vars.AZURE_TENANT_ID }}
          subscription-id: ${{ vars.AZURE_SUBSCRIPTION_ID }}

      - name: 'Run the Azure Functions action'
        uses: Azure/functions-action@v1
        id: deploy-to-function-app
        with:
          app-name: ${{ env.AZURE_FUNCTIONAPP_NAME }}
          package: '${{ env.AZURE_FUNCTIONAPP_PROJECT_PATH }}/downloaded-artifact'
name: Build and deploy .NET project to Azure Function App using OIDC

on:
  push:
    branches: [ main ]
  workflow_dispatch:

env:
  AZURE_FUNCTIONAPP_NAME: 'APP_NAME'         # Set this to your function app name on Azure
  AZURE_FUNCTIONAPP_PROJECT_PATH: '.'        # Set this to the path to your function app project, defaults to the repository root. The deploy action will package the contents of this path.
  DOTNET_VERSION: '10.0.x'                   # Set this to the .NET version of your project
  BUILD_ARTIFACT_NAME: 'released-package'    # Set this according to your team's naming convention

jobs:
  build:
    runs-on: ubuntu-latest # Assumes your target function app is Linux-based
    permissions:
      id-token: write  # Required for OIDC
      contents: read   # Required for actions/checkout
    defaults:
      run:
        shell: bash
        working-directory: ${{ env.AZURE_FUNCTIONAPP_PROJECT_PATH }}
    steps:
      - name: 'Checkout repository'
        uses: actions/checkout@v6

      - name: 'Set up .NET version: ${{ env.DOTNET_VERSION }}'
        uses: actions/setup-dotnet@v5
        with:
          dotnet-version: ${{ env.DOTNET_VERSION }}

      # Perform additional steps such as running tests, if needed

      - name: 'Build and prepare .NET project for deployment'
        run: dotnet publish --configuration Release --output ./output

      - name: Upload artifact for the deployment job
        uses: actions/upload-artifact@v7
        with:
          name: ${{ env.BUILD_ARTIFACT_NAME }}
          path: ${{ env.AZURE_FUNCTIONAPP_PROJECT_PATH }}/output
          include-hidden-files: true  # Required for .NET projects

  deploy:
    runs-on: ubuntu-latest # Assumes your target function app is Linux-based
    needs: build
    permissions:
      id-token: write  # Required for OIDC
    steps:
      - name: 'Download artifact from build job'
        uses: actions/download-artifact@v8
        with:
          name: ${{ env.BUILD_ARTIFACT_NAME }}
          path: '${{ env.AZURE_FUNCTIONAPP_PROJECT_PATH }}/downloaded-artifact'

      - name: 'Log in to Azure with AZ CLI'
        uses: azure/login@v3
        with:
          client-id: ${{ vars.AZURE_CLIENT_ID }}
          tenant-id: ${{ vars.AZURE_TENANT_ID }}
          subscription-id: ${{ vars.AZURE_SUBSCRIPTION_ID }}

      - name: 'Run the Azure Functions action'
        uses: Azure/functions-action@v1
        id: deploy-to-function-app
        with:
          app-name: ${{ env.AZURE_FUNCTIONAPP_NAME }}
          package: '${{ env.AZURE_FUNCTIONAPP_PROJECT_PATH }}/downloaded-artifact'
name: Build and deploy Java project to Azure Function App using OIDC

on:
  push:
    branches: [ main ]
  workflow_dispatch:

env:
  AZURE_FUNCTIONAPP_NAME: 'APP_NAME'          # set this to your function app name on Azure. Ensure that `functionAppName` in your pom.xml file matches.
  POM_XML_DIRECTORY: '.'                      # set this to the directory which contains the pom.xml file. The deploy action will package the contents of this path.
  JAVA_VERSION: '21'                          # set this to the Java version of your project
  BUILD_ARTIFACT_NAME: 'released-package'     # Set this according to your team's naming convention

jobs:
  build:
    runs-on: windows-latest # Assumes your target function app is Windows-based
    permissions:
        id-token: write  # Required to fetch an OIDC token to authenticate with the job
        contents: read # Required for actions/checkout
    defaults:
      run:
        shell: bash
        working-directory: ${{ env.POM_XML_DIRECTORY }}
    steps:
      - name: 'Checkout repository'
        uses: actions/checkout@v6

      - name: 'Set up Java version: ${{ env.JAVA_VERSION }}'
        uses: actions/setup-java@v4
        with:
          java-version: ${{ env.JAVA_VERSION }}
          distribution: 'microsoft'

      - name: 'Build project with Maven'
        run: mvn clean package -DfunctionAppName=${{ env.AZURE_FUNCTIONAPP_NAME }}

      # Perform additional steps such as running tests, if needed

      - name: 'Upload artifact for the deployment job'
        uses: actions/upload-artifact@v7
        with:
          name: ${{ env.BUILD_ARTIFACT_NAME }}
          path: ${{ env.POM_XML_DIRECTORY }}/target/azure-functions/${{ env.AZURE_FUNCTIONAPP_NAME }}

  deploy:
    runs-on: windows-latest # Assumes your target function app is Windows-based
    needs: build
    permissions:
      id-token: write  # Required to fetch an OIDC token to authenticate with the job
    steps:
      - name: 'Download artifact from build job'
        uses: actions/download-artifact@v8
        with:
          name: ${{ env.BUILD_ARTIFACT_NAME }}
          path: '${{ env.POM_XML_DIRECTORY }}/downloaded-artifact'

      - name: 'Log in to Azure with AZ CLI'
        uses: azure/login@v3
        with:
          client-id: ${{ vars.AZURE_CLIENT_ID }}
          tenant-id: ${{ vars.AZURE_TENANT_ID }}
          subscription-id: ${{ vars.AZURE_SUBSCRIPTION_ID }}

      - name: 'Run the Azure Functions action'
        uses: Azure/functions-action@v1
        id: deploy-to-function-app
        with:
          app-name: ${{ env.AZURE_FUNCTIONAPP_NAME }}
          package: '${{ env.POM_XML_DIRECTORY }}/downloaded-artifact'
          respect-pom-xml: false # Set to `true` if the build artifact path is ${{ env.POM_XML_DIRECTORY }}
name: Build and deploy Java project to Azure Function App using OIDC

on:
  push:
    branches: [ main ]
  workflow_dispatch:

env:
  AZURE_FUNCTIONAPP_NAME: 'APP_NAME'          # set this to your function app name on Azure. Ensure that `functionAppName` in your pom.xml file matches.
  POM_XML_DIRECTORY: '.'                      # set this to the directory which contains the pom.xml file. The deploy action will package the contents of this path.
  JAVA_VERSION: '21'                          # set this to the Java version of your project
  BUILD_ARTIFACT_NAME: 'released-package'     # Set this according to your team's naming convention

jobs:
  build:
    runs-on: ubuntu-latest # Assumes your target function app is Linux-based
    permissions:
        id-token: write  # Required to fetch an OIDC token to authenticate with the job
        contents: read # Required for actions/checkout
    defaults:
      run:
        shell: bash
        working-directory: ${{ env.POM_XML_DIRECTORY }}
    steps:
      - name: 'Checkout repository'
        uses: actions/checkout@v6

      - name: 'Set up Java version: ${{ env.JAVA_VERSION }}'
        uses: actions/setup-java@v4
        with:
          java-version: ${{ env.JAVA_VERSION }}
          distribution: 'microsoft'

      - name: 'Build project with Maven'
        run: mvn clean package -DfunctionAppName=${{ env.AZURE_FUNCTIONAPP_NAME }}

      # Perform additional steps such as running tests, if needed

      - name: 'Upload artifact for the deployment job'
        uses: actions/upload-artifact@v7
        with:
          name: ${{ env.BUILD_ARTIFACT_NAME }}
          path: ${{ env.POM_XML_DIRECTORY }}/target/azure-functions/${{ env.AZURE_FUNCTIONAPP_NAME }}

  deploy:
    runs-on: ubuntu-latest # Assumes your target function app is Linux-based
    needs: build
    permissions:
      id-token: write  # Required to fetch an OIDC token to authenticate with the job
    steps:
      - name: 'Download artifact from build job'
        uses: actions/download-artifact@v8
        with:
          name: ${{ env.BUILD_ARTIFACT_NAME }}
          path: '${{ env.POM_XML_DIRECTORY }}/downloaded-artifact'

      - name: 'Log in to Azure with AZ CLI'
        uses: azure/login@v3
        with:
          client-id: ${{ vars.AZURE_CLIENT_ID }}
          tenant-id: ${{ vars.AZURE_TENANT_ID }}
          subscription-id: ${{ vars.AZURE_SUBSCRIPTION_ID }}

      - name: 'Run the Azure Functions action'
        uses: Azure/functions-action@v1
        id: deploy-to-function-app
        with:
          app-name: ${{ env.AZURE_FUNCTIONAPP_NAME }}
          package: '${{ env.POM_XML_DIRECTORY }}/downloaded-artifact'
          respect-pom-xml: false # Set to `true` if the build artifact path is ${{ env.POM_XML_DIRECTORY }}
name: Build and deploy Node.js project to Azure Function App using OIDC

on:
  push:
    branches: [ main ]
  workflow_dispatch:

env:
  AZURE_FUNCTIONAPP_NAME: 'APP_NAME'        # Set this to your function app name on Azure
  AZURE_FUNCTIONAPP_PROJECT_PATH: '.'       # Set this to the path to your function app project, defaults to the repository root. The deploy action will package the contents of this path.
  NODE_VERSION: '22'                        # Set this to the Node version of your project
  BUILD_ARTIFACT_NAME: 'released-package'   # Set this according to your team's naming convention

jobs:
  build:
    runs-on: windows-latest # Assumes your target function app is Windows-based
    permissions:
      id-token: write  # Required for OIDC
      contents: read   # Required for actions/checkout
    defaults:
      run:
        shell: bash
        working-directory: ${{ env.AZURE_FUNCTIONAPP_PROJECT_PATH }}
    steps:
      - name: 'Checkout repository'
        uses: actions/checkout@v6

      - name: 'Set up Node version: ${{ env.NODE_VERSION }}'
        uses: actions/setup-node@v6
        with:
          node-version: ${{ env.NODE_VERSION }}

      - name: 'Install project dependencies'
        run: npm install # Use `npm ci` if you have a package-lock.json file and want to ensure a clean install

      - name: 'Build project'
        run: npm run build --if-present

      - name: 'Run tests'
        run: npm run test --if-present

      - name: 'Prune development dependencies'
        run: npm prune --production

      - name: 'Upload artifact for the deployment job'
        uses: actions/upload-artifact@v7
        with:
          name: ${{ env.BUILD_ARTIFACT_NAME }}
          path: ${{ env.AZURE_FUNCTIONAPP_PROJECT_PATH }}

  deploy:
    runs-on: windows-latest # Assumes your target function app is Windows-based
    needs: build
    permissions:
      id-token: write  # Required for OIDC
    steps:
      - name: 'Download artifact from build job'
        uses: actions/download-artifact@v8
        with:
          name: ${{ env.BUILD_ARTIFACT_NAME }}
          path: '${{ env.AZURE_FUNCTIONAPP_PROJECT_PATH }}/downloaded-artifact'

      - name: 'Log in to Azure with AZ CLI'
        uses: azure/login@v3
        with:
          client-id: ${{ vars.AZURE_CLIENT_ID }}
          tenant-id: ${{ vars.AZURE_TENANT_ID }}
          subscription-id: ${{ vars.AZURE_SUBSCRIPTION_ID }}

      - name: 'Run the Azure Functions action'
        uses: Azure/functions-action@v1
        id: deploy-to-function-app
        with:
          app-name: ${{ env.AZURE_FUNCTIONAPP_NAME }}
          package: '${{ env.AZURE_FUNCTIONAPP_PROJECT_PATH }}/downloaded-artifact'
name: Build and deploy Node.js project to Azure Function App using OIDC

on:
  push:
    branches: [ main ]
  workflow_dispatch:

env:
  AZURE_FUNCTIONAPP_NAME: 'APP_NAME'        # Set this to your function app name on Azure
  AZURE_FUNCTIONAPP_PROJECT_PATH: '.'       # Set this to the path to your function app project, defaults to the repository root. The deploy action will package the contents of this path.
  NODE_VERSION: '22'                        # Set this to the Node version of your project
  BUILD_ARTIFACT_NAME: 'released-package'   # Set this according to your team's naming convention

jobs:
  build:
    runs-on: ubuntu-latest # Assumes your target function app is Linux-based
    permissions:
      id-token: write  # Required for OIDC
      contents: read   # Required for actions/checkout
    defaults:
      run:
        shell: bash
        working-directory: ${{ env.AZURE_FUNCTIONAPP_PROJECT_PATH }}
    steps:
      - name: 'Checkout repository'
        uses: actions/checkout@v6

      - name: 'Set up Node version: ${{ env.NODE_VERSION }}'
        uses: actions/setup-node@v6
        with:
          node-version: ${{ env.NODE_VERSION }}

      - name: 'Install project dependencies'
        run: npm install # Use `npm ci` if you have a package-lock.json file and want to ensure a clean install

      - name: 'Build project'
        run: npm run build --if-present

      - name: 'Run tests'
        run: npm run test --if-present

      - name: 'Prune development dependencies'
        run: npm prune --production

      - name: 'Upload artifact for the deployment job'
        uses: actions/upload-artifact@v7
        with:
          name: ${{ env.BUILD_ARTIFACT_NAME }}
          path: ${{ env.AZURE_FUNCTIONAPP_PROJECT_PATH }}

  deploy:
    runs-on: ubuntu-latest # Assumes your target function app is Linux-based
    needs: build
    permissions:
      id-token: write  # Required for OIDC
    steps:
      - name: 'Download artifact from build job'
        uses: actions/download-artifact@v8
        with:
          name: ${{ env.BUILD_ARTIFACT_NAME }}
          path: '${{ env.AZURE_FUNCTIONAPP_PROJECT_PATH }}/downloaded-artifact'

      - name: 'Log in to Azure with AZ CLI'
        uses: azure/login@v3
        with:
          client-id: ${{ vars.AZURE_CLIENT_ID }}
          tenant-id: ${{ vars.AZURE_TENANT_ID }}
          subscription-id: ${{ vars.AZURE_SUBSCRIPTION_ID }}

      - name: 'Run the Azure Functions action'
        uses: Azure/functions-action@v1
        id: deploy-to-function-app
        with:
          app-name: ${{ env.AZURE_FUNCTIONAPP_NAME }}
          package: '${{ env.AZURE_FUNCTIONAPP_PROJECT_PATH }}/downloaded-artifact'
Windows 不支持 Python 函数。 请改为选择 Linux。
name: Build and deploy Python project to Azure Function App using OIDC

on:
  push:
    branches: [ main ]
  workflow_dispatch:

env:
  AZURE_FUNCTIONAPP_NAME: 'APP_NAME'        # Set this to your function app name on Azure
  AZURE_FUNCTIONAPP_PROJECT_PATH: '.'       # Set this to the path to your function app project, defaults to the repository root. The deploy action will package the contents of this path.
  PYTHON_VERSION: '3.13.x'                  # Set this to the Python version of your project
  BUILD_ARTIFACT_NAME: 'released-package'   # Set this according to your team's naming convention

jobs:
  build:
    runs-on: ubuntu-latest # Python function apps are Linux-based
    permissions:
      id-token: write  # Required for OIDC
      contents: read   # Required for actions/checkout
    defaults:
      run:
        shell: bash
        working-directory: ${{ env.AZURE_FUNCTIONAPP_PROJECT_PATH }}
    steps:
      - name: 'Checkout repository'
        uses: actions/checkout@v6

      - name: 'Set up Python version: ${{ env.PYTHON_VERSION }}'
        uses: actions/setup-python@v6
        with:
          python-version: ${{ env.PYTHON_VERSION }}

      - name: 'Install project dependencies'
        run: pip install -r requirements.txt --target ".python_packages/lib/site-packages"  # Ensure requirements.txt contains all dependencies

      # Perform additional steps such as running tests, if needed

      - name: 'Upload artifact for the deployment job'
        uses: actions/upload-artifact@v7
        with:
          name: ${{ env.BUILD_ARTIFACT_NAME }}
          path: ${{ env.AZURE_FUNCTIONAPP_PROJECT_PATH }}

  deploy:
    runs-on: ubuntu-latest # Python function apps are Linux-based
    needs: build
    permissions:
      id-token: write  # Required for OIDC
    steps:
      - name: 'Download artifact from build job'
        uses: actions/download-artifact@v8
        with:
          name: ${{ env.BUILD_ARTIFACT_NAME }}
          path: '${{ env.AZURE_FUNCTIONAPP_PROJECT_PATH }}/downloaded-artifact'

      - name: 'Log in to Azure with AZ CLI'
        uses: azure/login@v3
        with:
          client-id: ${{ vars.AZURE_CLIENT_ID }}
          tenant-id: ${{ vars.AZURE_TENANT_ID }}
          subscription-id: ${{ vars.AZURE_SUBSCRIPTION_ID }}

      - name: 'Run the Azure Functions action'
        uses: Azure/functions-action@v1
        id: deploy-to-function-app
        with:
          app-name: ${{ env.AZURE_FUNCTIONAPP_NAME }}
          package: '${{ env.AZURE_FUNCTIONAPP_PROJECT_PATH }}/downloaded-artifact'
name: Deploy PowerShell project to Azure Function App using OIDC

on:
  push:
    branches: [ main ]
  workflow_dispatch:

env:
  AZURE_FUNCTIONAPP_NAME: 'APP_NAME'       # Set this to your function app name on Azure
  AZURE_FUNCTIONAPP_PROJECT_PATH: '.'        # Set this to the path to your function app project, defaults to the repository root. The deploy action will package the contents of this path.

jobs:
  # PowerShell projects do not require a build step
  deploy:
    runs-on: windows-latest # For PowerShell projects, the OS of the runner does not affect deployment. You may use either ubuntu-latest or windows-latest.
    permissions:
      id-token: write  # Required for OIDC
      contents: read   # Required for actions/checkout
    steps:
      - name: 'Checkout repository'
        uses: actions/checkout@v6

      # Perform additional steps such as running tests, if needed

      - name: 'Log in to Azure with AZ CLI'
        uses: azure/login@v3
        with:
          client-id: ${{ vars.AZURE_CLIENT_ID }}
          tenant-id: ${{ vars.AZURE_TENANT_ID }}
          subscription-id: ${{ vars.AZURE_SUBSCRIPTION_ID }}

      - name: 'Run the Azure Functions action'
        uses: Azure/functions-action@v1
        id: deploy-to-function-app
        with:
          app-name: ${{ env.AZURE_FUNCTIONAPP_NAME }}
          package: ${{ env.AZURE_FUNCTIONAPP_PROJECT_PATH }}
Linux上不支持PowerShell函数。 选择Windows吧。
Windows不支持容器部署。 请改为选择 Linux。
# Action Requires
# 1. Setup the AZURE_CREDENTIALS secrets in your GitHub Repository
name: Linux_Container_Workflow

on:
  push:
    branches:
    - master

jobs:
  build-and-deploy:
    runs-on: ubuntu-latest
    environment: dev
    steps:
    - name: 'Checkout GitHub Action'
      uses: actions/checkout@v3

    - name: 'Login via Azure CLI'
      uses: azure/login@v1
      with:
        creds: ${{ secrets.AZURE_CREDENTIALS }}

    - name: 'Docker Login'
      uses: azure/docker-login@v1
      with:
        login-server: contoso.azurecr.io
        username: ${{ secrets.REGISTRY_USERNAME }}
        password: ${{ secrets.REGISTRY_PASSWORD }}

    - name: 'Compose Customized Docker Image'
      shell: bash
      run: |
        # If your function app project is not located in your repository's root
        # Please change the path to your directory for docker build
        docker build . -t REGISTRY/NAMESPACE/IMAGE:TAG
        docker push REGISTRY/NAMESPACE/IMAGE:TAG

    - name: 'Run Azure Functions Container Action'
      uses: Azure/functions-container-action@v1
      id: fa
      with:
        app-name: PLEASE_REPLACE_THIS_WITH_YOUR_FUNCTION_APP_NAME
        image: REGISTRY/NAMESPACE/IMAGE:TAG

    #- name: 'use the published functionapp url in upcoming steps'
    #  run: |
    #    echo "${{ steps.fa.outputs.app-url }}"

    - name: Azure logout
      run: |
        az logout
在使用这个YAML文件之前,请完成以下步骤:
- 根据你的容器注册表,更新
REGISTRY、NAMESPACE、IMAGE 和 TAG 的值。
- 在
docker/login-action 操作中更新容器仓库凭证。
在模板里更新 env: 项目变量。 每个模板都需要 AZURE_FUNCTIONAPP_NAME。 其他变量取决于你的语言:
| Variable |
Required |
Description |
AZURE_FUNCTIONAPP_NAME |
是的 |
Azure中的函数应用名称 |
DOTNET_VERSION |
是的 |
你项目的 .NET 版本(例如,10.0.x) |
AZURE_FUNCTIONAPP_PROJECT_PATH |
否 |
你的项目文件夹路径。 默认:.(仓库根目录) |
| Variable |
Required |
Description |
AZURE_FUNCTIONAPP_NAME |
是的 |
你在 Azure 中的函数应用名称。 必须与 pom.xml 中的 functionAppName 匹配。 |
JAVA_VERSION |
是的 |
你项目的Java版本(例如,21) |
POM_XML_DIRECTORY |
否 |
包含 pom.xml的目录路径。 默认:.(仓库根目录) |
| Variable |
Required |
Description |
AZURE_FUNCTIONAPP_NAME |
是的 |
Azure中的函数应用名称 |
NODE_VERSION |
是的 |
你项目的 Node.js 版本(例如, 22) |
AZURE_FUNCTIONAPP_PROJECT_PATH |
否 |
你的项目文件夹路径。 默认:.(仓库根目录) |
| Variable |
Required |
Description |
AZURE_FUNCTIONAPP_NAME |
是的 |
Azure中的函数应用名称 |
PYTHON_VERSION |
是的 |
你项目的Python版本(例如,3.13.x) |
AZURE_FUNCTIONAPP_PROJECT_PATH |
否 |
你的项目文件夹路径。 默认:.(仓库根目录) |
| Variable |
Required |
Description |
AZURE_FUNCTIONAPP_NAME |
是的 |
Azure中的函数应用名称 |
AZURE_FUNCTIONAPP_PROJECT_PATH |
否 |
你的项目文件夹路径。 默认值:.(仓库根目录) |
| Variable |
Required |
Description |
AZURE_FUNCTIONAPP_NAME |
是的 |
Azure中的函数应用名称 |
REGISTRY |
是的 |
你的容器注册登录服务器(例如, contoso.azurecr.io) |
NAMESPACE |
是的 |
你的注册表中的命名空间/仓库 |
IMAGE |
是的 |
容器图像名称 |
TAG |
是的 |
图像标签(例如, ${{ github.sha }}) |
OIDC 模板已包含带有 OIDC 身份验证的 azure/login 步骤。 验证 secrets.AZURE_CLIENT_ID、secrets.AZURE_TENANT_ID 和 secrets.AZURE_SUBSCRIPTION_ID 引用是否与你创建的 仓库密钥 匹配。
将此新 YAML 文件添加到存储库的 /.github/workflows/ 路径中。
在门户中创建工作流配置
当你用门户启用 GitHub Actions 时,Functions 会自动完成所有设置。 你不需要手动创建管理身份、配置凭证或编写工作流文件。 功能会帮你完成以下任务:
在您的Azure 订阅中:
在您的GitHub仓库中:
- 将客户端ID、订阅ID和租户ID值添加为GitHub Actions秘密。
- 基于你的应用栈创建一个工作流文件并提交给
.github/workflows。
创建函数应用期间
在 Azure 门户中创建函数时,可以通过“部署”选项卡快速开始使用 GitHub Actions。 若要在创建新的函数应用时添加 GitHub Actions 工作流,请执行以下操作:
在 Azure 门户中,选择“创建函数应用”流中的“部署”。
如果你希望每个代码更新都触发到 Azure 门户的代码推送,请启用持续部署。
在 GitHub 设置中,选择授权以连接您的 GitHub 账户。 用拥有写入权限的 GitHub 账户登录你的仓库。
输入你的 GitHub 组织、存储库和分支。
可选地,选择 预览文件 ,查看工作流文件生成并添加到仓库前的样子。
完成函数应用的配置。 你的 GitHub 存储库现在包含 /.github/workflows/ 中的新工作流文件。
对于现有函数应用
要将 GitHub Actions 工作流添加到现有函数应用:
在 Azure 门户中导航到函数应用并选择 Deployment Center。
对于 Source 请选择 GitHub。 如果未看到默认消息 Building with GitHub Actions,请选择 Change provider选择 GitHub Actions 并选择 OK。
如果尚未授权GitHub访问,请选择 Authorize。 提供GitHub凭据,然后选择 Sign in。 若要授权其他GitHub帐户,请选择 Change Account 并使用其他帐户登录。
选择 GitHub 组织、仓库 和 分支。 若要使用GitHub Actions进行部署,必须对此存储库具有写入访问权限。
在 Authentication 设置中,选择是使用 GitHub Actions 用户分配的标识还是使用 Basic authentication 凭据进行身份验证。 对于基本身份验证,将使用当前凭据。
选择预览文件以查看将添加到GitHub 存储库中的工作流文件。
选择“保存”,将工作流文件添加到存储库。
创建工作流配置文件
可以直接从 GitHub 存储库通过 Azure Functions 模板创建 GitHub Actions 工作流配置文件。
在 GitHub 中,转到存储库。
选择“操作”和“新建工作流”。
搜索函数。
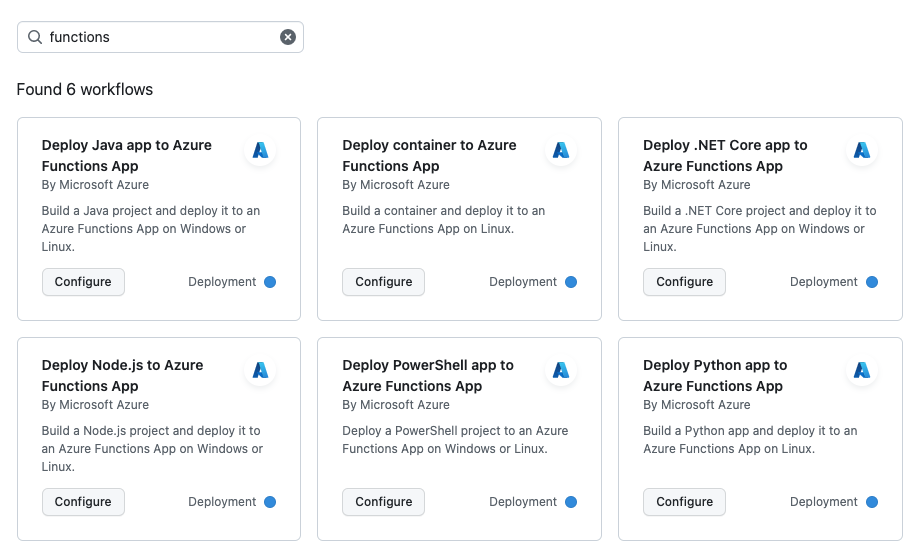
在显示的由 Azure 创作的函数应用工作流中,找到与代码语言匹配的工作流,然后选择“配置”。
在新创建的 YAML 文件中,将 env.AZURE_FUNCTIONAPP_NAME 参数更新为 Azure 中函数应用资源的名称。 你可能还需要更新设定应用所用语言版本的参数,比如DOTNET_VERSIONC#或PYTHON_VERSIONPython应用。
默认模板可能使用发布配置文件认证,而不是推荐的OIDC。 要切换到 OIDC 并与门户行为保持一致,请做出以下更改:
从 Azure/functions-action 中移除 publish-profile、scm-do-build-during-deployment 和 enable-oryx-build 参数。
如果存在,请从作业中移除该 environment 设置,因为联邦凭证主题必须与分支触发器匹配。
在Azure/functions-action步骤前添加一个azure/login步骤:
- name: 'Login via OIDC'
  uses: azure/login@v3
  with:
    client-id: ${{ secrets.AZURE_CLIENT_ID }}
    tenant-id: ${{ secrets.AZURE_TENANT_ID }}
    subscription-id: ${{ secrets.AZURE_SUBSCRIPTION_ID }}

- name: 'Run Azure Functions Action'
  uses: Azure/functions-action@v1
  with:
    app-name: ${{ env.AZURE_FUNCTIONAPP_NAME }}
    package: ${{ env.AZURE_FUNCTIONAPP_PACKAGE_PATH }}
为作业添加以下权限:
permissions:
  id-token: write
  contents: read
确认新工作流文件保存时有合适的名称 /.github/workflows/ ,然后选择 提交更改。
Azure Functions 操作
Azure Functions 操作 (Azure/functions-action) 定义你的代码如何发布到 Azure 中现有的函数应用或应用中的特定槽。
参数
下表描述了支持的 Azure/functions-action输入参数:
| 参数 |
Description |
|
app-name |
(必修)你在 Azure 中函数应用的名称。 |
|
package |
(必填)要发布的项目的路径。 默认值:.(仓库中的所有文件)。 |
|
远程构建 |
将其设置为 true 可在部署到 Flex Consumption 应用时启用 Kudu 的生成操作。 Oryx 构建始终会执行;不要同时设置 scm-do-build-during-deployment 或 enable-oryx-build。 默认值:false。 |
|
SCM-DO-部署期间构建 |
允许Kudu站点执行部署前操作,如 远程构建。 设置为 true 让Kudu在部署时构建你的项目。 默认值:false。 有关详细信息,请参阅 SCM_DO_BUILD_DURING_DEPLOYMENT。 |
|
enable-oryx-build |
允许Kudu通过使用 Oryx解决项目依赖。 将此项和 scm-do-build-during-deployment 都设置为 true,以使用 Oryx 而非工作流。 默认值:false。 仅限 Linux。 |
|
slot-name |
要部署到的部署槽位。 默认:生产槽位。 |
|
publish-profile |
包含你的发布配置文件的 GitHub 机密的名称。 使用推荐的OIDC认证时不需要。 |
|
sku |
在 Flex Consumption 计划中使用 publish-profile 进行身份验证时,将其设置为 flexconsumption。 对于OIDC认证或其他托管计划来说,这就不需要了。 |
|
respect-pom-xml |
(仅限 Java)将其设置为 true,以从 pom.xml 中获取部署工件。 当 true 时,将 package 设置为 .。 默认值:false。 |
|
respect-funcignore |
设置为 true 以尊重你的 .funcignore 文件并排除列出的路径。 默认值:false。 |
下表显示了每个托管计划支持的参数:
| 参数 |
Flex 消耗 |
弹性高级版 |
专属 |
消耗 |
|
app-name |
Required |
Required |
Required |
Required |
|
package |
Required |
Required |
Required |
Required |
|
远程构建 |
Optional |
— |
— |
— |
|
SCM-DO-部署期间构建 |
— |
Optional |
Optional |
Optional |
|
启用 Oryx 构建 |
— |
可选(Linux) |
可选(Linux) |
可选(Linux) |
|
slot-name |
不支持 |
Optional |
Optional |
Optional |
|
publish-profile |
不推荐 |
不推荐 |
不推荐 |
不推荐 |
|
sku |
仅发布个人资料 |
— |
— |
— |
|
respect-pom-xml |
可选(Java) |
可选(Java) |
可选(Java) |
可选(Java) |
|
respect-funcignore |
Optional |
Optional |
Optional |
Optional |
部署方法
使用GitHub Actions时,部署方式取决于你的托管计划:
* 在 Linux 上以消耗计划运行应用的功能已计划停用。 有关详细信息,请参阅 Azure Functions 按需计划托管。
有关详细信息,请参阅 Azure Functions 中的部署技术。
后续步骤