通过在 VM 上安装 Azure Monitor 代理来准备环境。
创建代理设置 DCR。
以下示例步骤将 Azure Monitor 代理缓存使用的最大磁盘空间量设置为 5 GB。
步骤 1 - 使用搜索栏查找 “部署自定义模板 ”选项。
显示 Azure 门户中搜索栏内自定义模板的截图。
步骤 2 - 在编辑器中选择“生成自己的模板”。
此截图展示了如何在 Azure 门户中打开模板编辑器。
步骤 3 - 删除模板编辑器中的现有 JSON,并将 JSON 代码复制到编辑器中。 请确保在编辑器中修改 JSON 中的参数以满足需求。
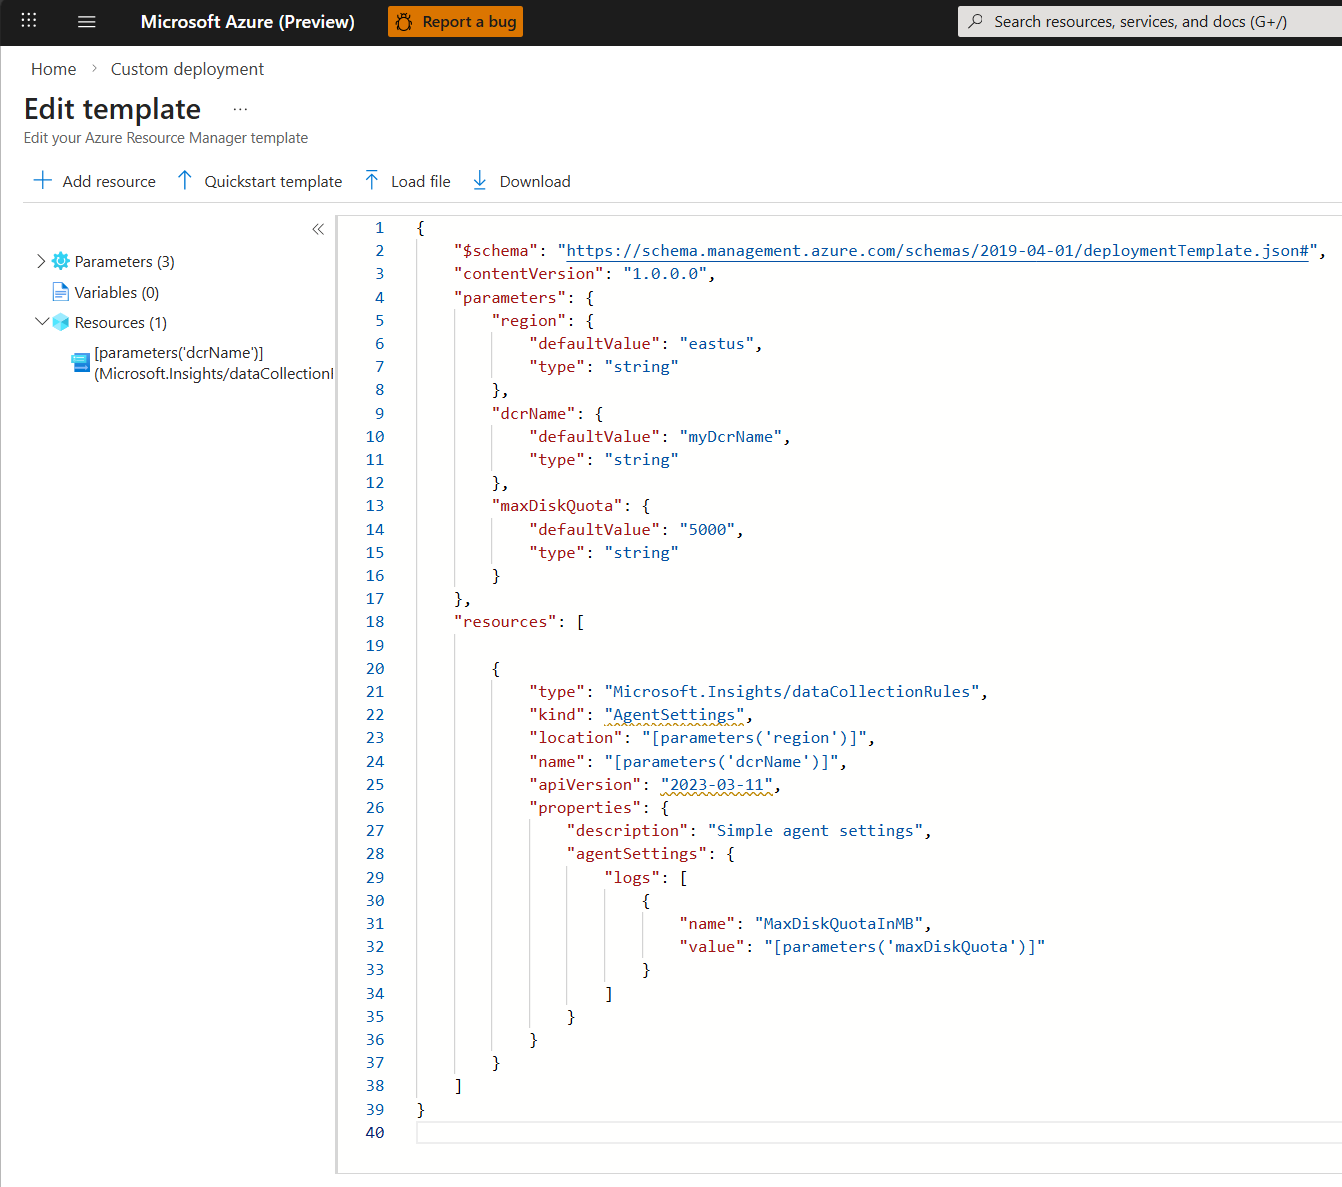
下面是用于创建代理设置 DCR 的示例 JSON 代码:
{
    "$schema": "https://schema.management.azure.com/schemas/2019-04-01/deploymentTemplate.json#",
    "contentVersion": "1.0.0.0",
    "parameters": {
        "region": {
            "defaultValue": "chinanorth",
            "type": "string"
        },
        "dcrName": {
            "defaultValue": "myDcrName",
            "type": "string"
        },
        "maxDiskQuota": {
            "defaultValue": "5000",
            "type": "string"
        }
    },
    "resources": [

        {
            "type": "Microsoft.Insights/dataCollectionRules",
            "kind": "AgentSettings",
            "location": "[parameters('region')]",
            "name": "[parameters('dcrName')]",
            "apiVersion": "2023-03-11",
            "properties": {
                "description": "Simple agent settings",
                "agentSettings": {
                    "logs": [
                        {
                            "name": "MaxDiskQuotaInMB",
                            "value": "[parameters('maxDiskQuota')]"
                        }
                    ]
                }
            }
        }
    ]
}
验证并部署模板。 请确保不会发生任何错误。
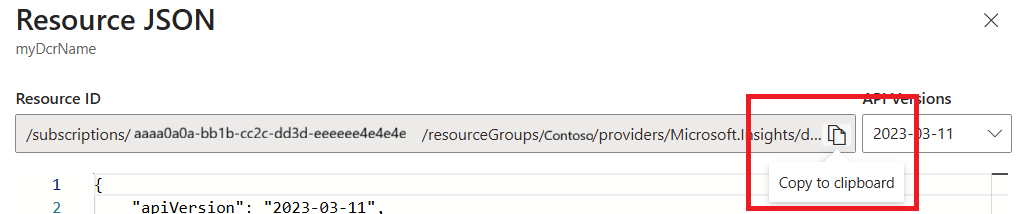
步骤 4 - 将 DCR 与虚拟机关联,转到“在编辑器”选项 中再次部署自定义模板 。 删除模板编辑器中的现有 JSON,并将 JSON 代码复制到编辑器中。 要与 VM 名称和 DCR 资源保持一致,请确保在参数部分修改相关项。 可以通过转到 DCR 并选择右上角的 JSON 视图来复制资源 ID。 使用 “复制到剪贴板 ”选项,然后将其粘贴到模板中。 对于vmName,请使用 VM 的字符串名。
{
  "$schema": "https://schema.management.azure.com/schemas/2019-04-01/deploymentTemplate.json#",
  "contentVersion": "1.0.0.0",
  "parameters": {
    "vmName": {
      "type": "string",
      "defaultValue":"WindowsM1",
      "metadata": {
        "description": "The name of the virtual machine."
      }
    },
    "dataCollectionResourceId": {
      "type": "string",
      "defaultValue": "/subscriptions/aaaa0a0a-bb1b-cc2c-dd3d-eeeeee4e4e4e/resourceGroups/ContosoAdmin/providers/Microsoft.Insights/dataCollectionRules/myDcrName",
      "metadata": {
        "description": "The resource ID of the data collection rule."
      }
    }
  },
  "resources": [
    {
      "type": "Microsoft.Insights/dataCollectionRuleAssociations",
      "apiVersion": "2021-09-01-preview",
      "scope": "[format('Microsoft.Compute/virtualMachines/{0}', parameters('vmResourceId'))]",
      "name": "agentSettings",
      "properties": {
        "description": "Association of data collection rule. Deleting this association will break the data collection for this virtual machine."
        "dataCollectionRuleId": "[parameters('dataCollectionResourceId')]"
      }
    }
  ]
}
验证并部署模板。 请确保不会发生任何错误。
步骤 5 - 应用更改并在 VM 上重启 AMA。

