了解如何通过部署脚本映像创建用于开发和测试部署脚本的开发环境。 可以创建 Azure 容器实例 或使用 Docker。 在本文中说明了这两个选项。
先决条件
Azure PowerShell 容器
如果没有 Azure PowerShell 部署脚本,则可创建包含以下内容的 hello.ps1 文件:
param([string] $name)
$output = 'Hello {0}' -f $name
Write-Output $output
$DeploymentScriptOutputs = @{}
$DeploymentScriptOutputs['text'] = $output
param([string] $name, [string] $subscription)
$output = 'Hello {0}' -f $name
#Write-Output $output

Connect-AzAccount -Environment AzureChinaCloud -Environment AzureChinaCloud -UseDeviceAuthentication
Set-AzContext -subscription $subscription

$kv = Get-AzKeyVault
#Write-Output $kv

$DeploymentScriptOutputs = @{}
$DeploymentScriptOutputs['greeting'] = $output
$DeploymentScriptOutputs['kv'] = $kv.resourceId
Write-Output $DeploymentScriptOutputs
在 Azure PowerShell 部署脚本中,变量 $DeploymentScriptOutputs 用于存储输出值。 有关使用 Azure PowerShell 输出的详细信息,请参阅使用输出。
Azure CLI 容器
对于 Azure CLI 容器映像,可以创建包含以下内容的 hello.sh 文件:
FIRSTNAME=$1
LASTNAME=$2
OUTPUT="{\"name\":{\"displayName\":\"$FIRSTNAME $LASTNAME\",\"firstName\":\"$FIRSTNAME\",\"lastName\":\"$LASTNAME\"}}"
echo -n "Hello "
echo $OUTPUT | jq -r '.name.displayName'
在 Azure CLI 部署脚本中,名为 AZ_SCRIPTS_OUTPUT_PATH 的环境变量会存储脚本输出文件的位置。 环境变量在开发环境容器中不可用。 有关使用 Azure CLI 输出的详细信息,请参阅使用 CLI 脚本中的输出。
使用 Azure PowerShell 容器实例
若要在计算机上创建 Azure PowerShell 脚本,需要创建一个存储帐户,并将存储帐户装载到容器实例。 这样,你就可以将脚本上传到存储帐户,并在容器实例上运行该脚本。 为测试你的脚本而创建的存储帐户与部署脚本服务用来执行脚本的存储帐户不是同一个。 部署脚本服务会在每次执行时创建唯一名称作为文件共享。
创建 Azure PowerShell 容器实例
以下 Bicep 文件创建一个容器实例和文件共享,然后将文件共享装载到容器映像。
@description('Specify a project name that is used for generating resource names.')
param projectName string

@description('Specify the resource location.')
param location string = resourceGroup().location

@description('Specify the container image.')
param containerImage string = 'mcr.microsoft.com/azuredeploymentscripts-powershell:az9.7'

@description('Specify the mount path.')
param mountPath string = '/mnt/azscripts/azscriptinput'

var storageAccountName = toLower('${projectName}store')
var fileShareName = '${projectName}share'
var containerGroupName = '${projectName}cg'
var containerName = '${projectName}container'

resource storageAccount 'Microsoft.Storage/storageAccounts@2025-06-01' = {
  name: storageAccountName
  location: location
  sku: {
    name: 'Standard_LRS'
  }
  kind: 'StorageV2'
  properties: {
    accessTier: 'Hot'
  }
}

resource fileShare 'Microsoft.Storage/storageAccounts/fileServices/shares@2025-06-01' = {
  name: '${storageAccountName}/default/${fileShareName}'
  dependsOn: [
    storageAccount
  ]
}

resource containerGroup 'Microsoft.ContainerInstance/containerGroups@2025-09-01' = {
  name: containerGroupName
  location: location
  properties: {
    containers: [
      {
        name: containerName
        properties: {
          image: containerImage
          resources: {
            requests: {
              cpu: 1
              memoryInGB: json('1.5')
            }
          }
          ports: [
            {
              protocol: 'TCP'
              port: 80
            }
          ]
          volumeMounts: [
            {
              name: 'filesharevolume'
              mountPath: mountPath
            }
          ]
          command: [
            '/bin/sh'
            '-c'
            'pwsh -c \'Start-Sleep -Seconds 1800\''
          ]
        }
      }
    ]
    osType: 'Linux'
    volumes: [
      {
        name: 'filesharevolume'
        azureFile: {
          readOnly: false
          shareName: fileShareName
          storageAccountName: storageAccountName
          storageAccountKey: storageAccount.listKeys().keys[0].value
        }
      }
    ]
  }
}
装载路径的默认值是 /mnt/azscripts/azscriptinput。 这是容器实例中将它装载到文件共享的路径。
Bicep 文件中指定的默认容器映像为 mcr.microsoft.com/azuredeploymentscripts-powershell:az9.7。 请参阅所有 受支持的 Azure PowerShell 版本的列表。
Bicep 文件在 1,800 秒后暂停容器实例。 在容器实例进入终端状态并且会话结束之前,你有 30 分钟的时间。
使用以下脚本部署 Bicep 文件:
$projectName = Read-Host -Prompt "Enter a project name that is used to generate resource names"
$location = Read-Host -Prompt "Enter the location (i.e. chinanorth2)"
$templateFile = Read-Host -Prompt "Enter the Bicep file path and file name"
$resourceGroupName = "${projectName}rg"

New-AzResourceGroup -Location $location -name $resourceGroupName
New-AzResourceGroupDeployment -resourceGroupName $resourceGroupName -TemplateFile $templatefile -projectName $projectName
上传部署脚本
将部署脚本上传到存储帐户。 以下是 PowerShell 脚本示例:
$projectName = Read-Host -Prompt "Enter the same project name that you used earlier"
$fileName = Read-Host -Prompt "Enter the deployment script file name with the path"

$resourceGroupName = "${projectName}rg"
$storageAccountName = "${projectName}store"
$fileShareName = "${projectName}share"

$context = (Get-AzStorageAccount -ResourceGroupName $resourceGroupName -Name $storageAccountName).Context
Set-AzStorageFileContent -Context $context -ShareName $fileShareName -Source $fileName -Force
你也可使用 Azure 门户或 Azure CLI 来上传文件。
测试部署脚本
在 Azure 门户中,打开部署了容器实例和存储帐户的资源组。
打开容器组。 默认资源组名称是追加了 cg 的项目名称。 容器实例处于“正在运行”状态。
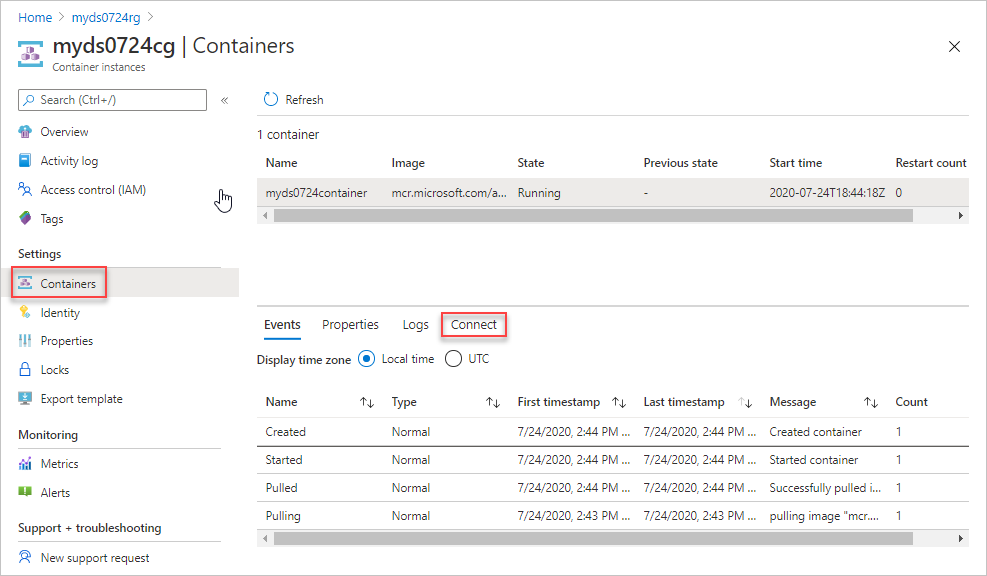
在资源菜单中,选择“容器”。 容器实例名称是追加了 container 的项目名称。

依次选择“连接”、“连接” 。 如果无法连接到容器实例,请重启容器组,然后重试。
在控制台窗格中运行以下命令:
cd /mnt/azscripts/azscriptinput
ls
pwsh ./hello.ps1 "John Dole"
输出为 Hello John Dole。

使用 Azure CLI 容器实例
若要在计算机上创建 Azure CLI 脚本,请创建一个存储帐户,并将存储帐户装载到容器实例。 然后,你就可以将脚本上传到存储帐户,并在容器实例上运行该脚本。 为测试你的脚本而创建的存储帐户与部署脚本服务用来执行脚本的存储帐户不是同一个。 部署脚本服务会在每次执行时创建唯一名称作为文件共享。
创建 Azure CLI 容器实例
以下 Bicep 文件创建一个容器实例和文件共享,然后将文件共享装载到容器映像:
@description('Specify a project name that is used for generating resource names.')
param projectName string

@description('Specify the resource location.')
param location string = resourceGroup().location

@description('Specify the container image.')
param containerImage string = 'mcr.microsoft.com/azure-cli:2.9.1'

@description('Specify the mount path.')
param mountPath string = '/mnt/azscripts/azscriptinput'

var storageAccountName = toLower('${projectName}store')
var fileShareName = '${projectName}share'
var containerGroupName = '${projectName}cg'
var containerName = '${projectName}container'

resource storageAccount 'Microsoft.Storage/storageAccounts@2025-06-01' = {
  name: storageAccountName
  location: location
  sku: {
    name: 'Standard_LRS'
  }
  kind: 'StorageV2'
  properties: {
    accessTier: 'Hot'
  }
}

resource fileshare 'Microsoft.Storage/storageAccounts/fileServices/shares@2025-06-01' = {
  name: '${storageAccountName}/default/${fileShareName}'
  dependsOn: [
    storageAccount
  ]
}

resource containerGroup 'Microsoft.ContainerInstance/containerGroups@2025-09-01' = {
  name: containerGroupName
  location: location
  properties: {
    containers: [
      {
        name: containerName
        properties: {
          image: containerImage
          resources: {
            requests: {
              cpu: 1
              memoryInGB: json('1.5')
            }
          }
          ports: [
            {
              protocol: 'TCP'
              port: 80
            }
          ]
          volumeMounts: [
            {
              name: 'filesharevolume'
              mountPath: mountPath
            }
          ]
          command: [
            '/bin/bash'
            '-c'
            'echo hello; sleep 1800'
          ]
        }
      }
    ]
    osType: 'Linux'
    volumes: [
      {
        name: 'filesharevolume'
        azureFile: {
          readOnly: false
          shareName: fileShareName
          storageAccountName: storageAccountName
          storageAccountKey: storageAccount.listKeys().keys[0].value
        }
      }
    ]
  }
}
装载路径的默认值是 /mnt/azscripts/azscriptinput。 这是容器实例中将它装载到文件共享的路径。
模板中指定的默认容器映像为 mcr.microsoft.com/azure-cli:2.9.1。 请参阅 受支持的 Azure CLI 版本列表。 部署脚本使用 Microsoft 容器注册表 (MCR) 中可用的 CLI 映像。 认证部署脚本的 CLI 映像大约需要一个月的时间。 不要使用 30 天内发布的 CLI 版本。 若要查找映像的发布日期,请参阅 Azure CLI 发行说明。 如果使用了不受支持的版本,错误消息中会列出受支持的版本。
Bicep 文件在 1,800 秒后暂停容器实例。 在容器实例进入终端状态并且会话结束之前,你有 30 分钟的时间。
若要部署 Bicep 文件:
$projectName = Read-Host -Prompt "Enter a project name that is used to generate resource names"
$location = Read-Host -Prompt "Enter the location (i.e. chinanorth2)"
$templateFile = Read-Host -Prompt "Enter the Bicep file path and file name"
$resourceGroupName = "${projectName}rg"

New-AzResourceGroup -Location $location -name $resourceGroupName
New-AzResourceGroupDeployment -resourceGroupName $resourceGroupName -TemplateFile $templatefile -projectName $projectName
上传部署脚本
将部署脚本上传到存储帐户。 以下脚本是 PowerShell 示例:
$projectName = Read-Host -Prompt "Enter the same project name that you used earlier"
$fileName = Read-Host -Prompt "Enter the deployment script file name with the path"

$resourceGroupName = "${projectName}rg"
$storageAccountName = "${projectName}store"
$fileShareName = "${projectName}share"

$context = (Get-AzStorageAccount -ResourceGroupName $resourceGroupName -Name $storageAccountName).Context
Set-AzStorageFileContent -Context $context -ShareName $fileShareName -Source $fileName -Force
你也可使用 Azure 门户或 Azure CLI 来上传文件。
测试部署脚本
在 Azure 门户中,打开部署了容器实例和存储帐户的资源组。
打开容器组。 默认资源组名称是追加了 cg 的项目名称。 容器实例处于“正在运行”状态。
在资源菜单中,选择“容器”。 容器实例名称是追加了 container 的项目名称。

依次选择“连接”、“连接” 。 如果无法连接到容器实例,请重启容器组,然后重试。
在控制台窗格中运行以下命令:
cd /mnt/azscripts/azscriptinput
ls
./hello.sh John Dole
输出为 Hello John Dole。

使用 Docker
可以使用预配置的 Docker 容器映像作为部署脚本开发环境。 若要安装 Docker,请参阅 “获取 Docker”。 你还需要配置文件共享以将包含部署脚本的目录装载到 Docker 容器中。
将部署脚本容器映像拉取到本地计算机:
docker pull mcr.microsoft.com/azuredeploymentscripts-powershell:az10.0此示例使用 PowerShell 4.3.0 版本。
从 MCR 中拉取 CLI 映像:
docker pull mcr.microsoft.com/azure-cli:2.52.0此示例使用 CLI 2.52.0 版本。 部署脚本使用默认的 CLI 容器映像。
在本地运行 Docker 映像。
docker run -v <host drive letter>:/<host directory name>:/data -it mcr.microsoft.com/azuredeploymentscripts-powershell:az10.0将“<主机驱动器号>”和“主机目录名<”替换为共享驱动器上的现有文件夹。 它将文件夹映射到容器中的/data 文件夹。 例如,要映射 D:\docker:
docker run -v d:/docker:/data -it mcr.microsoft.com/azuredeploymentscripts-powershell:az10.0-这意味着 使容器映像保持活动状态。
CLI 示例:
docker run -v d:/docker:/data -it mcr.microsoft.com/azure-cli:2.52.0以下屏幕截图显示了如何运行 PowerShell 脚本,假设你在共享驱动器中具有 helloworld.ps1 文件。

成功测试脚本后,可以将其用作 Bicep 文件中的部署脚本。
后续步骤
在本文中,你已学习了如何创建脚本开发环境。 若要了解详细信息,请访问以下链接: