本快速入门可指导你完成使用 Azure 资源管理器 (ARM) 模板创建 Azure SignalR 服务的过程。 可通过 Azure 门户、PowerShell 或 CLI 部署 Azure SignalR 服务。
Azure 资源管理器模板是定义项目基础结构和配置的 JavaScript 对象表示法 (JSON) 文件。 模板使用声明性语法。 你可以在不编写用于创建部署的编程命令序列的情况下,描述预期部署。
如果你的环境满足先决条件,并且你熟悉如何使用 ARM 模板,请选择“部署到 Azure”按钮。 登录后,将在 Azure 门户中打开该模板。

先决条件
具有活动订阅的 Azure 帐户。 试用版订阅。
查看模板
本快速入门中使用的模板来自 Azure 快速启动模板。
{
  "$schema": "https://schema.management.azure.com/schemas/2019-04-01/deploymentTemplate.json#",
  "contentVersion": "1.0.0.0",
  "metadata": {
    "_generator": {
      "name": "bicep",
      "version": "0.9.1.41621",
      "templateHash": "7185938028783900711"
    }
  },
  "parameters": {
    "name": {
      "type": "string",
      "defaultValue": "[uniqueString(resourceGroup().id)]",
      "metadata": {
        "description": "The globally unique name of the SignalR resource to create."
      }
    },
    "location": {
      "type": "string",
      "defaultValue": "[resourceGroup().location]",
      "metadata": {
        "description": "Location for the SignalR resource."
      }
    },
    "pricingTier": {
      "type": "string",
      "defaultValue": "Standard_S1",
      "allowedValues": [
        "Free_F1",
        "Standard_S1"
      ],
      "metadata": {
        "description": "The pricing tier of the SignalR resource."
      }
    },
    "capacity": {
      "type": "int",
      "defaultValue": 1,
      "allowedValues": [
        1,
        2,
        5,
        10,
        20,
        50,
        100
      ],
      "metadata": {
        "description": "The number of SignalR Unit."
      }
    },
    "serviceMode": {
      "type": "string",
      "defaultValue": "Default",
      "allowedValues": [
        "Default",
        "Serverless",
        "Classic"
      ],
      "metadata": {
        "description": "Visit https://github.com/Azure/azure-signalr/blob/dev/docs/faq.md#service-mode to understand SignalR Service Mode."
      }
    },
    "enableConnectivityLogs": {
      "type": "bool",
      "defaultValue": true
    },
    "enableMessagingLogs": {
      "type": "bool",
      "defaultValue": true
    },
    "enableLiveTrace": {
      "type": "bool",
      "defaultValue": true
    },
    "allowedOrigins": {
      "type": "array",
      "defaultValue": [
        "*"
      ],
      "metadata": {
        "description": "Set the list of origins that should be allowed to make cross-origin calls."
      }
    }
  },
  "resources": [
    {
      "type": "Microsoft.SignalRService/signalR",
      "apiVersion": "2022-02-01",
      "name": "[parameters('name')]",
      "location": "[parameters('location')]",
      "sku": {
        "capacity": "[parameters('capacity')]",
        "name": "[parameters('pricingTier')]"
      },
      "kind": "SignalR",
      "identity": {
        "type": "SystemAssigned"
      },
      "properties": {
        "tls": {
          "clientCertEnabled": false
        },
        "features": [
          {
            "flag": "ServiceMode",
            "value": "[parameters('serviceMode')]"
          },
          {
            "flag": "EnableConnectivityLogs",
            "value": "[string(parameters('enableConnectivityLogs'))]"
          },
          {
            "flag": "EnableMessagingLogs",
            "value": "[string(parameters('enableMessagingLogs'))]"
          },
          {
            "flag": "EnableLiveTrace",
            "value": "[string(parameters('enableLiveTrace'))]"
          }
        ],
        "cors": {
          "allowedOrigins": "[parameters('allowedOrigins')]"
        },
        "networkACLs": {
          "defaultAction": "Deny",
          "publicNetwork": {
            "allow": [
              "ClientConnection"
            ]
          },
          "privateEndpoints": [
            {
              "name": "mySignalRService.1fa229cd-bf3f-47f0-8c49-afb36723997e",
              "allow": [
                "ServerConnection"
              ]
            }
          ]
        },
        "upstream": {
          "templates": [
            {
              "categoryPattern": "*",
              "eventPattern": "connect,disconnect",
              "hubPattern": "*",
              "urlTemplate": "https://example.com/chat/api/connect"
            }
          ]
        }
      }
    }
  ]
}
该模板定义了一个 Azure 资源:
部署模板
要使用 ARM 模板部署 Azure SignalR 服务,请在 Azure 门户中选择以下链接:
在“部署 Azure SignalR 服务”页面上:
如果需要,可以更改“订阅”的默认值。
对于“资源组”,请选择“新建”,输入新资源组的名称,然后选择“确定” 。
如果创建了新的资源组,请为该资源组选择一个区域。
如果需要,请输入新版名称和 Azure SignalR 服务的位置(例如 chinaeast2)。 如果未指定“名称”,则会自动生成。 “位置”可以与资源组所在的区域相同,也可以不同。 如果未指定“位置”,则默认为与资源组所在区域相同。
选择“定价层”(“Free_F1”或“Standard_S1”),输入“容量”(SignalR 单位数),然后选择“服务模式”:“默认”(需要中心服务器)、“无服务器”(不允许任何服务器连接)或“经典”(仅当中心具有服务器连接时才路由到中心服务器) 。 现在,请选择是“启用连接日志”,还是“启用消息日志”。
注意
对于“Free_F1”定价层,容量限制为 1 个单位。
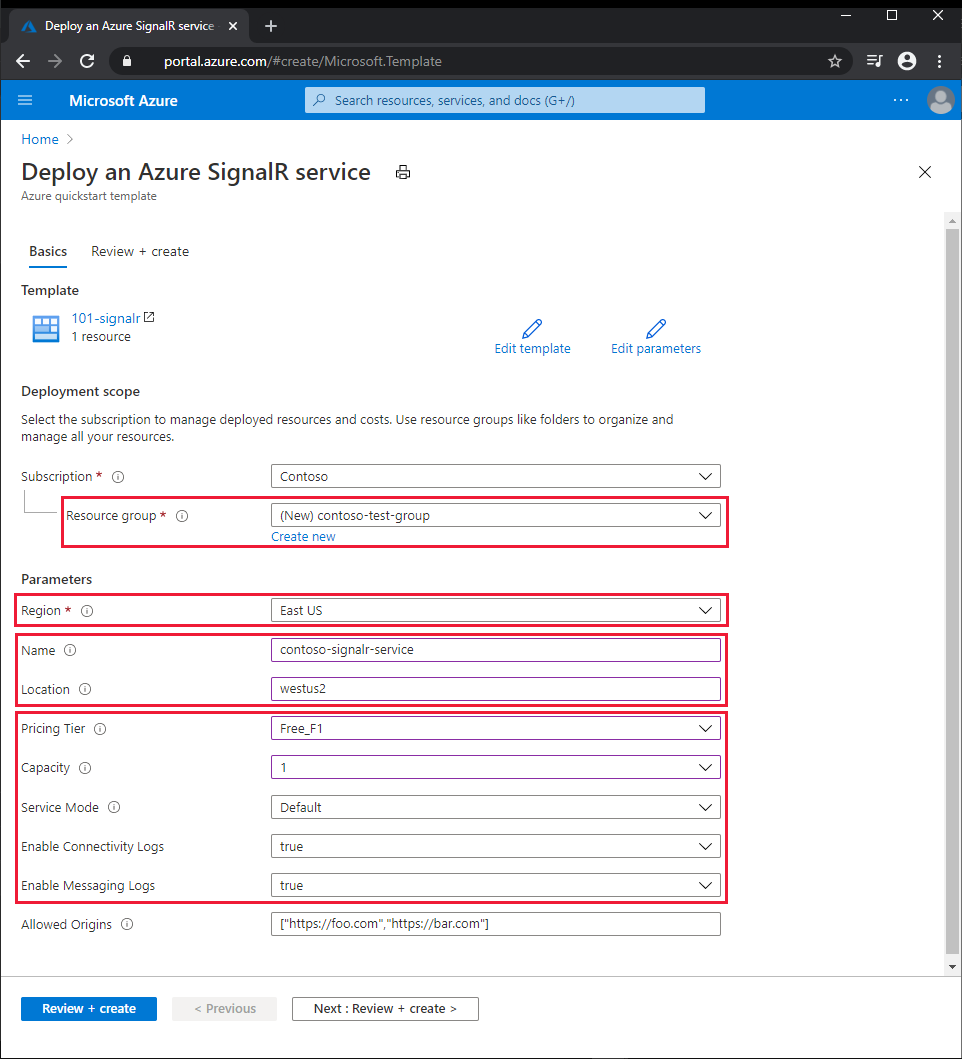
选择“查看 + 创建” 。
阅读条款和条件,然后选择“创建”。
注意
部署可能需要几分钟才能完成。 记下 Azure SignalR 服务和资源组的名称,稍后将使用它们来查看已部署的资源。
查看已部署的资源
按照以下步骤概要了解新的 Azure SignalR 服务:
在 Azure 门户中,搜索并选择“SignalR”。
在 SignalR 列表中,选择你的新服务。 此时将显示新的 Azure SignalR 服务的“概述”页面。
清理资源
如果不再需要该资源组,可以将其删除,这将删除资源组中的资源。
在 Azure 门户中,搜索并选择“资源组”。
在资源组列表中,选择你的资源组的名称。
在资源组的“概览”页中,选择“删除资源组” 。
在确认对话框中,键入资源组的名称,然后选择“删除”。
后续步骤
有关引导你完成 ARM 模板创建过程的分步教程,请参阅: