applies to:![]() Azure SQL Managed Instance
Azure SQL Managed Instance
本文将介绍如何在使用原生还原选项将受 TDE 保护的 SQL Server 数据库迁移到 Azure SQL 托管实例之前,先行迁移证书。
使用 native 还原选项将受 Transparent Data Encryption (TDE)保护的数据库从 SQL Server 迁移到 Azure SQL Managed Instance 时必须先迁移相应的证书,然后才能将数据库还原到 SQL 托管数据库实例。
本文重点介绍如何将数据库从SQL Server迁移到Azure SQL Managed Instance。 若要在 SQL 托管实例之间移动数据库,请参阅:
先决条件
若要完成本文中的步骤,需要符合以下先决条件:
- 已在本地服务器或其他能够访问已导出为文件的证书的计算机上安装了 Pvk2Pfx 命令行工具。 Pvk2Pfx 工具是 Enterprise Windows Driver Kit 中一个自包含的命令行环境的一部分。
- 已安装 Windows PowerShell 5.0 或更高版本。
确保满足以下先决条件:
- 已安装并更新了 Azure PowerShell 模块。
- Az.Sql 模块。
在 PowerShell 中运行以下命令以安装或更新模块:
Install-Module -Name Az.Sql
Update-Module -Name Az.Sql
将 TDE 证书导出为 .pfx 文件
可以直接从源SQL Server实例导出证书,也可以从证书存储区导出证书(如果保留该证书)。
从源SQL Server实例导出证书
以下步骤使用 SQL Server Management Studio 导出证书,并将其转换为 .pfx 格式。 TDE_Cert和full_path的泛型名称是证书名称、文件名和路径的占位符。 将它们替换为实际名称。
在 SSMS 中,打开一个新的查询窗口并连接到源SQL Server实例。
使用以下脚本列出 TDE 保护的数据库,并获取用于对要迁移的数据库进行保护加密的证书的名称:
USE master
GO
SELECT db.name as [database_name], cer.name as [certificate_name]
FROM sys.dm_database_encryption_keys dek
LEFT JOIN sys.certificates cer
ON dek.encryptor_thumbprint = cer.thumbprint
INNER JOIN sys.databases db
ON dek.database_id = db.database_id
WHERE dek.encryption_state = 3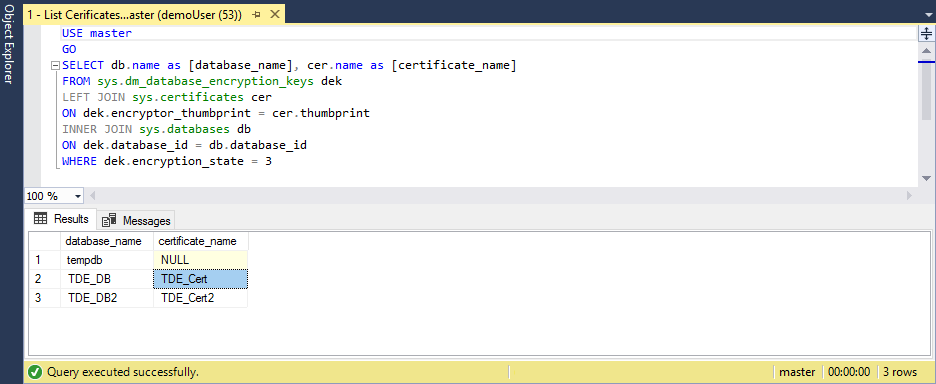
执行以下脚本,将证书导出到一对文件(.cer 和 .pvk),并保存公钥和私钥信息:
USE master
GO
BACKUP CERTIFICATE TDE_Cert
TO FILE = 'c:\full_path\TDE_Cert.cer'
WITH PRIVATE KEY (
  FILE = 'c:\full_path\TDE_Cert.pvk',
  ENCRYPTION BY PASSWORD = '<SomeStrongPassword>'
)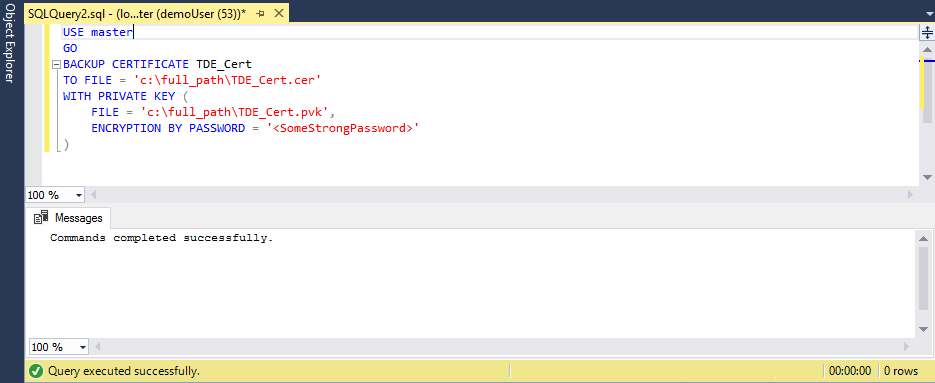
使用 PowerShell 控制台,使用 Pvk2Pfx 工具将证书信息从一对新创建的文件复制到 .pfx 文件:
.\pvk2pfx -pvk c:/full_path/TDE_Cert.pvk -pi "<SomeStrongPassword>" -spc c:/full_path/TDE_Cert.cer -pfx c:/full_path/TDE_Cert.pfx


从证书存储中导出证书
如果在SQL Server本地计算机证书存储中保留证书,请使用以下步骤导出该证书:
打开 PowerShell 控制台并运行以下命令以打开Microsoft Management Console的证书管理单元:
certlm在“证书 MMC”管理单元中,展开“ 个人>证书 ”路径以查看证书列表。
右键单击证书,然后选择“ 导出”。
遵循向导将证书和私钥导出为 .pfx 格式。
使用 Azure PowerShell cmdlet 将证书上传到 Azure SQL Managed Instance
重要
仅将迁移的证书用于还原受 TDE 保护的数据库。 还原完成后不久,迁移的证书将被其他保护器替换。 新保护程序是服务管理的证书或密钥保管库中的非对称密钥,具体取决于在实例上设置的 TDE 类型。
在 PowerShell 中开始准备步骤:
# import the module into the PowerShell session
Import-Module Az
# connect to Azure with an interactive dialog for sign-in
Connect-AzAccount -EnvironmentName AzureChinaCloud
# list subscriptions available and copy id of the subscription target the managed instance belongs to
Get-AzSubscription
# set subscription for the session
Select-AzSubscription <subscriptionId>
完成所有准备步骤后,运行以下命令,将 base-64 编码的证书上传到目标 SQL 托管实例:
# If you are using PowerShell 6.0 or higher, run this command:
$fileContentBytes = Get-Content 'C:/full_path/TDE_Cert.pfx' -AsByteStream
# If you are using PowerShell 5.x, uncomment and run this command instead of the one above:
# $fileContentBytes = Get-Content 'C:/full_path/TDE_Cert.pfx' -Encoding Byte
$base64EncodedCert = [System.Convert]::ToBase64String($fileContentBytes)
$securePrivateBlob = $base64EncodedCert  | ConvertTo-SecureString -AsPlainText -Force
$password = "<password>"
$securePassword = $password | ConvertTo-SecureString -AsPlainText -Force
Add-AzSqlManagedInstanceTransparentDataEncryptionCertificate -ResourceGroupName "<resourceGroupName>" `
    -ManagedInstanceName "<managedInstanceName>" -PrivateBlob $securePrivateBlob -Password $securePassword
证书现在可用于指定的 SQL 托管实例,可以还原相应受 TDE 保护的数据库的备份。
注意
上传的证书在 sys.certificates 目录视图中不可见。 要确认证书上传成功,请运行 RESTORE FILELISTONLY 命令。