在 Azure Stack Hub 或 Azure Stack 开发工具包上为 Azure CLI 设置证书
按照本文中的步骤设置 Azure 命令行接口 (CLI),以从 Linux、Mac 和 Windows 客户端平台管理 Azure Stack 开发工具包 (ASDK) 资源。 如果在断开连接的环境中使用 Azure Stack Hub 集成系统,或者证书不是由受信任的根程序中的 CA 颁发,也可以按照这些步骤操作。
本文介绍如何获取证书并在远程管理计算机上信任这些证书。 若要安装 Azure CLI 并连接到你的环境,请参阅在 Azure Stack Hub 上安装 Azure CLI。
准备 Azure CLI
需要 Azure Stack Hub 的 CA 根证书才能在开发计算机上使用 Azure CLI。 该证书用于通过 CLI 管理资源。
如果从 Azure Stack Hub 环境之外的工作站使用 CLI,则需要“Azure Stack Hub CA 根证书”。
虚拟机别名终结点提供了一个别名,如“UbuntuLTS”或“Win2012Datacenter”。在部署 VM 时,此别名将映像发布者、产品/服务、SKU 和版本作为单个参数引用。
以下部分介绍如何获取这些值。
导出 Azure Stack Hub CA 根证书
导出 CA 根证书。 导出 PEM 格式的 ASDK 根证书:
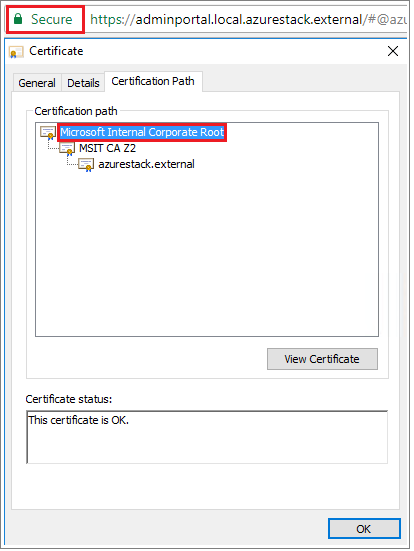
获取 Azure Stack Hub 根证书的名称:
- 登录 Azure Stack Hub 用户或 Azure Stack Hub 管理门户。
- 选择浏览器地址栏中的锁。
- 在弹出窗口中,选择“连接是安全的”。
- 在“证书”窗口中,选择“证书路径”选项卡。
- 记下 Azure Stack Hub 根证书的名称,例如
*.<locale>.<FQDN>
登录到 VM,打开权限提升的 PowerShell 提示符,然后运行以下脚本:
  $label = "*.<locale>.<FQDN> from step 1"
  Write-Host "Getting certificate from the current user trusted store with subject CN=$label"
  $root = Get-ChildItem Cert:\CurrentUser\Root | Where-Object Subject -eq "CN=$label" | select -First 1
  if (-not $root)
  {
      Write-Error "Certificate with subject CN=$label not found"
      return
  }

Write-Host "Exporting certificate"
Export-Certificate -Type CERT -FilePath root.cer -Cert $root
对于 Linux,还需要使用以下命令:
export REQUESTS_CA_BUNDLE=~/.local/lib/python3.9/site-packages/certifi/cacert.pem
# RECOMMENDED: set the env var automatically for your subsequent sessions
echo 'export REQUESTS_CA_BUNDLE=~/.local/lib/python3.9/site-packages/certifi/cacert.pem' >> ~/.bash_profile
将证书复制到本地计算机。
设置虚拟机别名终结点
可以设置一个可公开访问的终结点用于托管 VM 别名文件。 VM 别名文件是一个 JSON 文件,提供映像的公用名称。 以 Azure CLI 参数形式部署 VM 时,将使用该名称。
如果发布自定义映像,请记下发布过程中指定的发布者、产品/服务、SKU 和版本信息。 如果映像来自市场,可以使用
Get-AzureVMImagecmdlet 查看信息。从 GitHub 下载示例文件。
在 Azure Stack Hub 中创建存储帐户。 完成该操作后,将创建 Blob 容器。 将访问策略设置为“公开”。
将 JSON 文件上传到新容器。 完成该操作后,可以查看 blob 的 URL。 选择 blob 名称,然后从 blob 属性中选择该 URL。
信任证书
若要将 Azure CLI 与 ASDK 结合使用,必须信任远程计算机上的 CA 根证书。
在计算机上找到证书位置。 该位置根据 Python 的安装位置而异。
要查找位置,请打开 CMD 提示符或提升的 PowerShell 提示符并键入:
az --version。 版本和 python 位置随即出现在提示符中。azure-cli 2.30.0 core 2.30.0 telemetry 1.0.6 Python location 'C:\Program Files (x86)\Microsoft SDKs\Azure\CLI2\python.exe' Extensions directory 'C:\Users\username\.azure\cliextensions' Python (Windows) 3.8.9 (tags/v3.8.9:a743f81, Apr 6 2021, 13:22:56) [MSC v.1928 32 bit (Intel)] Legal docs and information: aka.ms/AzureCliLegal Your CLI is up-to-date. Please let us know how we are doing: https://aka.ms/azureclihats and let us know if you're interested in trying out our newest features: https://aka.ms/CLIUXstudy更改到 Azure CLI 安装 Python 的目录。 例如,使用步骤 2 中的位置
cd "C:\Program Files (x86)\Microsoft SDKs\Azure\CLI2\。键入以下命令:
.\python -c "import certifi; print(certifi.where())"这将返回计算机上证书位置的路径。 具体的路径取决于 OS 和已安装的 Python 版本。 例如:
C:\Program Files (x86)\Microsoft SDKs\Azure\CLI2\lib\site-packages\certifi\cacert.pem记下证书位置。 你将在下一步中使用该路径。
若要信任 Azure Stack Hub CA 根书,请将它附加到现有的 Python 证书。
$cerFile = "<Fully qualified path to the cer certificate exported from `
your Azure Stack Hub and saved. For example: C:\Users\user1\Downloads\root.cer"
$pythonCertStore = <result from step 4>

$cerDir = Split-Path -Parent $cerFile
$pemFile = "$cerDir\root.pem"
Write-Host "Converting certificate to PEM format at $pemFile"
certutil -encode $cerFile $pemFile
$root = New-Object System.Security.Cryptography.X509Certificates.X509Certificate2
$root.Import($pemFile)

# X509Certificate2.Thumbprint calculates SHA1 hash of the public key. You can get sha1 of the pem file by using openssl,
# e.g. openssl x509 -noout -fingerprint -sha1 -inform pem -in ./root.pem
# Alternatively, 'Get-FileHash' gives the same value (without ':') for the corresponding cer file
# Since the thumbprint is a unique value for the certificate, it is commonly used to find a particular certificate in a certificate store
Write-Host "Extracting required information from the cert file"
$md5Hash    = (Get-FileHash -Path $cerFile -Algorithm MD5).Hash.ToLower()
$sha1Hash   = (Get-FileHash -Path $cerFile -Algorithm SHA1).Hash.ToLower()
$sha256Hash = (Get-FileHash -Path $cerFile -Algorithm SHA256).Hash.ToLower()

$issuerEntry  = [string]::Format("# Issuer: {0}", $root.Issuer)
$subjectEntry = [string]::Format("# Subject: {0}", $root.Subject)
$labelEntry   = [string]::Format("# Label: {0}", $root.Subject.Split('=')[-1])
$serialEntry  = [string]::Format("# Serial: {0}", $root.GetSerialNumberString().ToLower())
$md5Entry     = [string]::Format("# MD5 Fingerprint: {0}", $md5Hash)
$sha1Entry    = [string]::Format("# SHA1 Fingerprint: {0}", $sha1Hash)
$sha256Entry  = [string]::Format("# SHA256 Fingerprint: {0}", $sha256Hash)
$certText = (Get-Content -Path $pemFile -Raw).ToString().Replace("`r`n","`n")

$rootCertEntry = "`n" + $issuerEntry + "`n" + $subjectEntry + "`n" + $labelEntry + "`n" + `
$serialEntry + "`n" + $md5Entry + "`n" + $sha1Entry + "`n" + $sha256Entry + "`n" + $certText

Write-Host "Adding the certificate content to Python Cert store"
Add-Content $pythonCertStore $rootCertEntry

Write-Host "Python Cert store was updated to allow the Azure Stack Hub CA root certificate"
有关安装和连接 Azure CLI 的说明,请参阅在 Azure Stack Hub 上安装 Azure CLI。