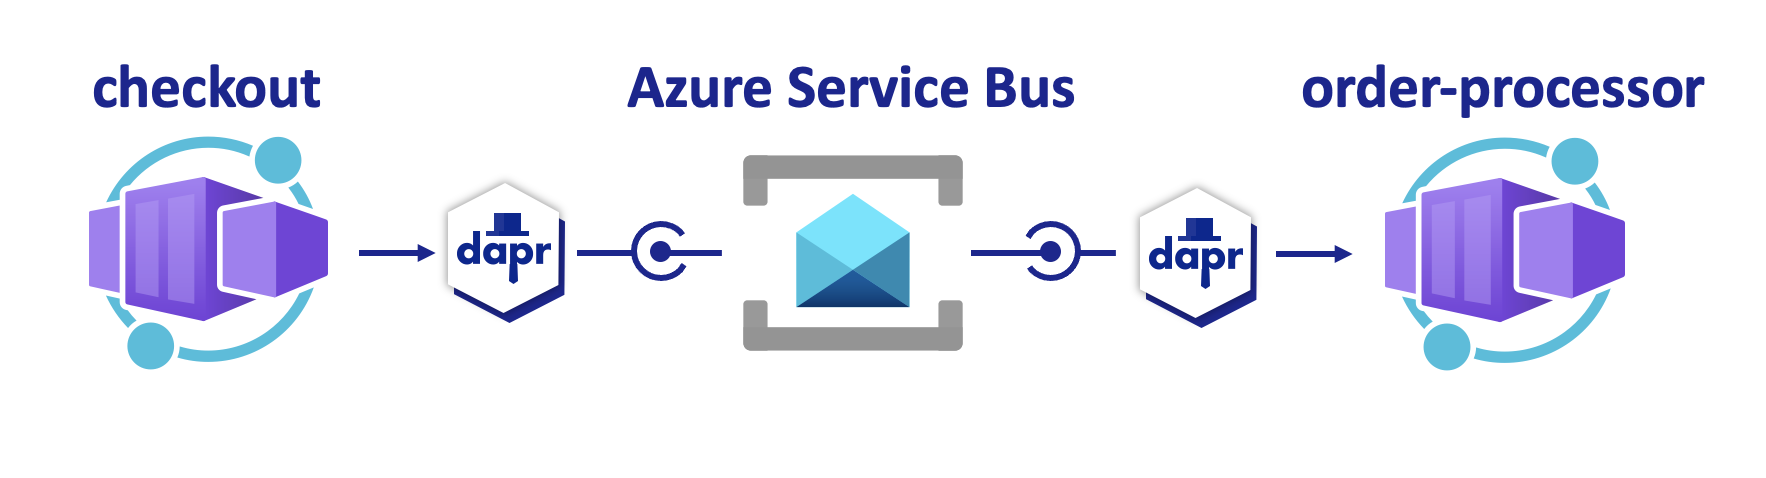
在发布/订阅(pub/sub)系统中,可以使用 分布式应用程序运行时(Dapr) 简化和标准化微服务与消息代理之间的通信。
- 发布者应用通过 Dapr sidecar 发布消息。 Sidecar 处理与代理的实际通信。
- 订阅者应用通过 Dapr sidecar 接收消息。 Sidecar 从消息代理接收消息,并使用消息的有效负载调用订阅者应用的终结点。
本教程使用示例项目演示如何运行 Dapr pub/sub 系统。 该示例包括:
- 专门生成特定主题消息的发布者服务(消息生成器)
checkout。 - 一个侦听来自特定主题的
order-processor服务的消息的checkout服务(订阅者)。
在本教程中,你将:
- 创建发布者微服务和订阅者微服务,该微服务使用 Dapr pub/sub API 发送和接收事件驱动的体系结构的消息。
- 使用示例项目中提供的 Azure 开发人员 CLI 和 Bicep 文件将应用程序部署到 Azure 容器应用。
先决条件
- Azure 开发人员 CLI
- Dapr CLI, 已安装 并 初始化
- Docker Desktop
- Git
在本地运行 Node.js 应用程序
将应用程序部署到容器应用之前,请执行以下部分中的步骤,使用 Dapr 和 Azure 服务总线在本地运行 order-processor 和服务 checkout 。
准备项目
将示例应用程序克隆到本地计算机。
git clone https://github.com/Azure-Samples/pubsub-dapr-nodejs-servicebus.git转到示例根目录。
cd pubsub-dapr-nodejs-servicebus
使用 Dapr CLI 运行应用程序
执行以下步骤来运行 order-processor 订阅服务器服务和 checkout 发布者服务。
从示例根目录转到 订单处理器 目录。
cd order-processor安装依赖项。
npm install运行
order-processor服务。dapr run --app-port 5001 --app-id order-processing --app-protocol http --dapr-http-port 3501 --resources-path ../components -- npm run start在新终端窗口中,转到示例根目录,然后转到 签出 目录。
cd checkout安装依赖项。
npm install运行
checkout服务。dapr run --app-id checkout --app-protocol http --resources-path ../components -- npm run start
预期输出
在 checkout 终端中 checkout ,服务发布 20 条消息,然后暂时暂停。
== APP == Published data: {"orderId":1}
== APP == Published data: {"orderId":2}
== APP == Published data: {"orderId":3}
== APP == Published data: {"orderId":4}
== APP == Published data: {"orderId":5}
== APP == Published data: {"orderId":6}
== APP == Published data: {"orderId":7}
== APP == Published data: {"orderId":8}
== APP == Published data: {"orderId":9}
== APP == Published data: {"orderId":10}
== APP == Published data: {"orderId":11}
== APP == Published data: {"orderId":12}
== APP == Published data: {"orderId":13}
== APP == Published data: {"orderId":14}
== APP == Published data: {"orderId":15}
== APP == Published data: {"orderId":16}
== APP == Published data: {"orderId":17}
== APP == Published data: {"orderId":18}
== APP == Published data: {"orderId":19}
== APP == Published data: {"orderId":20}
order-processor 终端中的 order-processor 服务接收 20 条消息。
== APP == Subscriber received: {"orderId":1}
== APP == Subscriber received: {"orderId":2}
== APP == Subscriber received: {"orderId":3}
== APP == Subscriber received: {"orderId":4}
== APP == Subscriber received: {"orderId":5}
== APP == Subscriber received: {"orderId":6}
== APP == Subscriber received: {"orderId":7}
== APP == Subscriber received: {"orderId":8}
== APP == Subscriber received: {"orderId":9}
== APP == Subscriber received: {"orderId":10}
== APP == Subscriber received: {"orderId":11}
== APP == Subscriber received: {"orderId":12}
== APP == Subscriber received: {"orderId":13}
== APP == Subscriber received: {"orderId":14}
== APP == Subscriber received: {"orderId":15}
== APP == Subscriber received: {"orderId":16}
== APP == Subscriber received: {"orderId":17}
== APP == Subscriber received: {"orderId":18}
== APP == Subscriber received: {"orderId":19}
== APP == Subscriber received: {"orderId":20}
停止应用程序
若要停止应用程序,请打开单独的终端并运行以下命令:
dapr stop --app-id checkout
dapr stop --app-id order-processor
使用 Azure 开发人员 CLI 部署应用程序模板
若要使用 azd 命令将应用程序部署到容器应用,请执行以下步骤。
准备项目
在新终端窗口中,转到 示例 根目录。
cd pubsub-dapr-nodejs-servicebus
使用 Azure 开发人员 CLI 创建和部署
运行
azd init以初始化项目。azd init在终端中出现提示时,输入唯一的环境名称。 该命令将此名称用作创建用于保存所有 Azure 资源的资源组的前缀。
运行
azd up以准备基础结构,并在单个命令中将应用程序部署到容器应用。azd up在终端中出现提示时,输入以下参数的值:
参数 说明 Azure 订阅 您资源的 Azure 订阅 Azure 位置 Azure 资源的位置 此过程可能需要一些时间才能完成。
azd up运行命令时,输出会显示两个可用于监视部署进度的 Azure 门户链接。 输出还演示了如何运行azd up:- 使用 ./infra 目录中的 Bicep 文件通过
azd provision创建和配置所有必要的 Azure 资源。 在 Azure 开发人员 CLI 部署这些资源后,可以使用 Azure 门户访问它们。 用于配置 Azure 资源的文件包括:- main.parameters.json。
- main.bicep.
- 按功能组织的 应用 资源目录。
- 包含模板使用的 Bicep 模块的核心引用库。
- 使用
azd deploy部署代码。
- 使用 ./infra 目录中的 Bicep 文件通过
预期输出
该 azd init 命令显示类似于以下行的输出:
Initializing an app to run on Azure (azd init)

? Enter a unique environment name: [? for help] <environment-name>

? Enter a unique environment name: <environment-name>

SUCCESS: Initialized environment <environment-name>.
该 azd up 命令显示类似于以下行的输出:
? Select an Azure Subscription to use:  3. <subscription-name> (aaaa0a0a-bb1b-cc2c-dd3d-eeeeee4e4e4e)
? Enter a value for the 'location' infrastructure parameter: 51. (US) China East 2 (chinaeast2)

Packaging services (azd package)

  (✓) Done: Packaging service checkout
  - Container: pubsub-dapr-javascript-servicebus-aca/checkout-<environment-name>:azd-deploy-1764784418

  (✓) Done: Packaging service orders
  - Container: pubsub-dapr-javascript-servicebus-aca/orders-<environment-name>:azd-deploy-1764784420

Provisioning Azure resources (azd provision)
Provisioning Azure resources can take some time.

Subscription: <subscription-name> (aaaa0a0a-bb1b-cc2c-dd3d-eeeeee4e4e4e)
Location: China East 2

  You can view detailed progress in the Azure Portal:
  https://portal.azure.cn/#view/HubsExtension/DeploymentDetailsBlade/~/overview/id/%2Fsubscriptions%2Faaaa0a0a-bb1b-cc2c-dd3d-eeeeee4e4e4e%2Fproviders%2FMicrosoft.Resources%2Fdeployments%2F<environment-name>-1764784426

  (✓) Done: Resource group: rg-<environment-name> (2.805s)
  (✓) Done: Service Bus Namespace: sb-a1bc2de3fh4ij (17.866s)
  (✓) Done: Log Analytics workspace: log-a1bc2de3fh4ij (23.262s)
  (✓) Done: Application Insights: appi-a1bc2de3fh4ij (3.167s)
  (✓) Done: Portal dashboard: dash-a1bc2de3fh4ij (1.858s)
  (✓) Done: Container Registry: cra1bc2de3fh4ij (20.097s)
  (✓) Done: Container Apps Environment: cae-a1bc2de3fh4ij (1m39.71s)
  (✓) Done: Container App: ca-orders-a1bc2de3fh4ij (19.927s)
  (✓) Done: Container App: ca-checkout-a1bc2de3fh4ij (20.213s)

Deploying services (azd deploy)

  (✓) Done: Deploying service checkout

  (✓) Done: Deploying service orders
  - Endpoint: https://ca-orders-a1bc2de3fh4ij.gentlebeach-c2de3fh4.chinaeast2.azurecontainerapps.io/

SUCCESS: Your up workflow to provision and deploy to Azure completed in 5 minutes 10 seconds.
确认部署是否成功
执行以下步骤,验证 checkout 服务是否正在将消息发布到服务总线主题,并且 order-processor 服务正在接收消息。
在终端输出中复制
checkout容器应用名称。登录到 Azure 门户,然后按名称搜索容器应用资源。
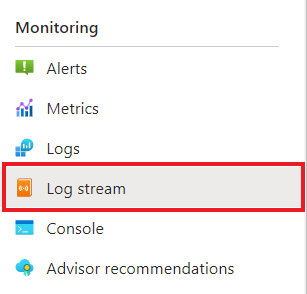
在“容器应用 概述 ”页上,选择“ 监视>日志流”。
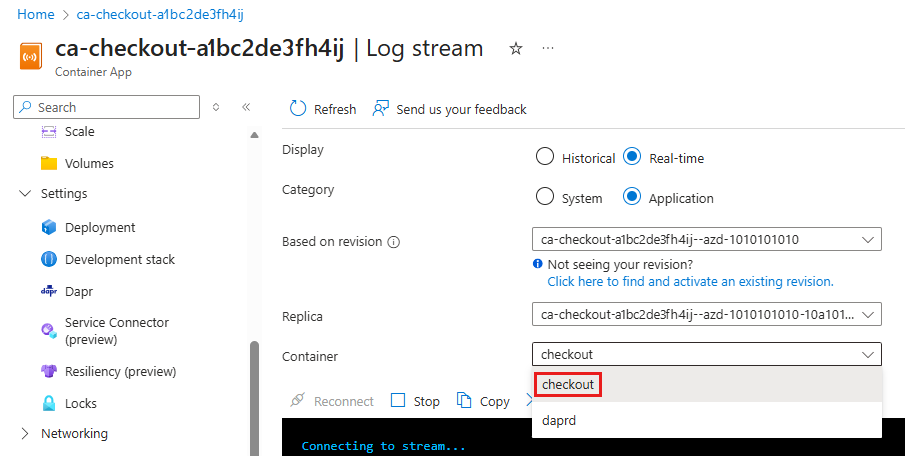
在 “日志流 ”页上的 “容器”旁边,选择 “签出”。
确认
checkout容器记录的输出是否与前面在终端中显示的输出相同。Connecting to stream... 2025-12-03T17:59:44.86984 Connecting to the container 'checkout'... 2025-12-03T17:59:44.88762 Successfully Connected to container: 'checkout' [Revision: 'ca-checkout-a1bc2de3fh4ij--azd-1010101010', Replica: 'ca-checkout-a1bc2de3fh4ij--azd-1010101010-e3fh4ij5kl-6mn7o'] 2025-12-03T17:59:20.110076973Z Published data: {"orderId":1} 2025-12-03T17:59:21.122761423Z Published data: {"orderId":2} 2025-12-03T17:59:22.134562301Z Published data: {"orderId":3} 2025-12-03T17:59:23.148699507Z Published data: {"orderId":4} 2025-12-03T17:59:24.160779162Z Published data: {"orderId":5} 2025-12-03T17:59:25.176694795Z Published data: {"orderId":6} 2025-12-03T17:59:26.189284846Z Published data: {"orderId":7} 2025-12-03T17:59:27.201353592Z Published data: {"orderId":8} 2025-12-03T17:59:28.217884685Z Published data: {"orderId":9} 2025-12-03T17:59:29.229885611Z Published data: {"orderId":10} 2025-12-03T17:59:30.242877567Z Published data: {"orderId":11} 2025-12-03T17:59:31.255062497Z Published data: {"orderId":12} 2025-12-03T17:59:32.270373602Z Published data: {"orderId":13} 2025-12-03T17:59:33.283227059Z Published data: {"orderId":14} 2025-12-03T17:59:34.297275983Z Published data: {"orderId":15} 2025-12-03T17:59:35.309770245Z Published data: {"orderId":16} 2025-12-03T17:59:36.324099049Z Published data: {"orderId":17} 2025-12-03T17:59:37.337279276Z Published data: {"orderId":18} 2025-12-03T17:59:38.351045429Z Published data: {"orderId":19} 2025-12-03T17:59:39.364701033Z Published data: {"orderId":20}对
order-processor服务执行类似的步骤。Connecting to stream... 2025-12-03T17:59:54.59128 Connecting to the container 'orders'... 2025-12-03T17:59:54.62517 Successfully Connected to container: 'orders' [Revision: 'ca-orders-h4ij5kl6mn7op--azd-1010101010', Replica: 'ca-orders-h4ij5kl6mn7op--azd-1010101010-8qr9st0uv1-wx2yz'] 2025-12-03T17:59:20.121003257Z Subscriber received: {"orderId":1} 2025-12-03T17:59:21.134397375Z Subscriber received: {"orderId":2} 2025-12-03T17:59:22.145897352Z Subscriber received: {"orderId":3} 2025-12-03T17:59:23.159802356Z Subscriber received: {"orderId":4} 2025-12-03T17:59:24.173394595Z Subscriber received: {"orderId":5} 2025-12-03T17:59:25.188890235Z Subscriber received: {"orderId":6} 2025-12-03T17:59:26.200088846Z Subscriber received: {"orderId":7} 2025-12-03T17:59:27.212526588Z Subscriber received: {"orderId":8} 2025-12-03T17:59:28.236604126Z Subscriber received: {"orderId":9} 2025-12-03T17:59:29.242356323Z Subscriber received: {"orderId":10} 2025-12-03T17:59:30.253994680Z Subscriber received: {"orderId":11} 2025-12-03T17:59:31.267712900Z Subscriber received: {"orderId":12} 2025-12-03T17:59:32.282449416Z Subscriber received: {"orderId":13} 2025-12-03T17:59:33.296803973Z Subscriber received: {"orderId":14} 2025-12-03T17:59:34.308987729Z Subscriber received: {"orderId":15} 2025-12-03T17:59:35.321011193Z Subscriber received: {"orderId":16} 2025-12-03T17:59:36.336338712Z Subscriber received: {"orderId":17} 2025-12-03T17:59:37.347838169Z Subscriber received: {"orderId":18} 2025-12-03T17:59:38.370022121Z Subscriber received: {"orderId":19} 2025-12-03T17:59:39.377157717Z Subscriber received: {"orderId":20}

了解 azd up,请参阅相关技术文档以获取详细信息
azd up命令成功运行时:
- Azure 开发人员 CLI 会在指定的 Azure 订阅中的 示例项目 ./infra 目录中 创建引用的 Azure 资源。 可以在 Azure 门户中找到这些 Azure 资源。
- 应用程序已部署到 Container Apps。 在 Azure 门户中,可以访问功能齐全的应用。
在本地运行 Python 应用程序
将应用程序部署到容器应用之前,请执行以下部分中的步骤,使用 Dapr 和 Azure 服务总线在本地运行 order-processor 和服务 checkout 。
准备项目
将示例应用程序克隆到本地计算机。
git clone https://github.com/Azure-Samples/pubsub-dapr-python-servicebus.git转到示例根目录。
cd pubsub-dapr-python-servicebus
使用 Dapr CLI 运行应用程序
执行以下步骤来运行 order-processor 订阅服务器服务和 checkout 发布者服务。
从示例根目录转到 订单处理器 目录。
cd order-processor安装依赖项。
pip3 install -r requirements.txt运行
order-processor服务。
在新终端窗口中,转到示例根目录,然后转到 签出 目录。
cd checkout安装依赖项。
pip3 install -r requirements.txt运行
checkout服务。
预期输出
在 checkout 终端中 checkout ,服务发布 19 条消息,然后暂时暂停。
== APP == INFO:root:Published data: {"orderId": 1}
== APP == INFO:root:Published data: {"orderId": 2}
== APP == INFO:root:Published data: {"orderId": 3}
== APP == INFO:root:Published data: {"orderId": 4}
== APP == INFO:root:Published data: {"orderId": 5}
== APP == INFO:root:Published data: {"orderId": 6}
== APP == INFO:root:Published data: {"orderId": 7}
== APP == INFO:root:Published data: {"orderId": 8}
== APP == INFO:root:Published data: {"orderId": 9}
== APP == INFO:root:Published data: {"orderId": 10}
== APP == INFO:root:Published data: {"orderId": 11}
== APP == INFO:root:Published data: {"orderId": 12}
== APP == INFO:root:Published data: {"orderId": 13}
== APP == INFO:root:Published data: {"orderId": 14}
== APP == INFO:root:Published data: {"orderId": 15}
== APP == INFO:root:Published data: {"orderId": 16}
== APP == INFO:root:Published data: {"orderId": 17}
== APP == INFO:root:Published data: {"orderId": 18}
== APP == INFO:root:Published data: {"orderId": 19}
在 order-processor 终端中, order-processor 服务接收 19 条消息。
== APP == Subscriber received : 1
== APP == 127.0.0.1 - - [03/Dec/2025 15:37:28] "POST /orders HTTP/1.1" 200 -
== APP == Subscriber received : 2
== APP == 127.0.0.1 - - [03/Dec/2025 15:37:29] "POST /orders HTTP/1.1" 200 -
== APP == Subscriber received : 3
== APP == 127.0.0.1 - - [03/Dec/2025 15:37:30] "POST /orders HTTP/1.1" 200 -
== APP == Subscriber received : 4
== APP == 127.0.0.1 - - [03/Dec/2025 15:37:31] "POST /orders HTTP/1.1" 200 -
== APP == Subscriber received : 5
== APP == 127.0.0.1 - - [03/Dec/2025 15:37:32] "POST /orders HTTP/1.1" 200 -
== APP == Subscriber received : 6
== APP == 127.0.0.1 - - [03/Dec/2025 15:37:33] "POST /orders HTTP/1.1" 200 -
== APP == Subscriber received : 7
== APP == 127.0.0.1 - - [03/Dec/2025 15:37:34] "POST /orders HTTP/1.1" 200 -
== APP == Subscriber received : 8
== APP == 127.0.0.1 - - [03/Dec/2025 15:37:35] "POST /orders HTTP/1.1" 200 -
== APP == Subscriber received : 9
== APP == 127.0.0.1 - - [03/Dec/2025 15:37:36] "POST /orders HTTP/1.1" 200 -
== APP == Subscriber received : 10
== APP == 127.0.0.1 - - [03/Dec/2025 15:37:37] "POST /orders HTTP/1.1" 200 -
== APP == Subscriber received : 11
== APP == 127.0.0.1 - - [03/Dec/2025 15:37:38] "POST /orders HTTP/1.1" 200 -
== APP == Subscriber received : 12
== APP == 127.0.0.1 - - [03/Dec/2025 15:37:39] "POST /orders HTTP/1.1" 200 -
== APP == Subscriber received : 13
== APP == 127.0.0.1 - - [03/Dec/2025 15:37:40] "POST /orders HTTP/1.1" 200 -
== APP == Subscriber received : 14
== APP == 127.0.0.1 - - [03/Dec/2025 15:37:41] "POST /orders HTTP/1.1" 200 -
== APP == Subscriber received : 15
== APP == 127.0.0.1 - - [03/Dec/2025 15:37:42] "POST /orders HTTP/1.1" 200 -
== APP == Subscriber received : 16
== APP == 127.0.0.1 - - [03/Dec/2025 15:37:43] "POST /orders HTTP/1.1" 200 -
== APP == Subscriber received : 17
== APP == 127.0.0.1 - - [03/Dec/2025 15:37:44] "POST /orders HTTP/1.1" 200 -
== APP == Subscriber received : 18
== APP == 127.0.0.1 - - [03/Dec/2025 15:37:45] "POST /orders HTTP/1.1" 200 -
== APP == Subscriber received : 19
== APP == 127.0.0.1 - - [03/Dec/2025 15:37:46] "POST /orders HTTP/1.1" 200 -
停止应用程序
若要停止应用程序,请打开单独的终端并运行以下命令:
dapr stop --app-id checkout
dapr stop --app-id order-processor
使用 Azure 开发人员 CLI 部署应用程序模板
若要使用 azd 命令将应用程序部署到容器应用,请执行以下步骤。
准备项目
在新终端窗口中,转到 示例 根目录。
cd pubsub-dapr-python-servicebus
使用 Azure 开发人员 CLI 创建和部署
运行
azd init以初始化项目。azd init在终端中出现提示时,输入唯一的环境名称。 该命令将此名称用作创建用于保存所有 Azure 资源的资源组的前缀。
运行
azd up以准备基础结构,并在单个命令中将应用程序部署到容器应用。azd up在终端中出现提示时,输入以下参数的值:
参数 说明 Azure 订阅 您资源的 Azure 订阅 Azure 位置 Azure 资源的位置 此过程可能需要一些时间才能完成。
azd up运行命令时,输出会显示两个可用于监视部署进度的 Azure 门户链接。 输出还演示了如何运行azd up:- 使用 ./infra 目录中的 Bicep 文件通过
azd provision创建和配置所有必要的 Azure 资源。 在 Azure 开发人员 CLI 部署这些资源后,可以使用 Azure 门户访问它们。 用于配置 Azure 资源的文件包括:- main.parameters.json。
- main.bicep.
- 按功能组织的 应用 资源目录。
- 包含模板使用的 Bicep 模块的核心引用库。
- 使用
azd deploy部署代码。
- 使用 ./infra 目录中的 Bicep 文件通过
预期输出
该 azd init 命令显示类似于以下行的输出:
Initializing an app to run on Azure (azd init)

? Enter a unique environment name: [? for help] <environment-name>

? Enter a unique environment name: <environment-name>

SUCCESS: Initialized environment <environment-name>.
该 azd up 命令显示类似于以下行的输出:
? Select an Azure Subscription to use:  3. <subscription-name> (aaaa0a0a-bb1b-cc2c-dd3d-eeeeee4e4e4e)
? Enter a value for the 'location' infrastructure parameter: 51. (US) China East 2 (chinaeast2)

Packaging services (azd package)

  (✓) Done: Packaging service checkout
  - Container: pubsub-dapr-python-servicebus-aca/checkout-<environment-name>:azd-deploy-1764794878

  (✓) Done: Packaging service orders
  - Container: pubsub-dapr-python-servicebus-aca/orders-<environment-name>:azd-deploy-1764794880

Provisioning Azure resources (azd provision)
Provisioning Azure resources can take some time.

Subscription: <subscription-name> (aaaa0a0a-bb1b-cc2c-dd3d-eeeeee4e4e4e)
Location: China East 2

  You can view detailed progress in the Azure Portal:
  https://portal.azure.cn/#view/HubsExtension/DeploymentDetailsBlade/~/overview/id/%2Fsubscriptions%2Faaaa0a0a-bb1b-cc2c-dd3d-eeeeee4e4e4e%2Fproviders%2FMicrosoft.Resources%2Fdeployments%2F<environment-name>-1764794886

  (✓) Done: Resource group: rg-<environment-name> (2.444s)
  (✓) Done: Service Bus Namespace: sb-a1bc2de3fh4ij (19.857s)
  (✓) Done: Log Analytics workspace: log-a1bc2de3fh4ij (21.144s)
  (✓) Done: Application Insights: appi-a1bc2de3fh4ij (1.154s)
  (✓) Done: Portal dashboard: dash-a1bc2de3fh4ij (573ms)
  (✓) Done: Container Registry: cra1bc2de3fh4ij (19.595s)
  (✓) Done: Container Apps Environment: cae-a1bc2de3fh4ij (1m26.226s)
  (✓) Done: Container App: ca-orders-a1bc2de3fh4ij (27.124s)
  (✓) Done: Container App: ca-checkout-a1bc2de3fh4ij (28.109s)

Deploying services (azd deploy)

  (✓) Done: Deploying service checkout

  (✓) Done: Deploying service orders
  - Endpoint: https://ca-orders-a1bc2de3fh4ij.icytree-c2de3fh4.chinaeast2.azurecontainerapps.io/

SUCCESS: Your up workflow to provision and deploy to Azure completed in 5 minutes.
确认部署是否成功
执行以下步骤,验证 checkout 服务是否正在将消息发布到服务总线主题,并且 order-processor 服务正在接收消息。
在终端输出中复制
checkout容器应用名称。登录到 Azure 门户,然后按名称搜索容器应用资源。
在“容器应用 概述 ”页上,选择“ 监视>日志流”。
在 “日志流 ”页上的 “容器”旁边,选择 “签出”。
确认
checkout容器记录的输出是否与前面在终端中显示的输出相同。Connecting to stream... 2025-12-03T20:56:10.89517 Connecting to the container 'checkout'... 2025-12-03T20:56:10.92655 Successfully Connected to container: 'checkout' [Revision: 'ca-checkout-a1bc2de3fh4ij--azd-1010101010', Replica: 'ca-checkout-a1bc2de3fh4ij--azd-1010101010-e3fh4ij5kl-6mn7o'] 2025-12-03T20:55:54.971898941Z INFO:root:Published data: {"orderId": 1} 2025-12-03T20:55:55.985395409Z INFO:root:Published data: {"orderId": 2} 2025-12-03T20:55:57.002043502Z INFO:root:Published data: {"orderId": 3} 2025-12-03T20:55:58.017690382Z INFO:root:Published data: {"orderId": 4} 2025-12-03T20:55:59.032269801Z INFO:root:Published data: {"orderId": 5} 2025-12-03T20:56:00.045075250Z INFO:root:Published data: {"orderId": 6} 2025-12-03T20:56:01.058436708Z INFO:root:Published data: {"orderId": 7} 2025-12-03T20:56:02.073213603Z INFO:root:Published data: {"orderId": 8} 2025-12-03T20:56:03.088542130Z INFO:root:Published data: {"orderId": 9} 2025-12-03T20:56:04.102553097Z INFO:root:Published data: {"orderId": 10} 2025-12-03T20:56:05.116147371Z INFO:root:Published data: {"orderId": 11} 2025-12-03T20:56:06.131053744Z INFO:root:Published data: {"orderId": 12} 2025-12-03T20:56:07.144493474Z INFO:root:Published data: {"orderId": 13} 2025-12-03T20:56:08.158381479Z INFO:root:Published data: {"orderId": 14} 2025-12-03T20:56:09.175048175Z INFO:root:Published data: {"orderId": 15} 2025-12-03T20:56:10.188971144Z INFO:root:Published data: {"orderId": 16} 2025-12-03T20:56:11.202891285Z INFO:root:Published data: {"orderId": 17} 2025-12-03T20:56:12.217084672Z INFO:root:Published data: {"orderId": 18} 2025-12-03T20:56:13.229771418Z INFO:root:Published data: {"orderId": 19}对
order-processor服务执行类似的步骤。Connecting to stream... 2025-12-03T20:56:18.74960 Connecting to the container 'orders'... 2025-12-03T20:56:18.76913 Successfully Connected to container: 'orders' [Revision: 'ca-orders-h4ij5kl6mn7op--azd-1010101010', Replica: 'ca-orders-h4ij5kl6mn7op--azd-1010101010-8qr9st0uv1-wx2yz'] 2025-12-03T20:56:24.260129668Z Subscriber received : 1 2025-12-03T20:56:24.260504460Z 127.0.0.1 - - [03/Dec/2025 20:56:24] "POST /orders HTTP/1.1" 200 - 2025-12-03T20:56:25.286774893Z Subscriber received : 2 2025-12-03T20:56:25.287837138Z 127.0.0.1 - - [03/Dec/2025 20:56:25] "POST /orders HTTP/1.1" 200 - 2025-12-03T20:56:26.302102842Z Subscriber received : 3 2025-12-03T20:56:26.302508442Z 127.0.0.1 - - [03/Dec/2025 20:56:26] "POST /orders HTTP/1.1" 200 - 2025-12-03T20:56:27.316271178Z Subscriber received : 4 2025-12-03T20:56:27.317288756Z 127.0.0.1 - - [03/Dec/2025 20:56:27] "POST /orders HTTP/1.1" 200 - 2025-12-03T20:56:28.329865261Z Subscriber received : 5 2025-12-03T20:56:28.330863461Z 127.0.0.1 - - [03/Dec/2025 20:56:28] "POST /orders HTTP/1.1" 200 - 2025-12-03T20:56:29.342843607Z Subscriber received : 6 2025-12-03T20:56:29.343687271Z 127.0.0.1 - - [03/Dec/2025 20:56:29] "POST /orders HTTP/1.1" 200 - 2025-12-03T20:56:30.357753094Z Subscriber received : 7 2025-12-03T20:56:30.358124513Z 127.0.0.1 - - [03/Dec/2025 20:56:30] "POST /orders HTTP/1.1" 200 - 2025-12-03T20:56:31.380741546Z Subscriber received : 8 2025-12-03T20:56:31.381553667Z 127.0.0.1 - - [03/Dec/2025 20:56:31] "POST /orders HTTP/1.1" 200 - 2025-12-03T20:56:32.391023392Z Subscriber received : 9 2025-12-03T20:56:32.391420895Z 127.0.0.1 - - [03/Dec/2025 20:56:32] "POST /orders HTTP/1.1" 200 - 2025-12-03T20:56:33.405031572Z Subscriber received : 10 2025-12-03T20:56:33.405412361Z 127.0.0.1 - - [03/Dec/2025 20:56:33] "POST /orders HTTP/1.1" 200 - 2025-12-03T20:56:34.420146848Z Subscriber received : 11 2025-12-03T20:56:34.420589649Z 127.0.0.1 - - [03/Dec/2025 20:56:34] "POST /orders HTTP/1.1" 200 - 2025-12-03T20:56:35.432973524Z Subscriber received : 12 2025-12-03T20:56:35.434080392Z 127.0.0.1 - - [03/Dec/2025 20:56:35] "POST /orders HTTP/1.1" 200 - 2025-12-03T20:56:36.451629817Z Subscriber received : 13 2025-12-03T20:56:36.452061763Z 127.0.0.1 - - [03/Dec/2025 20:56:36] "POST /orders HTTP/1.1" 200 - 2025-12-03T20:56:37.467384128Z Subscriber received : 14 2025-12-03T20:56:37.467686070Z 127.0.0.1 - - [03/Dec/2025 20:56:37] "POST /orders HTTP/1.1" 200 - 2025-12-03T20:56:38.480558316Z Subscriber received : 15 2025-12-03T20:56:38.481147786Z 127.0.0.1 - - [03/Dec/2025 20:56:38] "POST /orders HTTP/1.1" 200 - 2025-12-03T20:56:39.493898658Z Subscriber received : 16 2025-12-03T20:56:39.494203912Z 127.0.0.1 - - [03/Dec/2025 20:56:39] "POST /orders HTTP/1.1" 200 - 2025-12-03T20:56:40.508312320Z Subscriber received : 17 2025-12-03T20:56:40.508685327Z 127.0.0.1 - - [03/Dec/2025 20:56:40] "POST /orders HTTP/1.1" 200 - 2025-12-03T20:56:41.534284222Z Subscriber received : 18 2025-12-03T20:56:41.534598586Z 127.0.0.1 - - [03/Dec/2025 20:56:41] "POST /orders HTTP/1.1" 200 - 2025-12-03T20:56:42.559478561Z Subscriber received : 19 2025-12-03T20:56:42.559954290Z 127.0.0.1 - - [03/Dec/2025 20:56:42] "POST /orders HTTP/1.1" 200 -
了解 azd up,请参阅相关技术文档以获取详细信息
azd up命令成功运行时:
- Azure 开发人员 CLI 会在指定的 Azure 订阅中的 示例项目 ./infra 目录中 创建引用的 Azure 资源。 可以在 Azure 门户中找到这些 Azure 资源。
- 应用程序已部署到 Container Apps。 在 Azure 门户中,可以访问功能齐全的应用。
在本地运行 .NET 应用程序
将应用程序部署到容器应用之前,请执行以下部分中的步骤,使用 Dapr 和 Azure 服务总线在本地运行 order-processor 和服务 checkout 。
准备项目
将示例应用程序克隆到本地计算机。
git clone https://github.com/Azure-Samples/pubsub-dapr-csharp-servicebus.git转到示例根目录。
cd pubsub-dapr-csharp-servicebus
使用 Dapr CLI 运行应用程序
执行以下步骤来运行 order-processor 订阅服务器服务和 checkout 发布者服务。
从示例根目录转到 订单处理器 目录。
cd order-processor安装依赖项。
dotnet build运行
order-processor服务。dapr run --app-id order-processor --resources-path ../components/ --app-port 7001 -- dotnet run --project .在新终端窗口中,转到示例根目录,然后转到 签出 目录。
cd checkout安装依赖项。
dotnet build运行
checkout服务。dapr run --app-id checkout --resources-path ../components/ -- dotnet run --project .
预期输出
在 checkout 终端中 checkout ,服务发布 20 条消息,然后暂时暂停。
== APP == Published data: Order { OrderId = 1 }
== APP == Published data: Order { OrderId = 2 }
== APP == Published data: Order { OrderId = 3 }
== APP == Published data: Order { OrderId = 4 }
== APP == Published data: Order { OrderId = 5 }
== APP == Published data: Order { OrderId = 6 }
== APP == Published data: Order { OrderId = 7 }
== APP == Published data: Order { OrderId = 8 }
== APP == Published data: Order { OrderId = 9 }
== APP == Published data: Order { OrderId = 10 }
== APP == Published data: Order { OrderId = 11 }
== APP == Published data: Order { OrderId = 12 }
== APP == Published data: Order { OrderId = 13 }
== APP == Published data: Order { OrderId = 14 }
== APP == Published data: Order { OrderId = 15 }
== APP == Published data: Order { OrderId = 16 }
== APP == Published data: Order { OrderId = 17 }
== APP == Published data: Order { OrderId = 18 }
== APP == Published data: Order { OrderId = 19 }
== APP == Published data: Order { OrderId = 20 }
order-processor 终端中的 order-processor 服务接收 20 条消息。
== APP == Subscriber received : Order { OrderId = 1 }
== APP == Subscriber received : Order { OrderId = 2 }
== APP == Subscriber received : Order { OrderId = 3 }
== APP == Subscriber received : Order { OrderId = 4 }
== APP == Subscriber received : Order { OrderId = 5 }
== APP == Subscriber received : Order { OrderId = 6 }
== APP == Subscriber received : Order { OrderId = 7 }
== APP == Subscriber received : Order { OrderId = 8 }
== APP == Subscriber received : Order { OrderId = 9 }
== APP == Subscriber received : Order { OrderId = 10 }
== APP == Subscriber received : Order { OrderId = 11 }
== APP == Subscriber received : Order { OrderId = 12 }
== APP == Subscriber received : Order { OrderId = 13 }
== APP == Subscriber received : Order { OrderId = 14 }
== APP == Subscriber received : Order { OrderId = 15 }
== APP == Subscriber received : Order { OrderId = 16 }
== APP == Subscriber received : Order { OrderId = 17 }
== APP == Subscriber received : Order { OrderId = 18 }
== APP == Subscriber received : Order { OrderId = 19 }
== APP == Subscriber received : Order { OrderId = 20 }
停止应用程序
若要停止应用程序,请打开单独的终端并运行以下命令:
dapr stop --app-id checkout
dapr stop --app-id order-processor
使用 Azure 开发人员 CLI 部署应用程序模板
若要使用 azd 命令将应用程序部署到容器应用,请执行以下步骤。
准备项目
在新终端窗口中,转到 示例 根目录。
cd pubsub-dapr-csharp-servicebus
使用 Azure 开发人员 CLI 创建和部署
运行
azd init以初始化项目。azd init在终端中出现提示时,输入唯一的环境名称。 该命令将此名称用作创建用于保存所有 Azure 资源的资源组的前缀。
运行
azd up以准备基础结构,并在单个命令中将应用程序部署到容器应用。azd up在终端中出现提示时,输入以下参数的值:
参数 说明 Azure 订阅 您资源的 Azure 订阅 Azure 位置 Azure 资源的位置 此过程可能需要一些时间才能完成。
azd up运行命令时,输出会显示两个可用于监视部署进度的 Azure 门户链接。 输出还演示了如何运行azd up:- 使用 ./infra 目录中的 Bicep 文件通过
azd provision创建和配置所有必要的 Azure 资源。 在 Azure 开发人员 CLI 部署这些资源后,可以使用 Azure 门户访问它们。 用于配置 Azure 资源的文件包括:- main.parameters.json。
- main.bicep.
- 按功能组织的 应用 资源目录。
- 包含模板使用的 Bicep 模块的核心引用库。
- 使用
azd deploy部署代码。
- 使用 ./infra 目录中的 Bicep 文件通过
预期输出
该 azd init 命令显示类似于以下行的输出:
Initializing an app to run on Azure (azd init)

? Enter a unique environment name: [? for help] <environment-name>

? Enter a unique environment name: <environment-name>

SUCCESS: Initialized environment <environment-name>.
该 azd up 命令显示类似于以下行的输出:
? Select an Azure Subscription to use:  3. <subscription-name> (aaaa0a0a-bb1b-cc2c-dd3d-eeeeee4e4e4e)
? Enter a value for the 'location' infrastructure parameter: 51. (US) China East 2 (chinaeast2)

Packaging services (azd package)

  (✓) Done: Packaging service checkout
  - Container: pubsub-dapr-csharp-servicebus/checkout-<environment-name>:azd-deploy-1764796559

  (✓) Done: Packaging service orders
  - Container: pubsub-dapr-csharp-servicebus/orders-<environment-name>:azd-deploy-1764796569

Provisioning Azure resources (azd provision)
Provisioning Azure resources can take some time.

Subscription: <subscription-name> (aaaa0a0a-bb1b-cc2c-dd3d-eeeeee4e4e4e)
Location: China East 2

  You can view detailed progress in the Azure Portal:
  https://portal.azure.cn/#view/HubsExtension/DeploymentDetailsBlade/~/overview/id/%2Fsubscriptions%2Faaaa0a0a-bb1b-cc2c-dd3d-eeeeee4e4e4e%2Fproviders%2FMicrosoft.Resources%2Fdeployments%2F<environment-name>-1764796579

  (✓) Done: Resource group: rg-<environment-name> (1.727s)
  (✓) Done: Service Bus Namespace: sb-a1bc2de3fh4ij (18.228s)
  (✓) Done: Log Analytics workspace: log-a1bc2de3fh4ij (23.214s)
  (✓) Done: Application Insights: appi-a1bc2de3fh4ij (1.006s)
  (✓) Done: Portal dashboard: dash-a1bc2de3fh4ij (2.077s)
  (✓) Done: Container Registry: cra1bc2de3fh4ij (18.492s)
  (✓) Done: Container Apps Environment: cae-a1bc2de3fh4ij (1m53.753s)
  (✓) Done: Container App: ca-orders-a1bc2de3fh4ij (40.053s)
  (✓) Done: Container App: ca-checkout-a1bc2de3fh4ij (29.412s)

Deploying services (azd deploy)

  (✓) Done: Deploying service checkout

  (✓) Done: Deploying service orders
  - Endpoint: https://ca-orders-a1bc2de3fh4ij.whitecoast-c2de3fh4.chinaeast2.azurecontainerapps.io/

SUCCESS: Your up workflow to provision and deploy to Azure completed in 6 minutes 15 seconds.
确认部署是否成功
执行以下步骤,验证 checkout 服务是否正在将消息发布到服务总线主题,并且 order-processor 服务正在接收消息。
复制终端输出中的
checkout容器应用名称。转到 Azure 门户并按名称搜索容器应用资源。
在容器应用仪表板中,选择“监视”“日志流”。
在 “日志流 ”页上的 “容器”旁边,选择 “签出”。
确认
checkout容器记录的输出是否与前面在终端中显示的输出相同。Connecting to stream... 2025-12-03T21:22:38.59199 Connecting to the container 'checkout'... 2025-12-03T21:22:38.61294 Successfully Connected to container: 'checkout' [Revision: 'ca-checkout-a1bc2de3fh4ij--azd-1010101010', Replica: 'ca-checkout-a1bc2de3fh4ij--azd-1010101010-e3fh4ij5kl-6mn7o'] 2025-12-03T21:22:25.764173919Z Published data: Order { OrderId = 1 } 2025-12-03T21:22:26.775186594Z Published data: Order { OrderId = 2 } 2025-12-03T21:22:27.785402134Z Published data: Order { OrderId = 3 } 2025-12-03T21:22:28.795885226Z Published data: Order { OrderId = 4 } 2025-12-03T21:22:29.818661172Z Published data: Order { OrderId = 5 } 2025-12-03T21:22:30.833916028Z Published data: Order { OrderId = 6 } 2025-12-03T21:22:31.847722919Z Published data: Order { OrderId = 7 } 2025-12-03T21:22:32.858583147Z Published data: Order { OrderId = 8 } 2025-12-03T21:22:33.868997259Z Published data: Order { OrderId = 9 } 2025-12-03T21:22:34.879750628Z Published data: Order { OrderId = 10 } 2025-12-03T21:22:35.889718195Z Published data: Order { OrderId = 11 } 2025-12-03T21:22:36.905244880Z Published data: Order { OrderId = 12 } 2025-12-03T21:22:37.915565325Z Published data: Order { OrderId = 13 } 2025-12-03T21:22:38.926142458Z Published data: Order { OrderId = 14 } 2025-12-03T21:22:39.937747578Z Published data: Order { OrderId = 15 } 2025-12-03T21:22:40.952842205Z Published data: Order { OrderId = 16 } 2025-12-03T21:22:41.964924464Z Published data: Order { OrderId = 17 } 2025-12-03T21:22:42.974247022Z Published data: Order { OrderId = 18 } 2025-12-03T21:22:43.988211319Z Published data: Order { OrderId = 19 } 2025-12-03T21:22:44.997345767Z Published data: Order { OrderId = 20 }对
order-processor服务执行相同的操作。Connecting to stream... 2025-12-03T21:23:11.36616 Connecting to the container 'orders'... 2025-12-03T21:23:11.38606 Successfully Connected to container: 'orders' [Revision: 'ca-orders-h4ij5kl6mn7op--azd-1010101010', Replica: 'ca-orders-h4ij5kl6mn7op--azd-1010101010-8qr9st0uv1-wx2yz'] 2025-12-03T21:22:56.016634660Z Subscriber received : Order { OrderId = 1 } 2025-12-03T21:22:57.092104858Z Subscriber received : Order { OrderId = 2 } 2025-12-03T21:22:58.037571888Z Subscriber received : Order { OrderId = 3 } 2025-12-03T21:22:59.047149782Z Subscriber received : Order { OrderId = 4 } 2025-12-03T21:23:00.057088303Z Subscriber received : Order { OrderId = 5 } 2025-12-03T21:23:01.085777239Z Subscriber received : Order { OrderId = 6 } 2025-12-03T21:23:02.083886674Z Subscriber received : Order { OrderId = 7 } 2025-12-03T21:23:03.091921022Z Subscriber received : Order { OrderId = 8 } 2025-12-03T21:23:04.120860392Z Subscriber received : Order { OrderId = 9 } 2025-12-03T21:23:05.127930191Z Subscriber received : Order { OrderId = 10 } 2025-12-03T21:23:06.137896372Z Subscriber received : Order { OrderId = 11 } 2025-12-03T21:23:07.242953880Z Subscriber received : Order { OrderId = 12 } 2025-12-03T21:23:08.255497831Z Subscriber received : Order { OrderId = 13 } 2025-12-03T21:23:09.264101960Z Subscriber received : Order { OrderId = 14 } 2025-12-03T21:23:10.278569058Z Subscriber received : Order { OrderId = 15 } 2025-12-03T21:23:11.297722094Z Subscriber received : Order { OrderId = 16 } 2025-12-03T21:23:12.294944386Z Subscriber received : Order { OrderId = 17 } 2025-12-03T21:23:13.306328648Z Subscriber received : Order { OrderId = 18 } 2025-12-03T21:23:14.322317879Z Subscriber received : Order { OrderId = 19 } 2025-12-03T21:23:15.076995284Z Subscriber received : Order { OrderId = 20 }
了解 azd up,请参阅相关技术文档以获取详细信息
azd up命令成功运行时:
- Azure 开发人员 CLI 会在指定的 Azure 订阅中的 示例项目 ./infra 目录中 创建引用的 Azure 资源。 可以在 Azure 门户中找到这些 Azure 资源。
- 应用程序已部署到 Container Apps。 在 Azure 门户中,可以访问功能齐全的应用。
清理资源
如果不打算继续使用此应用程序,请使用以下命令删除创建的 Azure 资源:
azd down
相关内容
- 有关将应用程序部署到容器应用的详细信息,请参阅 快速入门:使用 Azure CLI 将 Dapr 应用程序部署到 Azure 容器应用。
- 有关使用令牌检查对应用的请求是否来自 Dapr 的信息,请参阅 为 Dapr 请求启用令牌身份验证。
- 有关使应用程序兼容
azd的信息,请参阅 “创建 Azure 开发人员 CLI 模板”概述。