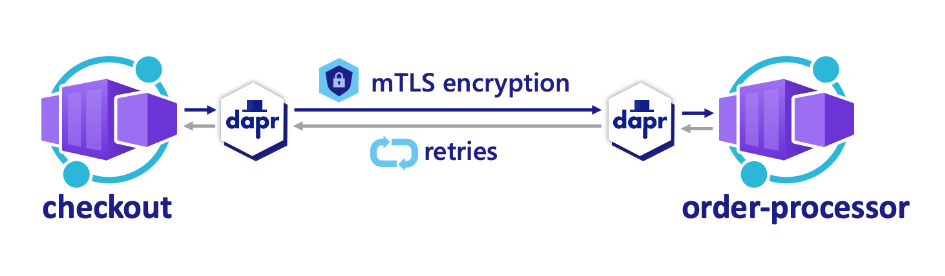
在基于微服务的应用程序中,可以使用分布式应用程序运行时(Dapr)来提高微服务之间的通信的安全性和可靠性。 为了加密传输中的数据, Dapr 服务调用 API 使用自动相互传输层安全性(mTLS)。 为了可靠性,此 API 提供复原功能,可在调用失败和暂时性错误后执行自动重试。
本教程使用包含以下组件的示例服务调用项目:
- 调用
checkout方服务,该服务在循环中使用 HTTP 代理,通过 Dapr 服务调用 API 向order-processor服务发出请求。 - 通过
order-processorDapr 服务调用 API 从checkout服务接收请求的被调用方服务
在本教程中,你将:
- 创建使用 Dapr 服务调用 API 进行通信的两个微服务。
- 在本地运行应用程序。
- 使用示例项目中提供的 Azure 开发人员 CLI 和 Bicep 文件将应用程序部署到 Azure 容器应用。
先决条件
- Azure 开发人员 CLI
- Dapr CLI, 已安装 并 初始化
- Docker Desktop
- Git
在本地运行 Node.js 应用程序
将应用程序部署到容器应用之前,请执行以下部分中的步骤,使用 Dapr 在本地运行 order-processor 和服务 checkout 。
准备项目
将示例应用程序克隆到本地计算机。
git clone https://github.com/Azure-Samples/svc-invoke-dapr-nodejs.git转到示例根目录。
cd svc-invoke-dapr-nodejs
使用 Dapr CLI 运行应用程序
执行以下步骤运行 order-processor 服务和 checkout 服务。
从示例根目录转到 订单处理器 目录。
cd order-processor安装依赖项。
npm install运行
order-processor服务。dapr run --app-port 5001 --app-id order-processor --app-protocol http --dapr-http-port 3501 -- npm start在新终端窗口中,转到示例根目录,然后转到 签出 目录。
cd checkout安装依赖项。
npm install运行
checkout服务。dapr run --app-id checkout --app-protocol http --dapr-http-port 3500 -- npm start
预期输出
在 checkout 终端中,checkout 服务向 order-processor 服务发送 20 个订单的信息,然后暂时暂停。
== APP == Order passed: {"orderId":1}
== APP == Order passed: {"orderId":2}
== APP == Order passed: {"orderId":3}
== APP == Order passed: {"orderId":4}
== APP == Order passed: {"orderId":5}
== APP == Order passed: {"orderId":6}
== APP == Order passed: {"orderId":7}
== APP == Order passed: {"orderId":8}
== APP == Order passed: {"orderId":9}
== APP == Order passed: {"orderId":10}
== APP == Order passed: {"orderId":11}
== APP == Order passed: {"orderId":12}
== APP == Order passed: {"orderId":13}
== APP == Order passed: {"orderId":14}
== APP == Order passed: {"orderId":15}
== APP == Order passed: {"orderId":16}
== APP == Order passed: {"orderId":17}
== APP == Order passed: {"orderId":18}
== APP == Order passed: {"orderId":19}
== APP == Order passed: {"orderId":20}
在 order-processor 终端中,服务 order-processor 接收有关 20 个订单的信息,然后暂时暂停。
== APP == Order received: { orderId: 1 }
== APP == Order received: { orderId: 2 }
== APP == Order received: { orderId: 3 }
== APP == Order received: { orderId: 4 }
== APP == Order received: { orderId: 5 }
== APP == Order received: { orderId: 6 }
== APP == Order received: { orderId: 7 }
== APP == Order received: { orderId: 8 }
== APP == Order received: { orderId: 9 }
== APP == Order received: { orderId: 10 }
== APP == Order received: { orderId: 11 }
== APP == Order received: { orderId: 12 }
== APP == Order received: { orderId: 13 }
== APP == Order received: { orderId: 14 }
== APP == Order received: { orderId: 15 }
== APP == Order received: { orderId: 16 }
== APP == Order received: { orderId: 17 }
== APP == Order received: { orderId: 18 }
== APP == Order received: { orderId: 19 }
== APP == Order received: { orderId: 20 }
停止应用程序
在两个终端中选择 Cmd/Ctrl+C 以停止服务到服务调用。
使用 Azure 开发人员 CLI 部署应用程序模板
若要使用 azd 命令将应用程序部署到容器应用,请执行以下步骤。
准备项目
在新终端窗口中,转到 示例 根目录。
cd svc-invoke-dapr-nodejs
使用 Azure 开发人员 CLI 创建和部署
运行
azd init以初始化项目。azd init在终端中出现提示时,输入唯一的环境名称。 该命令将此名称用作创建用于保存所有 Azure 资源的资源组的前缀。
运行
azd up以准备基础结构,并在单个命令中将应用程序部署到容器应用。azd up当终端中出现提示时,请提供以下参数。
参数 说明 Azure 位置 Azure 资源的位置 Azure 订阅 您资源的 Azure 订阅 此过程可能需要一些时间来完成。
azd up运行命令时,输出会显示两个可用于监视部署进度的 Azure 门户链接。 输出还演示了如何使用azd up:- 使用 ./infra 目录中的 Bicep 文件通过
azd provision创建和配置所有必要的 Azure 资源。 在 Azure 开发人员 CLI 部署这些资源后,可以使用 Azure 门户访问它们。 用于配置 Azure 资源的文件包括:- main.parameters.json。
- main.bicep.
- 按功能组织的 应用 资源目录。
- 包含模板使用的 Bicep 模块的核心引用库。
- 使用
azd deploy来部署代码。
如果此步骤导致 错误 BCP420,请转到克隆的存储库,打开 svc-invoke-dapr-nodejs/infra/core/host/container-apps.bicep 文件,并将第 28 行替换为以下行:
scope: resourceGroup(!empty(containerRegistryResourceGroupName) ? containerRegistryResourceGroupName : resourceGroup().name)- 使用 ./infra 目录中的 Bicep 文件通过
预期输出
该 azd init 命令显示类似于以下行的输出:
Initializing an app to run on Azure (azd init)

? Enter a unique environment name: [? for help] <environment-name>

? Enter a unique environment name: <environment-name>

SUCCESS: Initialized environment <environment-name>.
该 azd up 命令显示类似于以下行的输出:
? Select an Azure Subscription to use:  3. <subscription-name> (aaaa0a0a-bb1b-cc2c-dd3d-eeeeee4e4e4e)
? Enter a value for the 'location' infrastructure parameter: 51. (US) China East 2  (chinaeast2)

Packaging services (azd package)

  (✓) Done: Packaging service api
  - Container: service-invoke-dapr-node-aca/api-<environment-name>:azd-deploy-1765226976

  (✓) Done: Packaging service worker
  - Container: service-invoke-dapr-node-aca/worker-<environment-name>:azd-deploy-1765226992

Provisioning Azure resources (azd provision)
Provisioning Azure resources can take some time.

Subscription: <subscription-name> (aaaa0a0a-bb1b-cc2c-dd3d-eeeeee4e4e4e)
Location: China East 2

  You can view detailed progress in the Azure portal:
  https://portal.azure.cn/#view/HubsExtension/DeploymentDetailsBlade/~/overview/id/%2Fsubscriptions%2Faaaa0a0a-bb1b-cc2c-dd3d-eeeeee4e4e4e%2Fproviders%2FMicrosoft.Resources%2Fdeployments%2F<environment-name>-1765226998

  (✓) Done: Resource group: rg-<environment-name> (2.341s)
  (✓) Done: Log Analytics workspace: log-a1bc2de3fh4ij (25.882s)
  (✓) Done: Application Insights: appi-a1bc2de3fh4ij (1.314s)
  (✓) Done: Portal dashboard: dash-a1bc2de3fh4ij (1.833s)
  (✓) Done: Container Registry: cra1bc2de3fh4ij (17.672s)
  (✓) Done: Container Apps Environment: cae-a1bc2de3fh4ij (1m53.997s)
  (✓) Done: Container App: ca-checkout-a1bc2de3fh4ij (27.995s)
  (✓) Done: Container App: ca-order-processor-a1bc2de3fh4ij (22.651s)

Deploying services (azd deploy)

  (✓) Done: Deploying service api
  - Endpoint: https://ca-order-processor-a1bc2de3fh4ij.wittymeadow-c2de3fh4.chinaeast2.azurecontainerapps.io/

  (✓) Done: Deploying service worker
  - Endpoint: https://ca-checkout-a1bc2de3fh4ij.wittymeadow-c2de3fh4.chinaeast2.azurecontainerapps.io/

SUCCESS: Your up workflow to provision and deploy to Azure completed in 5 minutes 31 seconds.
确认部署是否成功
若要验证 checkout 服务是否将订单传递给 order-processor 服务,请执行以下步骤。
在终端输出中复制
checkout容器应用名称。登录到 Azure 门户,然后按名称搜索容器应用资源。
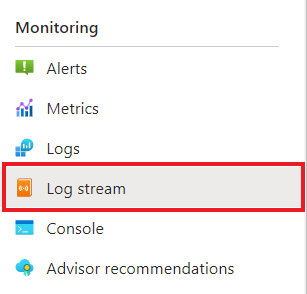
在“容器应用 概述 ”页上,选择“ 监视>日志流”。
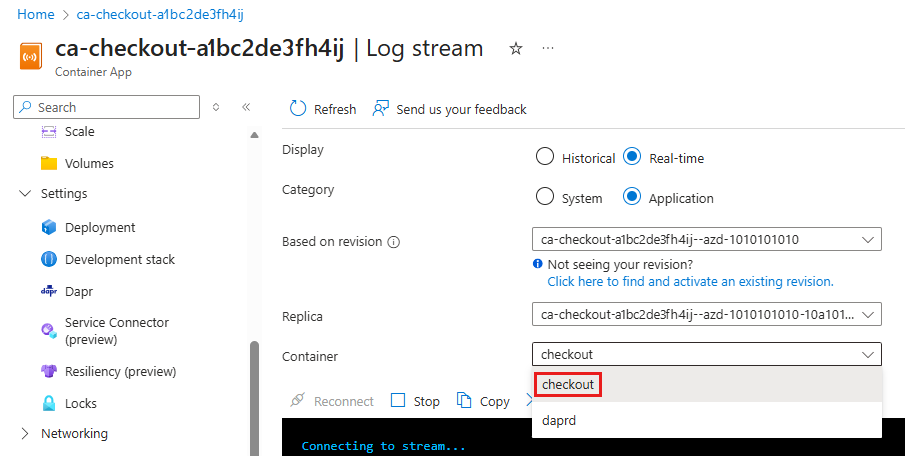
在 “日志流 ”页上的 “容器”旁边,选择 “签出”。
确认
checkout容器记录的输出是否与前面在终端中显示的输出相同。Connecting to stream... 2025-12-09T14:04:33.45953 Connecting to the container 'checkout'... 2025-12-09T14:04:33.53740 Successfully Connected to container: 'checkout' [Revision: 'ca-checkout-a1bc2de3fh4ij--azd-1010101010', Replica: 'ca-checkout-a1bc2de3fh4ij--azd-1010101010-e3fh4ij5kl-6mn7o'] 2025-12-09T14:04:24.125429697Z Order passed: {"orderId":1} 2025-12-09T14:04:25.132356280Z Order passed: {"orderId":2} 2025-12-09T14:04:26.138280828Z Order passed: {"orderId":3} 2025-12-09T14:04:27.143795525Z Order passed: {"orderId":4} 2025-12-09T14:04:28.149049451Z Order passed: {"orderId":5} 2025-12-09T14:04:29.155266540Z Order passed: {"orderId":6} 2025-12-09T14:04:30.160579732Z Order passed: {"orderId":7} 2025-12-09T14:04:31.165857030Z Order passed: {"orderId":8} 2025-12-09T14:04:32.171575903Z Order passed: {"orderId":9} 2025-12-09T14:04:33.176673433Z Order passed: {"orderId":10} 2025-12-09T14:04:34.183728937Z Order passed: {"orderId":11} 2025-12-09T14:04:35.191018777Z Order passed: {"orderId":12} 2025-12-09T14:04:36.196886189Z Order passed: {"orderId":13} 2025-12-09T14:04:37.203280592Z Order passed: {"orderId":14} 2025-12-09T14:04:38.209860731Z Order passed: {"orderId":15} 2025-12-09T14:04:39.230493897Z Order passed: {"orderId":16} 2025-12-09T14:04:40.236164211Z Order passed: {"orderId":17} 2025-12-09T14:04:41.242369482Z Order passed: {"orderId":18} 2025-12-09T14:04:42.249403792Z Order passed: {"orderId":19} 2025-12-09T14:04:43.255729366Z Order passed: {"orderId":20}对
order-processor服务执行类似的步骤。Connecting to stream... 2025-12-09T14:04:40.56424 Connecting to the container 'order-processor'... 2025-12-09T14:04:40.58332 Successfully Connected to container: 'order-processor' [Revision: 'ca-order-processor-a1bc2de3fh4ij--azd-1010101010', Replica: 'ca-order-processor-a1bc2de3fh4ij--azd-1010101010-8qr9st0uv1wx2y'] 2025-12-09T14:04:24.116375837Z Order received: { orderId: 1 } 2025-12-09T14:04:25.128718200Z Order received: { orderId: 2 } 2025-12-09T14:04:26.134766577Z Order received: { orderId: 3 } 2025-12-09T14:04:27.140414040Z Order received: { orderId: 4 } 2025-12-09T14:04:28.145763273Z Order received: { orderId: 5 } 2025-12-09T14:04:29.152026156Z Order received: { orderId: 6 } 2025-12-09T14:04:30.157316984Z Order received: { orderId: 7 } 2025-12-09T14:04:31.162593847Z Order received: { orderId: 8 } 2025-12-09T14:04:32.168252075Z Order received: { orderId: 9 } 2025-12-09T14:04:33.173389844Z Order received: { orderId: 10 } 2025-12-09T14:04:34.178499336Z Order received: { orderId: 11 } 2025-12-09T14:04:35.186679161Z Order received: { orderId: 12 } 2025-12-09T14:04:36.193541819Z Order received: { orderId: 13 } 2025-12-09T14:04:37.200040677Z Order received: { orderId: 14 } 2025-12-09T14:04:38.206379653Z Order received: { orderId: 15 } 2025-12-09T14:04:39.227185042Z Order received: { orderId: 16 } 2025-12-09T14:04:40.232518266Z Order received: { orderId: 17 } 2025-12-09T14:04:41.239199248Z Order received: { orderId: 18 } 2025-12-09T14:04:42.245578021Z Order received: { orderId: 19 } 2025-12-09T14:04:43.252568045Z Order received: { orderId: 20 }

了解 azd up,请参阅相关技术文档以获取详细信息
azd up命令成功运行时:
- Azure 开发人员 CLI 会在指定的 Azure 订阅中的 示例项目 ./infra 目录中 创建引用的 Azure 资源。 可以在 Azure 门户中找到这些 Azure 资源。
- 应用程序已部署到 Container Apps。 在 Azure 门户中,可以访问功能齐全的应用。
在本地运行 Python 应用程序
将应用程序部署到容器应用之前,请执行以下部分中的步骤,使用 Dapr 在本地运行 order-processor 和服务 checkout 。
准备项目
将示例应用程序克隆到本地计算机。
git clone https://github.com/Azure-Samples/svc-invoke-dapr-python.git转到示例根目录。
cd svc-invoke-dapr-python
使用 Dapr CLI 运行应用程序
执行以下步骤运行 order-processor 服务和 checkout 服务。
从示例根目录转到 订单处理器 目录。
cd order-processor安装依赖项。
pip3 install -r requirements.txt运行
order-processor服务。dapr run --app-port 8001 --app-id order-processor --app-protocol http --dapr-http-port 3501 -- python app.py
在新终端窗口中,转到示例根目录,然后转到 签出 目录。
cd checkout安装依赖项。
pip3 install -r requirements.txt运行
checkout服务。dapr run --app-id checkout --app-protocol http --dapr-http-port 3500 -- python app.py
预期输出
在 checkout 终端,checkout 服务向 order-processor 服务发送有关 19 个订单的信息,然后暂时暂停。
== APP == Order passed: {"orderId": 1}
== APP == Order passed: {"orderId": 2}
== APP == Order passed: {"orderId": 3}
== APP == Order passed: {"orderId": 4}
== APP == Order passed: {"orderId": 5}
== APP == Order passed: {"orderId": 6}
== APP == Order passed: {"orderId": 7}
== APP == Order passed: {"orderId": 8}
== APP == Order passed: {"orderId": 9}
== APP == Order passed: {"orderId": 10}
== APP == Order passed: {"orderId": 11}
== APP == Order passed: {"orderId": 12}
== APP == Order passed: {"orderId": 13}
== APP == Order passed: {"orderId": 14}
== APP == Order passed: {"orderId": 15}
== APP == Order passed: {"orderId": 16}
== APP == Order passed: {"orderId": 17}
== APP == Order passed: {"orderId": 18}
== APP == Order passed: {"orderId": 19}
在 order-processor 终端中,服务 order-processor 接收有关 19 个订单的信息,然后暂时暂停。
== APP == Order received : {"orderId": 1}
== APP == 127.0.0.1 - - [08/Dec/2025 16:42:08] "POST /orders HTTP/1.1" 200 -
== APP == Order received : {"orderId": 2}
== APP == 127.0.0.1 - - [08/Dec/2025 16:42:09] "POST /orders HTTP/1.1" 200 -
== APP == Order received : {"orderId": 3}
== APP == 127.0.0.1 - - [08/Dec/2025 16:42:10] "POST /orders HTTP/1.1" 200 -
== APP == Order received : {"orderId": 4}
== APP == 127.0.0.1 - - [08/Dec/2025 16:42:11] "POST /orders HTTP/1.1" 200 -
== APP == Order received : {"orderId": 5}
== APP == 127.0.0.1 - - [08/Dec/2025 16:42:12] "POST /orders HTTP/1.1" 200 -
== APP == Order received : {"orderId": 6}
== APP == 127.0.0.1 - - [08/Dec/2025 16:42:13] "POST /orders HTTP/1.1" 200 -
== APP == Order received : {"orderId": 7}
== APP == 127.0.0.1 - - [08/Dec/2025 16:42:14] "POST /orders HTTP/1.1" 200 -
== APP == Order received : {"orderId": 8}
== APP == 127.0.0.1 - - [08/Dec/2025 16:42:15] "POST /orders HTTP/1.1" 200 -
== APP == Order received : {"orderId": 9}
== APP == 127.0.0.1 - - [08/Dec/2025 16:42:16] "POST /orders HTTP/1.1" 200 -
== APP == Order received : {"orderId": 10}
== APP == 127.0.0.1 - - [08/Dec/2025 16:42:17] "POST /orders HTTP/1.1" 200 -
== APP == Order received : {"orderId": 11}
== APP == 127.0.0.1 - - [08/Dec/2025 16:42:18] "POST /orders HTTP/1.1" 200 -
== APP == Order received : {"orderId": 12}
== APP == 127.0.0.1 - - [08/Dec/2025 16:42:19] "POST /orders HTTP/1.1" 200 -
== APP == Order received : {"orderId": 13}
== APP == 127.0.0.1 - - [08/Dec/2025 16:42:20] "POST /orders HTTP/1.1" 200 -
== APP == Order received : {"orderId": 14}
== APP == 127.0.0.1 - - [08/Dec/2025 16:42:21] "POST /orders HTTP/1.1" 200 -
== APP == Order received : {"orderId": 15}
== APP == 127.0.0.1 - - [08/Dec/2025 16:42:22] "POST /orders HTTP/1.1" 200 -
== APP == Order received : {"orderId": 16}
== APP == 127.0.0.1 - - [08/Dec/2025 16:42:23] "POST /orders HTTP/1.1" 200 -
== APP == Order received : {"orderId": 17}
== APP == 127.0.0.1 - - [08/Dec/2025 16:42:24] "POST /orders HTTP/1.1" 200 -
== APP == Order received : {"orderId": 18}
== APP == 127.0.0.1 - - [08/Dec/2025 16:42:25] "POST /orders HTTP/1.1" 200 -
== APP == Order received : {"orderId": 19}
== APP == 127.0.0.1 - - [08/Dec/2025 16:42:26] "POST /orders HTTP/1.1" 200 -
停止应用程序
在两个终端中选择 Cmd/Ctrl+C 以停止服务到服务调用。
使用 Azure 开发人员 CLI 部署应用程序模板
若要使用 azd 命令将应用程序部署到容器应用,请执行以下步骤。
准备项目
在新终端窗口中,转到 示例 根目录。
cd svc-invoke-dapr-python
使用 Azure 开发人员 CLI 创建和部署
运行
azd init以初始化项目。azd init在终端中出现提示时,输入唯一的环境名称。 该命令将此名称用作创建用于保存所有 Azure 资源的资源组的前缀。
运行
azd up以准备基础结构,并在单个命令中将应用程序部署到容器应用。azd up当终端中出现提示时,请提供以下参数。
参数 说明 Azure 位置 Azure 资源的位置 Azure 订阅 您资源的 Azure 订阅 此过程可能需要一些时间来完成。
azd up运行命令时,输出会显示两个可用于监视部署进度的 Azure 门户链接。 输出还演示了如何使用azd up:- 使用 ./infra 目录中的 Bicep 文件通过
azd provision创建和配置所有必要的 Azure 资源。 在 Azure 开发人员 CLI 部署这些资源后,可以使用 Azure 门户访问它们。 用于配置 Azure 资源的文件包括:- main.parameters.json。
- main.bicep.
- 按功能组织的 应用 资源目录。
- 包含模板使用的 Bicep 模块的核心引用库。
- 使用
azd deploy来部署代码。
- 使用 ./infra 目录中的 Bicep 文件通过
预期输出
该 azd init 命令显示类似于以下行的输出:
Initializing an app to run on Azure (azd init)

? Enter a unique environment name: [? for help] <environment-name>

? Enter a unique environment name: <environment-name>

SUCCESS: Initialized environment <environment-name>.
该 azd up 命令显示类似于以下行的输出:
? Select an Azure Subscription to use:  3. <subscription-name> (aaaa0a0a-bb1b-cc2c-dd3d-eeeeee4e4e4e)
? Enter a value for the 'location' infrastructure parameter: 51. (US) China East 2  (chinaeast2)

Packaging services (azd package)

  (✓) Done: Packaging service api
  - Container: service-invoke-dapr-node-aca/api-<environment-name>:azd-deploy-1765230378

  (✓) Done: Packaging service worker
  - Container: service-invoke-dapr-node-aca/worker-<environment-name>:azd-deploy-1765230379

Provisioning Azure resources (azd provision)
Provisioning Azure resources can take some time.

Subscription: <subscription-name> (aaaa0a0a-bb1b-cc2c-dd3d-eeeeee4e4e4e)
Location: China East 2

  You can view detailed progress in the Azure portal:
  https://portal.azure.cn/#view/HubsExtension/DeploymentDetailsBlade/~/overview/id/%2Fsubscriptions%2Faaaa0a0a-bb1b-cc2c-dd3d-eeeeee4e4e4e%2Fproviders%2FMicrosoft.Resources%2Fdeployments%2F<environment-name>-1765230385

  (✓) Done: Resource group: rg-<environment-name> (1.633s)
  (✓) Done: Log Analytics workspace: log-a1bc2de3fh4ij (21.209s)
  (✓) Done: Application Insights: appi-a1bc2de3fh4ij (1.32s)
  (✓) Done: Portal dashboard: dash-a1bc2de3fh4ij (430ms)
  (✓) Done: Container Registry: cra1bc2de3fh4ij (20.632s)
  (✓) Done: Container Apps Environment: cae-a1bc2de3fh4ij (1m53.401s)
  (✓) Done: Container App: ca-order-processor-a1bc2de3fh4ij (49.189s)
  (✓) Done: Container App: ca-checkout-a1bc2de3fh4ij (47.751s)

Deploying services (azd deploy)

  (✓) Done: Deploying service api
  - Endpoint: https://ca-order-processor-a1bc2de3fh4ij.livelyriver-c2de3fh4.chinaeast2.azurecontainerapps.io/

  (✓) Done: Deploying service worker

SUCCESS: Your up workflow to provision and deploy to Azure completed in 5 minutes 22 seconds.
确认部署是否成功
若要验证 checkout 服务是否将订单传递给 order-processor 服务,请执行以下步骤。
在终端输出中复制
checkout容器应用名称。登录到 Azure 门户,然后按名称搜索容器应用资源。
在“容器应用 概述 ”页上,选择“ 监视>日志流”。
在 “日志流 ”页上的 “容器”旁边,选择 “签出”。
确认
checkout容器记录的输出是否与前面在终端中显示的输出相同。Connecting to stream... 2025-12-08T21:52:13.30188 Connecting to the container 'checkout'... 2025-12-08T21:52:13.32059 Successfully Connected to container: 'checkout' [Revision: 'ca-checkout-a1bc2de3fh4ij--azd-1010101010', Replica: 'ca-checkout-a1bc2de3fh4ij--azd-1010101010-e3fh4ij5kl-6mn7o'] 2025-12-08T21:51:50.336588427Z Order passed: {"orderId": 1} 2025-12-08T21:51:51.344226554Z Order passed: {"orderId": 2} 2025-12-08T21:51:52.352458279Z Order passed: {"orderId": 3} 2025-12-08T21:51:53.359545509Z Order passed: {"orderId": 4} 2025-12-08T21:51:54.367664737Z Order passed: {"orderId": 5} 2025-12-08T21:51:55.375686968Z Order passed: {"orderId": 6} 2025-12-08T21:51:56.384068096Z Order passed: {"orderId": 7} 2025-12-08T21:51:57.392023627Z Order passed: {"orderId": 8} 2025-12-08T21:51:58.400084856Z Order passed: {"orderId": 9} 2025-12-08T21:51:59.407839688Z Order passed: {"orderId": 10} 2025-12-08T21:52:00.415796718Z Order passed: {"orderId": 11} 2025-12-08T21:52:01.423684349Z Order passed: {"orderId": 12} 2025-12-08T21:52:02.431038891Z Order passed: {"orderId": 13} 2025-12-08T21:52:03.438415598Z Order passed: {"orderId": 14} 2025-12-08T21:52:04.445862305Z Order passed: {"orderId": 15} 2025-12-08T21:52:05.454030709Z Order passed: {"orderId": 16} 2025-12-08T21:52:06.462323213Z Order passed: {"orderId": 17} 2025-12-08T21:52:07.469778904Z Order passed: {"orderId": 18} 2025-12-08T21:52:08.478176259Z Order passed: {"orderId": 19}对
order-processor服务执行类似的步骤。Connecting to stream... 2025-12-08T21:52:21.69283 Connecting to the container 'order-processor'... 2025-12-08T21:52:21.71200 Successfully Connected to container: 'order-processor' [Revision: 'ca-order-processor-a1bc2de3fh4ij--azd-1010101010', Replica: 'ca-order-processor-a1bc2de3fh4ij--azd-1010101010-8qr9st0uv1wx2y'] 2025-12-08T21:52:08.466641579Z 127.0.0.1 - - [08/Dec/2025 21:52:08] "POST /orders HTTP/1.1" 200 - 2025-12-08T21:52:19.484297503Z Order received : {"orderId": 1} 2025-12-08T21:52:19.484712607Z 127.0.0.1 - - [08/Dec/2025 21:52:19] "POST /orders HTTP/1.1" 200 - 2025-12-08T21:52:20.492919969Z Order received : {"orderId": 2} 2025-12-08T21:52:20.493318072Z 127.0.0.1 - - [08/Dec/2025 21:52:20] "POST /orders HTTP/1.1" 200 - 2025-12-08T21:52:21.501517134Z Order received : {"orderId": 3} 2025-12-08T21:52:21.501881937Z 127.0.0.1 - - [08/Dec/2025 21:52:21] "POST /orders HTTP/1.1" 200 - 2025-12-08T21:52:22.509507378Z Order received : {"orderId": 4} 2025-12-08T21:52:22.510107685Z 127.0.0.1 - - [08/Dec/2025 21:52:22] "POST /orders HTTP/1.1" 200 - 2025-12-08T21:52:23.518153270Z Order received : {"orderId": 5} 2025-12-08T21:52:23.519026380Z 127.0.0.1 - - [08/Dec/2025 21:52:23] "POST /orders HTTP/1.1" 200 - 2025-12-08T21:52:24.526933360Z Order received : {"orderId": 6} 2025-12-08T21:52:24.528534270Z 127.0.0.1 - - [08/Dec/2025 21:52:24] "POST /orders HTTP/1.1" 200 - 2025-12-08T21:52:25.536263633Z Order received : {"orderId": 7} 2025-12-08T21:52:25.536895737Z 127.0.0.1 - - [08/Dec/2025 21:52:25] "POST /orders HTTP/1.1" 200 - 2025-12-08T21:52:26.544453199Z Order received : {"orderId": 8} 2025-12-08T21:52:26.545099303Z 127.0.0.1 - - [08/Dec/2025 21:52:26] "POST /orders HTTP/1.1" 200 - 2025-12-08T21:52:27.552418814Z Order received : {"orderId": 9} 2025-12-08T21:52:27.552886419Z 127.0.0.1 - - [08/Dec/2025 21:52:27] "POST /orders HTTP/1.1" 200 - 2025-12-08T21:52:28.560536453Z Order received : {"orderId": 10} 2025-12-08T21:52:28.560978457Z 127.0.0.1 - - [08/Dec/2025 21:52:28] "POST /orders HTTP/1.1" 200 - 2025-12-08T21:52:29.569267098Z Order received : {"orderId": 11} 2025-12-08T21:52:29.569883405Z 127.0.0.1 - - [08/Dec/2025 21:52:29] "POST /orders HTTP/1.1" 200 - 2025-12-08T21:52:30.577652340Z Order received : {"orderId": 12} 2025-12-08T21:52:30.578145945Z 127.0.0.1 - - [08/Dec/2025 21:52:30] "POST /orders HTTP/1.1" 200 - 2025-12-08T21:52:31.585742379Z Order received : {"orderId": 13} 2025-12-08T21:52:31.586148183Z 127.0.0.1 - - [08/Dec/2025 21:52:31] "POST /orders HTTP/1.1" 200 - 2025-12-08T21:52:32.593496421Z Order received : {"orderId": 14} 2025-12-08T21:52:32.594131028Z 127.0.0.1 - - [08/Dec/2025 21:52:32] "POST /orders HTTP/1.1" 200 - 2025-12-08T21:52:33.602273111Z Order received : {"orderId": 15} 2025-12-08T21:52:33.604202631Z 127.0.0.1 - - [08/Dec/2025 21:52:33] "POST /orders HTTP/1.1" 200 - 2025-12-08T21:52:34.610559896Z Order received : {"orderId": 16} 2025-12-08T21:52:34.610927600Z 127.0.0.1 - - [08/Dec/2025 21:52:34] "POST /orders HTTP/1.1" 200 - 2025-12-08T21:52:35.618588379Z Order received : {"orderId": 17} 2025-12-08T21:52:35.619991693Z 127.0.0.1 - - [08/Dec/2025 21:52:35] "POST /orders HTTP/1.1" 200 - 2025-12-08T21:52:36.628053075Z Order received : {"orderId": 18} 2025-12-08T21:52:36.628608981Z 127.0.0.1 - - [08/Dec/2025 21:52:36] "POST /orders HTTP/1.1" 200 - 2025-12-08T21:52:37.638211579Z Order received : {"orderId": 19} 2025-12-08T21:52:37.638144079Z 127.0.0.1 - - [08/Dec/2025 21:52:37] "POST /orders HTTP/1.1" 200 -
了解 azd up,请参阅相关技术文档以获取详细信息
azd up命令成功运行时:
- Azure 开发人员 CLI 会在指定的 Azure 订阅中的 示例项目 ./infra 目录中 创建引用的 Azure 资源。 可以在 Azure 门户中找到这些 Azure 资源。
- 应用程序已部署到 Container Apps。 在 Azure 门户中,可以访问功能齐全的应用。
在本地运行 .NET 应用程序
将应用程序部署到容器应用之前,请执行以下部分中的步骤,使用 Dapr 在本地运行 order-processor 和服务 checkout 。
准备项目
将示例应用程序克隆到本地计算机。
git clone https://github.com/Azure-Samples/svc-invoke-dapr-csharp.git转到示例根目录。
cd svc-invoke-dapr-csharp
使用 Dapr CLI 运行应用程序
执行以下步骤运行 order-processor 服务和 checkout 服务。
从示例根目录转到 订单处理器 目录。
cd order-processor安装依赖项。
dotnet build运行
order-processor服务。dapr run --app-port 7001 --app-id order-processor --app-protocol http --dapr-http-port 3501 -- dotnet run在新终端窗口中,转到示例根目录,然后转到 签出 目录。
cd checkout安装依赖项。
dotnet build运行
checkout服务。dapr run --app-id checkout --app-protocol http --dapr-http-port 3500 -- dotnet run
预期输出
在 checkout 终端中,checkout 服务向 order-processor 服务发送 20 个订单的信息,然后暂时暂停。
== APP == Order passed: Order { OrderId = 1 }
== APP == Order passed: Order { OrderId = 2 }
== APP == Order passed: Order { OrderId = 3 }
== APP == Order passed: Order { OrderId = 4 }
== APP == Order passed: Order { OrderId = 5 }
== APP == Order passed: Order { OrderId = 6 }
== APP == Order passed: Order { OrderId = 7 }
== APP == Order passed: Order { OrderId = 8 }
== APP == Order passed: Order { OrderId = 9 }
== APP == Order passed: Order { OrderId = 10 }
== APP == Order passed: Order { OrderId = 11 }
== APP == Order passed: Order { OrderId = 12 }
== APP == Order passed: Order { OrderId = 13 }
== APP == Order passed: Order { OrderId = 14 }
== APP == Order passed: Order { OrderId = 15 }
== APP == Order passed: Order { OrderId = 16 }
== APP == Order passed: Order { OrderId = 17 }
== APP == Order passed: Order { OrderId = 18 }
== APP == Order passed: Order { OrderId = 19 }
== APP == Order passed: Order { OrderId = 20 }
在 order-processor 终端中,服务 order-processor 接收有关 20 个订单的信息,然后暂时暂停。
== APP == Order received : Order { orderId = 1 }
== APP == Order received : Order { orderId = 2 }
== APP == Order received : Order { orderId = 3 }
== APP == Order received : Order { orderId = 4 }
== APP == Order received : Order { orderId = 5 }
== APP == Order received : Order { orderId = 6 }
== APP == Order received : Order { orderId = 7 }
== APP == Order received : Order { orderId = 8 }
== APP == Order received : Order { orderId = 9 }
== APP == Order received : Order { orderId = 10 }
== APP == Order received : Order { orderId = 11 }
== APP == Order received : Order { orderId = 12 }
== APP == Order received : Order { orderId = 13 }
== APP == Order received : Order { orderId = 14 }
== APP == Order received : Order { orderId = 15 }
== APP == Order received : Order { orderId = 16 }
== APP == Order received : Order { orderId = 17 }
== APP == Order received : Order { orderId = 18 }
== APP == Order received : Order { orderId = 19 }
== APP == Order received : Order { orderId = 20 }
停止应用程序
在两个终端中选择 Cmd/Ctrl+C 以停止服务到服务调用。
使用 Azure 开发人员 CLI 部署应用程序模板
使用 azd 将应用程序部署到 Azure 容器应用。
准备项目
在新终端窗口中,转到 示例 根目录。
cd svc-invoke-dapr-csharp
使用 Azure 开发人员 CLI 创建和部署
运行
azd init以初始化项目。azd init在终端中出现提示时,输入唯一的环境名称。 该命令将此名称用作创建用于保存所有 Azure 资源的资源组的前缀。
运行
azd up以准备基础结构,并在单个命令中将应用程序部署到容器应用。azd up当终端中出现提示时,请提供以下参数。
参数 说明 Azure 位置 Azure 资源的位置 Azure 订阅 您资源的 Azure 订阅 此过程可能需要一些时间来完成。
azd up运行命令时,输出会显示两个可用于监视部署进度的 Azure 门户链接。 输出还演示了如何使用azd up:- 使用 ./infra 目录中的 Bicep 文件通过
azd provision创建和配置所有必要的 Azure 资源。 在 Azure 开发人员 CLI 部署这些资源后,可以使用 Azure 门户访问它们。 用于配置 Azure 资源的文件包括:- main.parameters.json。
- main.bicep.
- 按功能组织的 应用 资源目录。
- 包含模板使用的 Bicep 模块的核心引用库。
- 使用
azd deploy来部署代码。
如果此步骤导致 错误 BCP420,请转到克隆的存储库,打开 svc-invoke-dapr-csharp/infra/core/host/container-apps.bicep 文件,并将第 28 行替换为以下行:
scope: resourceGroup(!empty(containerRegistryResourceGroupName) ? containerRegistryResourceGroupName : resourceGroup().name)- 使用 ./infra 目录中的 Bicep 文件通过
预期输出
该 azd init 命令显示类似于以下行的输出:
Initializing an app to run on Azure (azd init)

? Enter a unique environment name: [? for help] <environment-name>

? Enter a unique environment name: <environment-name>

SUCCESS: Initialized environment <environment-name>.
该 azd up 命令显示类似于以下行的输出:
? Select an Azure Subscription to use:  3. <subscription-name> (aaaa0a0a-bb1b-cc2c-dd3d-eeeeee4e4e4e)
? Enter a value for the 'location' infrastructure parameter: 51. (US) China East 2  (chinaeast2)

Packaging services (azd package)

  (✓) Done: Packaging service api
  - Container: service-invoke-dapr-dotnet-aca/api-<environment-name>:azd-deploy-1765290820

  (✓) Done: Packaging service worker
  - Container: service-invoke-dapr-dotnet-aca/worker-<environment-name>:azd-deploy-1765290828

Provisioning Azure resources (azd provision)
Provisioning Azure resources can take some time.

Subscription: <subscription-name> (aaaa0a0a-bb1b-cc2c-dd3d-eeeeee4e4e4e)
Location: China East 2

  You can view detailed progress in the Azure portal:
  https://portal.azure.cn/#view/HubsExtension/DeploymentDetailsBlade/~/overview/id/%2Fsubscriptions%2Faaaa0a0a-bb1b-cc2c-dd3d-eeeeee4e4e4e%2Fproviders%2FMicrosoft.Resources%2Fdeployments%2F<environment-name>-1765290834

  (✓) Done: Resource group: rg-<environment-name> (1.95s)
  (✓) Done: Log Analytics workspace: log-a1bc2de3fh4ij (21.073s)
  (✓) Done: Application Insights: appi-a1bc2de3fh4ij (3.339s)
  (✓) Done: Portal dashboard: dash-a1bc2de3fh4ij (1.791s)
  (✓) Done: Container Registry: cra1bc2de3fh4ij (18.521s)
  (✓) Done: Container Apps Environment: cae-a1bc2de3fh4ij (1m54.347s)
  (✓) Done: Container App: ca-order-processor-a1bc2de3fh4ij (20.447s)
  (✓) Done: Container App: ca-checkout-a1bc2de3fh4ij (19.159s)

Deploying services (azd deploy)

  (✓) Done: Deploying service api
  - Endpoint: https://ca-order-processor-a1bc2de3fh4ij.blackmoss-c2de3fh4.chinaeast2.azurecontainerapps.io/

  (✓) Done: Deploying service worker

SUCCESS: Your up workflow to provision and deploy to Azure completed in 5 minutes 14 seconds.
确认部署是否成功
若要验证 checkout 服务是否将订单传递给 order-processor 服务,请执行以下步骤。
在终端输出中复制
checkout容器应用名称。登录到 Azure 门户,然后按名称搜索容器应用资源。
在“容器应用 概述 ”页上,选择“ 监视>日志流”。
在 “日志流 ”页上的 “容器”旁边,选择 “签出”。
确认
checkout容器记录的输出是否与前面在终端中显示的输出相同。Connecting to stream... 2025-12-09T15:10:41.47802 Connecting to the container 'checkout'... 2025-12-09T15:10:41.51661 Successfully Connected to container: 'checkout' [Revision: 'ca-checkout-a1bc2de3fh4ij--azd-1010101010', Replica: 'ca-checkout-a1bc2de3fh4ij--azd-1010101010-e3fh4ij5kl-6mn7o'] 2025-12-09T15:10:35.970525383Z Order passed: Order { OrderId = 1 } 2025-12-09T15:10:36.974299140Z Order passed: Order { OrderId = 2 } 2025-12-09T15:10:37.977372717Z Order passed: Order { OrderId = 3 } 2025-12-09T15:10:38.980052480Z Order passed: Order { OrderId = 4 } 2025-12-09T15:10:39.983760836Z Order passed: Order { OrderId = 5 } 2025-12-09T15:10:40.987032666Z Order passed: Order { OrderId = 6 } 2025-12-09T15:10:41.990514871Z Order passed: Order { OrderId = 7 } 2025-12-09T15:10:42.993271242Z Order passed: Order { OrderId = 8 } 2025-12-09T15:10:43.996447160Z Order passed: Order { OrderId = 9 } 2025-12-09T15:10:44.999515468Z Order passed: Order { OrderId = 10 } 2025-12-09T15:10:46.003606414Z Order passed: Order { OrderId = 11 } 2025-12-09T15:10:47.006857265Z Order passed: Order { OrderId = 12 } 2025-12-09T15:10:48.012116293Z Order passed: Order { OrderId = 13 } 2025-12-09T15:10:49.015322253Z Order passed: Order { OrderId = 14 } 2025-12-09T15:10:50.018667962Z Order passed: Order { OrderId = 15 } 2025-12-09T15:10:51.019739902Z Order passed: Order { OrderId = 16 } 2025-12-09T15:10:52.021675650Z Order passed: Order { OrderId = 17 } 2025-12-09T15:10:53.024514318Z Order passed: Order { OrderId = 18 } 2025-12-09T15:10:54.028031299Z Order passed: Order { OrderId = 19 } 2025-12-09T15:10:55.031371921Z Order passed: Order { OrderId = 20 }对
order-processor服务执行类似的步骤。Connecting to stream... 2025-12-09T15:01:47.03912 Connecting to the container 'order-processor'... 2025-12-09T15:01:47.07513 Successfully Connected to container: 'order-processor' [Revision: 'ca-order-processor-a1bc2de3fh4ij--azd-1010101010', Replica: 'ca-order-processor-a1bc2de3fh4ij--azd-1010101010-e3fh4ij5kl6mn7'] 2025-12-09T15:10:35.961828162Z Order received : Order { orderId = 1 } 2025-12-09T15:10:36.971520049Z Order received : Order { orderId = 2 } 2025-12-09T15:10:37.974663292Z Order received : Order { orderId = 3 } 2025-12-09T15:10:38.977375837Z Order received : Order { orderId = 4 } 2025-12-09T15:10:39.980547949Z Order received : Order { orderId = 5 } 2025-12-09T15:10:40.984127518Z Order received : Order { orderId = 6 } 2025-12-09T15:10:41.987422901Z Order received : Order { orderId = 7 } 2025-12-09T15:10:42.990385188Z Order received : Order { orderId = 8 } 2025-12-09T15:10:43.993530965Z Order received : Order { orderId = 9 } 2025-12-09T15:10:44.996506444Z Order received : Order { orderId = 10 } 2025-12-09T15:10:46.000838163Z Order received : Order { orderId = 11 } 2025-12-09T15:10:47.004060023Z Order received : Order { orderId = 12 } 2025-12-09T15:10:48.007760527Z Order received : Order { orderId = 13 } 2025-12-09T15:10:49.012628202Z Order received : Order { orderId = 14 } 2025-12-09T15:10:50.016058393Z Order received : Order { orderId = 15 } 2025-12-09T15:10:51.016443730Z Order received : Order { orderId = 16 } 2025-12-09T15:10:52.018312472Z Order received : Order { orderId = 17 } 2025-12-09T15:10:53.021307966Z Order received : Order { orderId = 18 } 2025-12-09T15:10:54.025018485Z Order received : Order { orderId = 19 } 2025-12-09T15:10:55.028189928Z Order received : Order { orderId = 20 }
了解 azd up,请参阅相关技术文档以获取详细信息
azd up命令成功运行时:
- Azure 开发人员 CLI 会在指定的 Azure 订阅中的 示例项目 ./infra 目录中 创建引用的 Azure 资源。 可以在 Azure 门户中找到这些 Azure 资源。
- 应用程序已部署到 Container Apps。 在 Azure 门户中,可以访问功能齐全的应用。
清理资源
如果不打算继续使用此应用程序,请运行以下命令以删除创建的 Azure 资源:
azd down
相关内容
- 有关将 Dapr 应用程序部署到容器应用的详细信息,请参阅 快速入门:使用 Azure CLI 将 Dapr 应用程序部署到 Azure 容器应用。
- 有关使用令牌检查对应用的请求是否来自 Dapr 的信息,请参阅 为 Dapr 请求启用令牌身份验证。
- 有关使应用程序兼容
azd的信息,请参阅 “创建 Azure 开发人员 CLI 模板”概述。